PowerPoint 101: The Ultimate Guide for Beginners

Are you struggling with PowerPoint? You need a quick design in PowerPoint but don't know where to start? Don't worry, you have nothing to be ashamed of.
In this article, we're going to refresh the most important PowerPoint basics so you can take advantage of this Microsoft software and create high-impact presentations at any time!
Millions of users worldwide use Microsoft 365 services , making PowerPoint the presentation design software with the highest market share. And with good reason! PowerPoint's features stand out for its usability and originality . We can tell you that PowerPoint is pretty intuitive software, and it's a great option to choose when working with presentations on a daily basis. So, are you ready for a quick PowerPoint 101 class?
Let ' s see what you ' re going to learn today with this PowerPoint Guide :

What is PowerPoint?
What are the best uses of powerpoint, powerpoint basics: what are the components of powerpoint workspace, mastering powerpoint: what are the main features of powerpoint, what are powerpoint templates and where to find them, time to practice how to make a presentation in powerpoint.

Microsoft PowerPoint is a presentation design software that is part of Microsoft 365 . This software allows you to design presentations by combining text, images, graphics, video, and animation on slides in a simple and intuitive way.
Over time, PowerPoint has evolved and improved its accessibility to users. For this reason, it has been adapted to the main operating systems and modalities:
- PowerPoint Online
Additionally, you can use Word and Excel in this online version. That way, you'll be able to make real-time changes in the cloud without fearing losing your files. Sounds great, right?
PowerPoint has a versatile range of uses. Here's a list of the different tasks you can complete with this presentation design software:
- Business presentations or Pitch decks.
- Marketing, Sales and HR plans.
- Project briefs and timelines.
- Inductions to new employees.
- Seminars and educational classes.
- Professional portfolio of photos or designs.
- Presentations of a research summary.
- Presentations for special occasions.
These are just a few examples of the multiple possibilities this Microsoft software offers. Your imagination is the only limit!
Stay tuned as we continue with this PowerPoint 101 Guide...

In order to deeply understand this presentation design software, you need to recognize its main components. Now it's time to learn about the PowerPoint basics!
A quick note before going any further: when opening PowerPoint, some of the commands in the ribbons will look grayish and won't be highlighted when you hover the mouse over them.
This happens since some commands need to be selected in order to function. For example, if you want to change the color of a text, you first need to select it.
That being said, let's start with this Guide for PowerPoint beginners:
PowerPoint Main Window
The first aspect to learn is PowerPoint Main Window. To facilitate the explanation, we've organized its main elements with numbers from 1 to 10:

Based on that, the main components of PowerPoint window are the following:
1. Quick Access Toolbar: allows you to customize commands to have them at hand. You only have to select it and go to "More commands."
2. Title Bar: shows you the name of your file and other "Suggested options" like Slide Master View . These options will vary depending on the use you give to the commands.
3. File Tab: you will see the Home Menu (PowerPoint backstage) by selecting it. There, you can create a new presentation, save it, print it, export it, and many other options.
4. The Ribbon: it's where PowerPoint tabs and tools are. These tools can also be called "commands" or “features.”
5. More Button or Down Arrow: these arrows allow you to view more tools or layout options in PowerPoint.
6. Slides Pane: shows your slides in thumbnail size. By right-clicking, you can access additional options for customizing each slide. Perfect for PowerPoint beginners!
7. Slide: PowerPoint's blank canvas and the frame to be seen when presenting the file.
8. Placeholders: they are dotted boxes that will store your content.
9. Status Bar: allows you to view the slide number, grammatical errors, speaker notes, and the comments on your file.
10. Zoom: allows you to enlarge or minimize your PowerPoint workspace. The range goes from 10 to 400%.
PowerPoint Tabs
The PowerPoint tabs are the control desk of your presentation . Since PowerPoint's features are too many, they're organized in tabs.
You can come and go between tabs as you need. Once you click on a tab, it will open its ribbon, and there, you'll be able to see all the tools related to that particular category.
This PowerPoint tutorial for beginners will give you an overview of all PowerPoint tabs . Pay attention to the following list:
- Transitions Tab
- Animations Tab
- Slide Show Tab
- Recording Tab
1. Home Tab
The Home tab is the most common tab of PowerPoint. This is the tab you'll probably use the most if you're designing a presentation deck from scratch.

It allows you to add new slides and change the text characteristics : font, size, boldness, underlining, alignment, etc. If you've ever used Microsoft Word, these features will be familiar to you.
Also, you will find commands to edit the characteristics of the geometric shapes you insert. This includes: fill color, line color, sharpe effects, among others.
2. Insert Tab
The Insert tab is exactly what its name says it is. In this ribbon, you'll find all the options concerning adding a new element to your PowerPoint presentation .

You can insert a picture, some geometric shapes, icons, WordArt graphics, among others. We can tell you that this tab is really helpful for PowerPoint beginners!
For example, if you have a lot of data in PowerPoint , you could add a chart or diagram to show your information in a more visual way. Also, you can embed videos or music into PowerPoint really easily.
- PowerPoint tip for beginners: To be able to write text on your slides, you need a text box. So, if you're designing your presentation from scratch, remember to go first to the Insert tab and add a text box to start writing.
3. Design Tab
If you are one of those people who enjoy choosing the design of a PowerPoint presentation, this tab will be your favorite.

The Design tab offers a wide range of premade designs , allowing you to get more polished slides. Even better, if you explore its ribbon, you can adjust the color palette and change the overall style of your PowerPoint deck.
The PowerPoint interface, as this basic PowerPoint Tutorial, is really intuitive. We believe that you won't have any problem with this tab!
4. Transitions Tab
Using transitions in PowerPoint is a dynamic way to move from one slide to the next during a presentation. This feature is PowerPoint's stamp, so don ' t miss it!

Some PowerPoint transitions are really classic, like wiping the old slide to present the new one. Others are somewhat over the top, like the “Vortex” or the “Airplane” effect.
If you click on each kind of transition, you'll see a preview on how it would look when presenting. Really cool, right?
5. Animations Tab
In case you want to add special effects for certain elements in your slides , the Animations tab in PowerPoint will interest you.

Like the Transitions tab, you will find various animation effects in this ribbon. It's a matter of trying and choosing the best one according to your needs!
6. Slide Show Tab
As its name says, the Slide Show tab is about presenting your slides . We really like that it gives you several options to show up your presentation!

Considering that you're a PowerPoint beginner, you're not likely to use the Slide Show tab very much.
But if you're curious about this command, you must read our article: How to Make a PowerPoint Slideshow that Runs Automatically?
7. Review Tab
The Review tab is not often used by PowerPoint beginners either.
However, if your job is related to writing or if you work at an international company, this tool can be extremely useful!

With this tab, you can check the slide's spelling, translate the text in real-time, and add comments to your slides . This last function can be helpful to give feedback to a colleague.
8. View Tab
This View tab allows you to change the view of your PowerPoint slides and make handouts from them, among other things.

As you can see, the majority of its commands are really specific. So you won't have any issues while designing, test and see!
In this section, our favorite command for PowerPoint beginners is Slide Master . Explore more about this tool in our guide!
9. Recording Tab
In the last versions of this design presentation software, PowerPoint added the Recording tab. As its name says, it allows you to record all your presentation slides .

This ribbon has advanced commands, so the most common action for a PowerPoint beginner is to take a screenshot or record the screen sequentially .
10. Help Tab
Finally, there is the Help tab. If you have any problem or question concerning how to use PowerPoint, you may go here to look for a solution.
In the latest versions, Windows has added a “Show Training” option. You can click this command to practice the PowerPoint basics since it will download training templates.

As a beginner in PowerPoint, you must recognize the objective of each PowerPoint tab to be able to master the software . But, in order to conduct an outstanding presentation deck, you also need to dominate its most important features. Let's see some of them in the next section!
If you feel ready to delve deeper into PowerPoint's tools, this section is for you.
As you may know , 24Slides specializes in creating outstanding presentations for any Design Project . So, we asked one of our experts about her favorite PowerPoint features, and we want to share them all with you!
Carmen Navarrete , Graphic Designer at 24Slides, highlighted the following features that will make your presentations stand out from the crowd:
PowerPoint Feature #1: Crop to Shape
This first PowerPoint feature is simple but effective!
Let's see how to use it:
- First, choose an image you want to cut and insert it into your workspace.
- Once inserted, select it with the mouse.
- Go to the "Picture Format" tab.
- Press the arrow of the "Crop" button (right side of the screen).
- Select "Crop to Shape."
- Choose your favorite shape and customize your PowerPoint presentation!

PowerPoint Feature #2: Merge Shapes
If you don't like any figure enough, you can create one from scratch!
This is possible thanks to the "Merge Shapes" option. Follow these steps to unleash your creativity:
- First choose an image you want to cut.
- Check the list of PowerPoint shapes (Insert tab > Shapes).
- Choose two or three figures you want to merge (they can be the same figure).
- Select the figures you are going to merge (see the image).
- Once selected, go to the "Shape Format" tab.
- Press the "Merge Shapes" option and the type of merge you want (test and choose!).

- A new figure will appear, and you must fill it with the image from the first step.
- Stay on the Shape Format tab and go to "Shape Fill" (button in the middle of the ribbon).
- Select "Picture Fill" and browse for your image.
- Select the image to fill your new figure, and that's it!

- PowerPoint tip for beginners: When your merged figure is ready, paste the image to the background of your slide to achieve a better result. This way, you can use your image as a canvas and see if both elements fit well.
PowerPoint Feature #3: Insert Icons
This PowerPoint feature is quite easy to follow for PowerPoint beginners!
Just follow these steps:
- Go to the Insert tab.
- Select the "Icons" option.
- A Microsoft 365 library will open, where you can search for the required icon.
- Now, you must insert it into your presentation and adapt it to your design.
- If you have an active Microsoft 365 subscription, you'll have access to a larger number of icons in PowerPoint.
- PowerPoint tip for beginners: If you want to learn more about icons in PowerPoint, read our article on How to Use Icons to Make Amazing PowerPoint Presentations .
PowerPoint Feature #4: Insert SmartArt
PowerPoint's SmartArt is one of the most popular and accessible tools to dominate while learning about PowerPoint basics.
To use it in your slide deck, you must:
- Select SmartArt.
- See all SmartArt categories and choose your favorite based on your needs.
- Add the text you have prepared and adapt it to your presentation.

We want to give you some ideas to master this SmartArt tool in PowerPoint: you can make timelines , flowcharts , and even a Venn diagram in just a few seconds. Try and see!
PowerPoint Feature #5: Remove Background
If you don't know how to use Photoshop and want to remove the background from an image, in this PowerPoint 101 Guide, we show you how:
- First choose the image you want to remove the background from.
- Insert the image in the PowerPoint workspace.
- Select the image and go to the "Picture Format" tab.
- Select "Remove Background" (first option on the left).
- You can keep and remove parts of the image with the first two tools of the ribbon (see image).
- Keep in mind that all the sections highlighted in purple will be deleted.

- We recommend zooming in to keep or remove parts of the image with more detail.
- Once you're done, press the "Keep Changes" button.
- Finally, adapt the new image to your PowerPoint presentation.

- PowerPoint tip for beginners: Choose a high-contrast photo or image for best results. In other words, the outline of the person or object you want to cut out must have clear edges and cannot blend with the image's background color.
PowerPoint Feature #6: Add Speaker Notes
The latest PowerPoint feature is a command you can use to prepare your speech before presenting to an audience.
Learning how to add speaker notes in PowerPoint is simple:
- Select the slide that needs some notes.
- Usually, there is a footer below the slide, but if not, you will have to activate it.
- Go to the View tab and select "Notes."
- The Speaker Notes section will appear, and you can add whatever you want!

- PowerPoint tip for beginners: In case you want to practice your entire presentation and have a lot of notes, go to the View tab and select "Notes Page" (fourth command). You'll be able to see all your Speaker Notes faster!
PowerPoint Feature #7: PowerPoint Translator
If you've ever wondered how to translate your PowerPoint Slides, we'll explain the step by step here:
- Go to the Review tab.
- Select the text you want to translate.
- Press the “Translate” button.
- A panel will open on the right side of the screen.
- Choose the language you need and you'll see the translation in real-time.
- If you press Insert, the text will change to the new translation!
PowerPoint Feature #8: Screen Recording
The process of recording your screen in PowerPoint is straightforward and intuitive. Let's see:
- Go to the “Record” or “Recording” tab.
- Press the "Record Slide Show" button or the “From Beginning” button (depending on your PPT version).
- A new window will open.
- Select the red record button and start recording!
- When you're done, select “Export.”
- By default, the video will be 1080p. If you want to lower the video quality, go to "Customize export."
- Name the video, save it to a folder and that's it!
As you may have noticed, this software has endless PowerPoint design options for beginners. We encourage you to try and test each functionality!
However, we're clear that PowerPoint has different features, so it can be hard to know where to start. That's why understanding PowerPoint basics is crucial if you truly want to master this software!
Our PowerPoint 101 Guide continues; stay tuned to discover more great stuff about this Microsoft software. Keep reading!
A PowerPoint template is a pre-made design that you can use for your own means, and that will save you a lot of time!
Templates in PowerPoint are a great resource for designing since all the structure is already done, and you only have to update the content . We can tell you they're the perfect resource for PowerPoint beginners!
They can be incredibly specific. For example, there are templates for a SWOT analysis or a complete Marketing report. Otherwise, templates can also be very general, with several slides with a similar design.
If you struggle with the artistic part of designing presentations, downloading PowerPoint templates will be a life changer!

How to download PowerPoint templates for free?
If you didn't know, 24Slides has an extensive repository of PowerPoint templates. But how to obtain them? It's really simple:
- First, create an account on our Free Templates Website with the button “Register” (that way, you can download everything without problems!).
- Think about the graphics you need and the ideal structure for your presentation deck (you can also change the color palette later!).
- Download it in PowerPoint format (if you prefer it in Google Slides format, you'll also find this type in our repository).
- Edit and change everything you need for your PowerPoint presentation!
24Slides Designers specialize in business and corporate PowerPoints, but you'll also find other types of templates on our website: Data templates, Timelines, Roadmaps, Matrixes, Diagrams, and more.
Keep in mind that a well-designed PowerPoint deck helps you communicate stronger messages to your audience . Don't waste this opportunity to make your presentation shine!

If you want to learn more about how to master PowerPoint, do not miss the last section. We'll show you some PowerPoint basics from the software itself!
A PowerPoint 101 Guide wouldn't be that useful with no examples. So, if you enjoy the step-by-step guides, this section is for you.
Below, we'll show you how to make a simple PowerPoint presentation. But first, here are some tips to be more efficient in the process:
- Be clear about what type of presentation you're going to create (is it corporate, playful, or more creative?).
- Make a draft with the most important information you need to add and, thus, generate a good structure in your presentation .
- Get inspired by examples on the internet , but adapt them to your needs and audience.
- If you will create a business presentation, keep in mind your brand identity .
- Make sure your PowerPoint works , you may need to update to the latest version or pay for the subscription.
Step 1: Make a draft to structure your presentation
As we said before, writing a draft or script of your content will be vital to start on the right foot as a PowerPoint beginner.
This advice is so important that we choose it as the first step to learning how to make a PowerPoint presentation. Remember: Planning is key!

Regarding the process of planning, we share some good practices:
- If your presentation will be very long , write down all subtitles and content in a Word document. This will help you organize your ideas and give a correct sequence to your narrative. In addition to avoiding redundancies in the message you want to communicate.
- If your presentation will use many visual resources , we recommend choosing high-quality images. This will help you have a starting graphic base. Some good free image repositories are Freepick , Unsplash , and Adobe Stock .
- If your presentation is based on data , have all your results summarized or your most relevant conclusions at hand. The idea of making a PowerPoint presentation is to show your information in the simplest way possible for your audience.
Step 2: Create a new document in PowerPoint
Once you check that all the functions are working fine with the software, please open it and go to the File tab. If you've ever used Word or Excel, you'll probably find this Home Menu familiar.
In short, this is the main page of PowerPoint, where you can create a new presentation or open an older one. Let's see:

In order to follow this part of our PowerPoint Tutorial correctly, take into consideration the following points:
- On the lower side of the screen, you'll find your recently opened PowerPoint files. This option is great for saving some time.
- If you don't find the presentation you're looking for, click on the “Open” option at the left bar and find older files.
- Don't forget to save your presentation with a relatable name so you won't lose sight of it!
Step 3: Choose the perfect design for your presentation
With your information ready in a draft, it's time to choose the design of your PowerPoint slide deck. You must imagine that the available design options are endless!
For practical reasons, you have three options regarding the design:
- Start a design from scratch (very difficult for a PowerPoint beginner).
- Choose an established PowerPoint design or layout.
- Download a PowerPoint template and modify some details.
Don't worry if you don't know how to continue! In this PowerPoint 101 class, we're going to explain step by step the second option:
How do you set a default design in PowerPoint?
- First, go to the Design tab.
- Open the list of options by clicking on the third arrow.
- Choose the design you like the most for your PowerPoint presentation.

If you want to explore more PowerPoint designs, there is a way to research online. For that, you only need to:
- Go to the File tab (first tab, next to the Home tab).
- Select "More themes" (see image).

- Use the search engine and write the keyword you want (it can be related to your business or it can be a color).
- Check the list of PowerPoint themes and choose your favorite.
- Wait a few minutes while it loads and keep designing in PowerPoint!

How do you change the layout of one slide in PowerPoint?
In this PowerPoint 101 Guide, you will also learn how to configure the layout of each slide.
Keep in mind that to have a high-impact presentation, you must adapt your slides' design to the type of content you'll add. And using layouts is perfect for this purpose.
To change the layout type in PowerPoint, follow these steps:
- Right-click on the slide you want to change.
- Select the "Layout" option.
- You will find more than ten layout models.
- Choose the one that best suits your content.
- Repeat these steps for each slide (if you wish or require).

How do you customize your slides in PowerPoint?
The design process in this PowerPoint 101 Guide doesn't stop there.
You also can customize your presentation's color palette , font style, background format , and graphics effects .
Just go to:
- Design tab > Variants.
- Select Colors, Fonts, Effects or Background Styles (as you need).
- If you're inspired and want to create your own background in PowerPoint, select Background Styles > Format Background.
- Finally, custom your slides as you want!

Step 4: Add all your information to your presentation
Now, it's time to add all your information to your slides. If your script is long, take your time to copy each part of it.
In this PowerPoint Tutorial, we're going to show how our design is going so far. We design at your side!

Step 5: Add transitions or animations to your presentation
The stamp of PowerPoint is its transitions and animations! Naturally, our PowerPoint 101 has considered these essential commands.
If you want to add them to your presentation and make your speech more fluid, follow these steps:
- Go to the tabs section of PowerPoint.
- Select "Transitions" or "Animations" and try your favorite effects.
- Remember that if you select Transitions, these will modify the entire slide, while Animations can be added to each element individually.
When choosing one Animation, you can eliminate it if you aren't 100% convinced. You only need to:
- Select the Animation number that appears on the corner.
- Press the "Delete" or "Backspace" button on your keyboard.
- Choose another Animation in PowerPoint if you want!

This “PowerPoint for dummies” is full of tips and tricks! So here is one more: Don't overuse transitions or animations in PowerPoint ; they can make your presentation slower and unprofessional . Use this tool in a subtle way!
Step 6: Refine the final details
As always, every final product must be reviewed. Especially if you're learning the PowerPoint fundamentals with us.
We recommend reviewing each slide of your PowerPoint presentation one final time. In this process, you will be able to:
- Add icons if your presentation requires it.
- Change any image or illustration if they don't convince you.
- Change transitions or animations.
- Customize your presentation's color palette .
- Proofread your slides' text or add more information.
- Add speaker notes to your presentation.

Step 7: Slideshow your presentation
When your presentation is finished, it's essential to know how to make a PowerPoint slideshow. This way, you can see your slides from the exact same perspective your audience will see them.
To slideshow your presentation in PowerPoint, follow these simple steps for PowerPoint beginners:
- Position yourself on your first slide.
- Go to the bottom right of the software.
- Select the "Slide Show" button (see image).
- Have a look of your presentation by clicking on each slide or pressing the right arrow on your keyboard.
- To go out from the Slide Show mode, you have to press the ESC key.

Now you can present your slides like an expert!
When you master this presentation design software, you'll be able to create amazing things in PowerPoint : infographics, diagrams, charts, pitch decks, business cards, calendars, you name it!
This was our PowerPoint Guide for beginners. We hope that our compilation today will be useful for conducting more professional presentations in the future and, why not, achieve all your goals!
Don't forget to share this PowerPoint 101 Guide with your co-workers or whoever you want!

Want to boost your beginner PowerPoint skills? Check out this content:
- How to Work with Multiple Images in PowerPoint
- How to Add a Timer to Your Powerpoint Presentations
- PowerPoint Charts, Graphs, & Tables Made Easy | Tips & Tricks
- How To Use PowerPoint Design Ideas - All Questions Answered!
- 36 Fun Icebreakers for Your Next Presentation
- The Cost of PowerPoint Presentations: Discover the hidden expenses you might overlook!
Create professional presentations online
Other people also read

Tutorial: Save your PowerPoint as a Video
How To Convert Google Slides To PowerPoint and Vice Versa

How To Add Animations To PowerPoint
- PRO Courses Guides New Tech Help Pro Expert Videos About wikiHow Pro Upgrade Sign In
- EDIT Edit this Article
- EXPLORE Tech Help Pro About Us Random Article Quizzes Request a New Article Community Dashboard This Or That Game Happiness Hub Popular Categories Arts and Entertainment Artwork Books Movies Computers and Electronics Computers Phone Skills Technology Hacks Health Men's Health Mental Health Women's Health Relationships Dating Love Relationship Issues Hobbies and Crafts Crafts Drawing Games Education & Communication Communication Skills Personal Development Studying Personal Care and Style Fashion Hair Care Personal Hygiene Youth Personal Care School Stuff Dating All Categories Arts and Entertainment Finance and Business Home and Garden Relationship Quizzes Cars & Other Vehicles Food and Entertaining Personal Care and Style Sports and Fitness Computers and Electronics Health Pets and Animals Travel Education & Communication Hobbies and Crafts Philosophy and Religion Work World Family Life Holidays and Traditions Relationships Youth
- Browse Articles
- Learn Something New
- Quizzes Hot
- Happiness Hub
- This Or That Game
- Train Your Brain
- Explore More
- Support wikiHow
- About wikiHow
- Log in / Sign up
- Computers and Electronics
- Presentation Software
- PowerPoint Presentations
Simple Steps to Make a PowerPoint Presentation
Last Updated: July 23, 2024 Fact Checked
Creating a New PowerPoint
Creating the title slide, adding a new slide, adding content to slides, adding transitions, testing and saving your presentation.
This article was co-authored by wikiHow staff writer, Darlene Antonelli, MA . Darlene Antonelli is a Technology Writer and Editor for wikiHow. Darlene has experience teaching college courses, writing technology-related articles, and working hands-on in the technology field. She earned an MA in Writing from Rowan University in 2012 and wrote her thesis on online communities and the personalities curated in such communities. This article has been fact-checked, ensuring the accuracy of any cited facts and confirming the authority of its sources. This article has been viewed 4,341,588 times. Learn more...
Do you want to have your data in a slide show? If you have Microsoft 365, you can use PowerPoint! PowerPoint is a program that's part of the Microsoft Office suite (which you have to pay for) and is available for both Windows and Mac computers. This wikiHow teaches you how to create your own Microsoft PowerPoint presentation on a computer.
How to Make a PowerPoint Presentation
- Open the PowerPoint app, select a template and theme, then like “Create.”
- Click the text box to add your title and subtitle to create your title slide.
- Click the “Insert” tab, then “New Slide” to add another slide.
- Choose the type of slide you want to add, then add text and pictures.
- Rearrange slides by dragging them up or down in the preview box.
Things You Should Know
- Templates make it easy to create vibrant presentations no matter your skill level.
- When adding photos, you can adjust their sizes by clicking and dragging in or out from their corners.
- You can add animated transitions between slides or to individual elements like bullet points and blocks of text.

- If you don't have a Microsoft Office 365 subscription, you can use the website instead of the desktop app. Go to https://powerpoint.office.com/ to use the website version.
- You can also use the mobile app to make presentations, though it's easier to do this on a computer, which has a larger screen, a mouse, and a keyboard.

- If you don't want to use a template, just click the Blank option in the upper-left side of the page and skip to the next part.

- Skip this step if your selected template has no themes available.

- If you're creating a PowerPoint presentation for which an elaborate title slide has been requested, ignore this step.

- You can change the font and size of text used from the Home tab that's in the orange ribbon at the top of the window.

- You can also just leave this box blank if you like.

- You can also click and drag in or out one of a text box's corners to shrink or enlarge the text box.

- On a Mac, you'll click the Home tab instead. [1] X Research source

- Clicking the white slide-shaped box above this option will result in a new text slide being inserted.

- Title Slide
- Title and Content
- Section Header
- Two Content
- Content with Caption
- Picture with Caption

- Naturally, the title slide should be the first slide in your presentation, meaning that it should be the top slide in the left-hand column.

- Skip this step and the next two steps if your selected slide uses a template that doesn't have text boxes in it.

- Text boxes in PowerPoint will automatically format the bulk of your text for you (e.g., adding bullet points) based on the context of the content itself.
- You can add notes that the Presentation will not include (but you'll still be able to see them on your screen) by clicking Notes at the bottom of the slide.

- You can change the font of the selected text by clicking the current font's name and then clicking your preferred font.
- If you want to change the size of the text, click the numbered drop-down box and then click a larger or smaller number based on whether you want to enlarge or shrink the text.
- You can also change the color, bolding, italicization, underlining, and so on from here.

- Photos in particular can be enlarged or shrunk by clicking and dragging out or in one of their corners.

- Remember to keep slides uncluttered and relatively free of distractions. It's best to keep the amount of text per slide to around 33 words or less. [2] X Research source

- Slide content will animate in the order in which you assign transitions. For example, if you animate a photo on the slide and then animate the title, the photo will appear before the title.
- Make your slideshow progress automatically by setting the speed of every transition to align with your speech as well as setting each slide to Advance . [3] X Trustworthy Source Microsoft Support Technical support and product information from Microsoft. Go to source

- If you need to exit the presentation, press Esc .

- Windows - Click File , click Save , double-click This PC , select a save location, enter a name for your presentation, and click Save .
- Mac - Click File , click Save As... , enter the presentation's name in the "Save As" field, select a save location by clicking the "Where" box and clicking a folder, and click Save .
Community Q&A
- If you save your PowerPoint presentation in .pps format instead of the default .ppt format, double-clicking your PowerPoint presentation file will prompt the presentation to open directly into the slideshow view. Thanks Helpful 6 Not Helpful 0
- If you don't have Microsoft Office, you can still use Apple's Keynote program or Google Slides to create a PowerPoint presentation. Thanks Helpful 0 Not Helpful 0

- Your PowerPoint presentation (or some features in it) may not open in significantly older versions of PowerPoint. Thanks Helpful 1 Not Helpful 2
- Great PowerPoint presentations avoid placing too much text on one slide. Thanks Helpful 0 Not Helpful 0
You Might Also Like

- ↑ https://onedrive.live.com/view.aspx?resid=DBDCE00C929AA5D8!252&ithint=file%2cpptx&app=PowerPoint&authkey=!AH4O9NxcbehqzIg
- ↑ https://www.virtualsalt.com/powerpoint.htm
- ↑ https://support.microsoft.com/en-us/office/set-the-timing-and-speed-of-a-transition-c3c3c66f-4cca-4821-b8b9-7de0f3f6ead1#:~:text=To%20make%20the%20slide%20advance,effect%20on%20the%20slide%20finishes .
About This Article

- Send fan mail to authors
Reader Success Stories
Artis Holland
Sep 22, 2016
Is this article up to date?
Oct 18, 2016
Jul 23, 2016
Margery Niyi
Sep 25, 2017
Jul 21, 2016

Featured Articles

Trending Articles

Watch Articles

- Terms of Use
- Privacy Policy
- Do Not Sell or Share My Info
- Not Selling Info
wikiHow Tech Help:
Tech troubles got you down? We've got the tips you need
Critical PowerPoint Shortcuts – Claim Your FREE Training Module and Get Your Time Back!
How to Make a PowerPoint Presentation (Step-by-Step)
- PowerPoint Tutorials
- Presentation Design
- January 22, 2024
In this beginner’s guide, you will learn step-by-step how to make a PowerPoint presentation from scratch.
While PowerPoint is designed to be intuitive and accessible, it can be overwhelming if you’ve never gotten any training on it before. As you progress through this guide, you’ll will learn how to move from blank slides to PowerPoint slides that look like these.

Table of Contents
Additionally, as you create your presentation, you’ll also learn tricks for working more efficiently in PowerPoint, including how to:
- Change the slide order
- Reset your layout
- Change the slide dimensions
- Use PowerPoint Designer
- Format text
- Format objects
- Play a presentation (slide show)
With this knowledge under your belt, you’ll be ready to start creating PowerPoint presentations. Moreover, you’ll have taken your skills from beginner to proficient in no time at all. I will also include links to more advanced PowerPoint topics.
Ready to start learning how to make a PowerPoint presentation?
Take your PPT skills to the next level
Start with a blank presentation.
Note: Before you open PowerPoint and start creating your presentation, make sure you’ve collected your thoughts. If you’re going to make your slides compelling, you need to spend some time brainstorming.
For help with this, see our article with tips for nailing your business presentation here .
The first thing you’ll need to do is to open PowerPoint. When you do, you are shown the Start Menu , with the Home tab open.
This is where you can choose either a blank theme (1) or a pre-built theme (2). You can also choose to open an existing presentation (3).
For now, go ahead and click on the Blank Presentation (1) thumbnail.

Doing so launches a brand new and blank presentation for you to work with. Before you start adding content to your presentation, let’s first familiarize ourselves with the PowerPoint interface.
The PowerPoint interface

Here is how the program is laid out:
- The Application Header
- The Ribbon (including the Ribbon tabs)
- The Quick Access Toolbar (either above or below the Ribbon)
- The Slides Pane (slide thumbnails)
The Slide Area
The notes pane.
- The Status Bar (including the View Buttons)
Each one of these areas has options for viewing certain parts of the PowerPoint environment and formatting your presentation.
Below are the important things to know about certain elements of the PowerPoint interface.
The PowerPoint Ribbon

The Ribbon is contextual. That means that it will adapt to what you’re doing in the program.
For example, the Font, Paragraph and Drawing options are greyed out until you select something that has text in it, as in the example below (A).

Furthermore, if you start manipulating certain objects, the Ribbon will display additional tabs, as seen above (B), with more commands and features to help you work with those objects. The following objects have their own additional tabs in the Ribbon which are hidden until you select them:
- Online Pictures
- Screenshots
- Screen Recording
The Slides Pane

This is where you can preview and rearrange all the slides in your presentation.
Right-clicking on a slide in the pane gives you additional options on the slide level that you won’t find on the Ribbon, such as Duplicate Slide , Delete Slide , and Hide Slide .

In addition, you can add sections to your presentation by right-clicking anywhere in this Pane and selecting Add Section . Sections are extremely helpful in large presentations, as they allow you to organize your slides into chunks that you can then rearrange, print or display differently from other slides.

The Slide Area (A) is where you will build out your slides. Anything within the bounds of this area will be visible when you present or print your presentation.
Anything outside of this area (B) will be hidden from view. This means that you can place things here, such as instructions for each slide, without worrying about them being shown to your audience.

The Notes Pane is the space beneath the Slide Area where you can type in the speaker notes for each slide. It’s designed as a fast way to add and edit your slides’ talking points.
To expand your knowledge and learn more about adding, printing, and exporting your PowerPoint speaker notes, read our guide here .
Your speaker notes are visible when you print your slides using the Notes Pages option and when you use the Presenter View . To expand your knowledge and learn the ins and outs of using the Presenter View , read our guide here .

You can resize the Notes Pane by clicking on its edge and dragging it up or down (A). You can also minimize or reopen it by clicking on the Notes button in the Status Bar (B).
Note: Not all text formatting displays in the Notes Pane, even though it will show up when printing your speaker notes. To learn more about printing PowerPoint with notes, read our guide here .
Now that you have a basic grasp of the PowerPoint interface at your disposal, it’s time to make your presentation.
Adding Content to Your PowerPoint Presentation
Notice that in the Slide Area , there are two rectangles with dotted outlines. These are called Placeholders and they’re set on the template in the Slide Master View .
To expand your knowledge and learn how to create a PowerPoint template of your own (which is no small task), read our guide here .

As the prompt text suggests, you can click into each placeholder and start typing text. These types of placeholder prompts are customizable too. That means that if you are using a company template, it might say something different, but the functionality is the same.

Note: For the purposes of this example, I will create a presentation based on the content in the Starbucks 2018 Global Social Impact Report, which is available to the public on their website.
If you type in more text than there is room for, PowerPoint will automatically reduce its font size. You can stop this behavior by clicking on the Autofit Options icon to the left of the placeholder and selecting Stop Fitting Text to this Placeholder .
Next, you can make formatting adjustments to your text by selecting the commands in the Font area and the Paragraph area of the Home tab of the Ribbon.

The Reset Command: If you make any changes to your title and decide you want to go back to how it was originally, you can use the Reset button up in the Home tab .

Insert More Slides into Your Presentation
Now that you have your title slide filled in, it’s time to add more slides. To do that, simply go up to the Home tab and click on New Slide . This inserts a new slide in your presentation right after the one you were on.

You can alternatively hit Ctrl+M on your keyboard to insert a new blank slide in PowerPoint. To learn more about this shortcut, see my guide on using Ctrl+M in PowerPoint .
Instead of clicking the New Slide command, you can also open the New Slide dropdown to see all the slide layouts in your PowerPoint template. Depending on who created your template, your layouts in this dropdown can be radically different.

If you insert a layout and later want to change it to a different layout, you can use the Layout dropdown instead of the New Slide dropdown.
After inserting a few different slide layouts, your presentation might look like the following picture. Don’t worry that it looks blank, next we will start adding content to your presentation.

If you want to follow along exactly with me, your five slides should be as follows:
- Title Slide
- Title and Content
- Section Header
- Two Content
- Picture with Caption
Adding Content to Your Slides
Now let’s go into each slide and start adding our content. You’ll notice some new types of placeholders.

On slide 2 we have a Content Placeholder , which allows you to add any kind of content. That includes:
- A SmartArt graphic,
- A 3D object,
- A picture from the web,
- Or an icon.
To insert text, simply type it in or hit Ctrl+C to Copy and Ctrl+V to Paste from elsewhere. To insert any of the other objects, click on the appropriate icon and follow the steps to insert it.
For my example, I’ll simply type in some text as you can see in the picture below.

Slides 3 and 4 only have text placeholders, so I’ll go ahead and add in my text into each one.

On slide 5 we have a Picture Placeholder . That means that the only elements that can go into it are:
- A picture from the web

To insert a picture into the picture placeholder, simply:
- Click on the Picture icon
- Find a picture on your computer and select it
- Click on Insert
Alternatively, if you already have a picture open somewhere else, you can select the placeholder and paste in (shortcut: Ctrl+V ) the picture. You can also drag the picture in from a file explorer window.

If you do not like the background of the picture you inserted onto your slide, you can remove the background here in PowerPoint. To see how to do this, read my guide here .
Placeholders aren’t the only way to add content to your slides. At any point, you can use the Insert tab to add elements to your slides.
You can use either the Title Only or the Blank slide layout to create slides for content that’s different. For example, a three-layout content slide, or a single picture divider slide, as shown below.

In the first example above, I’ve inserted 6 text boxes, 3 icons, and 3 circles to create this layout. In the second example, I’ve inserted a full-sized picture and then 2 shapes and 2 text boxes.
The Reset Command: Because these slides are built with shapes and text boxes (and not placeholders), hitting the Reset button up in the Home tab won’t do anything.
That is a good thing if you don’t want your layouts to adjust. However, it does mean that it falls on you to make sure everything is aligned and positioned correctly.
For more on how to add and manipulate the different objects in PowerPoint, check out our step-by-step articles here:
- Using graphics in PowerPoint
- Inserting icons onto slides
- Adding pictures to your PowerPoint
- How to embed a video in PowerPoint
- How to add music to your presentation
Using Designer to generate more layouts ideas
If you have Office 365, your version of PowerPoint comes with a new feature called Designer (or Design Ideas). This is a feature that generates slide layout ideas for you. The coolest thing about this feature is that it uses the content you already have.
To use Designer , simply navigate to the Design tab in your Ribbon, and click on Design Ideas .

NOTE: If the PowerPoint Designer is not working for you (it is grey out), see my troubleshooting guide for Designer .
Change the Overall Design (optional)
When you make a PowerPoint presentation, you’ll want to think about the overall design. Now that you have some content in your presentation, you can use the Design tab to change the look and feel of your slides.
For additional help thinking through the design of your presentation, read my guide here .
A. Picking your PowerPoint slide size
If you have PowerPoint 2013 or later, when you create a blank document in PowerPoint, you automatically start with a widescreen layout with a 16:9 ratio. These dimensions are suitable for most presentations as they match the screens of most computers and projectors.
However, you do have the option to change the dimensions.
For example, your presentation might not be presented, but instead converted into a PDF or printed and distributed. In that case, you can easily switch to the standard dimensions with a 4:3 ratio by selecting from the dropdown (A).
You can also choose a custom slide size or change the slide orientation from landscape to portrait in the Custom Slide Size dialog box (B).

To learn all about the different PowerPoint slide sizes, and some of the issues you will face when changing the slide size of a non-blank presentation, read my guide here .
B. Selecting a PowerPoint theme
The next thing you can do is change the theme of your presentation to a pre-built one. For a detailed explanation of what a PowerPoint theme is, and how to best use it, read my article here .
In the beginning of this tutorial, we started with a blank presentation, which uses the default Office theme as you can see in the picture below.

That gives you the most flexibility because it has a blank background and quite simple layouts that work for most presentations. However, it also means that it’s your responsibility to enhance the design.
If you’re comfortable with this, you can stay with the default theme or create your own custom theme ( read my guide here ). But if you would rather not have to think about design, then you can choose a pre-designed theme.
Microsoft provides 46 other pre-built themes, which include slide layouts, color variants and palettes, and fonts. Each one varies quite significantly, so make sure you look through them carefully.
To select a different theme, go to the Design tab in the Ribbon, and click on the dropdown arrow in the Themes section .

For this tutorial, let’s select the Frame theme and then choose the third Variant in the theme. Doing so changes the layout, colors, and fonts of your presentation.

Note: The theme dropdown area is also where you can import or save custom themes. To see my favorite places to find professional PowerPoint templates and themes (and recommendations for why I like them), read my guide here .
C. How to change a slide background in PowerPoint
The next thing to decide is how you want your background to look for the entire presentation. In the Variants area, you can see four background options.

For this example, we want our presentation to have a dark background, so let’s select Style 3. When you do so, you’ll notice that:
- The background color automatically changes across all slides
- The color of the text on most of the slides automatically changes to white so that it’s visible on the dark background
- The colors of the objects on slides #6 and #7 also adjust, in a way we may not want (we’ll likely have to make some manual adjustments to these slides)

Note: If you want to change the slide background for just that one slide, don’t left-click the style. Instead, right-click it and select Apply to Selected Slides .
After you change the background for your entire presentation, you can easily adjust the background for an individual slide.

Inside the Format Background pane, you can see you have the following options:
- Gradient fill
- Picture or texture fill
- Pattern fill
- Hide background
You can explore these options to find the PowerPoint background that best fits your presentation.
D. How to change your color palette in PowerPoint
Another thing you may want to adjust in your presentation, is the color scheme. In the picture below you can see the Theme Colors we are currently using for this presentation.

Each PowerPoint theme comes with its own color palette. By default, the Office theme includes the Office color palette. This affects the colors you are presented with when you format any element within your presentation (text, shapes, SmartArt, etc.).

The good news is that the colors here are easy to change. To switch color palettes, simply:
- Go to the Design tab in the Ribbon
- In the Variants area, click on the dropdown arrow and select Colors
- Select the color palette (or theme colors) you want
You can choose among the pre-built color palettes from Office, or you can customize them to create your own.
As you build your presentation, make sure you use the colors from your theme to format objects. That way, changing the color palette adjusts all the colors in your presentation automatically.
E. How to change your fonts in PowerPoint
Just as we changed the color palette, you can do the same for the fonts.

Each PowerPoint theme comes with its own font combination. By default, the Office theme includes the Office font pairing. This affects the fonts that are automatically assigned to all text in your presentation.

The good news is that the font pairings are easy to change. To switch your Theme Fonts, simply:
- Go to the Design tab in the Ribbon
- Click on the dropdown arrow in the Variants area
- Select Fonts
- Select the font pairing you want
You can choose among the pre-built fonts from Office, or you can customize them to create your own.
If you are working with PowerPoint presentations on both Mac and PC computers, make sure you choose a safe PowerPoint font. To see a list of the safest PowerPoint fonts, read our guide here .
If you receive a PowerPoint presentation and the wrong fonts were used, you can use the Replace Fonts dialog box to change the fonts across your entire presentation. For details, read our guide here .
Adding Animations & Transitions (optional)
The final step to make a PowerPoint presentation compelling, is to consider using animations and transitions. These are by no means necessary to a good presentation, but they may be helpful in your situation.
A. Adding PowerPoint animations
PowerPoint has an incredibly robust animations engine designed to power your creativity. That being said, it’s also easy to get started with basic animations.
Animations are movements that you can apply to individual objects on your slide.

To add a PowerPoint animation to an element of your slide, simply:
- Select the element
- Go to the Animations tab in the Ribbon
- Click on the dropdown arrow to view your options
- Select the animation you want
You can add animations to multiple objects at one time by selecting them all first and then applying the animation.
B. How to preview a PowerPoint animation

There are three ways to preview a PowerPoint animation:
- Click on the Preview button in the Animations tab
- Click on the little star next to the slide
- Play the slide in Slide Show Mode
To learn other ways to run your slide show, see our guide on presenting a PowerPoint slide show with shortcuts .
To adjust the settings of your animations, explore the options in the Effect Options , Advanced Animation and the Timing areas of the Animation tab .

Note: To see how to make objects appear and disappear in your slides by clicking a button, read our guide here .
C. How to manage your animations in PowerPoint

The best way to manage lots of animations on your slide is with the Animation Pane . To open it, simply:
- Navigate to the Animations tab
- Select the Animation Pane
Inside the Animation Pane, you’ll see all of the different animations that have been applied to objects on your slide, with their numbers marked as pictured above.
Note: To see examples of PowerPoint animations that can use in PowerPoint, see our list of PowerPoint animation tutorials here .
D. How to add transitions to your PowerPoint presentation
PowerPoint has an incredibly robust transition engine so that you can dictate how your slides change from one to the other. It is also extremely easy to add transitions to your slides.
In PowerPoint, transitions are the movements (or effects) you see as you move between two slides.

To add a transition to a PowerPoint slide, simply:
- Select the slide
- Go to the Transitions tab in the Ribbon
- In the Transitions to This Slide area, click on the dropdown arrow to view your options
- Select the transition you want
To adjust the settings of the transition, explore the options in the Timing area of the Transitions tab.
You can also add the same transition to multiple slides. To do that, select them in the Slides Pane and apply the transition.
E. How to preview a transition in PowerPoint

There are three ways to preview your PowerPoint transitions (just like your animations):
- Click on the Preview button in the Transitions tab
- Click on the little star beneath the slide number in the thumbnail view
Note: In 2016, PowerPoint added a cool new transition, called Morph. It operates a bit differently from other transitions. For a detailed tutorial on how to use the cool Morph transition, see our step-by-step article here .
Save Your PowerPoint Presentation
After you’ve built your presentation and made all the adjustments to your slides, you’ll want to save your presentation. YOu can do this several different ways.

To save a PowerPoint presentation using your Ribbon, simply:
- Navigate to the File tab
- Select Save As on the left
- Choose where you want to save your presentation
- Name your presentation and/or adjust your file type settings
- Click Save
You can alternatively use the Ctrl+S keyboard shortcut to save your presentation. I recommend using this shortcut frequently as you build your presentation to make sure you don’t lose any of your work.

This is the standard way to save a presentation. However, there may be a situation where you want to save your presentation as a different file type.
To learn how to save your presentation as a PDF, see our guide on converting PowerPoint to a PDF .
How to save your PowerPoint presentation as a template
Once you’ve created a presentation that you like, you may want to turn it into a template. The easiest – but not technically correct – way, is to simply create a copy of your current presentation and then change the content.
But be careful! A PowerPoint template is a special type of document and it has its own parameters and behaviors.
If you’re interested in learning about how to create your own PowerPoint template from scratch, see our guide on how to create a PowerPoint template .
Printing Your PowerPoint Presentation
After finishing your PowerPoint presentation, you may want to print it out on paper. Printing your slides is relatively easy.

To open the Print dialog box, you can either:
- Hit Ctrl+P on your keyboard
- Or go to the Ribbon and click on File and then Print

Inside the Print dialog box, you can choose from the various printing settings:
- Printer: Select a printer to use (or print to PDF or OneNote)
- Slides: Choose which slides you want to print
- Layout: Determine how many slides you want per page (this is where you can print the notes, outline, and handouts)
- Collated or uncollated (learn what collated printing means here )
- Color: Choose to print in color, grayscale or black & white
There are many more options for printing your PowerPoint presentations. Here are links to more in-depth articles:
- How to print multiple slides per page
- How to print your speaker notes in PowerPoint
- How to save PowerPoint as a picture presentation
So that’s how to create a PowerPoint presentation if you are brand new to it. We’ve also included a ton of links to helpful resources to boost your PowerPoint skills further.
When you are creating your presentation, it is critical to first focus on the content (what you are trying to say) before getting lost inserting and playing with elements. The clearer you are on what you want to present, the easier it will be to build it out in PowerPoint.
If you enjoyed this article, you can learn more about our PowerPoint training courses and other presentation resources by visiting us here .
🔒 Unlock the PowerPoint Shortcuts Trusted by Industry Leaders KKR, American Express, HSBC, and More!
Join over 114,880 professionals from diverse fields including consulting, investment banking, advertising, marketing, sales, and business development who have supercharged their PowerPoint game with our proven methods.
✅ Customize compelling presentations effortlessly.
✅ Master time-saving techniques for faster deck creation.
✅ Boost your career prospects with top-notch PowerPoint skills.
Get FREE access to the Critical PowerPoint Shortcuts module of our premium training course by entering your name and email below.
DISCLAIMER: PC Users Only!
We respect your privacy and will keep your info safe and confidential.
About The Author

Popular Tutorials
- How to Strikethrough Text (l̶i̶k̶e̶ ̶t̶h̶i̶s̶) in Word, Excel & PowerPoint
- How to Make Animated Fireworks in PowerPoint (Step-by-Step)
- Strikethrough Shortcut (l̶i̶k̶e̶ ̶t̶h̶i̶s̶) for Word, Excel & PowerPoint
- How to Create a Flash Card Memory Game in PowerPoint (Like Jeopardy)
- Keyboard Shortcuts Not Working: Solved
PowerPoint Tutorial Categories
- Strategies & Opinions
- Shortcuts & Hacks
- Pictures, Icons, Videos, Etc.
- New Features
- Miscellaneous
- Charts & Data Viz
We help busy professionals save hours and gain peace of mind, with corporate workshops, self-paced courses and tutorials for PowerPoint and Word.
Work With Us
- Corporate Training
- Presentation & Template Design
- Courses & Downloads
- PowerPoint Articles
- Word Articles
- Productivity Resources
Find a Tutorial
- Free Training
- For Businesses
We help busy office workers save hours and gain peace of mind, with tips, training and tutorials for Microsoft PowerPoint and Word.
Master Critical PowerPoint Shortcuts – Secure Your FREE Training Module and Save Valuable Time!
⌛ Master time-saving expert techniques.
🔥 Create powerful presentations.
🚀 Propel your career to new heights.
We value your privacy – we keep your info safe.
Discover PowerPoint Hacks Loved by Industry Giants - KKR, AmEx, HSBC!
Over 114,880 professionals in finance, marketing and sales have revolutionized their PPT skills with our proven methods.
Gain FREE access to a full module of our premium PowerPoint training program – Get started today!
We hate spam too and promise to keep your information safe.
You are currently viewing a placeholder content from Facebook . To access the actual content, click the button below. Please note that doing so will share data with third-party providers.
Your current User-Agent string appears to be from an automated process, if this is incorrect, please click this link:
- Vote: Reader’s Choice
- Meta Quest 4
- Google Pixel 9
- Google Pixel 8a
- Apple Vision Pro 2
- Nintendo Switch 2
- Samsung Galaxy Ring
- Yellowstone Season 6
- Recall an Email in Outlook
- Stranger Things Season 5
How to use Microsoft PowerPoint

Creating a successful slideshow is no small task. So, if you’re new to Microsoft PowerPoint, you’ll need to familiarize yourself with the features and tools you need to build a presentation.
How to create a slideshow
How to add a slide, how to insert slide elements, how to use different views, how to add speaker notes, how to start and end a presentation.
We’ll guide you through the process of creating a PowerPoint slideshow by adding slides and elements as well as how to present the show when you finish. These basics are just what you need as a beginner and should get you off to a terrific start with PowerPoint.
Note : The information in this tutorial applies to PowerPoint for Microsoft 365 on Windows. While you may see variations in features or menus, most PowerPoint versions have the same basic options.
When you open the application, you can create a new blank slideshow or use a built-in PowerPoint template . To best familiarize yourself with the application and the items we’ll walk through here, select a Blank slideshow on the Home screen and follow along.
Next, you’ll want to name and save your presentation file. Select File > Save or Save As name the file on the right, choose a location for it, and select Save .
Be sure to continue saving your slideshow regularly as you work on it by selecting Save in the Quick Access Toolbar.
A Blank presentation in PowerPoint starts you off with a main slide. You’ll notice a text box at the top for the title and one beneath for the subtitle. Simply click inside these boxes to enter your text.
While it’s good to get in the habit of using title slides like these to begin future presentations, you’ll also need to know how to insert the additional slides.
Go to either the Home or Insert tab and open the New Slide menu in the ribbon.
Choose the layout you want to use for the new slide. You’ll see several options that include placeholders, which is handy for popping in what you need like text, lists, or images.
Once the slide appears, click inside a placeholder to add the necessary elements.
Continue to insert as many slides as you want the same way.
Along with using the placeholders on the slides, you can add your own items. This is helpful if a slide doesn’t contain the number or type of placeholders you need.
Add a text box
One popular slide element to add is a text box, which is just like the title and subtitle boxes on the title slide. With it, you can insert and format text as you wish.
Go to the Insert tab and select Text box in the Text group.
You can use your cursor to draw the size of the box you want or simply click the slide and begin typing inside the box.
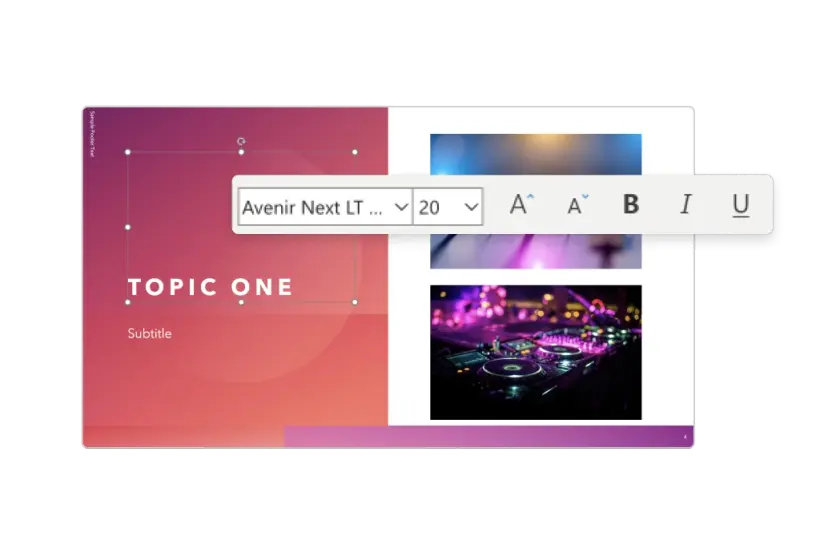
To format the text in the box, select it and go to the Home tab. Use the options in the Font section of the ribbon to adjust the style, size, color, or emphasis.
Specific to PowerPoint on Windows, you’ll also see a floating toolbar appear near the text that you select. This toolbar contains the same features as on the Home tab along with additional options.
Add images, shapes, and icons
Because a slideshow is a visual tool, you’ll likely want to add photos, illustrations, shapes, or icons to slides.
Go to the Insert tab and open the Pictures , Shapes , or Icons menu.
- Pictures : Pick an image from your device, one of the stock images, or an online picture and select Insert .
- Shapes : Pick a shape from the menu and use your cursor to draw it on the slide.
- Icons : Search or use the categories to find the icon, select it, and click Insert .
Once you insert one of the above on your slide, you’ll see the corresponding tab appear to format the object. For pictures, you have a Picture Format tab, for shapes, you have a Shape Format tab, and for icons, you have a Graphics Format tab.
You can use the tools in the ribbon to do things like change the color, add a border, align or rotate the object, and resize it.
Add audio or video
Another useful object to add to your slides is an audio file or video. You can then play the sound or video clip during your presentation.
Go to the Insert tab and open the Audio or Video menu.
- Audio : Pick an audio file on your device or record audio on the spot.
- Video : Pick a video from your device, one of the stock videos, or an online video and select Insert .
Like with images and shapes, you’ll see tabs appear to format the file you insert. For audio, you have an Audio Format tab, for video, you have a Video Format tab, and for both types of files, you have a Playback tab.
Use the Format tabs to adjust the color, add a border, or apply an effect and the Playback tab to set a fade in or out effect, loop the playback, or play it in the background.
You can take advantage of different views in PowerPoint for accomplishing various tasks. This is helpful for seeing all of your slides in a grid, viewing a notes page, or working with an outline.
Go to the View tab and you’ll see the options in the Presentation Views group.
- Normal : Use this to create and edit your slides.
- Outline View : Use this to work with an outline of your presentation. Each slide is numbered with a hierarchy of slide elements.
- Slide Sorter : Use this to see your slides in a grid format for an overall slideshow view.
- Notes Page : Use this to view your presentation with notes if you decide to print it .
- Reading View : Use this to play your slideshow in the same window without entering full-screen mode.
Use the tools in the Show section of the View tab to display a Ruler , Gridlines , or Guides . These items can help you line up your slide elements.
You can also select the Zoom and Fit to Window options in the Zoom section of the ribbon to get a better view of slide items or the overall slide.
Presenting a slideshow is similar to giving a speech where you may want to use speaker notes. Like note cards, you can add notes to each slide in your presentation. When you present the slideshow, only you can view your notes; your audience cannot see them.
Select Notes in the Status Bar at the bottom of the PowerPoint window or go to View > Notes .
Add your notes in the section that appears below the slide.
You can use the options in the Font section of the Home tab to add emphasis or create a list.
For more detail, check out our how-to for adding notes in PowerPoint .
When you’re ready to present your PowerPoint slideshow or to see it as your audience will, you can start the presentation anytime.
Go to the Slide Show tab.
To display your speaker notes and a dashboard of controls while you present, check the box for Use Presenter View in the Monitors section. Then, select the monitors for the slideshow display and presenter view using the Monitor drop-down menu.
On the left side of the ribbon, pick From Beginning or From Current Slide per your preference.
When the slideshow starts, you’ll see what your audience sees on one monitor with Presenter View on the other. This is a super helpful way to present your slideshow because the Presenter View window provides you with controls.
If you’re unable to use more than one monitor, you’ll also see controls on the bottom left of the slides.
In the Presenter View window, you’ll see the current slide on the left with the controls beneath and the next slide on the right along with your speaker notes.
To use a control, hover your cursor over each button for a brief description.
From left to right, you can choose a laser pointer or pen, see all slides in a grid, zoom in on the slide, display a black screen, turn the subtitles or camera on or off, and view additional options like changing the subtitle settings or ending the presentation.
To stop presentation mode, press your Esc key, select End Slide Show at the top, or use the three dots to choose End Show .
While this beginner’s guide to using PowerPoint should get you off to a great start creating and presenting your first slideshow, there’s plenty more to learn. Check out how to use Presenter Coach for rehearsing your presentation and best practices for making awesome PowerPoint slides for tips and suggestions.
Editors’ Recommendations
- What is Microsoft Teams? How to use the collaboration app
- What is Microsoft Edge and how to use it
- Best Microsoft Office deals: Get Word, PowerPoint, and Excel for free
- Copilot Pro: how to use Microsoft’s advanced AI sidekick
- Microsoft Copilot: how to use this powerful AI assistant

Microsoft hasn't been shy about pushing first-party services and apps in Windows, but this time, it's getting a little ridiculous. As reported by Windows Latest, the Microsoft application PC Manager claims you can "fix" your computer simply by changing Bing to be the default search engine.
The change was spotted when using the Edge browser and having, for example, Google as the default search engine. After you run a health check, one of the suggested changes will be to set Bing as your default search engine. If that's how you want to go, there's a button to make it happen.
In its Annual Work Trend Index, Microsoft has, unsurprisingly, published some fresh data around AI in the workplace. The big stat is that according to its survey, 75% of "knowledge workers" are already using generative AI at work, with that number doubling in the last six months alone.
The survey defines "knowledge workers" as "those who typically work at a desk (whether in an office or at home)," which is a pretty broad demographic.
Microsoft Teams was introduced in 2017 as a unified communication and collaboration platform aimed at helping businesses and organizations get things done. Microsoft leveraged the company's existing Office software experience and created a unified experience between Teams, Office 365, and Skype for Business. However, as with all software, things don't always go according to plan. Sometimes you can run into Teams problems.
We're big Teams users here at Digital Trends -- it's our go-to communication and meeting tool -- and we've come across a few issues ourselves over the years. In the event you're having Microsoft Teams issues, here's how to fix some of the most common problems.
Find the perfect PowerPoint presentation template
Bring your next presentation to life with customizable powerpoint design templates. whether you're wowing with stats via charts and graphs or putting your latest and greatest ideas on display, you'll find a powerpoint presentation template to make your ideas pop., presentations.
Help your data, insights, and recommendations make a statement with beautiful and easily customizable presentation templates.

Certificates
Celebrate accomplishments big and small with customizable certificate templates. From gift certificates to awards for finishing a course or training, find a template that highlights their accolades.
Boost visibility for your show, project, or business with easily customizable poster templates. Find templates for all your promotion needs and make them uniquely yours in a flash.

Keep track of whatever you need to in style. From personal planning to promotional calendars, find templates for every kind of project and aesthetic.

Infographics
Say more with less using helpful and easily customizable infographic templates. Add clarity to business presentations, school projects, and more with these helpful templates.
Start with the best PowerPoint templates

Elevate your storytelling
Tips, tricks, and insider advice from our business and design experts
A quick way to create beautiful, powerful PowerPoint presentations
Create captivating, informative content for PowerPoint in just a few minutes—no graphic design experience needed. Here's how:

1. Find the perfect PowerPoint template
2. Customize your creation

3. Show it off
Let's create a powerpoint design, frequently asked questions, where can i find slide templates and themes that i can customize.
To find customizable slide templates and themes, you can explore the business presentations templates or search by PowerPoint templates . Once you find a template that resonates with you, customize it by changing its color scheme, add in your own photos, and swap out the font.
How do I use pre-made PowerPoint templates?
After you've chosen a PowerPoint template to use, customize it. Explore [design tips] on how to customize a deck that resonates with your brand while putting emphasis on the topic at hand. Play with other design elements, like photo shapes, to make each slide unique.
How can I make or edit my own custom PowerPoint templates?
Start from scratch by creating your own PowerPoint template . Follow tips for designs and business presentations so that your unique template is cohesive and relevant to your brand. Incorporate your brand's color scheme and graphics so that all your slides aren't text only.
What kinds templates can I get online for PowerPoint?
You can get PowerPoint templates that have modern designs, animated ones, or even hand-drawn art in each slide. The color schemes range from bold to subtle. Each template's slides are also organized based on what you may want to include in your presentation . You can use the template as a starting point and customize its specific details from theme.
Popular categories

How-To Geek
How to start a powerpoint slideshow.

Your changes have been saved
Email is sent
Email has already been sent
Please verify your email address.
You’ve reached your account maximum for followed topics.
Quick Links
Start a slideshow in powerpoint's desktop app, start a slideshow in powerpoint's web app, start a slideshow in powerpoint's mobile app, key takeaways.
To start a PowerPoint slideshow on your desktop, open your slideshow and click "Start Slide Show" in the "Slide Show" tab. If you're using the web app, select "From Beginning" in the "Slide Show" tab. On mobile, simply tap the Monitor icon at the top of your screen.
There's nothing quite like finishing a presentation after spending hours getting it just right. Now, show off your hard work by starting your Microsoft PowerPoint slideshow on desktop, web, and mobile using the methods below.
Related: How (and Why) to Start Microsoft PowerPoint from the Command Prompt
To play a slideshow in PowerPoint's desktop app, all you have to do is click an option or press a shortcut on your keyboard .
Start the process by opening your presentation with PowerPoint. Then, in the app's ribbon at the top, select the "Slide Show" tab.

In the "Slide Show" tab, from the "Start Slide Show" section, choose "From Beginning" (or press F5). Now your presentation will play from the very first slide.
If you'd like to start the slideshow from your current slide, choose the "From Current Slide" option. Alternatively, press Shift+F5 on your keyboard.

While your presentation is playing, you can perform various tasks, like moving to the next slide or ending the show. You can reveal these options by right-clicking anywhere on the slide.

Alternatively, you can use the following keyboard shortcuts while viewing your slideshow:
- Spacebar or Right Arrow Button: Go to the next slide in the presentation.
- Left Arrow Button: Go to the previous slide in the presentation.
- Esc: End the show.
- W: Hide your current slide and display a white screen. Press the same key again to bring back the slide's content.
- B: Hide your current slide and display a black screen. Revert back to the slide's content by pressing the same button.
- Ctrl+Left Mouse Button: Activate the laser point tool to point at things in your slides.
- Ctrl+P: Launch the pen tool to annotate your slide's content during your show. You can choose if you'd like to keep these annotations when you end the show.
- Ctrl+i: Access the highlighter tool to highlight items in your slides.
If you'd like to jump to a specific slide while presenting, press that slide's number on your keyboard and hit Enter. For example, press 12 and hit Enter to access that slide quickly.
To access the Presenter view, where you can see the upcoming slides and other options, right-click anywhere on your slide and choose "Show Presenter View."

With these options, you can start a slideshow and have it play exactly how you want.
To play a slideshow on the web, launch your preferred web browser and access PowerPoint on the web . Then, open your presentation.
From PowerPoint's ribbon at the top, select the "Slide Show" tab.

In the "Slide Show" tab, start your slideshow from the first slide by clicking the "From Beginning" option. To have your show play from your current slide, choose "From Current Slide."

Your presentation is now playing.
To reveal the options for moving slides, annotating items, and using Presenter Coach , bring your cursor to your screen's bottom-left corner. Then, click the appropriate icon.

Related: How to Practice Your Presentations with PowerPoint's Presenter Coach
To start a slideshow in the PowerPoint mobile app , launch the app on your phone and open your presentation.
On the presentation screen, at the top, tap the Monitor icon to play the slideshow.

Your presentation has now begun.
To move to the next slide, swipe left on your screen. To go to the previous slide, swipe right.

You can reveal PowerPoint's presentation options, like annotation and black screen tools, by tapping at the top of your presentation. Then, choose the option you'd like to use.

And that's it. Happy presenting!
Want to learn a few tips to help you make the best PowerPoint presentations ? If so, check out our guide.
Related: 8 Tips to Make the Best PowerPoint Presentations
- Microsoft Office
- Microsoft PowerPoint
- Use Presenter View Video
- Add speaker notes Video
- Practice and time your presentation Video
- Record a presentation Video
- Print a presentation Video

Use Presenter View

PowerPoint Presenter View shows you the current slide, the next slide, and your speaker notes, to help you focus while presenting and connect with your audience.
Select the Slide Show tab.
Select the Use Presenter View checkbox.

Select which monitor to display Presenter View on.

In Presenter View , you can:
See your current slide, next slide, and speaker notes.
Select the arrows next to the slide number to go between slides.
Select the pause button or reset button to pause or reset the slide timer in the upper left.
See the current time to help you pace your presentation.
Select the font icons to make the speaker notes larger or smaller.
Select the annotations pen icon to draw on the screen in real time, or select a laser pointer.
Select the thumbnail icon to see all the slides in your presentation and quickly jump to another slide.
Select the magnifying glass icon to zoom in on a particular part of a slide.
The screen icon let's you make the screen temporarily black to focus the attention on you.
Select END SLIDESHOW when you're done presenting.
Start the presentation and see your notes in Presenter view

Need more help?
Want more options.
Explore subscription benefits, browse training courses, learn how to secure your device, and more.

Microsoft 365 subscription benefits

Microsoft 365 training

Microsoft security

Accessibility center
Communities help you ask and answer questions, give feedback, and hear from experts with rich knowledge.

Ask the Microsoft Community

Microsoft Tech Community

Windows Insiders
Microsoft 365 Insiders
Was this information helpful?
Thank you for your feedback.
COMMENTS
Under Drawing Tools, choose Format. Do one of the following: To change the color of your text, choose Text Fill, and then choose a color. To change the outline color of your text, choose Text Outline, and then choose a color. To apply a shadow, reflection, glow, bevel, 3-D rotation, a transform, choose Text Effects, and then choose the effect ...
Create a presentation. Open PowerPoint. In the left pane, select New. Select an option: To create a presentation from scratch, select Blank Presentation. To use a prepared design, select one of the templates. To see tips for using PowerPoint, select Take a Tour, and then select Create, . Add a slide.
Create a new presentation. Open PowerPoint. Select Blank presentation, or select one of the themes. Select More themes to view the gallery and search for more. Add a slide. Select the slide you want your new slide to follow. Select Home > New Slide. Select Layout and the you type want from the drop-down.
The idea of making a PowerPoint presentation is to show your information in the simplest way possible for your audience. Step 2: Create a new document in PowerPoint. Once you check that all the functions are working fine with the software, please open it and go to the File tab. If you've ever used Word or Excel, you'll probably find this Home ...
Open the PowerPoint app, select a template and theme, then like "Create.". Click the text box to add your title and subtitle to create your title slide. Click the "Insert" tab, then "New Slide" to add another slide. Choose the type of slide you want to add, then add text and pictures. Rearrange slides by dragging them up or down in ...
To do that, simply go up to the Home tab and click on New Slide. This inserts a new slide in your presentation right after the one you were on. You can alternatively hit Ctrl+M on your keyboard to insert a new blank slide in PowerPoint. To learn more about this shortcut, see my guide on using Ctrl+M in PowerPoint.
In PowerPoint, you can create a presentation from scratch, or from a theme with built-in graphics, fonts, and placeholders for your text, images, and content...
Get started with PowerPoint for Beginners. Follow this 20-Minute step by step PowerPoint tutorial to start creating presentations smoothly.Contents of this v...
In the "Insert" menu, select "Table" and opt for a one-by-one table. Change the table color to a light gray shade, elongate it, and position it neatly to the left of your text. To improve readability and aesthetics, increase the spacing between text phrases. A small adjustment in the before spacing setting (setting it to 48) significantly ...
Six steps for creating a slide show. 1. Plan your slide show. Before getting too deep into your slide show project, it's a good idea to select and save the photos and videos you want to use. This helps you create a slide show more efficiently and purposefully, ensuring a better outcome. 4.
Share and collaborate. Start with Microsoft Copilot. Generate a presentation outline instantly with Microsoft Copilot for Microsoft 365. Expand your ideas. Ask for more information or a new slide on your topic directly through Copilot in PowerPoint. Use a free template. Choose from thousands of customizable templates to kickstart your slideshow.
Watch this video to find out how. Set up your presentation. First, go to the SLIDE SHOW tab and make sure Use Presenter View is selected. For rehearsal, you can press ALT+F5 to display the Presenter view on a single screen. Rehearsing this way will help you get comfortable with your slides, and give you practice using the Presenter view.
A good presentation needs two fonts: a serif and sans-serif. Use one for the headlines and one for body text, lists, and the like. Keep it simple. Veranda, Helvetica, Arial, and even Times New Roman are safe choices. Stick with the classics and it's hard to botch this one too badly.
One person. Sharing and real-time collaboration. PowerPoint for the web and PowerPoint desktop app for offline use. Premium templates, fonts, icons, and stickers with thousands of options to choose from. Dictation, voice commands, and transcription. Advanced spelling and grammar, in-app learning tips, use in 20+ languages, and more.
Create a blank presentation. Open PowerPoint. Select one of the Blank Presentation and start typing. Note: Microsoft 365 subscribers will find Design Ideas based on the words you type. You can browse and select a new look.
A Blank presentation in PowerPoint starts you off with a main slide. You'll notice a text box at the top for the title and one beneath for the subtitle. Simply click inside these boxes to enter ...
Find the perfect PowerPoint presentation template Bring your next presentation to life with customizable PowerPoint design templates. Whether you're wowing with stats via charts and graphs or putting your latest and greatest ideas on display, you'll find a PowerPoint presentation template to make your ideas pop.
On the Home tab, click New Slide. To choose a different slide layout, click the arrow next to New Slide and then click the slide layout you want. On the Transitions tab, click the transition you want. To see more transitions, expand the Transition gallery . On the Transitions tab, click Apply To All. Now you've set up a presentation with a ...
Start a Slideshow in PowerPoint's Web App. To play a slideshow on the web, launch your preferred web browser and access PowerPoint on the web. Then, open your presentation. From PowerPoint's ribbon at the top, select the "Slide Show" tab. In the "Slide Show" tab, start your slideshow from the first slide by clicking the "From Beginning" option.
PowerPoint Presentation Last modified by: kobrien Created Date: 1/1/1601 12:00:00 AM Document presentation format: On-screen Show Other titles: Times New Roman Arial Wingdings Symbol Default Design Slide 1 Setting Up an Electrophoresis Gel Electrophoresis involves: Determining the size of gel needed Preparing Your Gel Tray Making the Gel ...
Give a presentation Article; Set up your mobile apps Article; Learn more Article; Next: Slides and layouts Create a presentation in PowerPoint for the web. With PowerPoint for the web running in your web browser, you can: Create presentations that include images, videos, transitions, and animations.
Start a presentation. On the Slide Show tab select From Beginning . Now, if you are working with PowerPoint on a single monitor and you want to display Presenter view, in Slide Show view, on the control bar at the bottom left select the three dots, and then Show Presenter View. To move to the previous or next slide, select Previous or Next .
On the Slide Show tab, in the Set Up group, click the arrow on the Record Slide Show button. In the Record Slide Show dialog box, select the Narrations and laser pointer check box, and if appropriate, select or deselect the Slide and animation timings check box. Click Start Recording.
You can show your presentation to an audience with PowerPoint Mobile. Start presenting. On the Slide Show tab, in the Start Slide Show group, select From Beginning or From Current Slide.. Presenter View. If you have a two-screen setup in which you are projecting from your device to a large screen, you can see Presenter View visible on your device while your audience sees the slide show on the ...
Select the Use Presenter View checkbox. Select which monitor to display Presenter View on. Select From Beginning or press F5. In Presenter View, you can: See your current slide, next slide, and speaker notes. Select the arrows next to the slide number to go between slides. Select the pause button or reset button to pause or reset the slide ...