Creating a Blank Presentation
When you create a new, blank presentationby choosing Blank Presentation in the New Presentation pane or by clicking the New icon on the Standard toolbarPowerPoint generates a new presentation and displays the Slide Layout task pane (see Figure 4 ).

Figure 4. Use the Slide Layout pane to specify which placeholders will go on a slide and where they will sit.

When you begin with a blank presentation, PowerPoint starts with a single title slide. Although it's a tedious way to work, you can build your presentation from this view, one slide at a time. Aim your mouse pointer at the layout that matches the kind of slide you want to add, click the arrow to the right of the slide layout icon, and choose Insert New Slide from the menu.
In a blank PowerPoint presentation, each new slide you create is completely free of any design elements whatsoever. You get a white background, with text formatted in the Arial font (44-point for slide titles and 32-point for body text) and generic round bullets.
It is hard to imagine a layout more dull than this default design. To replace it with one that contains coordinated colors, fonts, and graphics, click the Design icon on the Formatting toolbar (or choose Slide Design from the drop-down list at the top of the task pane). The Slide Design pane (see Figure 5 ) appears.
Figure 5. Switch to this larger preview to get a better picture of what each design template looks like.

| Initially, PowerPoint installs only a limited selection of its design templates. To make the entire collection of templates available, scroll all the way to the bottom of the Slide Design pane and click Additional Design Templates. (If you kept the installation files on your hard drive, you won't need the Office CD.) If that's not enough, a quick search of the Internet will turn up literally thousands of downloadable templates of varying sophistication. You can also create your own templates, either from scratch or by modifying a template you found elsewhere. Don't be afraid to experiment! |
When you click the icon for a design template, PowerPoint immediately applies the design to all slides in your presentation. The icons offer a thumbnail-sized preview of the design, but there's no substitute for experimentation. Feel free to apply different designs to the current presentation and then flip through the slides to see what each design looks like; if your presentation includes important content, create a copy first so that you don't have to worry about inadvertently messing up the existing design.
If you regularly prepare presentations for an organization or company that has certain standards for all presentationslogo in a specific location, identification of title slides, and so onyou might want to customize PowerPoint's "blank" presentation so that it reflects those standards. That way, whenever you begin a new presentation you'll have the basic requirements out of the way before you type your first bullet point.
To replace the PowerPoint default blank presentation with one of your own design, follow these steps:
| in the File Name box and click Save. |
| By default, PowerPoint saves your new blank presentation in your personal Templates folder (to view the contents of this folder, click Start, Run, enter ). To make this change for all the users in your organization, you must copy the Blank Presentation design template file into the personal Templates folder for each user. |
With a Blank Presentation file in the correct location, all "blank" presentations whether created via the New Presentation task pane or using the New icon on the Standard toolbarwill be based on that file.
- PRO Courses Guides New Tech Help Pro Expert Videos About wikiHow Pro Upgrade Sign In
- EDIT Edit this Article
- EXPLORE Tech Help Pro About Us Random Article Quizzes Request a New Article Community Dashboard This Or That Game Happiness Hub Popular Categories Arts and Entertainment Artwork Books Movies Computers and Electronics Computers Phone Skills Technology Hacks Health Men's Health Mental Health Women's Health Relationships Dating Love Relationship Issues Hobbies and Crafts Crafts Drawing Games Education & Communication Communication Skills Personal Development Studying Personal Care and Style Fashion Hair Care Personal Hygiene Youth Personal Care School Stuff Dating All Categories Arts and Entertainment Finance and Business Home and Garden Relationship Quizzes Cars & Other Vehicles Food and Entertaining Personal Care and Style Sports and Fitness Computers and Electronics Health Pets and Animals Travel Education & Communication Hobbies and Crafts Philosophy and Religion Work World Family Life Holidays and Traditions Relationships Youth
- Browse Articles
- Learn Something New
- Quizzes Hot
- Happiness Hub
- This Or That Game
- Train Your Brain
- Explore More
- Support wikiHow
- About wikiHow
- Log in / Sign up
- Computers and Electronics
- Presentation Software
- PowerPoint Presentations
Simple Steps to Make a PowerPoint Presentation
Last Updated: July 23, 2024 Fact Checked
Creating a New PowerPoint
Creating the title slide, adding a new slide, adding content to slides, adding transitions, testing and saving your presentation.
This article was co-authored by wikiHow staff writer, Darlene Antonelli, MA . Darlene Antonelli is a Technology Writer and Editor for wikiHow. Darlene has experience teaching college courses, writing technology-related articles, and working hands-on in the technology field. She earned an MA in Writing from Rowan University in 2012 and wrote her thesis on online communities and the personalities curated in such communities. This article has been fact-checked, ensuring the accuracy of any cited facts and confirming the authority of its sources. This article has been viewed 4,343,539 times. Learn more...
Do you want to have your data in a slide show? If you have Microsoft 365, you can use PowerPoint! PowerPoint is a program that's part of the Microsoft Office suite (which you have to pay for) and is available for both Windows and Mac computers. This wikiHow teaches you how to create your own Microsoft PowerPoint presentation on a computer.
How to Make a PowerPoint Presentation
- Open the PowerPoint app, select a template and theme, then like “Create.”
- Click the text box to add your title and subtitle to create your title slide.
- Click the “Insert” tab, then “New Slide” to add another slide.
- Choose the type of slide you want to add, then add text and pictures.
- Rearrange slides by dragging them up or down in the preview box.
Things You Should Know
- Templates make it easy to create vibrant presentations no matter your skill level.
- When adding photos, you can adjust their sizes by clicking and dragging in or out from their corners.
- You can add animated transitions between slides or to individual elements like bullet points and blocks of text.

- If you don't have a Microsoft Office 365 subscription, you can use the website instead of the desktop app. Go to https://powerpoint.office.com/ to use the website version.
- You can also use the mobile app to make presentations, though it's easier to do this on a computer, which has a larger screen, a mouse, and a keyboard.

- If you don't want to use a template, just click the Blank option in the upper-left side of the page and skip to the next part.

- Skip this step if your selected template has no themes available.

- If you're creating a PowerPoint presentation for which an elaborate title slide has been requested, ignore this step.

- You can change the font and size of text used from the Home tab that's in the orange ribbon at the top of the window.

- You can also just leave this box blank if you like.

- You can also click and drag in or out one of a text box's corners to shrink or enlarge the text box.

- On a Mac, you'll click the Home tab instead. [1] X Research source

- Clicking the white slide-shaped box above this option will result in a new text slide being inserted.

- Title Slide
- Title and Content
- Section Header
- Two Content
- Content with Caption
- Picture with Caption

- Naturally, the title slide should be the first slide in your presentation, meaning that it should be the top slide in the left-hand column.

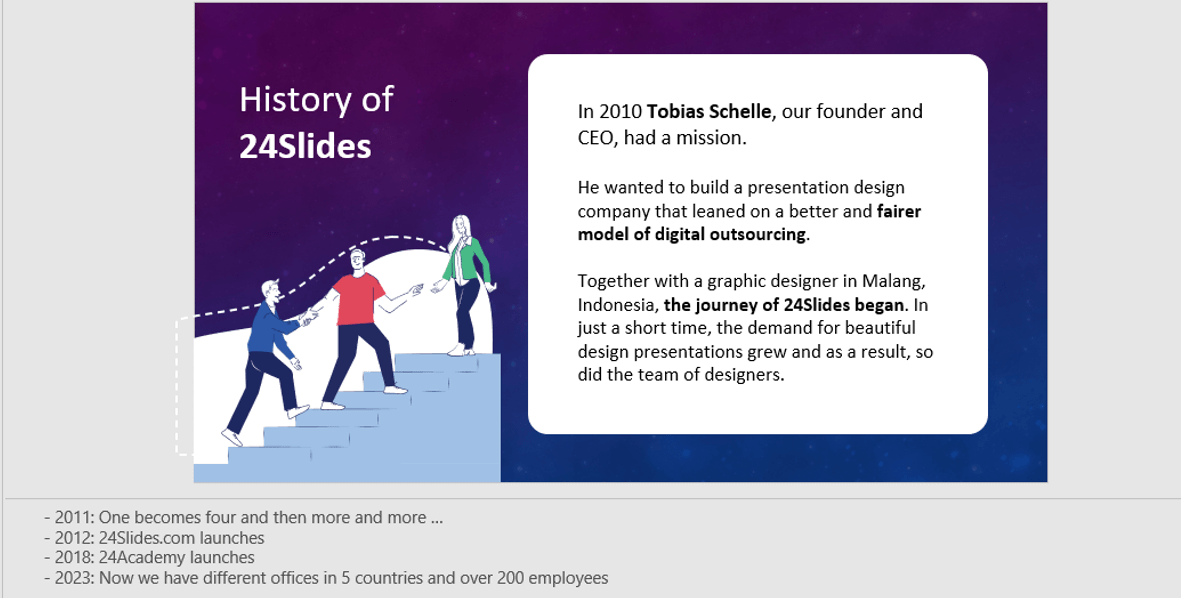
- Skip this step and the next two steps if your selected slide uses a template that doesn't have text boxes in it.

- Text boxes in PowerPoint will automatically format the bulk of your text for you (e.g., adding bullet points) based on the context of the content itself.
- You can add notes that the Presentation will not include (but you'll still be able to see them on your screen) by clicking Notes at the bottom of the slide.

- You can change the font of the selected text by clicking the current font's name and then clicking your preferred font.
- If you want to change the size of the text, click the numbered drop-down box and then click a larger or smaller number based on whether you want to enlarge or shrink the text.
- You can also change the color, bolding, italicization, underlining, and so on from here.

- Photos in particular can be enlarged or shrunk by clicking and dragging out or in one of their corners.

- Remember to keep slides uncluttered and relatively free of distractions. It's best to keep the amount of text per slide to around 33 words or less. [2] X Research source

- Slide content will animate in the order in which you assign transitions. For example, if you animate a photo on the slide and then animate the title, the photo will appear before the title.
- Make your slideshow progress automatically by setting the speed of every transition to align with your speech as well as setting each slide to Advance . [3] X Trustworthy Source Microsoft Support Technical support and product information from Microsoft. Go to source

- If you need to exit the presentation, press Esc .

- Windows - Click File , click Save , double-click This PC , select a save location, enter a name for your presentation, and click Save .
- Mac - Click File , click Save As... , enter the presentation's name in the "Save As" field, select a save location by clicking the "Where" box and clicking a folder, and click Save .
Community Q&A
- If you save your PowerPoint presentation in .pps format instead of the default .ppt format, double-clicking your PowerPoint presentation file will prompt the presentation to open directly into the slideshow view. Thanks Helpful 6 Not Helpful 0
- If you don't have Microsoft Office, you can still use Apple's Keynote program or Google Slides to create a PowerPoint presentation. Thanks Helpful 0 Not Helpful 0

- Your PowerPoint presentation (or some features in it) may not open in significantly older versions of PowerPoint. Thanks Helpful 1 Not Helpful 2
- Great PowerPoint presentations avoid placing too much text on one slide. Thanks Helpful 0 Not Helpful 0
You Might Also Like

- ↑ https://onedrive.live.com/view.aspx?resid=DBDCE00C929AA5D8!252&ithint=file%2cpptx&app=PowerPoint&authkey=!AH4O9NxcbehqzIg
- ↑ https://www.virtualsalt.com/powerpoint.htm
- ↑ https://support.microsoft.com/en-us/office/set-the-timing-and-speed-of-a-transition-c3c3c66f-4cca-4821-b8b9-7de0f3f6ead1#:~:text=To%20make%20the%20slide%20advance,effect%20on%20the%20slide%20finishes .
About This Article

- Send fan mail to authors
Reader Success Stories
Artis Holland
Sep 22, 2016
Is this article up to date?
Oct 18, 2016
Jul 23, 2016
Margery Niyi
Sep 25, 2017
Jul 21, 2016

Featured Articles

Trending Articles

Watch Articles

- Terms of Use
- Privacy Policy
- Do Not Sell or Share My Info
- Not Selling Info
wikiHow Tech Help Pro:
Level up your tech skills and stay ahead of the curve
PowerPoint 101: The Ultimate Guide for Beginners

Are you struggling with PowerPoint? You need a quick design in PowerPoint but don't know where to start? Don't worry, you have nothing to be ashamed of.
In this article, we're going to refresh the most important PowerPoint basics so you can take advantage of this Microsoft software and create high-impact presentations at any time!
Millions of users worldwide use Microsoft 365 services , making PowerPoint the presentation design software with the highest market share. And with good reason! PowerPoint's features stand out for its usability and originality . We can tell you that PowerPoint is pretty intuitive software, and it's a great option to choose when working with presentations on a daily basis. So, are you ready for a quick PowerPoint 101 class?
Let ' s see what you ' re going to learn today with this PowerPoint Guide :
What is PowerPoint?
What are the best uses of powerpoint, powerpoint basics: what are the components of powerpoint workspace, mastering powerpoint: what are the main features of powerpoint, what are powerpoint templates and where to find them, time to practice how to make a presentation in powerpoint.

Microsoft PowerPoint is a presentation design software that is part of Microsoft 365 . This software allows you to design presentations by combining text, images, graphics, video, and animation on slides in a simple and intuitive way.
Over time, PowerPoint has evolved and improved its accessibility to users. For this reason, it has been adapted to the main operating systems and modalities:
- PowerPoint Online
Additionally, you can use Word and Excel in this online version. That way, you'll be able to make real-time changes in the cloud without fearing losing your files. Sounds great, right?
PowerPoint has a versatile range of uses. Here's a list of the different tasks you can complete with this presentation design software:
- Business presentations or Pitch decks.
- Marketing, Sales and HR plans.
- Project briefs and timelines.
- Inductions to new employees.
- Seminars and educational classes.
- Professional portfolio of photos or designs.
- Presentations of a research summary.
- Presentations for special occasions.
These are just a few examples of the multiple possibilities this Microsoft software offers. Your imagination is the only limit!
Stay tuned as we continue with this PowerPoint 101 Guide...
In order to deeply understand this presentation design software, you need to recognize its main components. Now it's time to learn about the PowerPoint basics!
A quick note before going any further: when opening PowerPoint, some of the commands in the ribbons will look grayish and won't be highlighted when you hover the mouse over them.
This happens since some commands need to be selected in order to function. For example, if you want to change the color of a text, you first need to select it.
That being said, let's start with this Guide for PowerPoint beginners:
PowerPoint Main Window
The first aspect to learn is PowerPoint Main Window. To facilitate the explanation, we've organized its main elements with numbers from 1 to 10:
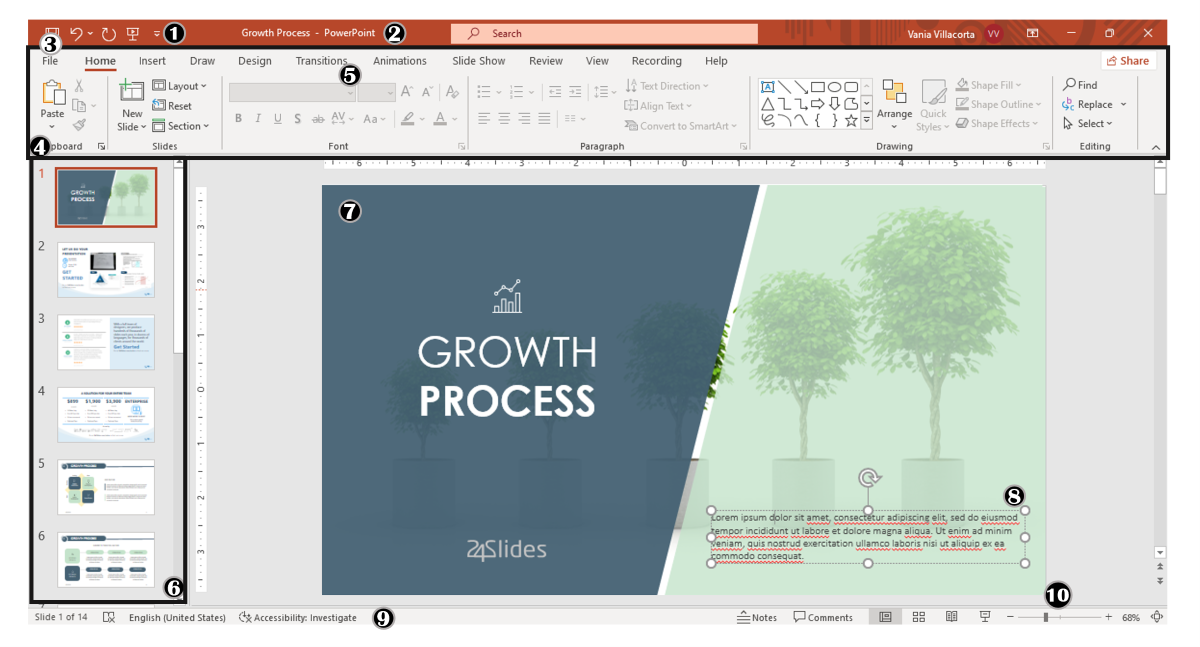
Based on that, the main components of PowerPoint window are the following:
1. Quick Access Toolbar: allows you to customize commands to have them at hand. You only have to select it and go to "More commands."
2. Title Bar: shows you the name of your file and other "Suggested options" like Slide Master View . These options will vary depending on the use you give to the commands.
3. File Tab: you will see the Home Menu (PowerPoint backstage) by selecting it. There, you can create a new presentation, save it, print it, export it, and many other options.
4. The Ribbon: it's where PowerPoint tabs and tools are. These tools can also be called "commands" or “features.”
5. More Button or Down Arrow: these arrows allow you to view more tools or layout options in PowerPoint.
6. Slides Pane: shows your slides in thumbnail size. By right-clicking, you can access additional options for customizing each slide. Perfect for PowerPoint beginners!
7. Slide: PowerPoint's blank canvas and the frame to be seen when presenting the file.
8. Placeholders: they are dotted boxes that will store your content.
9. Status Bar: allows you to view the slide number, grammatical errors, speaker notes, and the comments on your file.
10. Zoom: allows you to enlarge or minimize your PowerPoint workspace. The range goes from 10 to 400%.
PowerPoint Tabs
The PowerPoint tabs are the control desk of your presentation . Since PowerPoint's features are too many, they're organized in tabs.
You can come and go between tabs as you need. Once you click on a tab, it will open its ribbon, and there, you'll be able to see all the tools related to that particular category.
This PowerPoint tutorial for beginners will give you an overview of all PowerPoint tabs . Pay attention to the following list:
- Transitions Tab
- Animations Tab
- Slide Show Tab
- Recording Tab
1. Home Tab
The Home tab is the most common tab of PowerPoint. This is the tab you'll probably use the most if you're designing a presentation deck from scratch.

It allows you to add new slides and change the text characteristics : font, size, boldness, underlining, alignment, etc. If you've ever used Microsoft Word, these features will be familiar to you.
Also, you will find commands to edit the characteristics of the geometric shapes you insert. This includes: fill color, line color, sharpe effects, among others.
2. Insert Tab
The Insert tab is exactly what its name says it is. In this ribbon, you'll find all the options concerning adding a new element to your PowerPoint presentation .

You can insert a picture, some geometric shapes, icons, WordArt graphics, among others. We can tell you that this tab is really helpful for PowerPoint beginners!
For example, if you have a lot of data in PowerPoint , you could add a chart or diagram to show your information in a more visual way. Also, you can embed videos or music into PowerPoint really easily.
- PowerPoint tip for beginners: To be able to write text on your slides, you need a text box. So, if you're designing your presentation from scratch, remember to go first to the Insert tab and add a text box to start writing.
3. Design Tab
If you are one of those people who enjoy choosing the design of a PowerPoint presentation, this tab will be your favorite.

The Design tab offers a wide range of premade designs , allowing you to get more polished slides. Even better, if you explore its ribbon, you can adjust the color palette and change the overall style of your PowerPoint deck.
The PowerPoint interface, as this basic PowerPoint Tutorial, is really intuitive. We believe that you won't have any problem with this tab!
4. Transitions Tab
Using transitions in PowerPoint is a dynamic way to move from one slide to the next during a presentation. This feature is PowerPoint's stamp, so don ' t miss it!

Some PowerPoint transitions are really classic, like wiping the old slide to present the new one. Others are somewhat over the top, like the “Vortex” or the “Airplane” effect.
If you click on each kind of transition, you'll see a preview on how it would look when presenting. Really cool, right?
5. Animations Tab
In case you want to add special effects for certain elements in your slides , the Animations tab in PowerPoint will interest you.

Like the Transitions tab, you will find various animation effects in this ribbon. It's a matter of trying and choosing the best one according to your needs!
6. Slide Show Tab
As its name says, the Slide Show tab is about presenting your slides . We really like that it gives you several options to show up your presentation!

Considering that you're a PowerPoint beginner, you're not likely to use the Slide Show tab very much.
But if you're curious about this command, you must read our article: How to Make a PowerPoint Slideshow that Runs Automatically?
7. Review Tab
The Review tab is not often used by PowerPoint beginners either.
However, if your job is related to writing or if you work at an international company, this tool can be extremely useful!

With this tab, you can check the slide's spelling, translate the text in real-time, and add comments to your slides . This last function can be helpful to give feedback to a colleague.
8. View Tab
This View tab allows you to change the view of your PowerPoint slides and make handouts from them, among other things.

As you can see, the majority of its commands are really specific. So you won't have any issues while designing, test and see!
In this section, our favorite command for PowerPoint beginners is Slide Master . Explore more about this tool in our guide!
9. Recording Tab
In the last versions of this design presentation software, PowerPoint added the Recording tab. As its name says, it allows you to record all your presentation slides .

This ribbon has advanced commands, so the most common action for a PowerPoint beginner is to take a screenshot or record the screen sequentially .
10. Help Tab
Finally, there is the Help tab. If you have any problem or question concerning how to use PowerPoint, you may go here to look for a solution.
In the latest versions, Windows has added a “Show Training” option. You can click this command to practice the PowerPoint basics since it will download training templates.

As a beginner in PowerPoint, you must recognize the objective of each PowerPoint tab to be able to master the software . But, in order to conduct an outstanding presentation deck, you also need to dominate its most important features. Let's see some of them in the next section!
If you feel ready to delve deeper into PowerPoint's tools, this section is for you.
As you may know , 24Slides specializes in creating outstanding presentations for any Design Project . So, we asked one of our experts about her favorite PowerPoint features, and we want to share them all with you!
Carmen Navarrete , Graphic Designer at 24Slides, highlighted the following features that will make your presentations stand out from the crowd:
PowerPoint Feature #1: Crop to Shape
This first PowerPoint feature is simple but effective!
Let's see how to use it:
- First, choose an image you want to cut and insert it into your workspace.
- Once inserted, select it with the mouse.
- Go to the "Picture Format" tab.
- Press the arrow of the "Crop" button (right side of the screen).
- Select "Crop to Shape."
- Choose your favorite shape and customize your PowerPoint presentation!

PowerPoint Feature #2: Merge Shapes
If you don't like any figure enough, you can create one from scratch!
This is possible thanks to the "Merge Shapes" option. Follow these steps to unleash your creativity:
- First choose an image you want to cut.
- Check the list of PowerPoint shapes (Insert tab > Shapes).
- Choose two or three figures you want to merge (they can be the same figure).
- Select the figures you are going to merge (see the image).
- Once selected, go to the "Shape Format" tab.
- Press the "Merge Shapes" option and the type of merge you want (test and choose!).
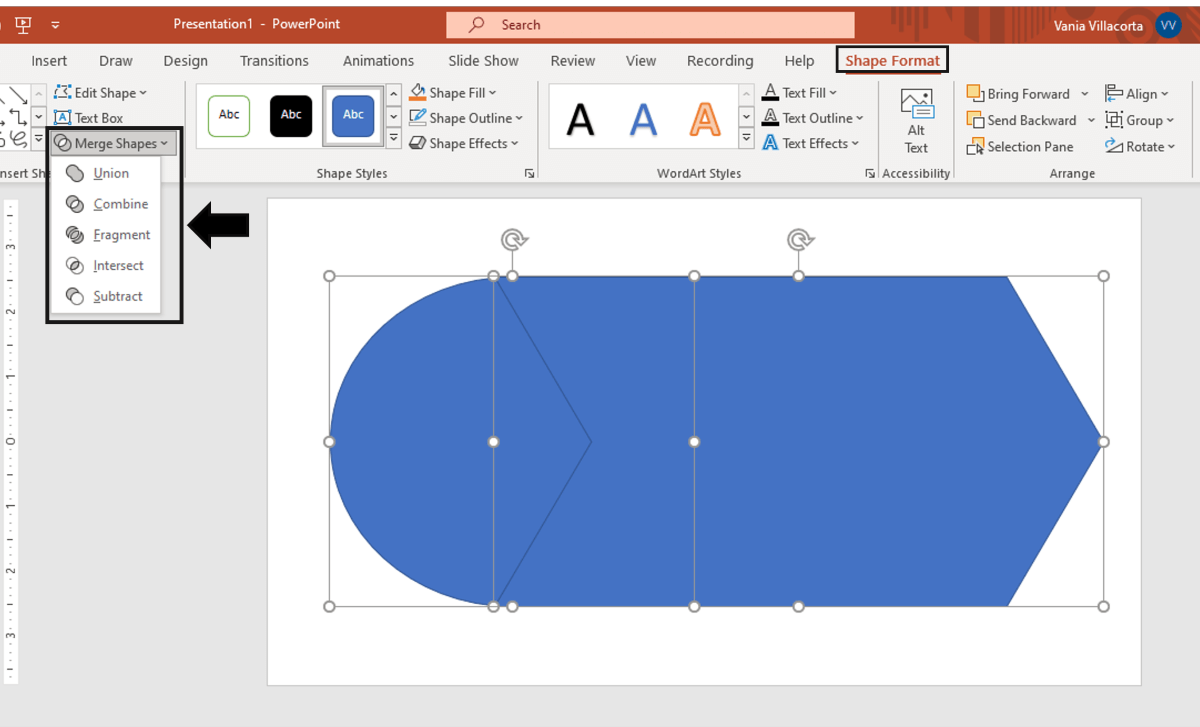
- A new figure will appear, and you must fill it with the image from the first step.
- Stay on the Shape Format tab and go to "Shape Fill" (button in the middle of the ribbon).
- Select "Picture Fill" and browse for your image.
- Select the image to fill your new figure, and that's it!

- PowerPoint tip for beginners: When your merged figure is ready, paste the image to the background of your slide to achieve a better result. This way, you can use your image as a canvas and see if both elements fit well.
PowerPoint Feature #3: Insert Icons
This PowerPoint feature is quite easy to follow for PowerPoint beginners!
Just follow these steps:
- Go to the Insert tab.
- Select the "Icons" option.
- A Microsoft 365 library will open, where you can search for the required icon.
- Now, you must insert it into your presentation and adapt it to your design.
- If you have an active Microsoft 365 subscription, you'll have access to a larger number of icons in PowerPoint.
- PowerPoint tip for beginners: If you want to learn more about icons in PowerPoint, read our article on How to Use Icons to Make Amazing PowerPoint Presentations .
PowerPoint Feature #4: Insert SmartArt
PowerPoint's SmartArt is one of the most popular and accessible tools to dominate while learning about PowerPoint basics.
To use it in your slide deck, you must:
- Select SmartArt.
- See all SmartArt categories and choose your favorite based on your needs.
- Add the text you have prepared and adapt it to your presentation.
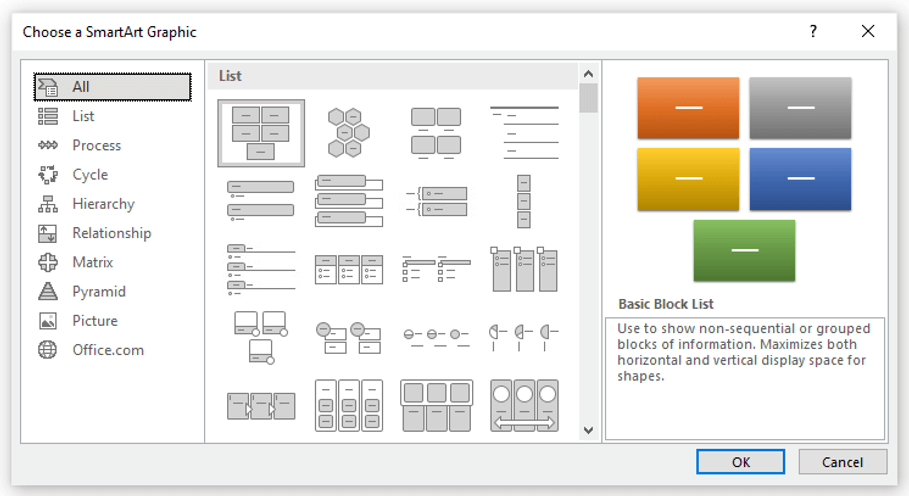
We want to give you some ideas to master this SmartArt tool in PowerPoint: you can make timelines , flowcharts , and even a Venn diagram in just a few seconds. Try and see!
PowerPoint Feature #5: Remove Background
If you don't know how to use Photoshop and want to remove the background from an image, in this PowerPoint 101 Guide, we show you how:
- First choose the image you want to remove the background from.
- Insert the image in the PowerPoint workspace.
- Select the image and go to the "Picture Format" tab.
- Select "Remove Background" (first option on the left).
- You can keep and remove parts of the image with the first two tools of the ribbon (see image).
- Keep in mind that all the sections highlighted in purple will be deleted.
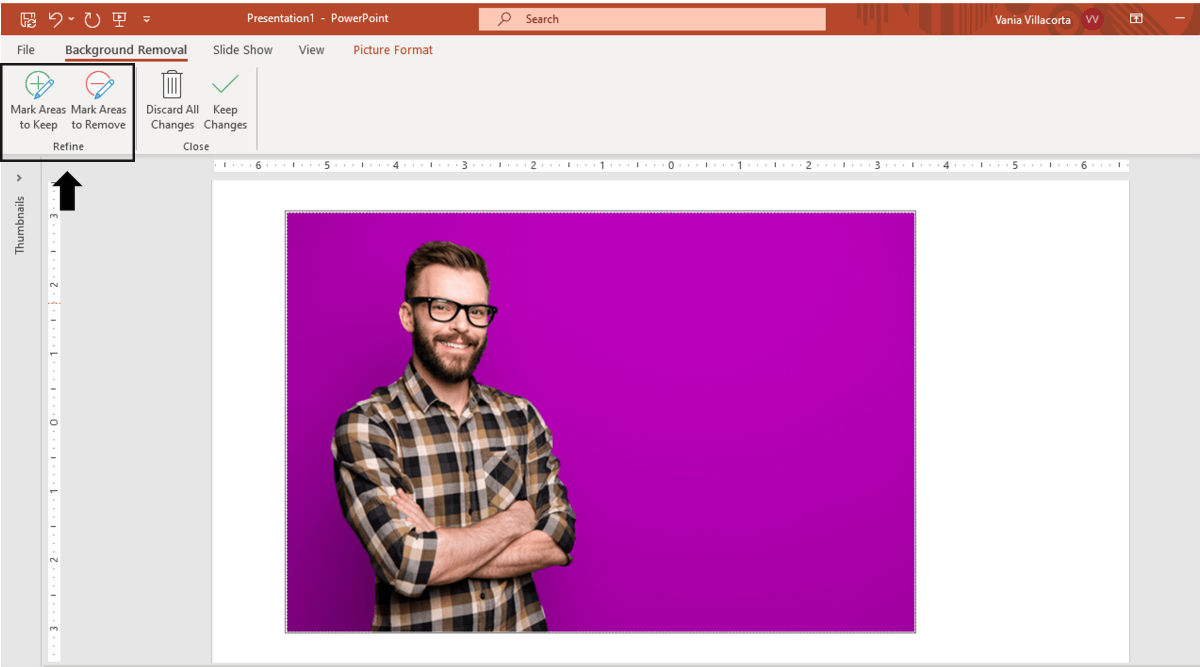
- We recommend zooming in to keep or remove parts of the image with more detail.
- Once you're done, press the "Keep Changes" button.
- Finally, adapt the new image to your PowerPoint presentation.

- PowerPoint tip for beginners: Choose a high-contrast photo or image for best results. In other words, the outline of the person or object you want to cut out must have clear edges and cannot blend with the image's background color.
PowerPoint Feature #6: Add Speaker Notes
The latest PowerPoint feature is a command you can use to prepare your speech before presenting to an audience.
Learning how to add speaker notes in PowerPoint is simple:
- Select the slide that needs some notes.
- Usually, there is a footer below the slide, but if not, you will have to activate it.
- Go to the View tab and select "Notes."
- The Speaker Notes section will appear, and you can add whatever you want!
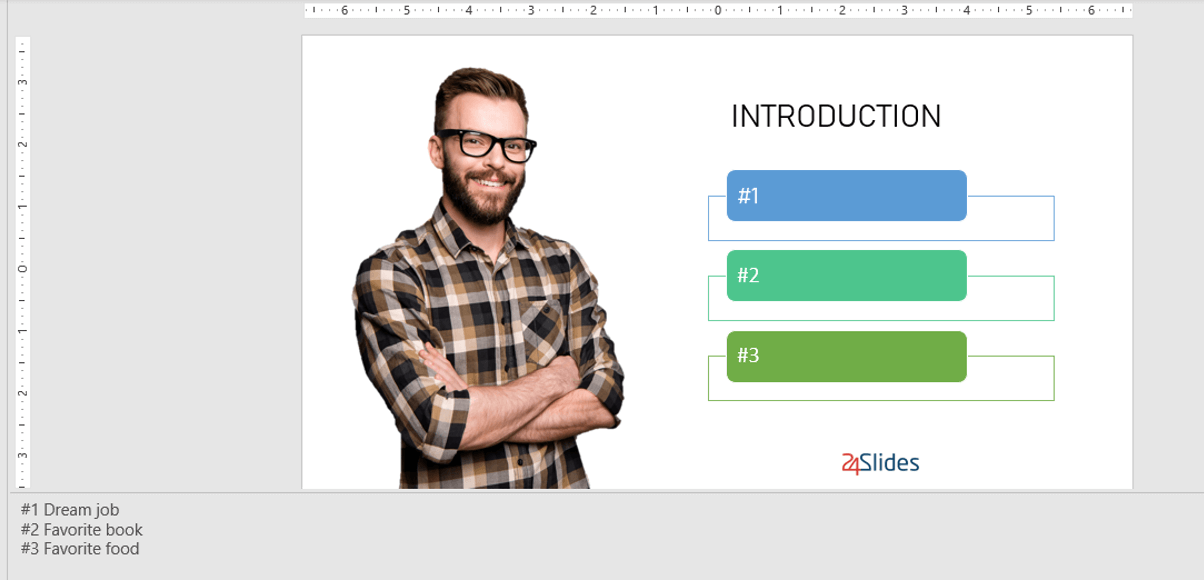
- PowerPoint tip for beginners: In case you want to practice your entire presentation and have a lot of notes, go to the View tab and select "Notes Page" (fourth command). You'll be able to see all your Speaker Notes faster!
PowerPoint Feature #7: PowerPoint Translator
If you've ever wondered how to translate your PowerPoint Slides, we'll explain the step by step here:
- Go to the Review tab.
- Select the text you want to translate.
- Press the “Translate” button.
- A panel will open on the right side of the screen.
- Choose the language you need and you'll see the translation in real-time.
- If you press Insert, the text will change to the new translation!
PowerPoint Feature #8: Screen Recording
The process of recording your screen in PowerPoint is straightforward and intuitive. Let's see:
- Go to the “Record” or “Recording” tab.
- Press the "Record Slide Show" button or the “From Beginning” button (depending on your PPT version).
- A new window will open.
- Select the red record button and start recording!
- When you're done, select “Export.”
- By default, the video will be 1080p. If you want to lower the video quality, go to "Customize export."
- Name the video, save it to a folder and that's it!
As you may have noticed, this software has endless PowerPoint design options for beginners. We encourage you to try and test each functionality!
However, we're clear that PowerPoint has different features, so it can be hard to know where to start. That's why understanding PowerPoint basics is crucial if you truly want to master this software!
Our PowerPoint 101 Guide continues; stay tuned to discover more great stuff about this Microsoft software. Keep reading!
A PowerPoint template is a pre-made design that you can use for your own means, and that will save you a lot of time!
Templates in PowerPoint are a great resource for designing since all the structure is already done, and you only have to update the content . We can tell you they're the perfect resource for PowerPoint beginners!
They can be incredibly specific. For example, there are templates for a SWOT analysis or a complete Marketing report. Otherwise, templates can also be very general, with several slides with a similar design.
If you struggle with the artistic part of designing presentations, downloading PowerPoint templates will be a life changer!
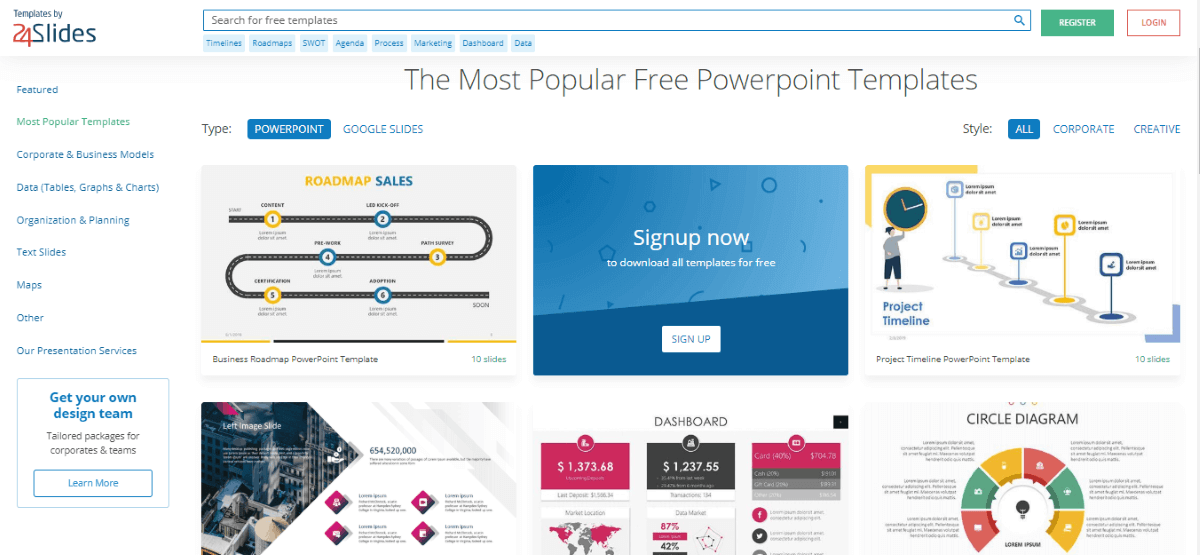
How to download PowerPoint templates for free?
If you didn't know, 24Slides has an extensive repository of PowerPoint templates. But how to obtain them? It's really simple:
- First, create an account on our Free Templates Website with the button “Register” (that way, you can download everything without problems!).
- Think about the graphics you need and the ideal structure for your presentation deck (you can also change the color palette later!).
- Download it in PowerPoint format (if you prefer it in Google Slides format, you'll also find this type in our repository).
- Edit and change everything you need for your PowerPoint presentation!
24Slides Designers specialize in business and corporate PowerPoints, but you'll also find other types of templates on our website: Data templates, Timelines, Roadmaps, Matrixes, Diagrams, and more.
Keep in mind that a well-designed PowerPoint deck helps you communicate stronger messages to your audience . Don't waste this opportunity to make your presentation shine!
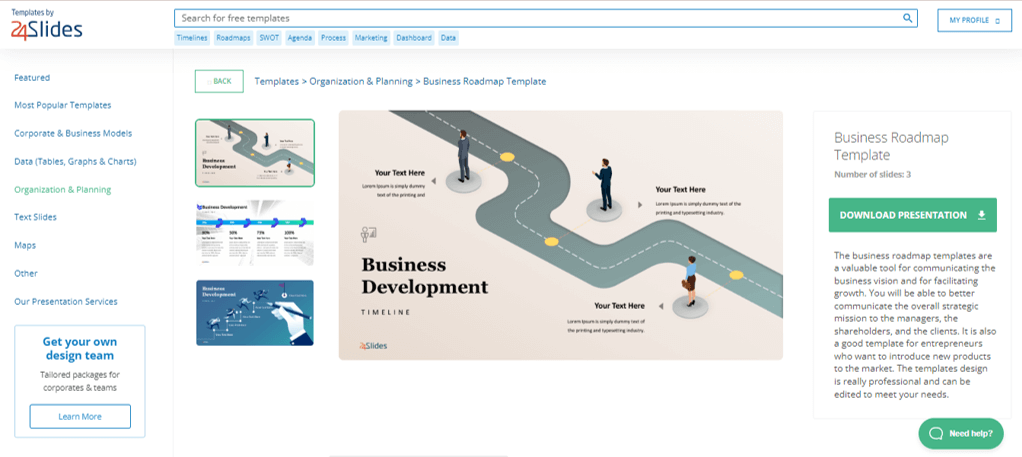
If you want to learn more about how to master PowerPoint, do not miss the last section. We'll show you some PowerPoint basics from the software itself!
A PowerPoint 101 Guide wouldn't be that useful with no examples. So, if you enjoy the step-by-step guides, this section is for you.
Below, we'll show you how to make a simple PowerPoint presentation. But first, here are some tips to be more efficient in the process:
- Be clear about what type of presentation you're going to create (is it corporate, playful, or more creative?).
- Make a draft with the most important information you need to add and, thus, generate a good structure in your presentation .
- Get inspired by examples on the internet , but adapt them to your needs and audience.
- If you will create a business presentation, keep in mind your brand identity .
- Make sure your PowerPoint works , you may need to update to the latest version or pay for the subscription.
Step 1: Make a draft to structure your presentation
As we said before, writing a draft or script of your content will be vital to start on the right foot as a PowerPoint beginner.
This advice is so important that we choose it as the first step to learning how to make a PowerPoint presentation. Remember: Planning is key!
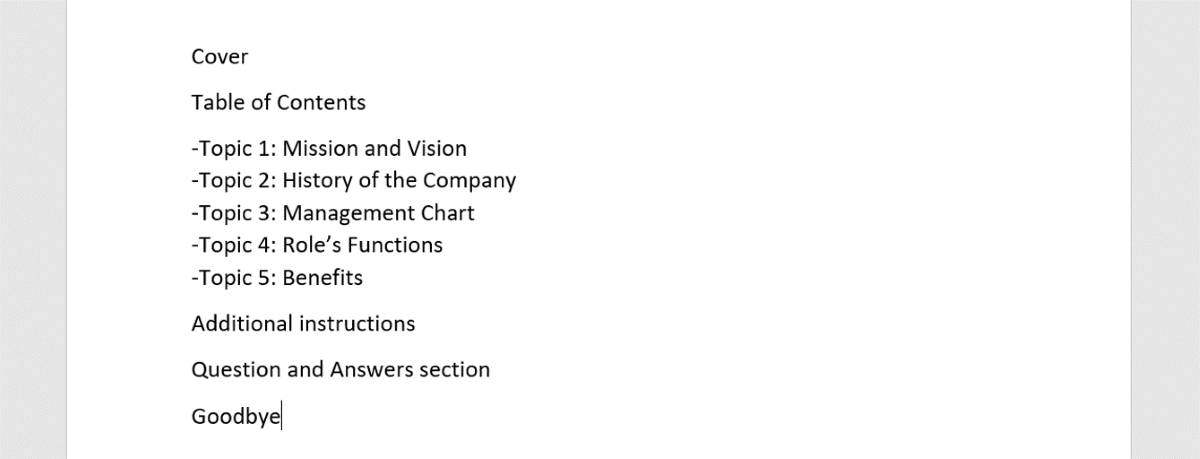
Regarding the process of planning, we share some good practices:
- If your presentation will be very long , write down all subtitles and content in a Word document. This will help you organize your ideas and give a correct sequence to your narrative. In addition to avoiding redundancies in the message you want to communicate.
- If your presentation will use many visual resources , we recommend choosing high-quality images. This will help you have a starting graphic base. Some good free image repositories are Freepick , Unsplash , and Adobe Stock .
- If your presentation is based on data , have all your results summarized or your most relevant conclusions at hand. The idea of making a PowerPoint presentation is to show your information in the simplest way possible for your audience.
Step 2: Create a new document in PowerPoint
Once you check that all the functions are working fine with the software, please open it and go to the File tab. If you've ever used Word or Excel, you'll probably find this Home Menu familiar.
In short, this is the main page of PowerPoint, where you can create a new presentation or open an older one. Let's see:
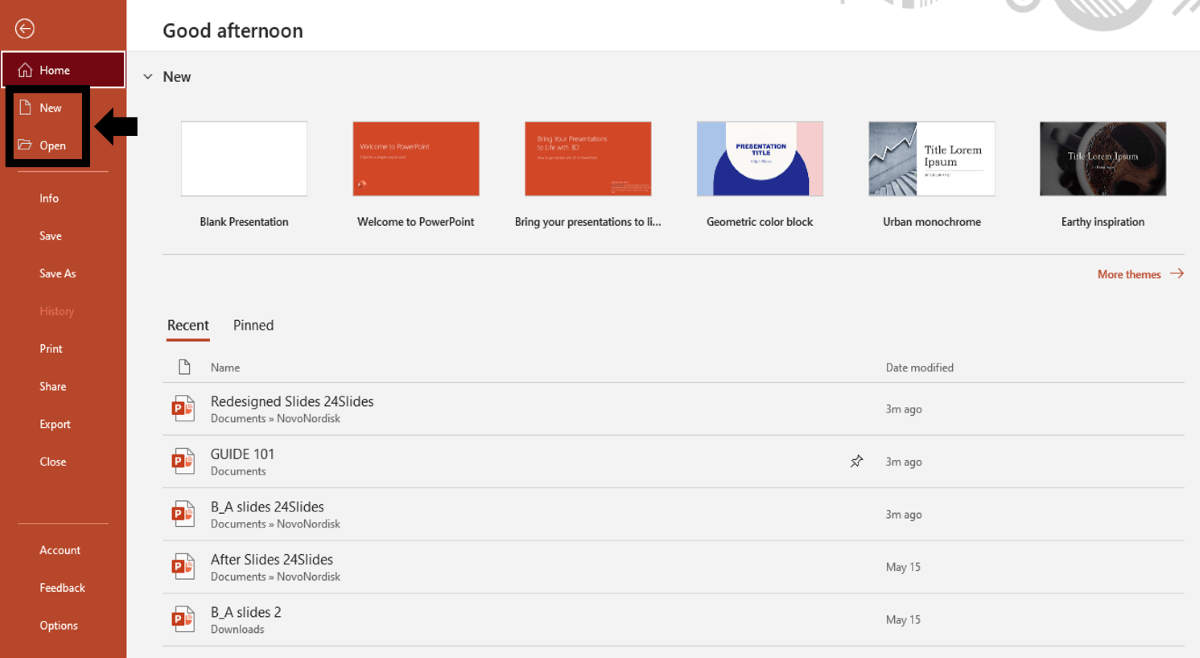
In order to follow this part of our PowerPoint Tutorial correctly, take into consideration the following points:
- On the lower side of the screen, you'll find your recently opened PowerPoint files. This option is great for saving some time.
- If you don't find the presentation you're looking for, click on the “Open” option at the left bar and find older files.
- Don't forget to save your presentation with a relatable name so you won't lose sight of it!
Step 3: Choose the perfect design for your presentation
With your information ready in a draft, it's time to choose the design of your PowerPoint slide deck. You must imagine that the available design options are endless!
For practical reasons, you have three options regarding the design:
- Start a design from scratch (very difficult for a PowerPoint beginner).
- Choose an established PowerPoint design or layout.
- Download a PowerPoint template and modify some details.
Don't worry if you don't know how to continue! In this PowerPoint 101 class, we're going to explain step by step the second option:
How do you set a default design in PowerPoint?
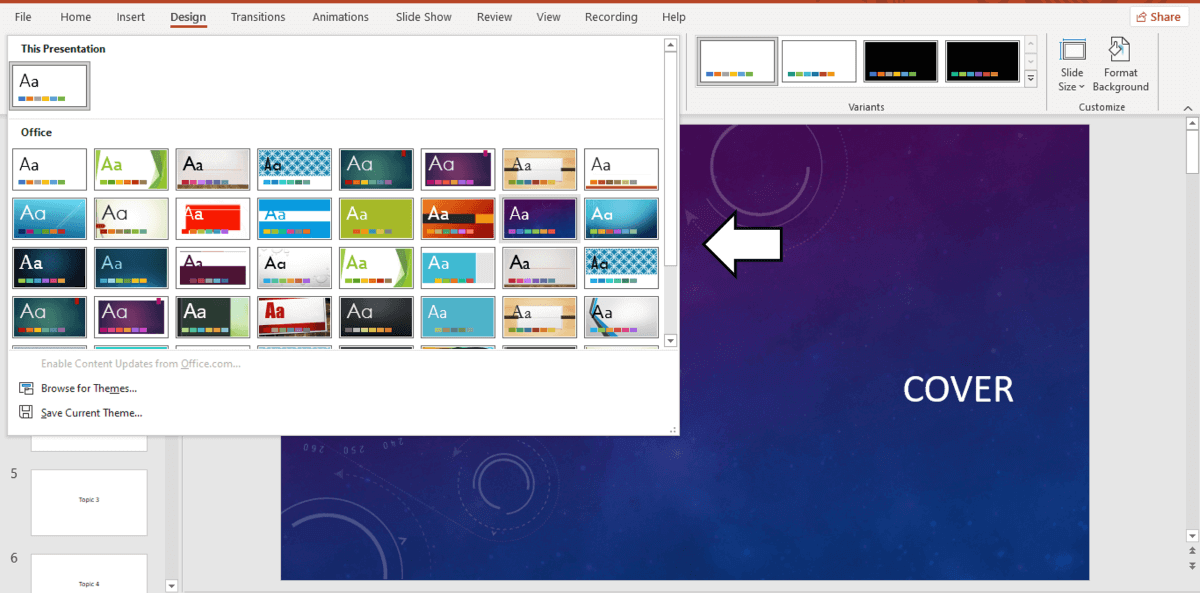
- First, go to the Design tab.
- Open the list of options by clicking on the third arrow.
- Choose the design you like the most for your PowerPoint presentation.
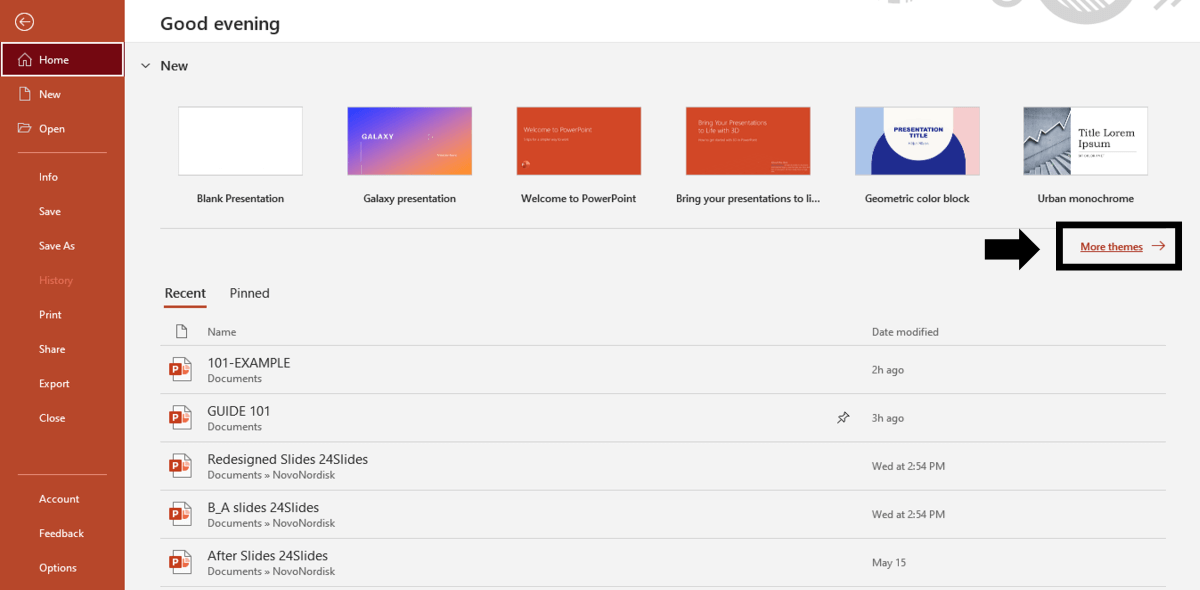
If you want to explore more PowerPoint designs, there is a way to research online. For that, you only need to:
- Go to the File tab (first tab, next to the Home tab).
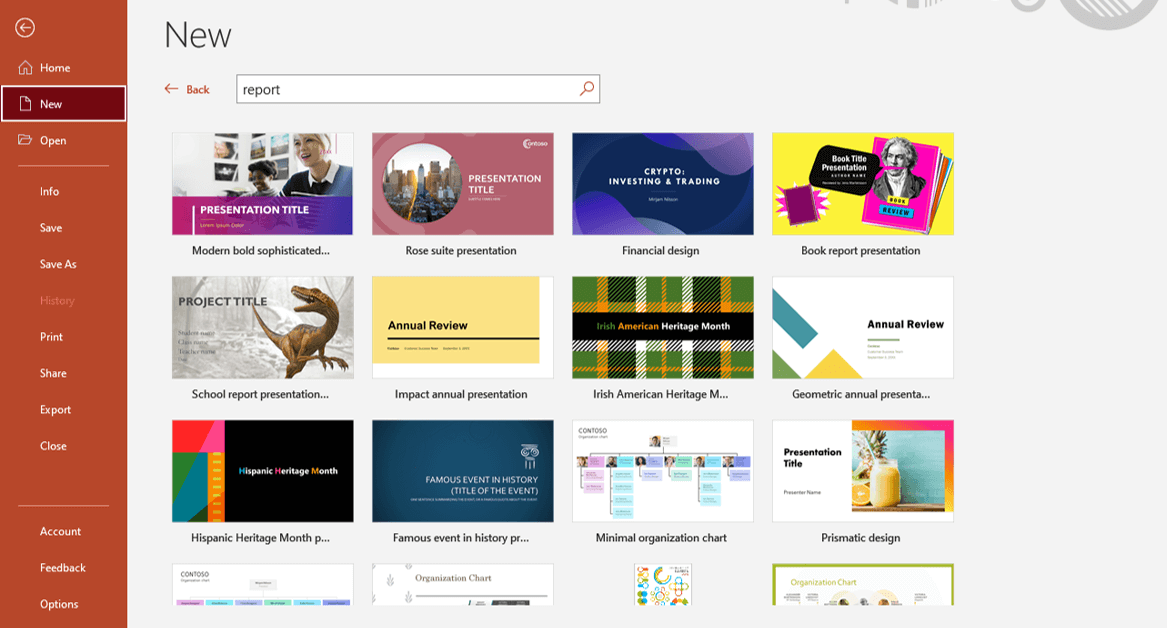
- Select "More themes" (see image).
- Use the search engine and write the keyword you want (it can be related to your business or it can be a color).
- Check the list of PowerPoint themes and choose your favorite.
- Wait a few minutes while it loads and keep designing in PowerPoint!
How do you change the layout of one slide in PowerPoint?
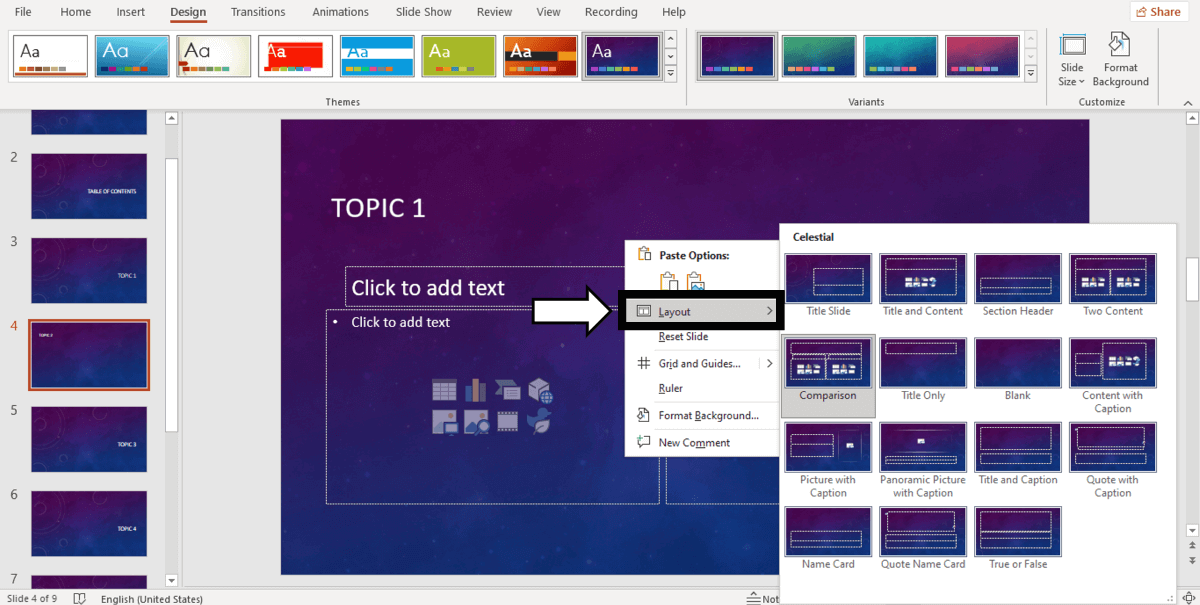
In this PowerPoint 101 Guide, you will also learn how to configure the layout of each slide.
Keep in mind that to have a high-impact presentation, you must adapt your slides' design to the type of content you'll add. And using layouts is perfect for this purpose.
To change the layout type in PowerPoint, follow these steps:
- Right-click on the slide you want to change.
- Select the "Layout" option.
- You will find more than ten layout models.
- Choose the one that best suits your content.
- Repeat these steps for each slide (if you wish or require).
How do you customize your slides in PowerPoint?
The design process in this PowerPoint 101 Guide doesn't stop there.
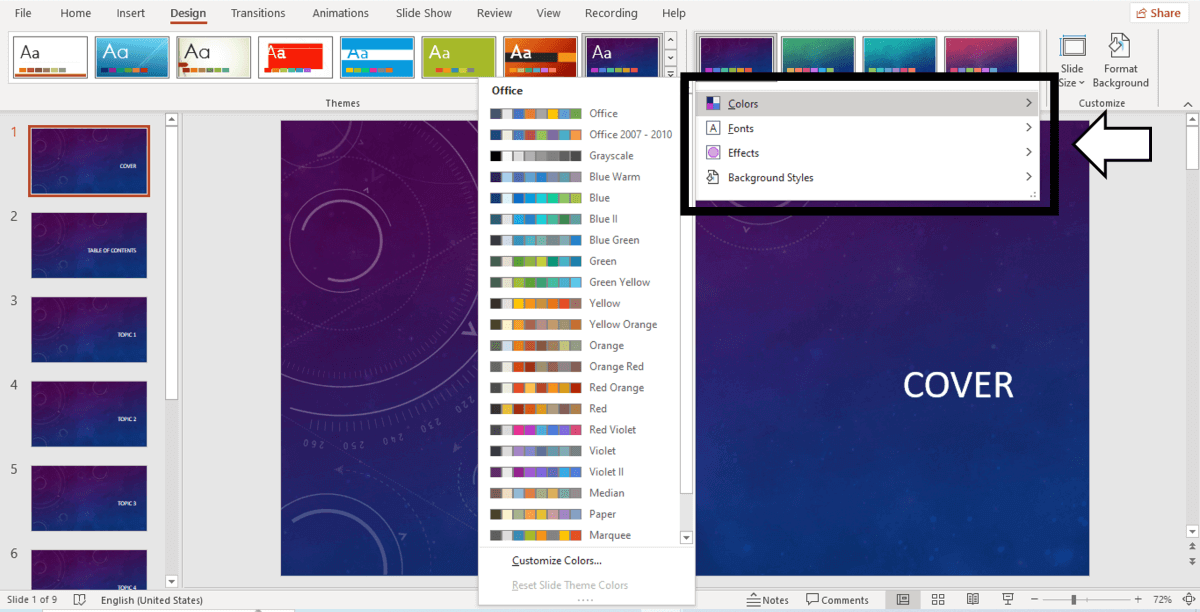
You also can customize your presentation's color palette , font style, background format , and graphics effects .
Just go to:
- Design tab > Variants.
- Select Colors, Fonts, Effects or Background Styles (as you need).
- If you're inspired and want to create your own background in PowerPoint, select Background Styles > Format Background.
- Finally, custom your slides as you want!
Step 4: Add all your information to your presentation
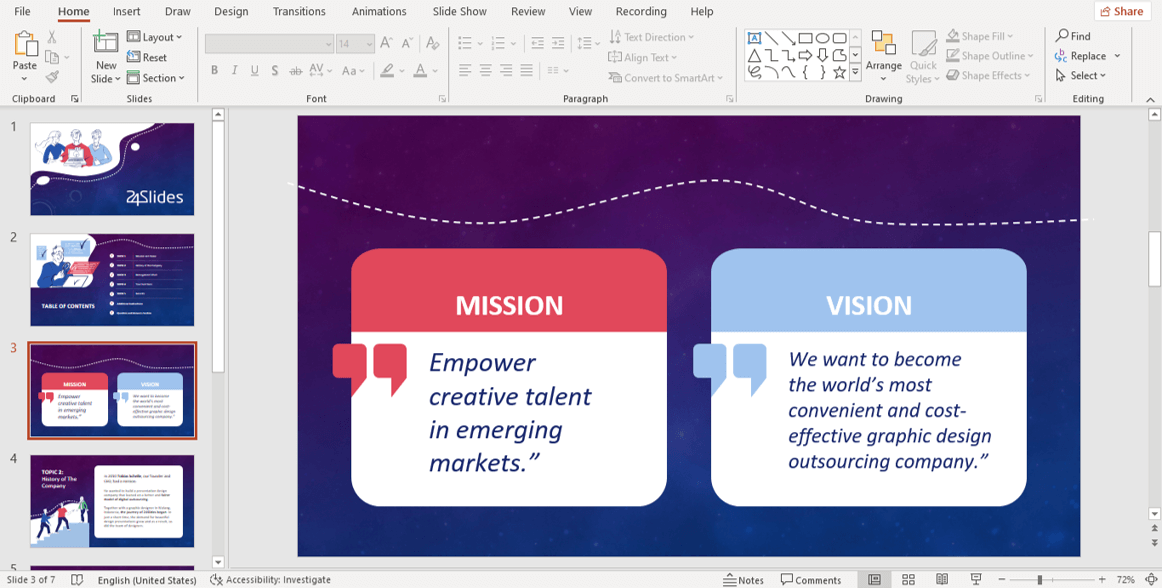
Now, it's time to add all your information to your slides. If your script is long, take your time to copy each part of it.
In this PowerPoint Tutorial, we're going to show how our design is going so far. We design at your side!
Step 5: Add transitions or animations to your presentation
The stamp of PowerPoint is its transitions and animations! Naturally, our PowerPoint 101 has considered these essential commands.
If you want to add them to your presentation and make your speech more fluid, follow these steps:
- Go to the tabs section of PowerPoint.
- Select "Transitions" or "Animations" and try your favorite effects.
- Remember that if you select Transitions, these will modify the entire slide, while Animations can be added to each element individually.
When choosing one Animation, you can eliminate it if you aren't 100% convinced. You only need to:
- Select the Animation number that appears on the corner.
- Press the "Delete" or "Backspace" button on your keyboard.
- Choose another Animation in PowerPoint if you want!
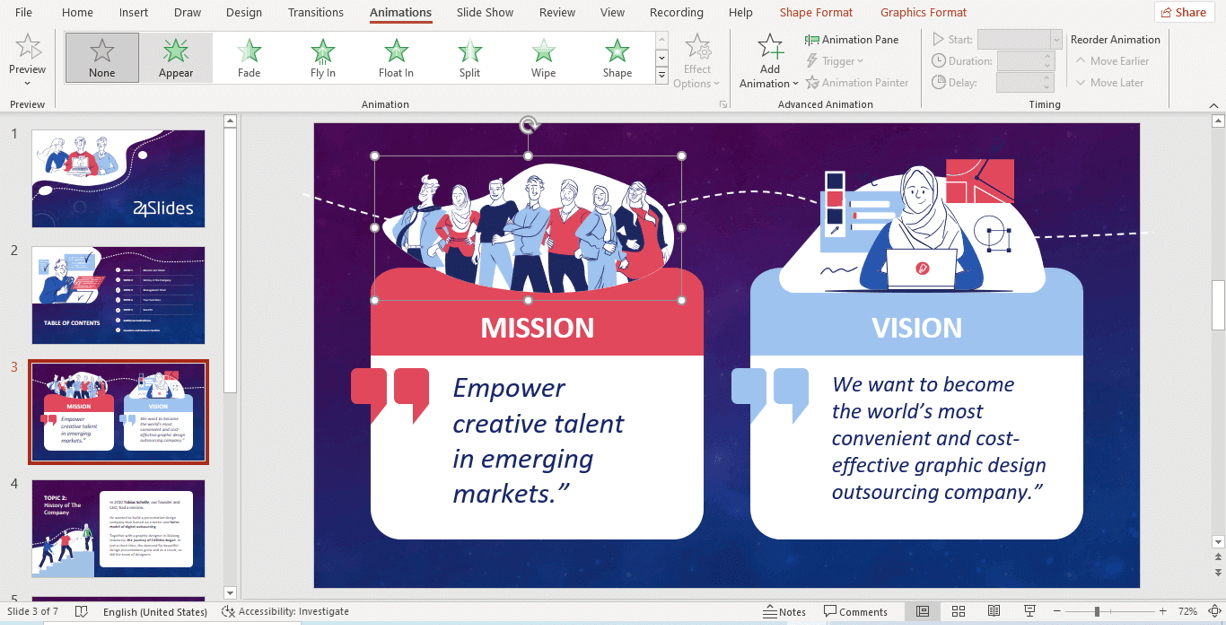
This “PowerPoint for dummies” is full of tips and tricks! So here is one more: Don't overuse transitions or animations in PowerPoint ; they can make your presentation slower and unprofessional . Use this tool in a subtle way!
Step 6: Refine the final details
As always, every final product must be reviewed. Especially if you're learning the PowerPoint fundamentals with us.
We recommend reviewing each slide of your PowerPoint presentation one final time. In this process, you will be able to:
- Add icons if your presentation requires it.
- Change any image or illustration if they don't convince you.
- Change transitions or animations.
- Customize your presentation's color palette .
- Proofread your slides' text or add more information.
- Add speaker notes to your presentation.

Step 7: Slideshow your presentation
When your presentation is finished, it's essential to know how to make a PowerPoint slideshow. This way, you can see your slides from the exact same perspective your audience will see them.
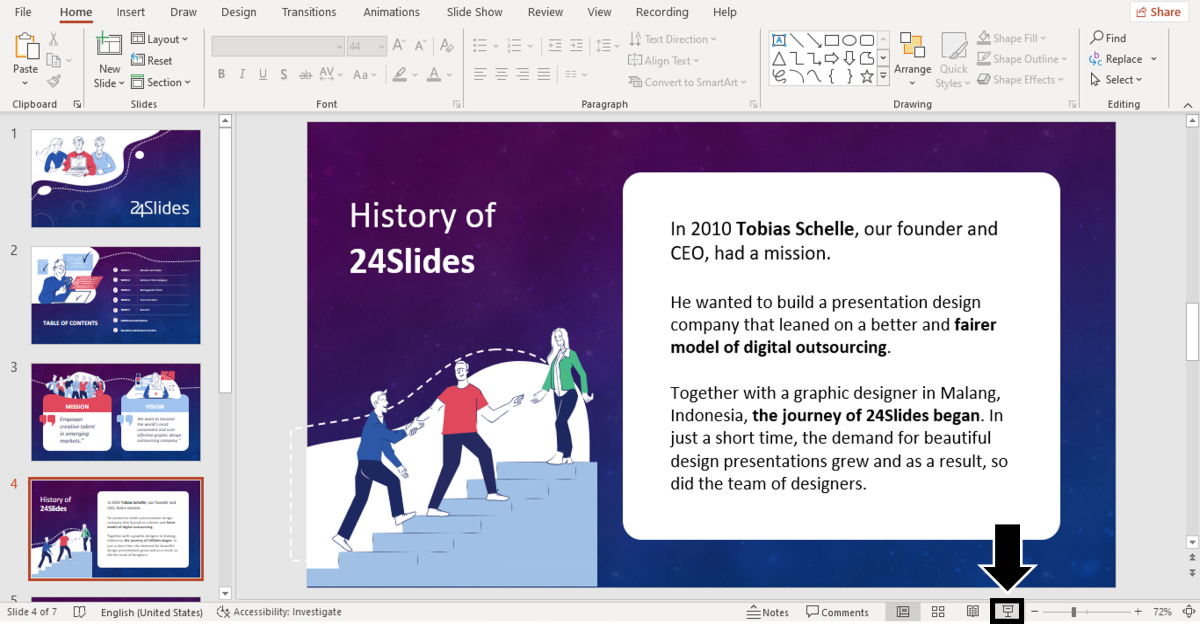
To slideshow your presentation in PowerPoint, follow these simple steps for PowerPoint beginners:
- Position yourself on your first slide.
- Go to the bottom right of the software.
- Select the "Slide Show" button (see image).
- Have a look of your presentation by clicking on each slide or pressing the right arrow on your keyboard.
- To go out from the Slide Show mode, you have to press the ESC key.
Now you can present your slides like an expert!
When you master this presentation design software, you'll be able to create amazing things in PowerPoint : infographics, diagrams, charts, pitch decks, business cards, calendars, you name it!
This was our PowerPoint Guide for beginners. We hope that our compilation today will be useful for conducting more professional presentations in the future and, why not, achieve all your goals!
Don't forget to share this PowerPoint 101 Guide with your co-workers or whoever you want!

Want to boost your beginner PowerPoint skills? Check out this content:
- How to Work with Multiple Images in PowerPoint
- How to Add a Timer to Your Powerpoint Presentations
- PowerPoint Charts, Graphs, & Tables Made Easy | Tips & Tricks
- How To Use PowerPoint Design Ideas - All Questions Answered!
- 36 Fun Icebreakers for Your Next Presentation
- The Cost of PowerPoint Presentations: Discover the hidden expenses you might overlook!
Create professional presentations online
Other people also read

Tutorial: Save your PowerPoint as a Video

How To Convert Google Slides To PowerPoint and Vice Versa

How To Add Animations To PowerPoint

- Get started with computers
- Learn Microsoft Office
- Apply for a job
- Improve my work skills
- Design nice-looking docs
- Getting Started
- Smartphones & Tablets
- Typing Tutorial
- Online Learning
- Basic Internet Skills
- Online Safety
- Social Media
- Zoom Basics
- Google Docs
- Google Sheets
- Career Planning
- Resume Writing
- Cover Letters
- Job Search and Networking
- Business Communication
- Entrepreneurship 101
- Careers without College
- Job Hunt for Today
- 3D Printing
- Freelancing 101
- Personal Finance
- Sharing Economy
- Decision-Making
- Graphic Design
- Photography
- Image Editing
- Learning WordPress
- Language Learning
- Critical Thinking
- For Educators
- Translations
- Staff Picks
- English expand_more expand_less
PowerPoint - Creating and Opening Presentations
Powerpoint -, creating and opening presentations, powerpoint creating and opening presentations.

PowerPoint: Creating and Opening Presentations
Lesson 3: creating and opening presentations.
/en/powerpoint/understanding-onedrive/content/
Introduction
PowerPoint files are called presentations . Whenever you start a new project in PowerPoint, you'll need to create a new presentation , which can either be blank or from a template . You'll also need to know how to open an existing presentation .
Watch the video below to learn more about creating and opening presentations in PowerPoint.
To create a new presentation:
When beginning a new project in PowerPoint, you'll often want to start with a new blank presentation.
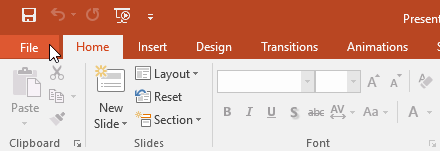
- A new presentation will appear.
To create a new presentation from a template:
A template is a predesigned presentation you can use to create a new slide show quickly. Templates often include custom formatting and designs , so they can save you a lot of time and effort when starting a new project.
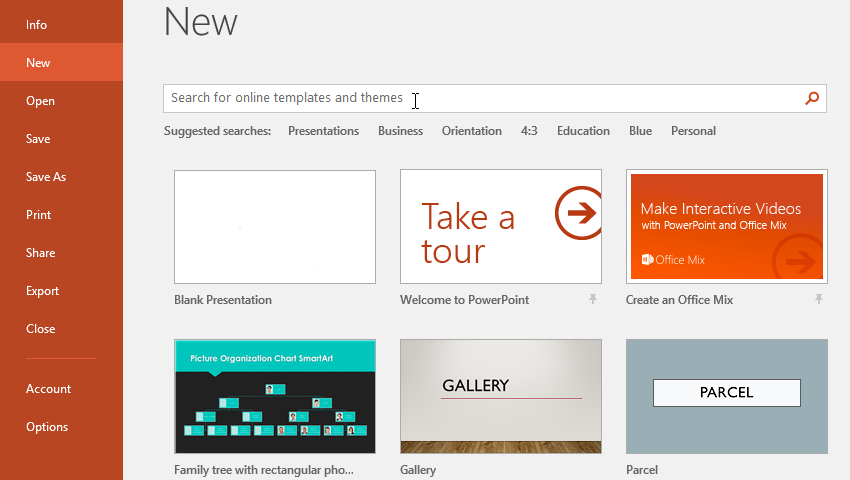
- Click the File tab to access Backstage view , then select New .
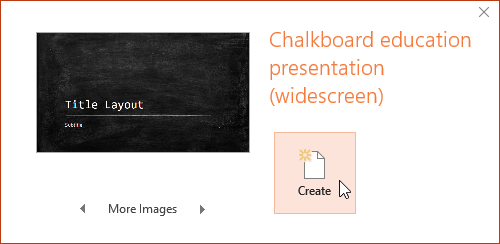
- A preview of the template will appear, along with additional information on how the template can be used.
- A new presentation will appear with the selected template .
It's important to note that not all templates are created by Microsoft. Many are created by third-party providers and even individual users, so some templates may work better than others.
To open an existing presentation:
In addition to creating new presentations, you'll often need to open a presentation that was previously saved. To learn more about saving presentations, review our lesson on Saving Presentations .
Most features in Microsoft Office, including PowerPoint, are geared toward saving and sharing documents online . This is done with OneDrive , which is an online storage space for your documents and files. If you want to use OneDrive, make sure you’re signed in to PowerPoint with your Microsoft account. Review our lesson on Understanding OneDrive to learn more.
To pin a presentation:
If you frequently work with the same presentation , you can pin it to Backstage view for easy access.
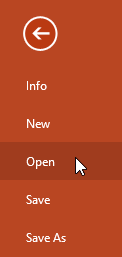
- Select the File tab to go to Backstage view , then click Open . Your Recent Presentations will appear.
Compatibility Mode
Sometimes you may need to work with presentations that were created in earlier versions of PowerPoint, like PowerPoint 2003 or PowerPoint 2000. When you open these types of presentations, they will appear in Compatibility Mode .
Compatibility Mode disables certain features, so you'll only be able to access commands found in the program that was used to create the presentation. For example, if you open a presentation created in PowerPoint 2003, you can only use tabs and commands found in PowerPoint 2003.
In the image below, you can see at the top of the window that the presentation is in Compatibility Mode. This will disable some current PowerPoint features, including newer types of slide transitions.
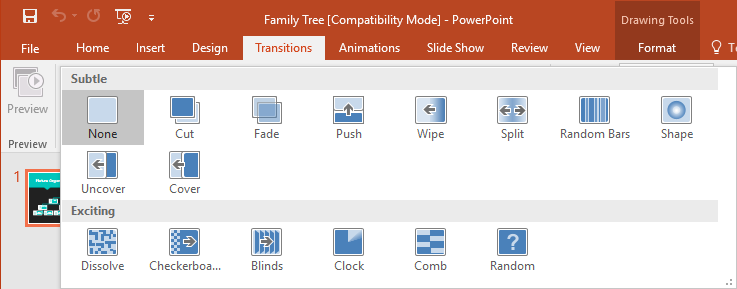
To exit Compatibility Mode, you'll need to convert the presentation to the current version type. However, if you're collaborating with others who only have access to an earlier version of PowerPoint, it's best to leave the presentation in Compatibility Mode so the format will not change.
You can review this support page from Microsoft to learn more about which features are disabled in Compatibility Mode.
To convert a presentation:
If you want access to the newer features, you can convert the presentation to the current file format.
Note that converting a file may cause some changes to the original layout of the presentation.
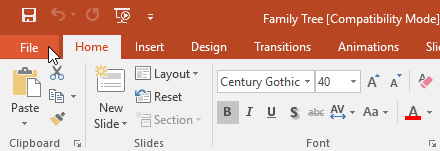
- The presentation will be converted to the newest file type.
- Open our practice presentation .
- Notice that the presentation opens in Compatibility Mode . Convert it to the current file format. If a dialog box appears asking if you would like to close and reopen the file in order to see the new features, choose Yes .
- In Backstage view, pin a file or folder.
/en/powerpoint/saving-presentations/content/
- Enter Our Giveaway
- Meta Quest 4
- Google Pixel 9
- Google Pixel 8a
- Apple Vision Pro 2
- Nintendo Switch 2
- Samsung Galaxy Ring
- Yellowstone Season 6
- Recall an Email in Outlook
- Stranger Things Season 5
How to create a Powerpoint Presentation
Powerpoint presentations are a great way to share information with a team, but making them is a skillset in its own right. We've got guides on general Powerpoint use , but if you're keen to just get started making a slideshow right now, this is the way.
How to create a Powerpoint presentation
How to build your first slide, how to add more slides to a powerpoint presentation, how to make an awesome slideshow presentation.
Here's how to make a Powerpoint presentation.
What You Need
Powerpoint or Microsoft 365 subscription
The first step in building your fancy slideshow is to create the presentation itself. Here's how to do it.
Step 1: Install Powerpoint (as part of Microsoft 365 ) if you haven't already, then open the app up.
Step 2: The home screen will give you a range of options for selecting templates and premade presentations to give you a great starting-off point. Select one of them if they're applicable. For even more options, select the New tab from the left-hand menu.
Alternatively, if you want to start from a blank canvas, select Blank presentation.
Step 3: From there, it's a good idea to name and save the presentation so you can come back to it later. Select File > Save or* Save As*, then name the file on the right, choose a location for it, and select Save .
Step 1: Your first slide will automatically have text fields for a title and subtitle. If you want to have that on your first slide, select them, then type in what you want them to read. You can also click and drag them around, or resize them using your mouse.
Hover your mouse over the white circles, then click and drag them to resize the box. Alternatively, select the rotational arrows near the corners of the box, to rotate it.
If you don't want those text fields, select their boundary individually and press the Delete key to remove them.
Step 2: If you want to add more text to this slide (or any others in the future), select the Insert tab, then select Text box. Click on the slide where you want the box to appear, then use your mouse to drag the box to the desired shape.
Then click the box and type in what you want that text box to say. The contextual home menu will automatically adjust to give you quick access to font choices and other text style options.
You can access more detailed text formatting options by selecting the Format tab. There you'll find options for changing text coloring, its outline, and any text effects you want to use.
Step 3: To add pictures to your slideshow, select the Insert tab, then select Pictures in the top-left. You'll then have the option to insert an image from your local PC, a selection of stock images, or a range of online images.
Step 4: You can also freehand draw or annotate your slides, using the Draw tab, or alter the entire theme of the slideshow by selecting Design.
To add a new slide to your presentation, select the Insert tab at the top of the screen, then select New slide on the left. Then choose the type of slide you want. You can have a blank slide to do it all yourself, or you can get a headstart on its design by copying a previous slide, using the same theme as another part of your presentation, or having a predefined layout.
Want even more tips on making a great slideshow? We've got you covered. Check out our guide on how to use Microsoft Powerpoint , for all the most important tips.
We've also got a guide for more tips and tricks for making engaging and attractive slides .
Editors’ Recommendations
- The best PowerPoint templates
- How to change the background in Powerpoint
- 5 ways to add music to PowerPoint
- How to print a PowerPoint presentation with notes
- How to convert PDF to PowerPoint
- How-To Guides

While PowerPoint is widely used to develop presentations, using Google Slides has become a popular alternative. Part of what makes it so popular is that it's free to use, as is other Google software such as Google Docs and Google Sheets – which is a stark contrast to the premium price you'll pay for Microsoft Office and PowerPoint.
Even if you know how to use Microsoft PowerPoint, you might want to jump ship to Slides, and Google makes it easy to do so. In fact, it takes little more than a few clicks to convert a PowerPoint to Google Slides. Whether you need to change the format for a coworker or want to permanently switch to the free platform, here's a look at how to convert your PowerPoint into a Google Slides presentation.
We all know that Microsoft’s PowerPoint software has been a presentations staple for a few decades now. And whether you only used it in school once or twice, or you use it for work on a daily basis, there’s always something new to learn about the classic Microsoft platform.
Even if you know how to use PowerPoint, did you know that you can embed videos in your presentations?
Creating a successful slideshow is no small task. So, if you’re new to Microsoft PowerPoint, you’ll need to familiarize yourself with the features and tools you need to build a presentation.
We’ll guide you through the process of creating a PowerPoint slideshow by adding slides and elements as well as how to present the show when you finish. These basics are just what you need as a beginner and should get you off to a terrific start with PowerPoint.
Article Categories
Book categories, collections.
- Technology Articles
- Software Articles
- Microsoft Products Articles
- PowerPoint Articles
How to Create New Presentations in PowerPoint 2019
Powerpoint 2019 for dummies.

Sign up for the Dummies Beta Program to try Dummies' newest way to learn.
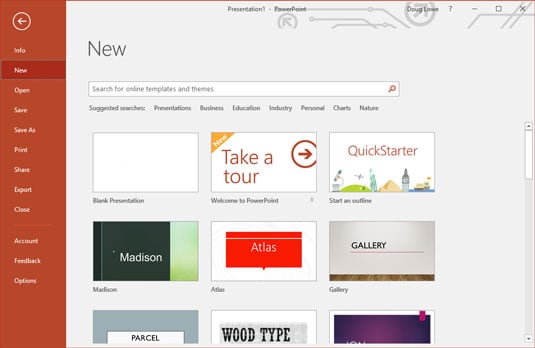
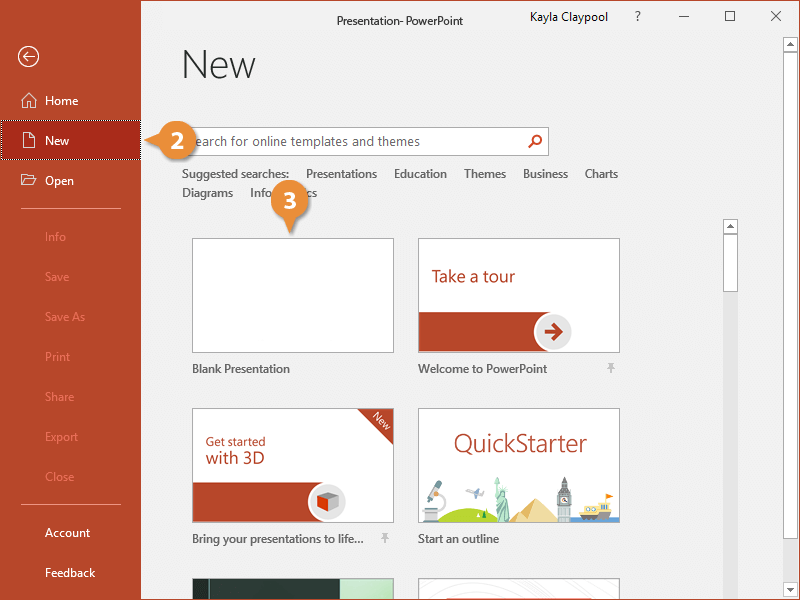
After PowerPoint is started, you can also create a new presentation by clicking the File tab to switch to Backstage View and then clicking the New command. This action brings up the screen shown here, which offers several ways to create a new presentation:
- Choose Blank Presentation: Double-click Blank Presentation to start a new presentation from scratch.
- Choose a template: You can select one of the displayed templates to create a new presentation based on the template’s design. Several templates are displayed on the New screen.
- Search for a template: You can type a search phrase into the Search text box and then click the magnifying glass icon. Doing this opens a list of templates that match your search criteria. Double-click one of these templates to create a presentation based on it.
How to edit text in a PowerPoint presentation
Most slides contain two text objects: one for the slide’s title and the other for its body text. However, you can add more text objects if you want, and you can remove the body text or title text object. You can even remove both to create a slide that contains no text.
Whenever you move the cursor over a text object, the cursor changes from an arrow to the I-beam, which you can use to support bridges or build aircraft carriers. Seriously, when the cursor changes to an I-beam, you can click the mouse button and start typing text.
When a text object contains no text, a placeholder message appears in the object. For example, a title text object displays the message Click to add title. Other placeholders display similar messages. The placeholder message magically vanishes when you click the object and begin typing text.
If you start typing without clicking anywhere, the text that you type is entered into the title text object — assuming that the title text object doesn’t already have text of its own. If the title object is not empty, any text that you type (with no text object selected) is simply ignored.
How to add a new slide to a PowerPoint presentation
- On the Home tab, click the New Slide button in the Slides group, as shown.
- Press Ctrl+M.
- Right-click in the Slides pane on the left and then choose New Slide.
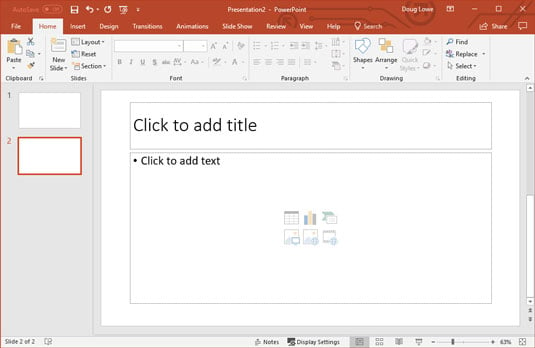
In all three cases, PowerPoint adds a blank slide with a standard layout that includes a title and content area, as shown. If you want to choose a different layout, click the Layout button in the Home tab to display the gallery of slide layouts. This pane enables you to pick from several types of slide layouts. Just click the one that you want to use, and PowerPoint sets the new slide to the layout of your choosing.
Each slide layout has a name. For example, the Title and Content layout includes a text object in addition to the title area . This is probably the layout you’ll use most. It’s the best format for presenting a topic along with several supporting points. For example, this figure shows a typical bulleted list slide.
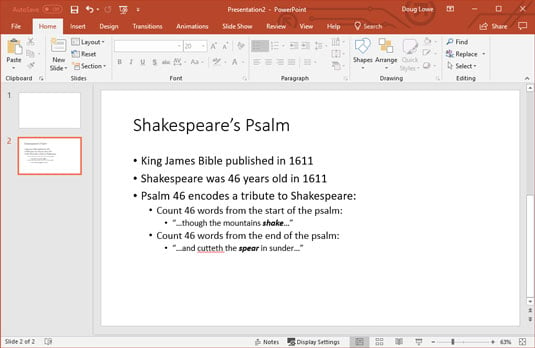
The bit about Psalm 46 secretly containing the name Shakespeare is true, and indeed worthy of a Dan Brown novel. It only works with the 1611 edition of the King James Bible, though. If you have a copy lying around, check it out!
Moving from slide to slide
- Click one of the double-headed arrows at the bottom of the vertical scroll bar. Doing so moves you through the presentation one slide at a time.
- Press the Page Up and Page Down keys. Using these keys also moves one slide at a time.
- Use the scroll bar. When you drag the box in the scroll bar, a tooltip appears to display the number and title of the current slide. Dragging the scroll bar is the quickest way to move directly to any slide in your presentation.
- In the list of slides on the left side of the window, click the thumbnail for the slide that you want to display. If the thumbnails are not visible, click the Slides tab above the outline.
Choosing a design
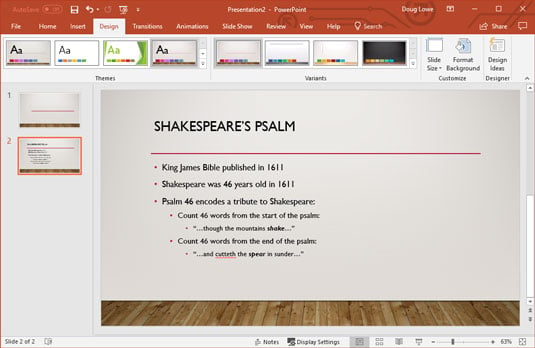
Because of space constraints, PowerPoint doesn’t display all the available themes on the Ribbon at the same time. But just to the right of the themes is a scroll bar that you can use to scroll through the themes. And the button at the bottom of the scroll bar brings up a gallery that displays all the themes that come with Office 2019.
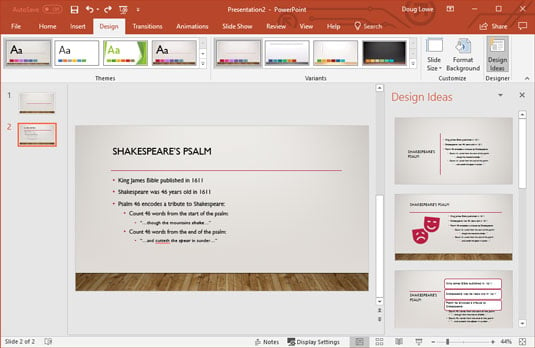
A new design feature for PowerPoint 2019 is the Design Ideas task pane, which you can activate by clicking Design Ideas in the Design ribbon tab. It lets you apply fancy design features to your otherwise plain slides. The following figure shows a slide after the Design Ideas features has had its way. The Design Ideas tab is smart enough to suggest designs that relate to what it deduces to be the slide’s topic. For example, PowerPoint noticed the word Shakespeare in the slide, so it offered to include the classic dramatic comedy and tragedy masks.
About This Article
This article is from the book:.
- PowerPoint 2019 For Dummies ,
About the book author:
Doug Lowe is a master at demystifying technology. The 50+ technology books he's written include more than 30 For Dummies books, including Networking All-in-One For Dummies. Doug has been managing networks at publishing companies and nonprofit organizations for more than 20 years and is presently IT director for a civil engineering firm.
This article can be found in the category:
- PowerPoint ,
- How to Remove Picture Backgrounds in PowerPoint 2019
- Audio Options in Microsoft PowerPoint 2019
- How to Share Presentations via the PowerPoint Web App
- How to Share a PowerPoint 2019 Presentation in the Cloud
- PowerPoint 2019 Slide Libraries and Ways to Reuse Slides
- View All Articles From Book
- PowerPoint Training
How to Make a PowerPoint

PowerPoint Training Features:
Interactive bite-sized lessons
Get Certified
Accurate skill assessments
Customizable, LMS-ready content
4.9 out of 5 on G2
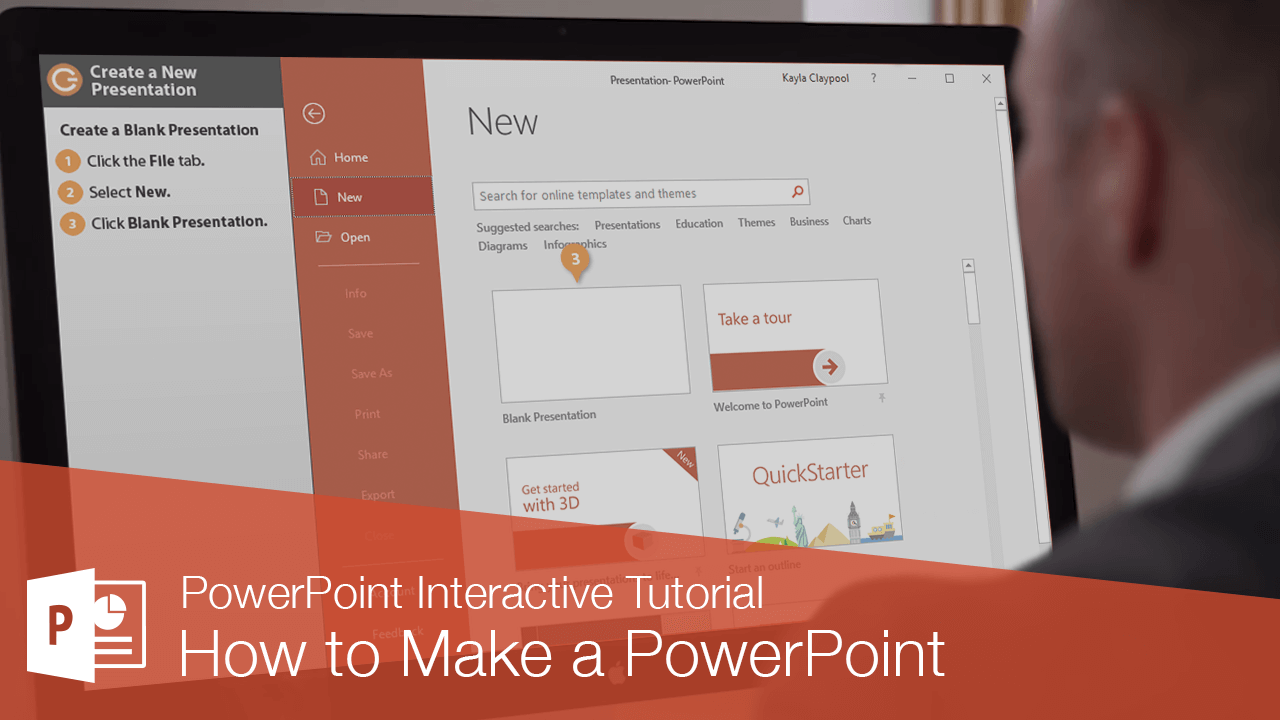
Creating a new presentation is one of the most basic commands you’ll need in PowerPoint. You can create a new, blank presentation, or create a new presentation based on a variety of pre-designed templates.
Create a Blank Presentation

- Select New .
Press Ctrl + N to create a new, blank presentation.
Create a Presentation from a Template
Using a template allows you to begin with a presentation that has already been designed and formatted so you can just insert the information. This saves you time and you will end up with a professionally designed presentation.

- Select a secondary template category to further narrow the search.
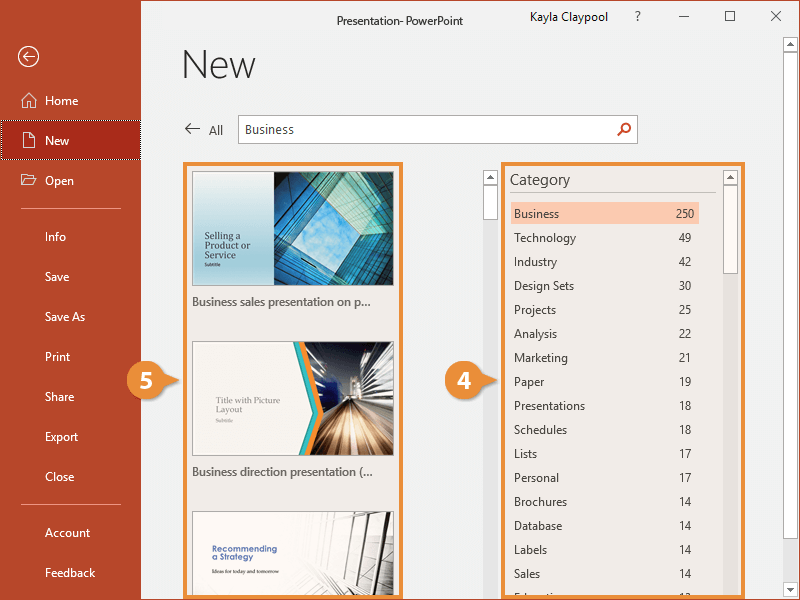
- Click Create .
The presentation template is downloaded, and a new presentation using it opens in PowerPoint. You can fill in the placeholders, and delete the elements of a template that you don’t need.
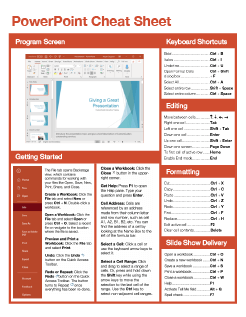
FREE Quick Reference
Free to distribute with our compliments; we hope you will consider our paid training.
- LinkedIn-ready certificate
- Skill assessments
- Bite-sized, interactive lessons
- Saved progress
How-To Geek
How to create a custom template in powerpoint.

Your changes have been saved
Email is sent
Email has already been sent
Please verify your email address.
You’ve reached your account maximum for followed topics.
Microsoft Office vs. Google Docs, Sheets, Slides: Which Is Best?
What is kali linux, and should you use it, sharing your excel spreadsheet with others do these 8 things first, quick links, create a custom powerpoint template, save your custom template.
PowerPoint provides extremely useful resources called templates that automatically construct the foundation and framework of your presentation. If you can’t quite find one that’s just right for you, you can create your own. Here’s how to do it.
To create a custom PowerPoint template, you’ll first need to open a blank presentation. You can do so by clicking the “File” tab and then selecting “New” in the left pane.
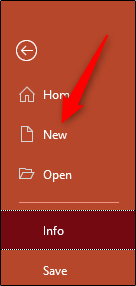
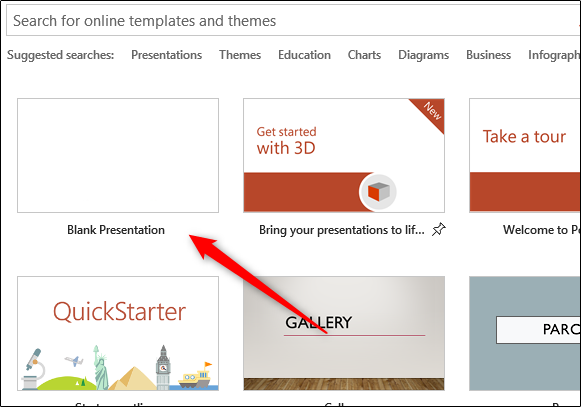
A large library of templates will appear, but since that’s not what we’re looking for, go ahead and select the “Blank Presentation” option.
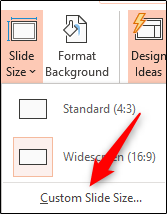
Next, you need to choose the slide orientation and size . In the “Customize” group of the “Design” tab, select the “Slide Size” button. A small drop-down menu will appear. Here, click the “Customize Slide Size” option.
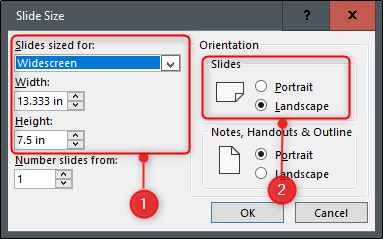
The “Slide Size” dialog box will appear. Here, you can (1) adjust the slide height and width or simply select a predefined option from the drop-down menu, and (2) select the slide orientation.
The rest of the template creation will be done in PowerPoint’s Slide Master . The Slide Master allows you to customize a presentation's fonts, headings, and colors in one place, applying the selections to all of your slides. This allows you to maintain consistency throughout the template, as well as eliminating the need to make changes to each individual slide.
Related: How to Change the Default Font in PowerPoint
To access the slide master, click on the "View" tab and then select “Slide Master” in the “Master Views” group.

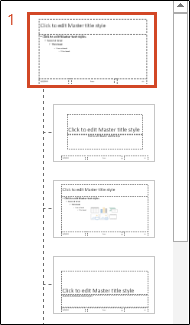
The Slide Master will appear in the left pane. The Slide Master is the top thumbnail that appears in the pane. Each sub-thumbnail represents each slide layout available in your theme. Edits you make to the Slide Master will affect each slide layout.
This is where the magic happens. First, you can select a unique theme for what will be your PowerPoint template. To do so, select “Themes” in the “Edit Theme” group of the “Slide Master” tab.
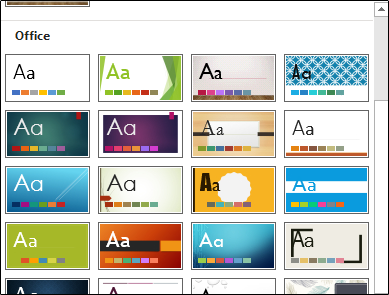
A drop-down menu will appear, presenting a large library of themes to choose from. Each theme comes with its own fonts and effects. Browse through the collection and select the one you like.
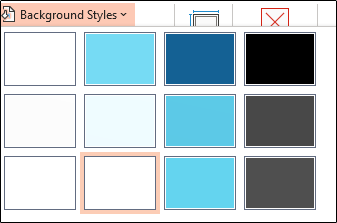
You can also choose a background style for the theme you chose. Select “Background Styles” in the “Background” group and then select the style you like from the drop-down menu.
If you want to customize the placeholders in the slides, you can do so by selecting one of the options from the “Insert Placeholder” menu. You can find this option in the “Master Layout” group.

Once you’ve selected the slide where you want to insert a placeholder from the pane on left and the type of placeholder you want to insert from the menu, click and drag your cursor to draw the placeholder box.
Repeat this process until you’re happy with the placeholders in your template. Once you’re finished with this, all that’s left to do is save your custom template.
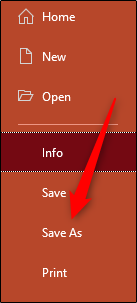
To save the PowerPoint presentation (.pptx) as a template (.potx), click the “File” tab and then the "Save As" button.
In the “Other Locations” group, select the “Browse" option.

The “Save As” dialog box will then appear. Select the box next to “Save as Type” and then choose “PowerPoint Template” from the list of options.
When you select the PowerPoint Template file type, PowerPoint redirects you to the “Custom Office Templates” folder. This is where you’ll want to save your template. Click the “Save” button.

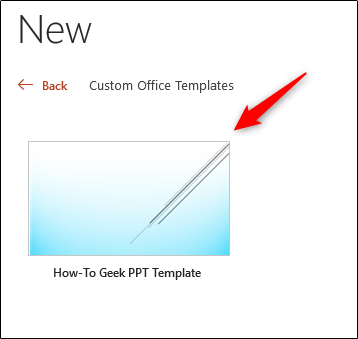
Your template will now be saved and is ready to be used. To find your template next time you open PowerPoint, click the “File” tab and select the “New” button. Next, select the “Custom” tab and then select the “Custom Office Templates" option.
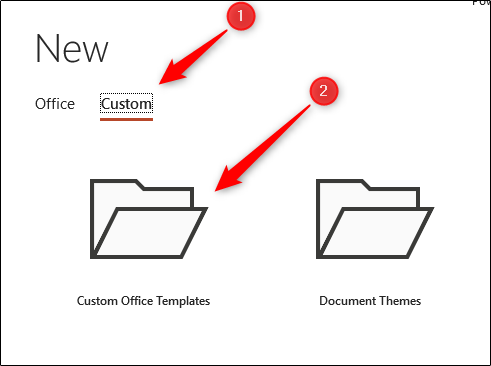
You’ll now see your custom template. Select it to start using your custom PowerPoint template.
- Microsoft Office
- Microsoft PowerPoint
- office 2019
Stack Exchange Network
Stack Exchange network consists of 183 Q&A communities including Stack Overflow , the largest, most trusted online community for developers to learn, share their knowledge, and build their careers.
Q&A for work
Connect and share knowledge within a single location that is structured and easy to search.
How can I make new slides in powerpoint blank by default?
enter image description here
I want to disable this stupid text that I have to manually remove from new slides globally for all current and future presentations.
- microsoft-powerpoint
- microsoft-office-2016
- 2 You shouldn't have to delete it: double-click and start typing; the place-holder text disappears. – DrMoishe Pippik Commented Nov 20, 2022 at 21:01
- You might also wish to Create your own default presentation . – harrymc Commented Nov 20, 2022 at 21:10
- I tried making a template but that only makes the first slide blank with no place holders, when I make a new slide within the presentation, the place holders appear. I use powerpoint to manage projects, not to make slideshows. So although they aren't visible during slideshows, the fact that they are during the main editor screen causes me an inconveinence in deleting them. – user1740026 Commented Nov 21, 2022 at 0:03
Do you need the text box?
If not, I suggest you go to View > Slide Master, delete the text box of Office Theme Slide Master and the Title Slide layout.

Then close Master View.
Delete the first slide and insert new blank slide.

You must log in to answer this question.
- The Overflow Blog
- The hidden cost of speed
- The creator of Jenkins discusses CI/CD and balancing business with open source
- Featured on Meta
- Announcing a change to the data-dump process
- Bringing clarity to status tag usage on meta sites
Hot Network Questions
- Representing permutation groups as equivalence relations
- When has the SR-71 been used for civilian purposes?
- Can I use Cat 6A to create a USB B 3.0 Superspeed?
- In which town of Europe (Germany ?) were this 2 photos taken during WWII?
- Does Psalm 127:2 promote laidback attitude towards hard work?
- How can I play MechWarrior 2?
- Fusion September 2024: Where are we with respect to "engineering break even"?
- Intersection of Frobenius subalgebra objects
- do-release-upgrade from 22.04 LTS to 24.04 LTS still no update available
- Is "She played good" a grammatically correct sentence?
- SOT 23-6 SMD marking code GC1MGR
- Could a lawyer agree not to take any further cases against a company?
- Why is this bolt's thread the way it is?
- What was the typical amount of disk storage for a mainframe installation in the 1980s?
- Nausea during high altitude cycling climbs
- What was the first "Star Trek" style teleporter in SF?
- \ExplSyntaxOn problem with new paragraph
- Direction of centripetal acceleration
- Is there a non-semistable simple sheaf?
- What prevents random software installation popups from mis-interpreting our consents
- Breaker trips when plugging into wall outlet(receptacle) directly, but not when using extension
- how do I fix apt-file? - not working and added extra repos
- How do you tip cash when you don't have proper denomination or no cash at all?
- An instructor is being added to co-teach a course for questionable reasons, against the course author's wishes—what can be done?
Presentation templates
Captivate your audience with customizable business presentation templates. whether you're pitching clients, wooing investors, or showing off your latest wins, there are presentation templates that'll suit your next meeting..
Free slide templates for presentations
Presentation decks can make or break your speech—don't risk boring or unprofessional slides distracting from your message. Set yourself up for success with free, eye-catching presentation templates that don't require graphic design skills to use. Whether you're pitching to investors or sharing a class project, using presentation templates allows you to focus on the content of your work without worrying about the design. Explore presentation templates for pitch decks, annual reviews, and conference slides, and get ready to wow your audience. Choose a presentation template and customize it with your business's branding and logo. If you work in a creative field, don't shy away from bold designs and vivid colors . Presentation templates offer versatile options for personalizing—get creative by customizing your template or opt for adding your own text to existing designs. When you use a template at your next meeting, you'll turn a simple presentation into an opportunity to impress. To make presenting even easier, you can download your template in a variety of formats, like PowerPoint and PDF, or share it digitally with your colleagues.
Your current User-Agent string appears to be from an automated process, if this is incorrect, please click this link:

Create and save a PowerPoint template
When you create a presentation and then save it as a PowerPoint template (.potx) file, you can share it with your colleagues and reuse it again. To create a template, you'll need to modify a slide master and a set of slide layouts.
Choose from thousands of free templates to download at Microsoft templates
Select a topic to see detailed instructions:
Create a PowerPoint template
Open a blank presentation: File > New > Blank Presentation
On the Design tab, select Slide Size > Custom Slide Size and choose the page orientation and dimensions you want.
On the View tab, in the Master Views group, choose Slide Master .
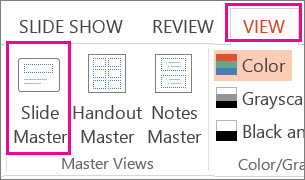
The slide master is the largest slide image at the top of the slide thumbnail list, to the left of your slides. Associated slide layouts are positioned beneath the slide master.

To make changes to the slide master or slide layouts, on the Slide Master tab, do any of the following:
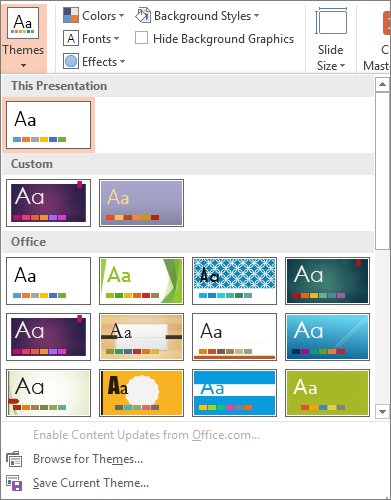
To add a colorful theme with special fonts and effects, select Themes , and choose a theme from the gallery. Use the scrollbar on the right to see more themes.
To change the background, select Background Styles , and choose a background.
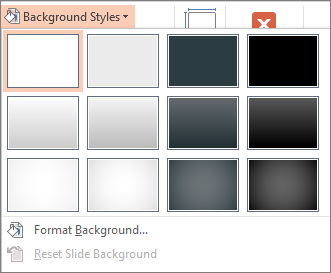
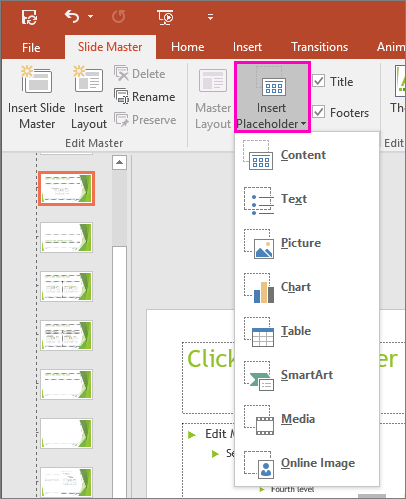
To add a placeholder (to hold text, a picture, chart, video, sound, and other objects), in the thumbnail pane, select the slide layout that you want to hold the placeholder, and do the following:
Select Insert Placeholder and choose the type of placeholder you want to add.
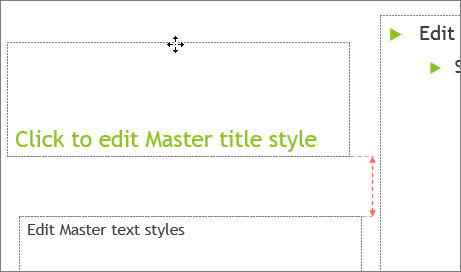
On the slide master or slide layout, select and drag to draw the placeholder size.
Tip: To resize a placeholder, drag the corner of one of its borders.
To move a placeholder around on a slide master or slide layout, select the edge and then drag it into a new position.
To remove an unwanted placeholder in a slide master or slide layout, select it in the slide thumbnail pane, and then select the border of the placeholder on the slide and press Delete.
To set the page orientation for all of the slides in your presentation, select Slide Size > Custom Slide Size .
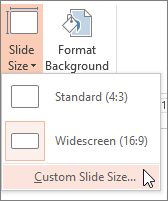
Under Orientation , choose Portrait or Landscape .
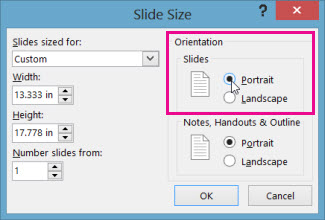
Save your presentation as a PowerPoint template (.potx)
On the File tab, select Save As (or Save a Copy , if you are using Microsoft 365).
In the Save as type list, choose PowerPoint Template .
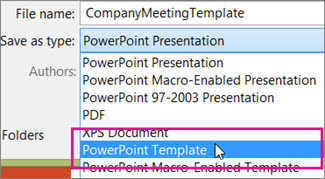
When you choose the "template" type, PowerPoint automatically switches the storage location to the appropriate folder, the Custom Office Templates folder.
In the Save As dialog box, in the File name box, type a file name for your template, or do nothing to accept the suggested file name.
Select Save .
To use your template for a new presentation, select File > New . Then select Custom > Custom Office Templates , and then double-click the template you saved.
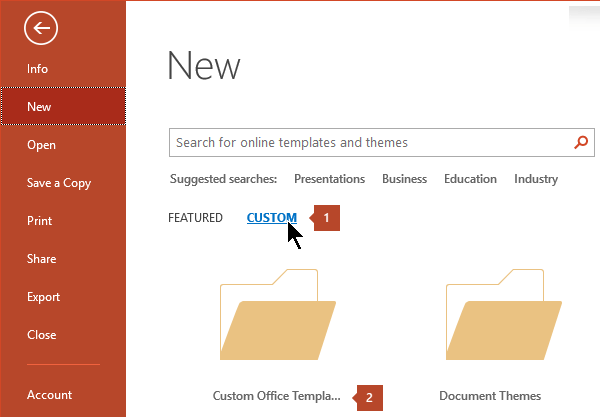
Apply a template to a new presentation
See Apply a template to your presentation .
Create your own theme in PowerPoint
Save a slide design (theme) as a template
Edit, change, or delete a placeholder
What is a slide master?
What is a slide layout?
Create and use your own template in Microsoft 365 for Mac
How to make a branded PowerPoint presentation
You can't create a template in PowerPoint for the web. You have to use a desktop version of PowerPoint instead.

Need more help?
Want more options.
Explore subscription benefits, browse training courses, learn how to secure your device, and more.

Microsoft 365 subscription benefits

Microsoft 365 training

Microsoft security

Accessibility center
Communities help you ask and answer questions, give feedback, and hear from experts with rich knowledge.

Ask the Microsoft Community

Microsoft Tech Community

Windows Insiders
Microsoft 365 Insiders
Was this information helpful?
Thank you for your feedback.

IMAGES
VIDEO
COMMENTS
Create a presentation. Open PowerPoint. In the left pane, select New. Select an option: To create a presentation from scratch, select Blank Presentation. To use a prepared design, select one of the templates. To see tips for using PowerPoint, select Take a Tour, and then select Create, . Add a slide.
Create a blank presentation. Open PowerPoint. Select one of the Blank Presentation and start typing. Note: Microsoft 365 subscribers will find Design Ideas based on the words you type. You can browse and select a new look.
Welcome to the first episode of our Mastering Microsoft PowerPoint series! In this episode, we'll start with the basics by learning how to create a blank pre...
Basic tasks for creating a PowerPoint presentation
In a blank PowerPoint presentation, each new slide you create is completely free of any design elements whatsoever. You get a white background, with text formatted in the Arial font (44-point for slide titles and 32-point for body text) and generic round bullets. It is hard to imagine a layout more dull than this default design.
To do that, simply go up to the Home tab and click on New Slide. This inserts a new slide in your presentation right after the one you were on. You can alternatively hit Ctrl+M on your keyboard to insert a new blank slide in PowerPoint. To learn more about this shortcut, see my guide on using Ctrl+M in PowerPoint.
Open the PowerPoint app, select a template and theme, then like "Create.". Click the text box to add your title and subtitle to create your title slide. Click the "Insert" tab, then "New Slide" to add another slide. Choose the type of slide you want to add, then add text and pictures. Rearrange slides by dragging them up or down in ...
Creating a Blank Presentation. When you start PowerPoint, click on New. Click on the option to create a Blank Presentation. A blank presentation has a white background and black text without any ...
Microsoft PowerPoint is a presentation design software that is part of Microsoft 365. This software allows you to design presentations by combining text, images, graphics, video, and animation on slides in a simple and intuitive way. Over time, PowerPoint has evolved and improved its accessibility to users.
A new presentation will appear. To create a new presentation from a template: A template is a predesigned presentation you can use to create a new slide show quickly.Templates often include custom formatting and designs, so they can save you a lot of time and effort when starting a new project.. Click the File tab to access Backstage view, then select New.
PowerPoint design templates
How to Set a Custom Template as the Default in PowerPoint
Microsoft. Powerpoint presentations are a great way to share information with a team, but making them is a skillset in its own right. We've got guides on general Powerpoint use, but if you're keen ...
PowerPoint 2019 For Dummies. The simplest way to create a new presentation is to start Microsoft PowerPoint 2019, click Blank Presentation on the opening screen, and then edit the blank presentation to your liking. After PowerPoint is started, you can also create a new presentation by clicking the File tab to switch to Backstage View and then ...
Click the File tab. Select New. Type a category in the Search field or select one beneath it. Select a secondary template category to further narrow the search. Select a template. Click Create. The presentation template is downloaded, and a new presentation using it opens in PowerPoint. You can fill in the placeholders, and delete the elements ...
Create and open a PowerPoint presentation
Welcome to our PowerPoint tutorial on how to insert a blank slide in Microsoft PowerPoint! Blank slides serve as a blank canvas for your creativity, allowing...
To create a custom PowerPoint template, you'll first need to open a blank presentation. You can do so by clicking the "File" tab and then selecting "New" in the left pane. A large library of templates will appear, but since that's not what we're looking for, go ahead and select the "Blank Presentation" option. Next, you need ...
How to create a new PowerPoint Presentation | Creating Blank Presentation in MS PowerPoint | Part 10Hello Friends,Welcome to our youtube channelAbout MS Powe...
Insert a blank slide when using a formatted template in PPT
Use a personal template to create a new ...
If not, I suggest you go to View > Slide Master, delete the text box of Office Theme Slide Master and the Title Slide layout. Then close Master View. Delete the first slide and insert new blank slide. Share.
To make presenting even easier, you can download your template in a variety of formats, like PowerPoint and PDF, or share it digitally with your colleagues. Craft engaging presentations for school, business, extracurriculars, and more. Start with eye-catching PowerPoint slide designs and customize easily with AI tools.
Invite collaborators: Share the presentation with your team members by sending them a link or inviting them directly through the software. Work together in real time: Once your team members have access, they can start editing the slide presentation simultaneously.Use the built-in chat and comment features to communicate and provide feedback in real time.
Create and save a PowerPoint template