Byte Bite Bit

How to Save a PowerPoint to a Flash Drive: Step-by-Step Guide for Tech Users
Storing a PowerPoint presentation on a flash drive is a skill that comes in handy more often than you’d think. Whether you’re heading to an important meeting, preparing a lecture, or simply wanting to have a backup, saving your PowerPoint presentation to a USB flash drive ensures your file is portable and secure .

First, you need to insert the flash drive into your computer’s USB port. Open your PowerPoint presentation, click on the ‘File’ tab, select ‘Save As’, and choose your USB flash drive as the saving location. It’s as straightforward as saving to your local drive , but don’t forget to safely eject the flash drive afterward to avoid data corruption.
I’ve personally found this method invaluable in countless tight situations. Once, during a workshop, my laptop crashed but my flash drive saved the day. Just imagine the relief of confidently walking into a room, knowing your presentation is safe and sound. It’s a stress-buster and a professional must-have!
- 1 Creating a PowerPoint Presentation
- 2.1 Utilizing Save Features
- 2.2 Choosing the Right Saving Location
- 2.3 Backup Best Practices
- 3.1 Connecting and Ejecting Devices
- 3.2 Ensuring Compatibility and Security
- 3.3 Exporting Presentations
Creating a PowerPoint Presentation
Creating a PowerPoint presentation can be a fun and engaging process, especially with the different versions available like PowerPoint 2021, 2019, 2016, or even Microsoft 365. PowerPoint allows you to blend creativity with information, making each slide a canvas for your ideas.
First, open the PowerPoint application. If you’re using Microsoft 365, you’ll also benefit from subscription perks such as extra templates and cloud storage.
- Choose a template: Start with a pre-designed template to give your presentation a professional look. You can find these in the “Design” tab.
- Add slides: Click on the “New Slide” button under the “Home” tab. Each new slide can be customized with different layouts based on your content needs.
- Insert text: Click on text boxes to type in your information. You can format text using the options in the “Font” section. It’s like giving your text a makeover!
Use multimedia elements like images, videos, and graphics to make your presentation lively. You can embed these through the “Insert” tab. My personal favorite? Adding videos – they keep the audience hooked!
| Professional look | 2021, 2019, 2016, 365 | |
| Engaging content | 2021, 2019, 2016, 365 | |
| Anywhere access | Microsoft 365 |
Extending your creativity, use animations and transitions to add life to your slides. It’s like giving your presentation a bit of theater! If you’re newer to PowerPoint, take advantage of training courses available online. These can guide you through utilizing advanced features.
Finally, joining online communities can provide support and inspiration. From sharing cool tricks to troubleshooting issues, these groups are gold mines of information.
Saving and Backing Up Your Work
To ensure your PowerPoint presentations remain safe and accessible, it’s essential to understand the nuances of saving and backing up your work. This includes using various save options, selecting the right storage location, and implementing secure backup practices.
Utilizing Save Features
Using Ctrl+S frequently while working in PowerPoint minimizes data loss due to unexpected shutdowns or crashes. Each time I use Ctrl+S, I feel a bit more at ease, knowing my latest edits are secure.
Selecting the right file format is vital. Save As lets me choose .pptx for easy edits or .pdf for sharing. Sometimes, I’d save a copy with a different name to track changes. Save often, save smart. The little effort helps greatly.
Choosing the Right Saving Location
Trusty USB flash drives are handy, but ensuring their storage capacity aligns with my file sizes is crucial. Insert the flash drive into a USB port , and using the Save As feature, I often select the drive under available locations.
I make sure to safely remove hardware after saving to avoid corruption. It’s a tiny watch-out that many overlook. Configuring PowerPoint to save directly to a Cloud service like OneDrive adds another layer of security. You can never be too safe.
Backup Best Practices
Besides USB drives, I recommend keeping backups on external hard drives or Cloud storage. Weekly backups are my go-to strategy, adjusted based on project intensity. Redundancy is key ; I often keep multiple copies in different locations.
Data corruption nightmares are best avoided by checking stored files periodically. And yes, using secure, password-protected devices guarantees no one tampers with my precious work. By doing so, I maintain both data integrity and peace of mind .
Transferring Presentations to External Devices
Transferring your PowerPoint presentations to external devices like USB flash drives or CDs involves a few clear and simple steps to ensure your files are secure and compatible with various systems. Follow these guidelines to avoid data loss and maximize convenience.
Connecting and Ejecting Devices
Connecting your USB flash drive involves locating a USB port on your computer. Insert the device, and a drive icon should appear on your system. If using a CD, ensure you have a suitable drive on your laptop.
Ejecting the device correctly is crucial. On Windows, find the “Safely Remove Hardware” icon in the taskbar. On a Mac, drag the drive icon to the trash. Not doing this can result in data loss.
Ensuring Compatibility and Security
Saving your presentation in a universal format like .pptx is vital, ensuring compatibility across different versions of PowerPoint. Choosing a secure file name and location helps track the presentation more effortlessly.
Security measures include keeping your flash drive safe from physical damage and using encryption if your presentation contains sensitive information. Always double-check the destination before transferring to ensure the right location is selected.
Exporting Presentations
To export your presentation, open PowerPoint. Click the “File” tab and select “Save As” . Choose your USB drive from the menu, specify the file name, and select the file type.
Alternatively, you can use the “Export” function under the “File” tab for more advanced options like packaging your presentation. Always make sure the correct destination is chosen to prevent saving in the wrong location. `
Related posts:
- How to Embed a YouTube Video in PowerPoint: Step-by-Step Guide
- How to Do a Voice Over on PowerPoint: Easy Steps for Professionals
- How to Make an Org Chart in PowerPoint: A Step-by-Step Guide
- How to Embed Excel into PowerPoint: Simplify Data Visualization
- How Is a Chart from Microsoft Excel Added to a PowerPoint Presentation? Step-by-Step Guide
- How to Present PowerPoint in Teams: A Step-by-Step Guide for Professionals
- How to Create a Multilevel List in PowerPoint: Step-by-Step Guide
- PowerPoint Cannot Insert a Video from the Selected File: Solutions and Workarounds
- How to Link Slides in PowerPoint: A Step-by-Step Guide
- How to Make a Picture Black and White in PowerPoint: Quick Guide
- How to Remove Footer in PowerPoint: Quick and Easy Guide
- How to Remove Page Numbers in PowerPoint: Step-by-Step Guide for All Versions
Leave a Comment Cancel reply
Save my name, email, and website in this browser for the next time I comment.
How to Transfer From PowerPoint to Flash Drives: A Step-by-Step Guide
Transferring a PowerPoint presentation to a flash drive is a straightforward process. Simply plug in your flash drive, open the PowerPoint file, click on ‘File’, then ‘Save As’, and choose your flash drive as the location. Save the file, and you’re done! It’s that simple, and now your presentation is portable and ready to go wherever you do.
After you complete the action, your PowerPoint presentation will be stored safely on your flash drive. This allows you to easily transport the file and use it on different computers without the need for internet access or email attachments.
Introduction
Ever been in a situation where you needed to present your ideas, but technology failed you? Maybe the email with your PowerPoint didn’t go through, or the internet was down, and you couldn’t access your cloud storage. In moments like these, having a physical copy of your presentation on a flash drive can be a lifesaver. In today’s fast-paced digital world, the ability to quickly and efficiently move files from one device to another is crucial, especially for professionals who often present in various locations.
Whether you’re a student, an educator, a business professional, or just someone who likes to be prepared, knowing how to transfer your PowerPoint presentation to a flash drive is an essential skill. So let’s dive in and learn how to ensure your presentation is always ready to roll, no matter what technological hurdles you may face.
Step by Step Tutorial: Transferring PowerPoint to Flash Drives
The following steps will help you transfer your PowerPoint presentation to a flash drive, ensuring you have a portable and accessible copy of your important files.
Step 1: Insert Flash Drive
- Insert your flash drive into a USB port on your computer.
Once you have inserted the flash drive, wait for your computer to recognize it. This will typically be indicated by a notification or a new drive appearing in ‘My Computer’ or ‘This PC’.
Step 2: Open PowerPoint File
- Open the PowerPoint presentation you wish to transfer.
Make sure that you have saved all the latest changes to your presentation before proceeding to transfer it to the flash drive.
Step 3: Click ‘File’
In PowerPoint, click on the ‘File’ tab at the top-left corner of the screen.
The ‘File’ tab is where you can find various options for managing your PowerPoint documents, including saving and exporting files.
Step 4: Select ‘Save As’
From the menu, select ‘Save As’ to choose where you want to save your presentation.
‘Save As’ allows you to choose a specific location for your file, which is necessary when transferring files to external storage devices.
Step 5: Choose Flash Drive Location
In the ‘Save As’ dialog box, choose your flash drive from the list of available locations.
Make sure you select the correct drive letter that corresponds to your flash drive to avoid saving the file in the wrong location.
Step 6: Save File
- Click ‘Save’ to transfer the presentation to your flash drive.
After clicking ‘Save’, the transfer will begin, and a progress bar may appear depending on the file size. Once completed, your PowerPoint is now on your flash drive, ready to go.
| Benefit | Explanation |
|---|---|
| Portability | Having your PowerPoint on a flash drive makes it highly portable. You can carry it in your pocket, briefcase, or backpack, taking your presentation anywhere without relying on internet connectivity. |
| Compatibility | Flash drives are universally compatible with almost all computers and operating systems. This means you can plug into any device with a USB port and access your presentation without compatibility issues. |
| Security | Transferring your presentation to a flash drive can act as a backup. If your primary device fails, you’ll have a secure copy of your work that’s safe from technical failures or cyber threats. |
| Drawback | Explanation |
|---|---|
| Limited Storage | Flash drives have limited storage capacity compared to other options like external hard drives or cloud storage. You may need to manage space efficiently, especially for larger presentations with multimedia elements. |
| Physical Damage | Flash drives can be lost, stolen, or physically damaged, which can result in the loss of your presentation. They require careful handling and storage. |
| Slower Transfer Speeds | Depending on the USB version of your flash drive, transfer speeds can be slower compared to other methods like direct transfers via high-speed internet connections. |
Additional Information
When transferring your PowerPoint presentation to a flash drive, there are a few more things to keep in mind. Firstly, ensure that your flash drive has enough free space for the file. PowerPoint presentations, especially those with a lot of images or videos, can be quite large. If your flash drive is nearly full, you might need to delete some files or use a drive with a larger capacity.
Also, consider formatting your flash drive to the appropriate file system. Most come pre-formatted with the FAT32 file system, which is widely compatible but has a file size limit of 4GB. For larger files, you may need to format your drive to NTFS or exFAT. Remember, formatting will erase all data on the drive, so back up any important files first. Always safely eject your flash drive after the transfer to avoid data corruption.
- Click on the ‘File’ tab in PowerPoint.
- Select ‘Save As’ from the menu.
- Choose your flash drive from the list of available locations.
Frequently Asked Questions
What if my computer doesn’t recognize my flash drive.
First, try inserting the flash drive into a different USB port. If it’s still not recognized, check if the flash drive appears in ‘Disk Management’. If it does, it may need to be assigned a drive letter or formatted.
Can I transfer multiple PowerPoint presentations to the same flash drive?
Yes, as long as your flash drive has enough storage space, you can transfer multiple presentations. Just ensure that they are clearly labeled to avoid confusion when accessing them.
Will my PowerPoint animations and transitions work on another computer?
Animations and transitions should work on another computer, provided that it has a compatible version of PowerPoint installed. However, custom fonts or media files might not transfer, so it’s a good idea to embed them in the presentation.
Can I edit the PowerPoint presentation directly from the flash drive?
Yes, you can open and edit the presentation directly from the flash drive. However, to avoid potential data loss, it’s recommended to copy the file to the local computer before editing.
How can I ensure my presentation is compatible with older versions of PowerPoint?
When saving your presentation, you can choose to save it in a compatibility mode for older versions of PowerPoint, such as .ppt instead of .pptx. This helps to ensure it can be opened on computers with earlier versions.
Transferring your PowerPoint presentation to a flash drive is a smart move that can save you from many potential headaches. It’s a simple process that anyone can master with just a few clicks. Whether you’re a professional preparing for a big pitch or a student gearing up for a class presentation, having a backup on a flash drive ensures you’re ready to impress, no matter where you are.
So go ahead, take the plunge, and make your presentations as portable and safe as possible. Who knows, this skill might just be your ticket to a flawless performance next time you’re up to present!

Matthew Burleigh has been writing tech tutorials since 2008. His writing has appeared on dozens of different websites and been read over 50 million times.
After receiving his Bachelor’s and Master’s degrees in Computer Science he spent several years working in IT management for small businesses. However, he now works full time writing content online and creating websites.
His main writing topics include iPhones, Microsoft Office, Google Apps, Android, and Photoshop, but he has also written about many other tech topics as well.
Read his full bio here.
Share this:
Join our free newsletter.
Featured guides and deals
You may opt out at any time. Read our Privacy Policy
Related posts:
- How to Save Powerpoint as PDF with Notes
- How to Turn Off Flash Notification on iPhone (2024 Guide)
- How to Change the Name of a Flash Drive in Windows 7
- Can I Convert My Powerpoint to Google Slides?
- How to Get an Adobe Flash-Compatible Browser on iPhone: A Guide
- How to Put Files on a Flash Drive
- How to Email a PowerPoint Slideshow: A Step-by-Step Guide
- How to Convert PowerPoint Presentations to HTML: A Step-by-Step Guide
- How to Make a Powerpoint Slide Vertical in Powerpoint 2013
- How to Loop a Slideshow on Powerpoint 2013
- What is the Flash Notification on the iPhone?
- How to Save on a Flash Drive in Microsoft Word 2010
- How to Change Hyperlink Color in Powerpoint 2010 (An Easy 5 Step Guide)
- Can You Save a Powerpoint as a Video in Powerpoint 2013?
- iOS 17 – How to Stop Flash Notifications on iPhone
- How to Select Multiple Files in Google Drive
- How to Copy a PowerPoint to a New PowerPoint: A Step-by-Step Guide
- How to Make All Columns the Same Width in Excel 2013
- How to Drag Slides From One PowerPoint to Another: A Step-by-Step Guide
- How to Delete Files on a Flash Drive
How to save a PowerPoint presentation on a USB flash drive
How to save a powerpoint presentation on a usb flash drive.

PowerPoint s are widely used for various purposes, from business meetings to educational presentations . When you create a PowerPoint presentation , it is essential to save it in a secure and portable . One popular method is to save the presentation on a USB , allowing for easy access and sharing with others. In this article, we will guide you through the steps of saving a PowerPoint presentation on a USB flash drive, ensuring that your presentation is safely stored and ready to be presented anytime, anywhere.
Step 1: Prepare Your USB Flash Drive Before saving your PowerPoint presentation on a USB flash drive, ensure that you have an appropriately formatted and functional USB flash drive. Insert the USB flash drive into an available USB port on your . It is advisable to use a USB flash drive with ample storage capacity to accommodate your presentation and any associated media .
Step 2: Open the PowerPoint Presentation Locate the PowerPoint presentation you want to save on the USB flash drive. Double-click the file to open it in PowerPoint. Ensure that any external media files, such as images or videos, are appropriately linked to the presentation. Check that all multimedia elements are working correctly within the PowerPoint file.
Step 3: Save the PowerPoint Presentation To save the PowerPoint presentation on your USB flash drive, click on the “File” tab in the top left corner of the PowerPoint window. From the drop-down menu, select “Save As.” A new dialog box will appear, allowing you to choose the destination and format for your presentation.
Step 4: Choose the USB Flash Drive as Destination In the “Save As” dialog box, navigate to your USB flash drive. It should be listed under “Devices and Drives.” Click on the USB flash drive to select it as the destination for saving your presentation.
Step 5: Name Your Presentation Provide a name for your PowerPoint presentation in the “File name” field. Choose a descriptive and easily recognizable name to help you locate the file later.
Step 6: Choose File Format Next, you need to choose the file format for your presentation. By default, PowerPoint saves the presentation in the .pptx format, which is compatible with newer versions of PowerPoint. However, if you need to share your presentation with people using older versions of PowerPoint or prefer a more universal format, you can choose to save it as a PowerPoint 97-2003 compatible format (.ppt).
Step 7: Save Options To ensure that your PowerPoint presentation is ready to be viewed and edited from the USB flash drive, consider selecting the “Embed fonts in the file” option. This will guarantee that the fonts used in your presentation will be displayed correctly, even if the presentation is opened on a different computer that does not have the same fonts installed.
Step 8: Save and Copy to USB Flash Drive After configuring the necessary options, click on the “Save” button to save the PowerPoint presentation on your USB flash drive. Ensure that the saving process completes without any errors or interruptions.
Step 9: Safely Remove the USB Flash Drive Once the PowerPoint presentation is successfully saved on the USB flash drive, it is essential to safely remove the USB flash drive from your computer. Click on the “Safely Remove Hardware and Eject Media” icon located in the system tray on the taskbar. Select your USB flash drive from the list of devices and wait for the confirmation message indicating that it is safe to remove the USB flash drive. You can now safely disconnect the USB flash drive from your computer.
By following these steps, you can now confidently save your PowerPoint presentations on a USB flash drive, ensuring easy portability and sharing capabilities. Remember to always keep a backup of your presentations on your computer or other secure storage devices to avoid any potential data loss or corruption. Whether you are presenting at a conference or sharing your work with colleagues, having your PowerPoint presentation readily available on a USB flash drive offers convenience and peace of mind.
How helpful was this article?
How to Save a PowerPoint on a Flash Drive

When you're about to make a PowerPoint presentation to your classmates or co-workers, the last thing you want is projector problems. If one computer is already properly connected to the projector, it's much easier to open your PowerPoint on that machine than to start the connection process all over again with your own laptop. Saving a copy of your presentation on a flash drive -- a storage device small enough to fit on your keychain -- makes it easy to transfer the file and provides a convenient backup at the same time.
Advertisement
Open your presentation in PowerPoint.
Video of the Day
Click the Office button and choose "Save As."
Click "Computer" on the left to bring up a list of all your computer's drives.
Insert your flash drive into a free slot on your computer.
Double-click on your flash drive, for example, "J:." Watch the "Computer" window carefully right after you insert the flash drive; the drive icon that changes wording or colors is usually your flash drive.
Click "Save." Your PowerPoint file is now saved on your flash drive.
Click "Start" > "Computer."
Right-click on your flash drive. Choose "Eject."
Remove the flash drive from your computer.
How to Save a PowerPoint Presentation? [PPT & Other Formats!]
By: Author Shrot Katewa
![How to Save a PowerPoint Presentation? [PPT & Other Formats!]](https://artofpresentations.com/wp-content/uploads/2022/03/Featured-Image-How-to-Save-a-PowerPoint-Presentation.webp "how to save a powerpoint presentation on a usb")
Saving a PowerPoint presentation is one of the most important things that you need to do when you are creating a presentation using PowerPoint. Unlike some of the modern web-based presentation applications, you need to make sure that you save a PowerPoint presentation when you are using an offline version!
To save a PowerPoint presentation, click on the “File” tab. Then, from the backstage view, click on the “Save” option from the left panel. Choose the location or the folder where you want to save the presentation on your computer, and click on “Save”.
In this article, we shall not only understand how to save a standard PPT or PPTx file, but we shall also take a look at how to save a PowerPoint presentation in different file formats such as a PDF, video or an image!
So, let’s get started!
1. How to Save a PowerPoint Presentation?
Once you have saved a PowerPoint presentation, you can easily save it again with just one click. Furthermore, you can also save a PowerPoint presentation in other formats. However, the process of saving a PowerPoint presentation is slightly different on Windows and on Mac.
Let’s understand the process in further detail.
1a. Saving a PowerPoint Presentation on Windows
To save a PowerPoint Presentation on Windows PC, you can follow either of the 2 simple methods.
Method-1: Using the “Save” button on Quick Access Toolbar
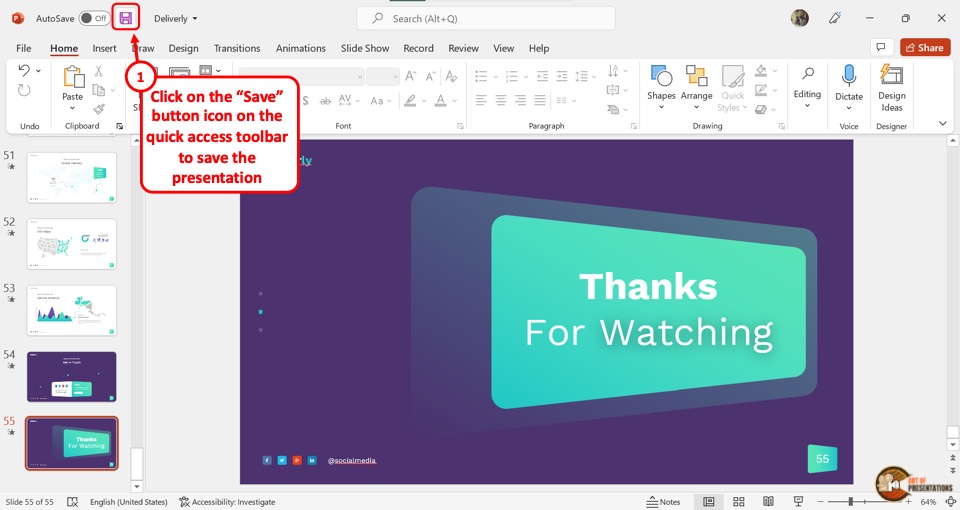
In the Quick Access Toolbar located at the very top of the screen, click on the “Save” icon.
The “Save” icon is located on the left side in the Quick Access Toolbar and looks like a floppy disk. Clicking on the “Save” button will immediately save the PowerPoint presentation in its current location as a “.pptx” file.
If you have opened a new presentation and you are saving it for the first time, clicking on the “Save” button will open a new explorer window. Simply navigate to the folder where you wish to save the new presentation on your computer, and click on “ Save “.
Method-2: Using the “File” tab
Another, more common method is to use the “File” tab in PowerPoint to save your PowerPoint presentation.
Here’s what you need to do –
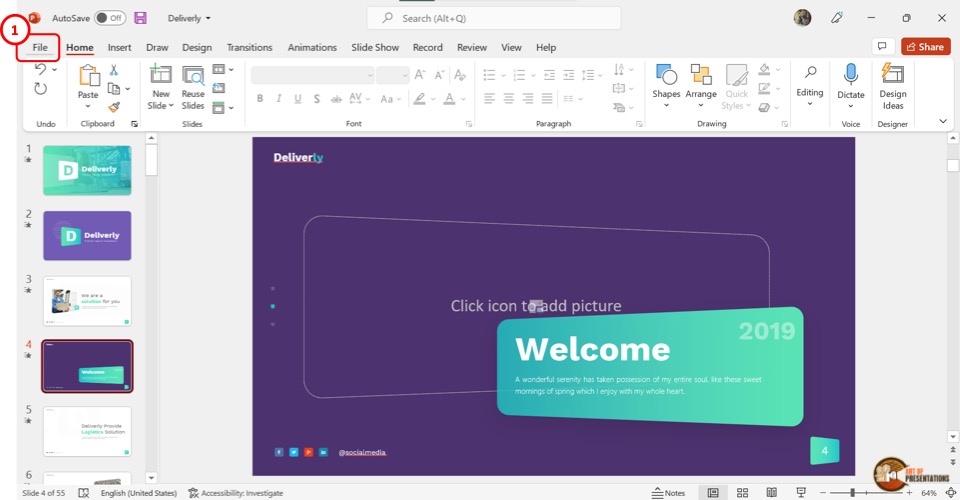
Step 1 – Click on the “File” Tab
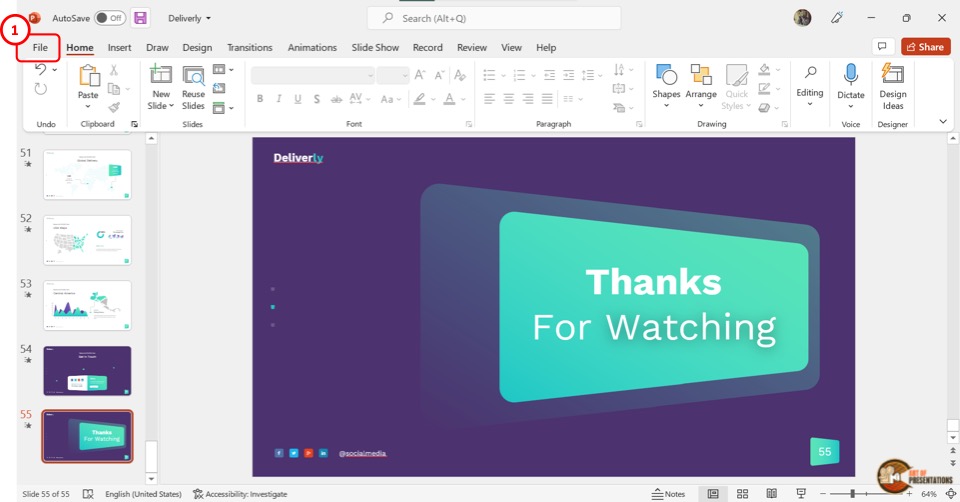
Another way to save a PowerPoint presentation is to use the “File” menu. You have to first click on the “File” tab located at the left corner of the menu ribbon at the top of the screen.
Step 2 – Click on the “Save” option
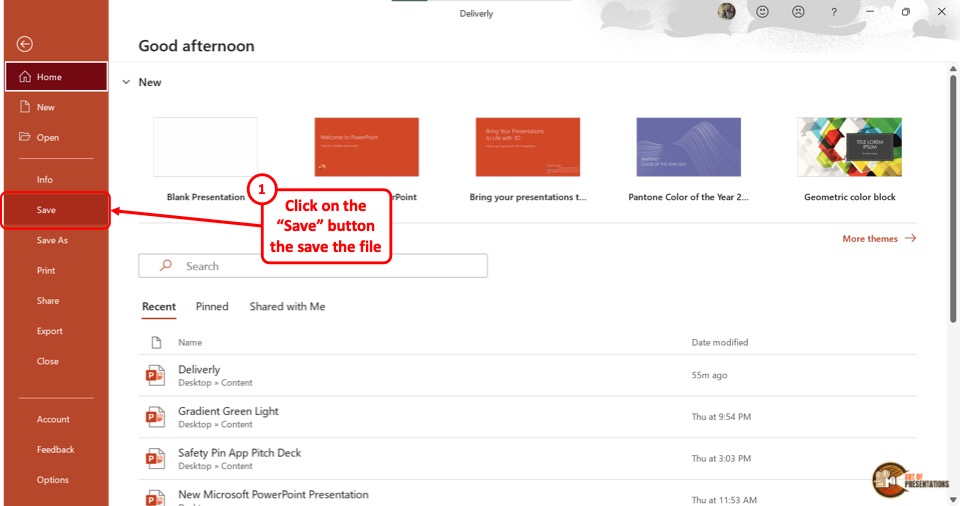
This will open the backstage view in PowerPoint. Now, click on the “Save” option from the sidebar on the left side of the screen. This will save the Microsoft PowerPoint as a “.pptx” file in the current location.
1b. Saving a PowerPoint Presentation on Mac
On a Mac computer, you can use the “File” menu as well to save the PowerPoint presentation.
The first step is to click on the “File” menu in the menu bar located at the top of the screen (above the PowerPoint window). This will open a dropdown menu. Click on the “Save” option from the dropdown menu to save the presentation as a “.pptx” file which is the standard format for presentations.
1c. Shortcut Keys to Save a PowerPoint Presentation
Microsoft PowerPoint also allows you to save a presentation with keyboard shortcuts. All you have to do is press the “Ctrl+S” keys on your keyboard in an open PowerPoint file. This will save the PowerPoint presentation.
1d. Best Format to Save a PowerPoint Presentation?
PowerPoint allows you to save a presentation in various different file formats! For instance, you can use the .ppt format if you wish to open the presentation file using PowerPoint 2007 or earlier. You can use .ppsx to open presentation directly as a PowerPoint Show file that opens it in the presentation mode.
In fact, there are several other formats you can save a presentation in. We shall explore how to save a PowerPoint presentation in several different formats later in the article.
However, the best format to save a PowerPoint Presentation is a “.pptx” file. This type can support all the latest as well as the older features of the PowerPoint presentation.
If you will be opening the presentation using a different software other than Microsoft PowerPoint, “.odp” is the best format. For printing, make sure to save the PowerPoint presentation as a PDF. That said, .pptx file format can help serve these purposes too.
2. How to Save a PowerPoint Presentation as PDF
Saving a PowerPoint presentation in PDF format is the suitable method for printing out your presentation. To save the PowerPoint presentation as a PDF file, follow the 4 easy steps.
Step-1: Click on the “File” Tab
First, click on the “ File ” tab in PowerPoint to open the back stage view of PowerPoint.
Step 2 – Click on the “Save As” option
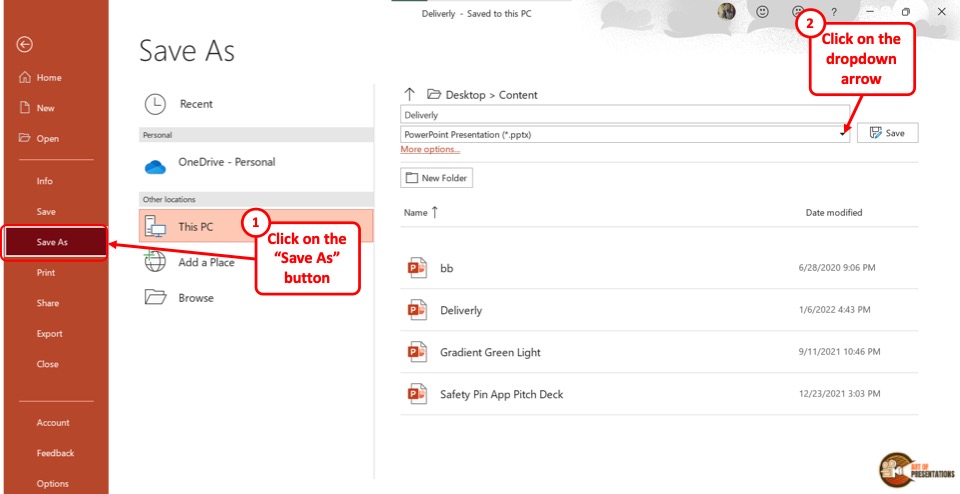
In the menu ribbon located at the top of the screen, click on the “File” tab. In the “File” menu, click on the “Save As” option from the sidebar on the left side of the screen.
Step-3: Click on the “PDF (*.pdf)” option
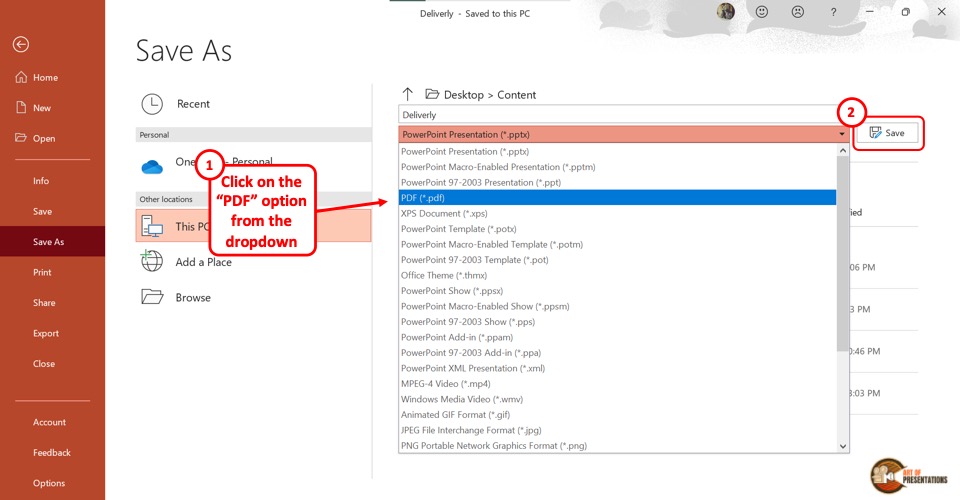
In the “Save As” screen, click on the box that shows “PowerPoint Presentation (*.pptx)” . This will open a dropdown menu. Click on the “PDF (*.pdf)” option from the dropdown menu.
Step-4: Click on the “Save” button
Now all you have to do is click on the “Save” button beside the box to save the PowerPoint presentation as a PDF file (as shown in the image in step 2).
3. How to Save a PowerPoint Presentation as a Video?
In Microsoft PowerPoint, you can also save a presentation as a video. This allows you to play the presentation slides as a video rather than a slide show.
3a. On Windows
To save a PowerPoint presentation as a video on a Windows PC, follow the 3 easy steps.
Step-1: Click on the “File” tab
The first step is to open the “Save As” screen. To do so, click on the “File” tab in the menu ribbon. In the “File” menu, click on the “Save As” option.
Step-2: Choose the “.mp4” file format from the “Save As” tab
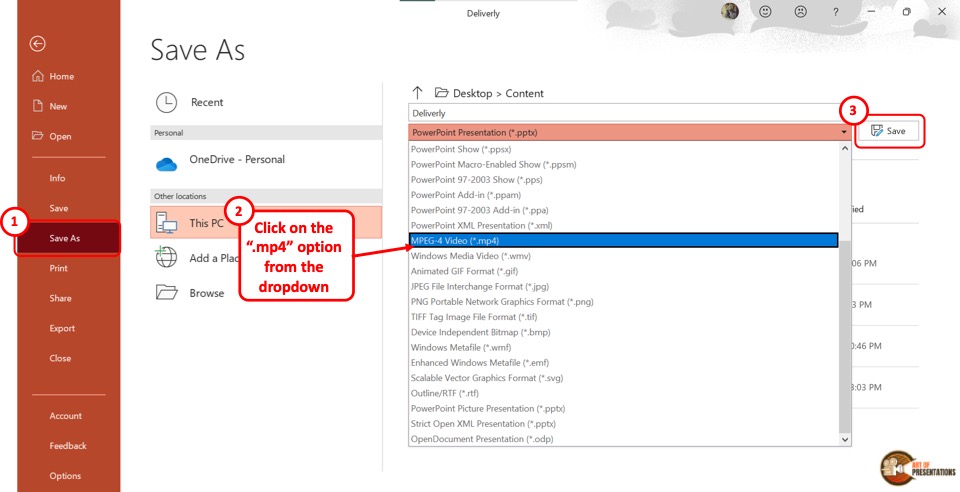
The next step is to click on the “Save As Options” box. It is the second box on the right side of the “Save As” screen. In the dropdown menu, click on either the “MPEG-4 Video (*.mp4)” option or the “Windows Media Video (*.wmv)” option.
Step-3: Click on the “Save” button
The final step is to click on the “Save” button (as indicated in step 2 above). It is located on the right side of the “Save As Options” box. This will save your PowerPoint presentation as a video.
To save a PowerPoint presentation as a video on a Mac device, follow the 3 simple steps.
Step-1: Click on the “Export” option
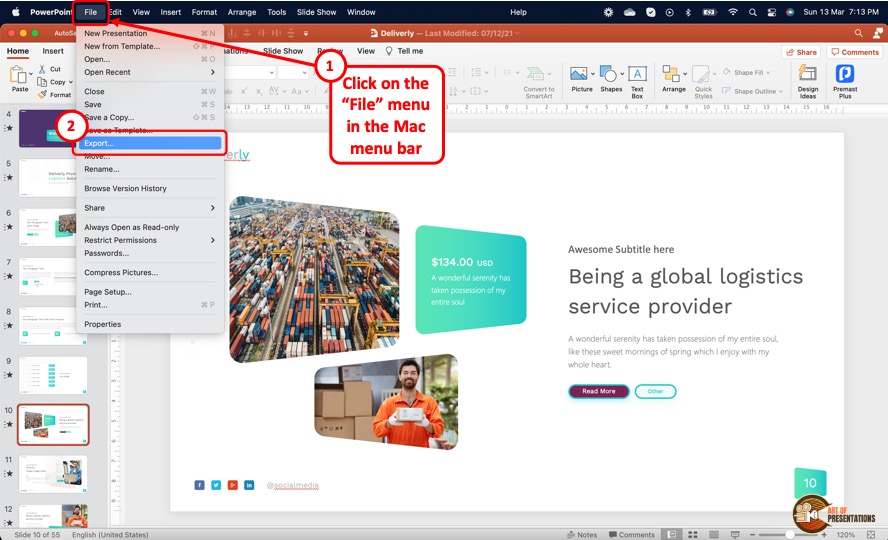
In the menu bar at the top of the screen, click on the “File” option. In the “File” dropdown menu, click on the “Export” option. This will open a dialog box.
Step-2: Click on the “File Format” box
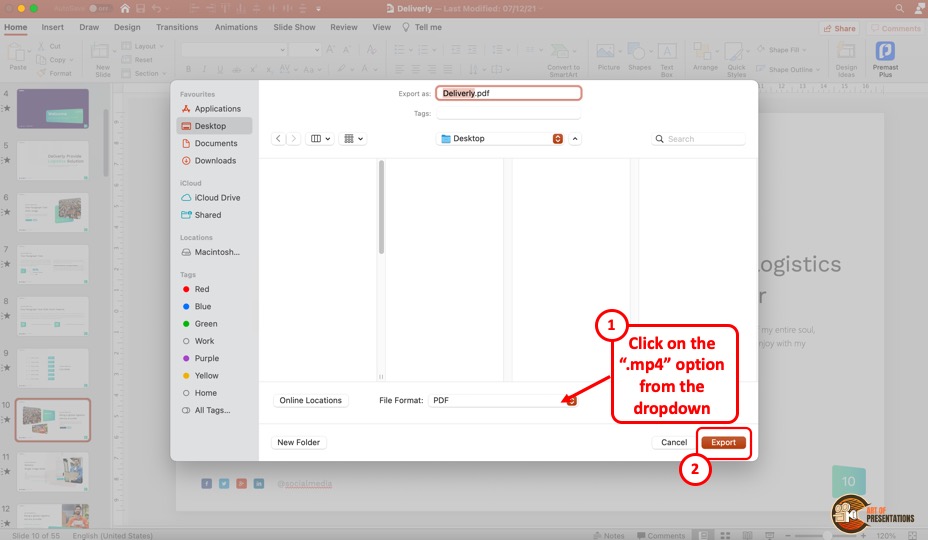
In the dialog box, click on the “File Format” box. This will open a dropdown menu. You can click on either the “MP4” option or the “MOV” option as you prefer.
Step-3: Click on the “Export” button
In the dialog box, you can also click on the “Quality” option to select the quality of the video. Once you are satisfied with the selections in the dialog box, click on the “Export” button at the bottom (as shown in the image in the previous step). This will save the presentation as a video.
4. How to Save a PowerPoint Presentation to Open in Slideshow Mode?
Microsoft PowerPoint allows you to save the PowerPoint presentation as a “PowerPoint Show” file. This opens directly as a slideshow. To save a PowerPoint presentation to open in slideshow mode, follow the 2 easy steps.
In the open PowerPoint file, click on the “File” tab from the menu ribbon which is located at the top of the screen. In the “File” menu, click on the “Save As” option.
Step-2: Click on the “PowerPoint Show (*.ppsx)” option
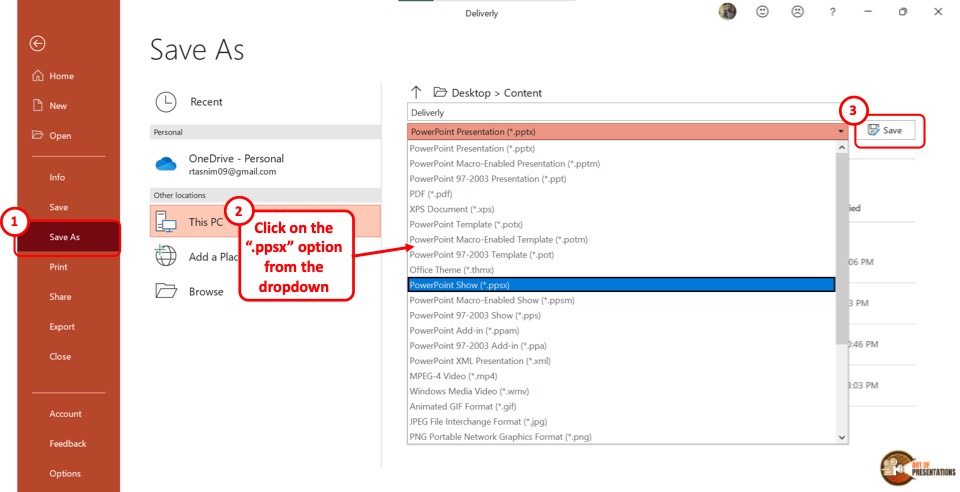
In the “Save As” screen, click on the “Save As Options” box which shows “PowerPoint Presentation (*.pptx)” . This will open a dropdown menu. Click on the “PowerPoint Show (*.ppsx)” option.
Now all you have to do is click on the “Save” button to save the PowerPoint presentation to open as a slideshow.
5. How to Save a PowerPoint Presentation as an Image?
In Microsoft PowerPoint, you can save the presentation as an image in five different formats: “Animated GIF Format (*.gif)” , “JPEG File Interchange Format (*.jpeg)” , “PNG Portable Network Graphics Format (*.png)” , “TIFF Tag Image File Format (*.tif)”, and “Scalable Vector Graphics Format (*.svg)” .
To save your presentation as an image, follow the 3 simple steps.
Step-1: Click on the “Save As” option from the “File” tab
The first step is to click on the “File” tab in the menu ribbon. Then click on the “Save As” option from the “File” menu.
Step-2: Select your preferred image format
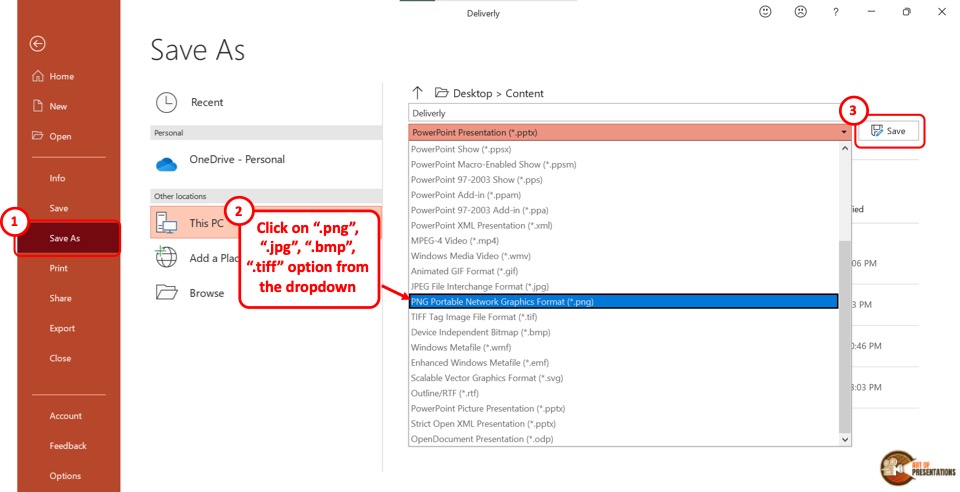
In the “Save As” screen, click on the “Save As Type” box which is the second box in the right column. From the dropdown menu, click on your preferred image format from the five available formats.
Now all you have to do is click on the “Save” button (as shown in the image in step 2) beside the “Save As Type” box. This will save your presentation in a folder containing each slide as a separate image file.
6. How to Save a PowerPoint Presentation as a Template?
A PowerPoint template is a predesigned presentation that you can edit to add your own content. To save a presentation as a template, follow the 3 easy steps.
The first step is to click on the “File” tab in the menu ribbon. Then click on the “Export” option from the sidebar in the “File” menu.
Step-2: Click on “Change File Type”
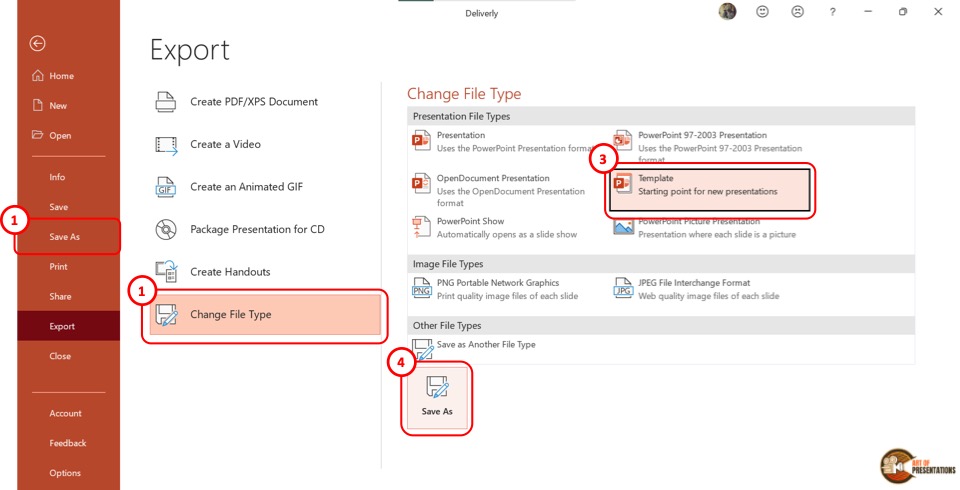
Now you have to click on the “Change File Type” option. Under the “Presentation File Types” group in the right column, click on the “Templates” option. Then click on the “Save As” button at the bottom of the screen.
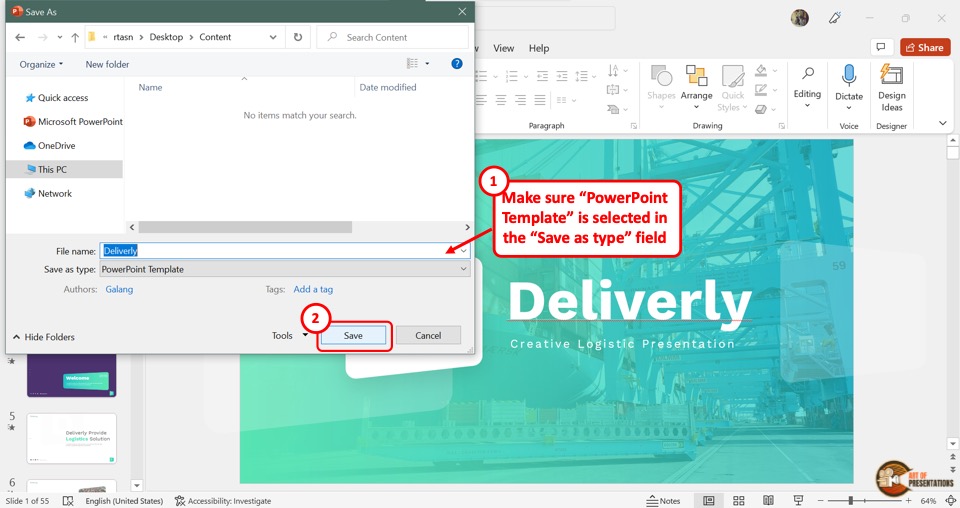
In the “Save As” dialog box, you will see that the “Save as type” box shows the “PowerPoint Template” format. Now all you have to do is click on the “Save” button.
7. How to Save PowerPoint Presentation as Google Slides?
Microsoft PowerPoint does not offer any feature to upload a presentation to Google Slides directly. However, Google Slides does offer you an option to upload your PowerPoint presentation and save it in Google Slides!
Step-1: Save Your PowerPoint Presentation
The first step is to save your PowerPoint presentation using any method described in the section 1 of this article.
Make sure that you note down the location of the folder in which you have save the PowerPoint file.
Step-2: Click on the “Open file picker” option in Google Slides
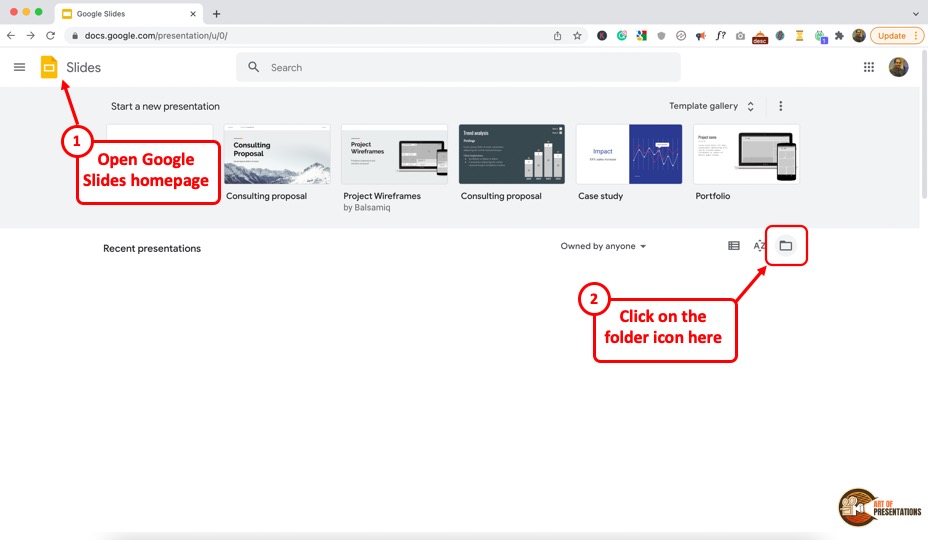
Now, the next thing you need to do is open your Google Slides account by visiting slides.google.com . If you aren’t logged in, make sure you sign in with your account credentials.
Next, you will be presented with Google Slides home screen (as shown in the image above). In Google Slides, click on the “Open file picker” icon which looks like a folder. This will open the “Open a file” dialog box.
Step-2: Click on “Upload”

In the “Open a file” dialog box, click on the “Upload” tab.
From your “File Explorer” window, drag and drop the PowerPoint presentation in the dialog box. Now the presentation will automatically open in Google Slides.
Also Read – How to “ Make a Copy of a Google Slides Presentation ” and how to “ Share a Google Slides Presentation Correctly ” with others!
You can also click on the “ Select a file from your device ” button (blue button in the center of the screen). This will open the file explorer window. Navigate to the folder in which you have saved your PowerPoint presentation, and click on “OK”. This will open and save the presentation file in Google Slides.
8. How to Save a PowerPoint Presentation to a Flash Drive?
To save a PowerPoint presentation on a flash drive or any external device, follow the 3 simple steps.
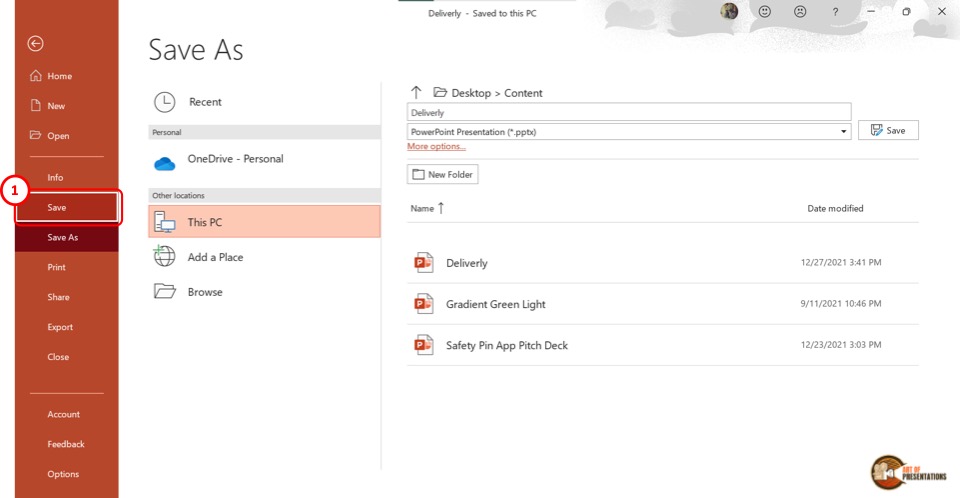
In the menu ribbon located at the top of the screen, click on the “File” tab. In the “File” menu, click on the “Save As” option.
Step-2: Click on “Browse”
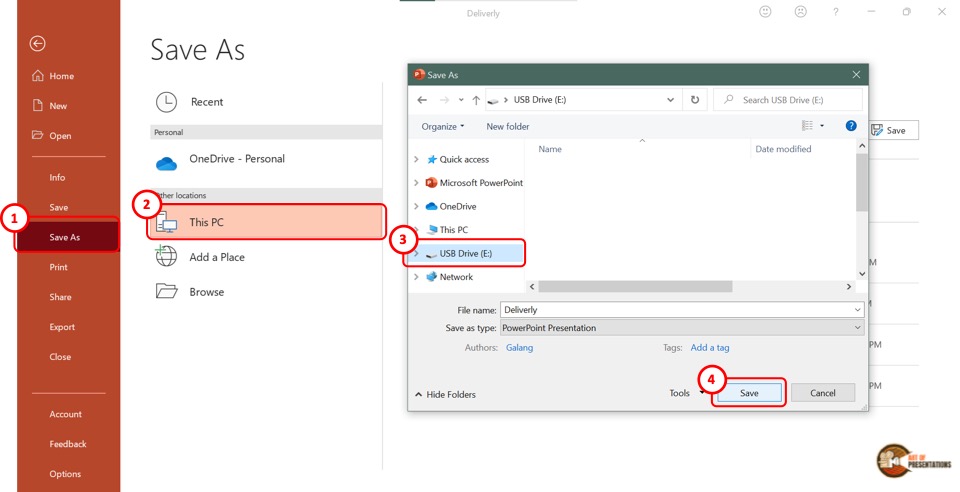
In the “Save As” screen, click on the “Browse” option which is the last option in the left column. This will open the “Save As” dialog box. In the sidebar on the left of the dialog box, click on the external disc.
Now all you have to do is click on the “Save” button at the bottom of the dialog box to save the PowerPoint presentation on the flash drive (as shown in the image in step 2).
9. How to Save a Copy of a PowerPoint Presentation?
The “Save A Copy” feature of Microsoft PowerPoint allows you to save changes in your presentation in a copied file without changing the original file.
Check out my article to learn detailed steps on how to save a copy of a PowerPoint presentation .
10. How to Save a Read-Only PowerPoint Presentation?
The “Read-Only” feature of Microsoft PowerPoint allows you to protect your PowerPoint presentation .
Using this feature, you can share your presentation with others without giving them the access to change your presentation. To save a read-only PowerPoint presentation, follow the steps mentioned below –
The first step is to click on the “File” tab in the menu ribbon. From the sidebar in the “File” menu, click on the “Info” option.
Step-2: Click on the “Protect Presentation” button

The next step is to click on the “Protect Presentation” option in the “Info” screen. This will open a dropdown menu. Click on the “Always Open Read-Only” option from the dropdown menu.
Step-3: Click on the “Save” option
Now all you have to do is save the presentation. To do so, click on the “Save” option in the sidebar right under the “Info” option. Alternatively, you can press the “Ctrl+S” keys on your keyboard.
If you have received a presentation that opens only in the read-only mode, but you don’t know how to work with it, check out my other article on “ How to Edit a Presentation in Read-Only Mode “.
11. How to Save a PowerPoint Presentation Without Notes?
When saving a PowerPoint presentation, you might want to remove the speaker notes. To do so, all you have to do is follow the 5 quick steps.
In the menu ribbon, click on the “File” tab. Then click on the “Info” option from the “File” menu.
Step-2: Click on “Check for Issues” on the “Info” tab
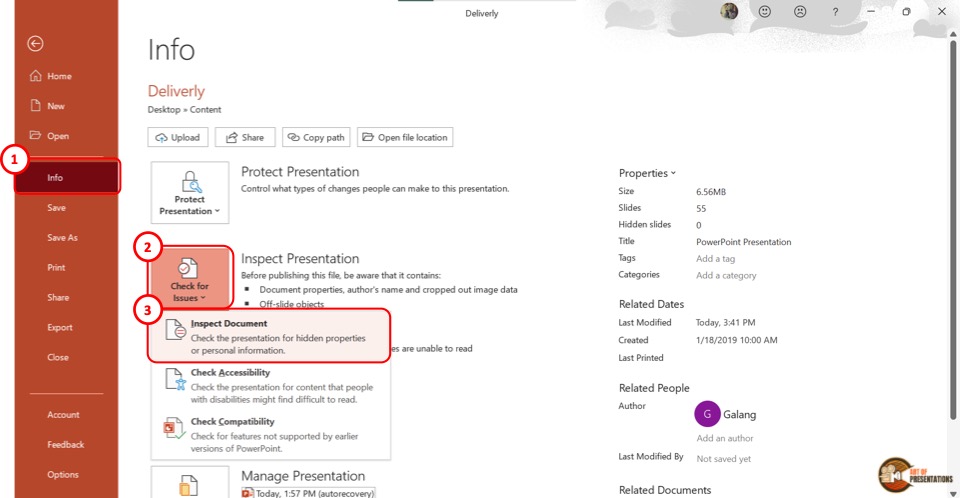
In the “Info” option, click on the “Check for Issues” button. Then click on the “Inspect Document” option from the dropdown menu. This will prompt a dialog box.
Step-3: Click on the “Inspect” option
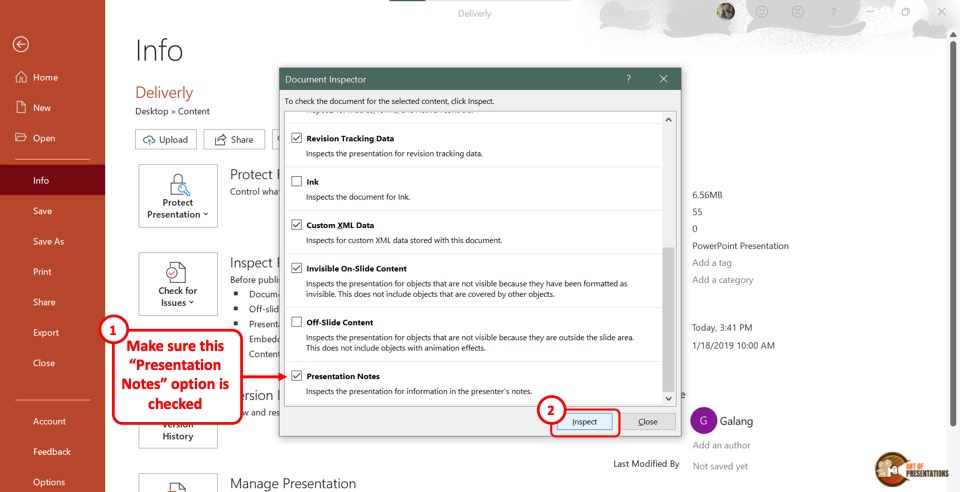
In the “Document Inspector” dialog box, scroll all the way to the bottom and make sure the “Presentation Notes” option is selected. Then click on the “Inspect” button at the bottom of the dialog box.
Step-4: Click on the “Remove All” option
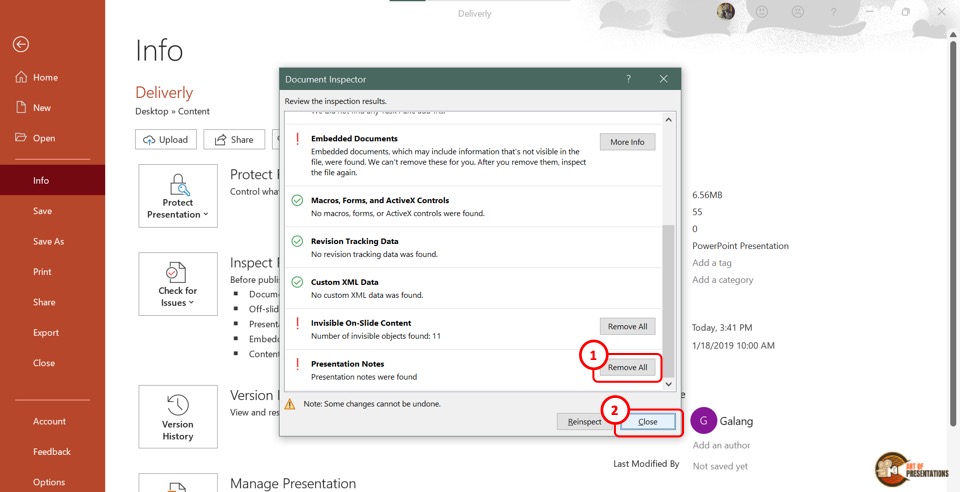
Once the inspection results are shown in the “Document Inspector” dialog, scroll to the bottom again to find the “Presentation Notes” option. Then click on the “Remove All” button at the right side of the “Presentation Notes” option.
Now all you have to do is click on the “Close” button at the bottom of the dialog box to finish the process.
Step-5: Click on the “Save” option
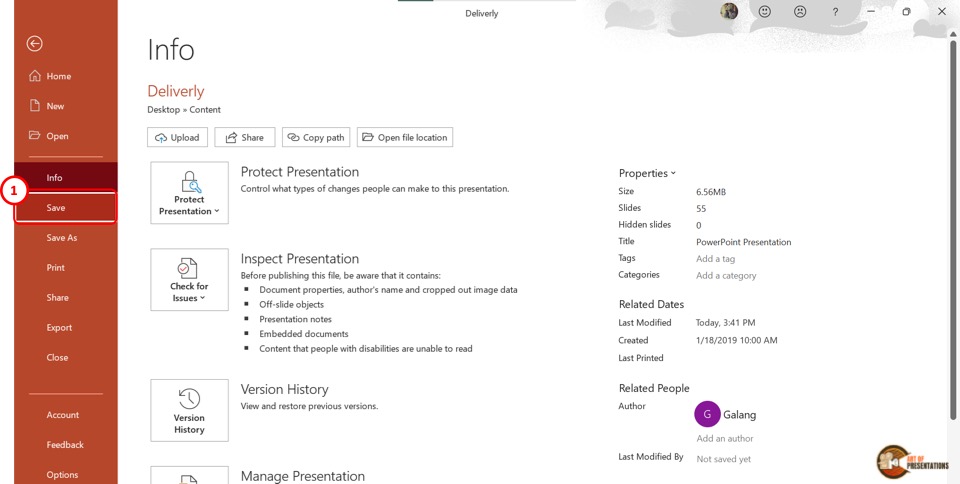
The final step is to click on the “ Save ” option in the sidebar of the “File” menu to save the presentation without notes. You can alternatively press the “Ctrl+S” keys on your keyboard.
12. How to Save PowerPoint Presentation Directly in Microsoft Teams?
If you are delivering a PowerPoint presentation to an audience using Microsoft teams, you can easily share a PowerPoint deck with your audience in the following steps –
- First, open the Microsoft Teams application and login to the meeting.
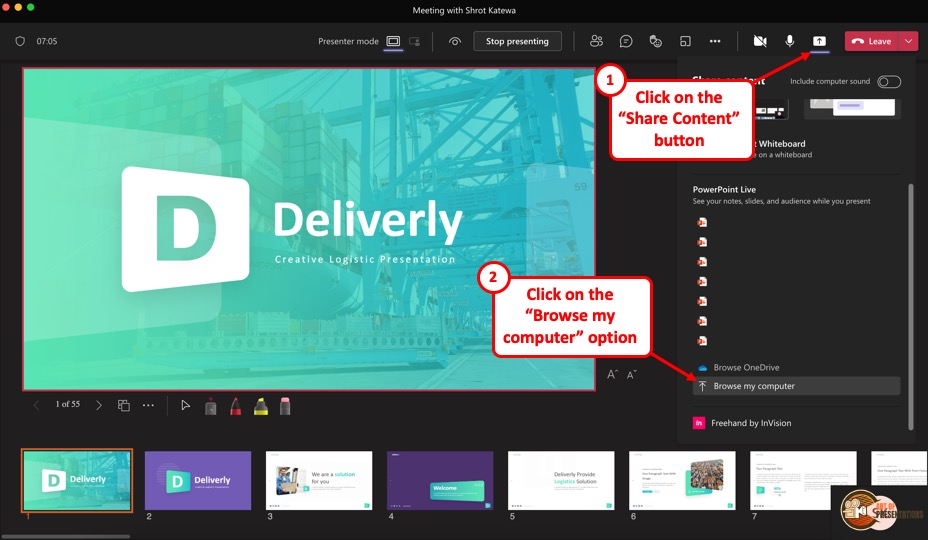
- On the “ Meeting Controls ” menu available in the top part of your meeting screen, locate the “ Share Content ” option.
- Click on the share content button. This will show the most recent PowerPoint files that you opened. You can either choose to click on one of the files visible. Alternatively, scroll down on the right panel and click on the “ Browse my computer ” option.
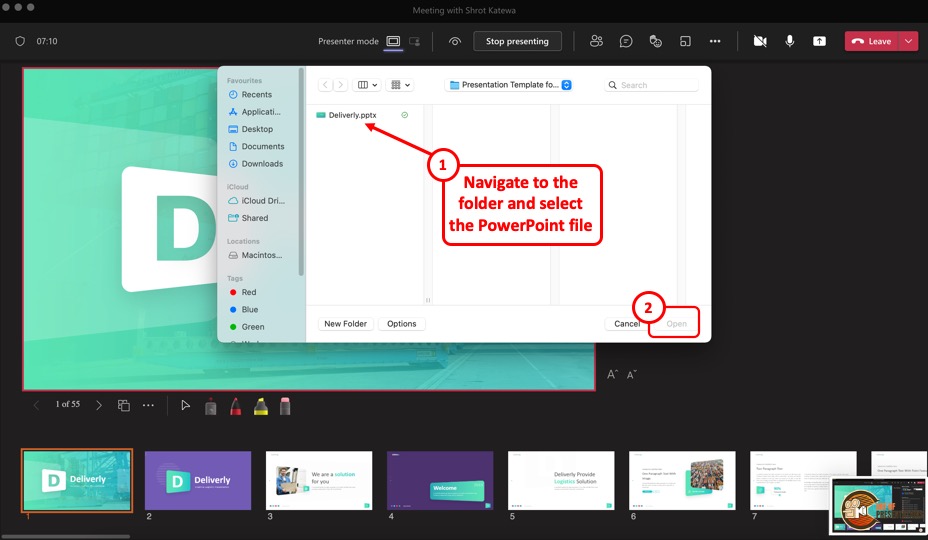
- This will open a new file browser window. Navigate to the respective location where your PowerPoint presentation is saved, click on it to select it. Then, click on “Open” to open the presentation in Microsoft Teams.
- The presentation will open by default in the presenter mode and shared with the audience of the meeting.
13. How to Enable Autosave in PowerPoint Presentation?
The autosave option is only available if you are using the Microsoft Office 365 version of PowerPoint . Other than that, you will have to manually save the PowerPoint file in all other versions.
You can autosave the PowerPoint presentation to the OneDrive cloud, and also autosave recovery files. To enable autosave in PowerPoint presentation, follow the 4 simple steps.
Step-1: Click on the “AutoSave” button
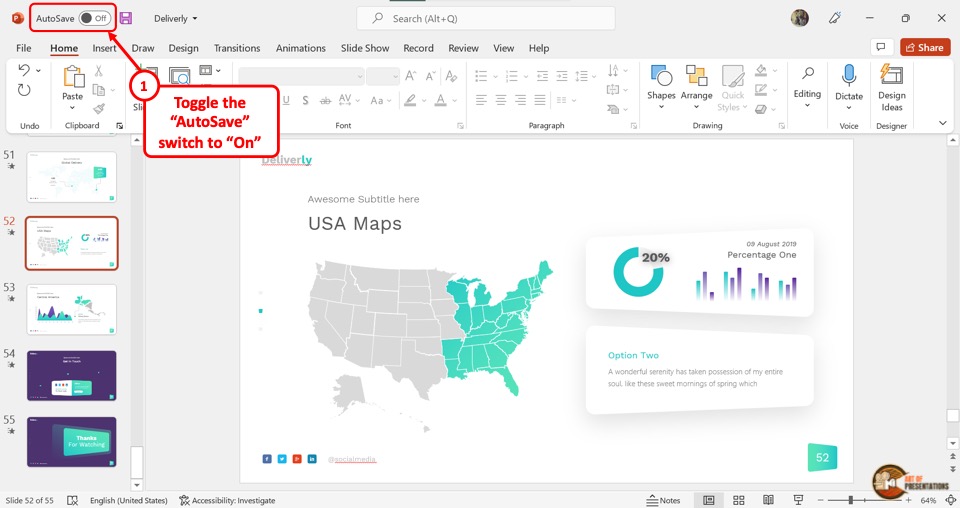
To simply turn on autosave in the OneDrive cloud for the PowerPoint presentation, all you have to do is click on the slider beside the “Autosave” option.
It is located in the left corner of the Quick Access Toolbar at the top of the screen.
Step-2: Click on “Options”
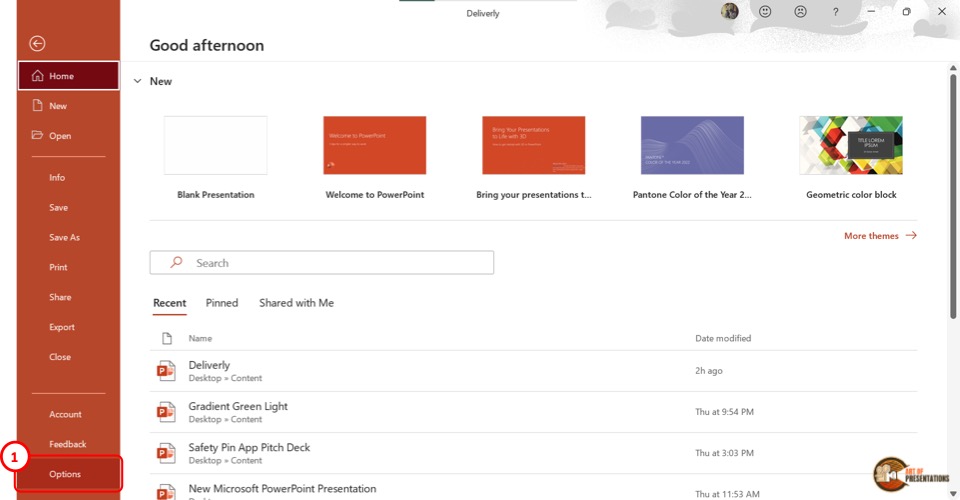
To access more autosave options, click on the “File” tab in the menu ribbon. Then click on the “Options” option which is the last option in the sidebar in the “File” menu. It will open a dialog box.
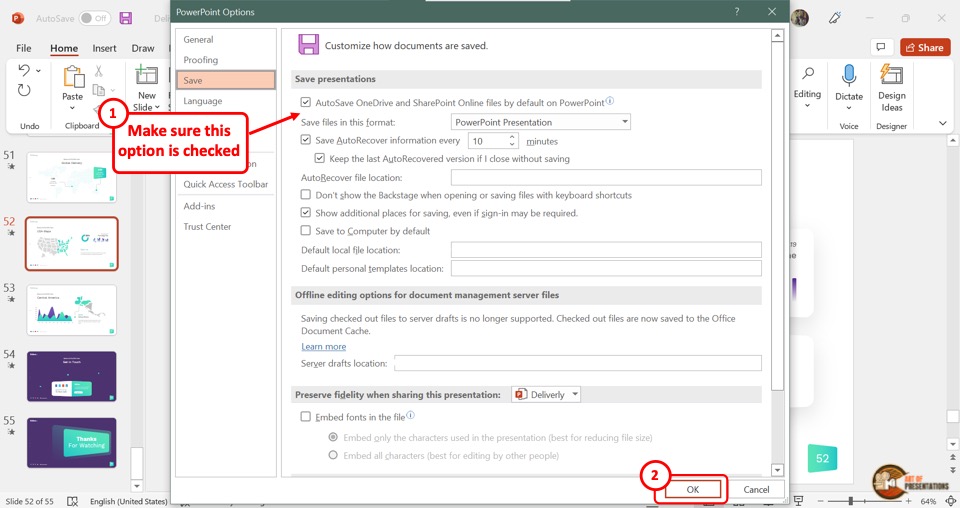
In the “PowerPoint Options” dialog, click on the “Save” option from the sidebar located on the left side. Now you can enable your preferred autosave options in the “Save presentations” section.
Click on the “Autosave OneDrive and SharePoint Online files by default on PowerPoint” for auto-saving on the cloud. You can also select how often the auto-recovery copy is saved by clicking on the box at the right side of the “Save Autorecover information” option.
Step-4: Click on the “OK” button
Now all you have to do is click on the “OK” button at the bottom of the “PowerPoint Options” dialog box to enable your autosave preference (as shown in the image in step 2).
Credit to Cookie_studio (on Freepik) for the featured image of this article (further edited).
- PRO Courses Guides New Tech Help Pro Expert Videos About wikiHow Pro Upgrade Sign In
- EXPLORE Tech Help Pro About Us Random Article Quizzes Request a New Article Community Dashboard This Or That Game Happiness Hub Popular Categories Arts and Entertainment Artwork Books Movies Computers and Electronics Computers Phone Skills Technology Hacks Health Men's Health Mental Health Women's Health Relationships Dating Love Relationship Issues Hobbies and Crafts Crafts Drawing Games Education & Communication Communication Skills Personal Development Studying Personal Care and Style Fashion Hair Care Personal Hygiene Youth Personal Care School Stuff Dating All Categories Arts and Entertainment Finance and Business Home and Garden Relationship Quizzes Cars & Other Vehicles Food and Entertaining Personal Care and Style Sports and Fitness Computers and Electronics Health Pets and Animals Travel Education & Communication Hobbies and Crafts Philosophy and Religion Work World Family Life Holidays and Traditions Relationships Youth
- Browse Articles
- Learn Something New
- Quizzes Hot
- Happiness Hub
- This Or That Game
- Train Your Brain
- Explore More
- Support wikiHow
- About wikiHow
- Log in / Sign up
- Computers and Electronics
- Presentation Software
- PowerPoint Presentations
How to Save a PowerPoint Presentation
Last Updated: May 26, 2022
wikiHow is a “wiki,” similar to Wikipedia, which means that many of our articles are co-written by multiple authors. To create this article, volunteer authors worked to edit and improve it over time. This article has been viewed 52,718 times. Learn more...
A PowerPoint presentation is an excellent way of presenting information or ideas to an audience. The software is easy to use and offers a lot of cool effects for your slideshows, too. But, what's all the use of this if you don't even know how to save your finished PowerPoint? This wikiHow will teach you how to save your file.
Design your PowerPoint presentation.

- You don't have to wait until you're totally finished to save your work. It can help to save along the way, too, to ensure you don't lose any progress.
Open the File menu when you're ready to save.

Choose the Save or Save As option.

Decide where to save the presentation.

Name and save your presentation.

Expert Q&A
You might also like.

About This Article
- Send fan mail to authors
Is this article up to date?

Featured Articles

Trending Articles

Watch Articles

- Terms of Use
- Privacy Policy
- Do Not Sell or Share My Info
- Not Selling Info
Keep up with the latest tech with wikiHow's free Tech Help Newsletter

How Do I Put a PowerPoint on A Flash Drive?
To put a PowerPoint on a flash drive, open your presentation and click on “File” in the menu. Choose “Save As,” select your flash drive as the destination, and click “Save.” Now, your PowerPoint is saved on the flash drive, making it portable and easy to share.
Discovering how to transfer your PowerPoint presentation to a flash drive is a simple yet crucial skill. How do I put a PowerPoint on a flash drive? With just a few easy steps, you can ensure your slideshows are portable and ready to impress on any computer. Unveil the convenience of sharing your presentations hassle-free by mastering this quick and essential process.
To put a PowerPoint on a flash drive, first, open your PowerPoint presentation and save it to your computer. Then, insert the flash drive into a USB port. Finally, copy and paste the PowerPoint file from your computer to the flash drive. Now, you can easily share your presentation by plugging the flash drive into another computer.
Table of Contents
Saving PowerPoint Presentation to a Flash Drive
Saving a PowerPoint presentation to a flash drive is a straightforward process. First, ensure your PowerPoint is saved on your computer. Next, insert the flash drive into a USB port. Then, locate your PowerPoint file and right-click to select “Copy.”
Navigate to your flash drive folder, right-click, and choose “Paste” to transfer the PowerPoint onto the flash drive. Once completed, safely eject the flash drive. To access your PowerPoint on a different device, simply plug the flash drive in, locate the file, and open it.
With this method, sharing and transporting PowerPoint on a flash drive becomes convenient and efficient for presentations or collaborations. Always remember to keep backups of your important files, including your PowerPoint on a flash drive, for added security and accessibility.
Preparing to Save Your Presentation
When preparing to save your presentation for easy portability, ensure that your PowerPoint on a flash drive is organized and ready for transfer. Begin by opening your PowerPoint file and selecting “Save As.” Choose a location on your computer to save the file, and then insert the flash drive into a USB port.
Within the “Save As” window, locate the flash drive in your file explorer, select it, and click “Save.” This process ensures that your PowerPoint on a flash drive is conveniently stored, allowing seamless sharing and accessibility across different devices.
Saving the Presentation
Saving your PowerPoint presentation on a flash drive is a straightforward process. Begin by opening your presentation and selecting “Save As” from the File menu. Choose a location on your computer to save the file and name it appropriately. Next, insert your flash drive into a USB port. Locate the saved presentation on your computer, then copy it and paste it onto the flash drive.
With your PowerPoint on a flash drive, you can conveniently carry and share your presentation by plugging the flash drive into any compatible computer. Always remember to safely eject the flash drive to avoid data loss. Power up your presentations with the simplicity of storing them on a flash drive for easy accessibility anytime, anywhere.
Step-by-step guide to how to use PowerPoint on a USB flash drive for presentations

- Insert your USB flash drive into a compatible port on your computer.
- Open PowerPoint on your computer and create or open the presentation you want to save on the USB flash drive.
- Click on “File” in the top left corner, then select “Save As” from the dropdown menu.
- Choose your USB flash drive as the location to save the presentation file.
- Name your file and click “Save” to transfer the PowerPoint presentation to the USB flash drive.
- Safely eject the USB flash drive from your computer once the transfer is complete.
- Insert the USB flash drive into the computer you’ll be using for the presentation.
- Locate the USB drive in the file explorer and open the PowerPoint file.
- Verify that all multimedia elements and formatting are intact.
- Practice navigating through your presentation to ensure smooth transitions.
- Adjust any settings, such as slide show options, according to your preferences.
- Rehearse your presentation on the actual computer to familiarize yourself with the setup.
- Keep a backup copy of your presentation on the USB flash drive for contingency.
- When ready to present, connect the USB flash drive to the projector or display device.
- Launch the PowerPoint presentation from the USB flash drive, delivering a seamless and professional presentation experience.
Selecting the Right Flash Drive for Your PowerPoint Presentation:
Choosing the appropriate flash drive is crucial for a seamless PowerPoint presentation. Opt for a USB drive with sufficient storage capacity to accommodate your presentation file along with any multimedia elements.
Ensure compatibility with both your computer and the devices you’ll be using during the presentation. A reliable, high-speed flash drive can enhance data transfer rates, minimizing potential delays during your presentation.
Step-by-Step Guide: Saving Your PowerPoint to a USB Drive
Saving your PowerPoint presentation to a USB drive involves a few straightforward steps. After opening your presentation in PowerPoint, navigate to the “File” menu and select “Save As.”
Choose your USB drive as the designated location and provide a relevant file name. Click “Save,” and your presentation will be transferred to the flash drive. This step-by-step process ensures that your PowerPoint file is stored securely on the USB drive and can be easily accessed when needed.
Ensuring Compatibility: Formatting Your Flash Drive for PowerPoint
To guarantee compatibility, it is essential to format your flash drive appropriately for PowerPoint. Most flash drives come pre-formatted, but if not, you may need to format it to a compatible file system such as FAT32 or ex-FAT.
This ensures that the drive can be recognized by various operating systems and devices. Remember that formatting erases all data on the drive, so be sure to back up any important files before proceeding.
Safely Transferring Your Presentation: Best Practices for USB Usage
Adhering to best practices for USB usage is critical to prevent data corruption and ensure a smooth transfer process. Always eject the USB drive safely from your computer before physically removing it to avoid potential data loss. Additionally, consider using high-quality, reputable USB drives to minimize the risk of file errors.
Regularly back up your presentation on another storage device to mitigate the impact of unforeseen issues, providing an extra layer of security for your valuable content. These precautions contribute to a reliable and trouble-free experience when using a USB drive for your PowerPoint presentations. Troubleshooting Tips: Common Issues When Putting PowerPoint on a Flash Drive
Optimizing Multimedia: Tips for Embedding Videos and Audio in Your Presentation
| Ensure your videos and audio files are in widely supported formats (e.g., MP4 for videos, MP3 for audio) to ensure compatibility when sharing your PowerPoint on a flash drive. |
| Compress multimedia files to reduce their size, allowing for smoother playback when transferring your PowerPoint on a flash drive. Utilize tools to maintain quality while minimizing file size. |
| Embed videos and audio directly into your PowerPoint to ensure offline accessibility when presenting from a flash drive. This eliminates the need for an internet connection. |
| Before transferring your PowerPoint on a flash drive, verify that the multimedia elements work seamlessly on different computers by testing them in advance. |
| Opt for a reliable and adequately sized flash drive. Ensure there’s enough space to accommodate your PowerPoint presentation and embedded multimedia files. |
| Save a copy of your PowerPoint presentation with embedded multimedia locally on your computer before copying it onto a flash drive for added security. |
| Be mindful of file sizes when embedding multimedia. Large files may impact the responsiveness of your PowerPoint on a flash drive, potentially leading to slower loading times. |
| Always check your presentation in full-screen mode from the flash drive on different computers to confirm that multimedia elements play smoothly. |
Customizing Settings: Tailoring Your PowerPoint for Portable Presentations
Customizing settings for PowerPoint on a flash drive is key for seamless portable presentations. Start by adjusting slide dimensions to match the display, ensuring a consistent view. Optimize image and multimedia settings to balance quality and file size, ensuring smooth playback when sharing your PowerPoint on a flash drive.
Choose a clear and legible font size for easy readability on diverse screens. Embed videos and audio directly into your presentation to enhance offline accessibility when using PowerPoint on a flash drive. Save your customized settings along with the presentation file for a hassle-free experience on any computer. Keep in mind that the flash drive’s capacity should accommodate both the presentation and any embedded files.
Regularly test your customized PowerPoint on a flash drive on different devices to catch any compatibility issues. Always select the ‘Portable’ or ‘Package Presentation for CD’ option when saving, ensuring all linked files travel with your PowerPoint on a flash drive. Adjust transition and animation settings for a polished yet subtle delivery. With these tailored settings, your PowerPoint on a flash drive will be ready for impactful presentations anytime, anywhere.
How do I save my PowerPoint presentation to a flash drive?
To save your PowerPoint presentation to a flash drive, first, open the file, then select “Save As” from the File menu. Choose your flash drive as the destination and click “Save.”
What file format is best for storing PowerPoint presentations on a flash drive?
It is recommended to save your PowerPoint presentation in the default .pptx format. This format is widely supported and ensures compatibility when transferring the file to a flash drive.
Can I embed multimedia files in my PowerPoint presentation on a flash drive?
Yes, you can. Embedding videos and audio directly into your PowerPoint presentation ensures they travel with the file when saved on a flash drive, providing offline accessibility on any compatible device.
Do I need to adjust settings before saving my PowerPoint on a flash drive?
Yes, consider adjusting settings such as slide dimensions, font size, and multimedia optimization to tailor your presentation for portable use. These adjustments enhance the viewing experience on different devices.
How do I safely eject the flash drive after transferring my PowerPoint presentation?
To safely eject the flash drive, locate the USB icon in your system tray (Windows) or on your desktop (Mac). Right-click (Windows) or Control-click (Mac) on the icon and select the option to eject or safely remove the flash drive before physically unplugging it from the computer.
In conclusion, transferring your PowerPoint presentation to a flash drive is a straightforward process that allows for convenient portability and easy sharing. By saving the presentation on your computer, inserting the flash drive, and copying the file over, you create a portable version of your content that can be accessed on different computers.
This method not only eliminates the need for an internet connection but also ensures that your presentation remains intact, including any embedded multimedia elements. Overall, putting a PowerPoint on a flash drive is a practical solution for professionals, educators, and anyone who needs to share their presentations without the constraints of specific devices or online access. It provides flexibility and accessibility, making your presentations truly portable and ready to impress in various settings.
Leave a Comment Cancel reply
Save my name, email, and website in this browser for the next time I comment.
Recent Posts

Top 23 Real Estate Development Firms Shaping the US

Top 21 Real Estate Investment Companies in the US: Uncover Lucrative Opportunities

Jobdirecto Your Ultimate Destination for Job Opportunities

Veestrit: A Unique App to Customize Your Charging Screen

MyFlexBot Review: Enhancing Your Amazon Flex Experience

Rajkotupdates.news Watchgpt App Apple Watch Users

Snapchat Planets: A Guide to Snapchat’s Friend’s Solar System

How To Use iGanony? Download Instagram Story Easily
We're thrilled to have you here. Whether you're exploring our services , seeking information, or just passing by, consider yourself part of the techplces.com family.
Privacy Policy
Terms of Services
Latest Post

April 17, 2024

April 16, 2024

April 15, 2024
How to use a USB flash drive for PowerPoint presentations
Wondering how to use a USB flash drive for PowerPoint presentations? If you need to make a presentation, it’s a good idea to bring along a USB flash drive, available from stores like Amazon (aff). Whether it’s your main way of connecting to the presentation or a backup plan, having a one of these inexpensive devices can reduce stress.
Many presenters like to bring their own computer and simply plug it into the existing projector when they meet with a client, speak at an event or give a lecture. But you may arrive only to find out that you need a special cord, that the promised cord isn’t working or that no one knows quite how to change the custom setup. Some organizations may have rules about who can touch the equipment.
For good measure, you may want to email yourself and the client copies of the presentation. With cloud-based email, you can simply log in and retrieve the presentation if neither your computer nor your USB flash drive turn out to work.
In any case, figuring out how to use a USB flash drive for your presentation in PowerPoint or other applications makes sense. You don’t want to be scrambling at the last minute if you’re asked to speak or present. After all, speaking can help build your expert status .
Here’s how to use a USB flash drive for PowerPoint presentations….
Step by step guide to how to use a USB flash drive for PowerPoint presentations
- Prepare your presentation files . If you know for sure that PowerPoint or your presentation software will be available on the other computer, you can just bring along the raw files. However, because of version problems or even potential problems with transferring the file, it’s probably best to save your presentation as a .exe file, so that it can run on its own, without any external software.
- Insert the USB drive into your computer, using the USB port.
- Transfer the PowerPoint or other presentation to your USB flash drive. It should show up as one of your available drives. You can either transfer the file by copying it or you can open the presentation and “save as” to your flash drive. If you’re using an .exe file, be sure to include everything you need.
- Open the USB drive using your file management software (e.g. Windows Explorer). Make sure the file is on the drive. Open it and make sure it works properly.
- Eject the USB drive . If you are using Windows, you should see an icon on the bottom of your screen. On a Mac, drag the drive to the trash.
- At the client site, insert the USB drive and open the file.
- For stability, you may wish to transfer the file to the client’s computer . USB drives run more slowly and may be less stable. However, many people run presentations right from the drive.
- When you’re done, don’t forget to eject the USB drive and take the file home with you. If you transferred a file to the client’s computer, you may also wish to delete it.
- If your files are sensitive, you may wish to encrypt them with a password .
Any tips to share? Learning how to prepare your flash drive for a presentation the first time may take a little patience, but you should get the hang of it and be able to do it with ease in future. Presenting helps build your credibility and feeling confident with tech will help.
Build credibility with a solid plan for your consulting fees. Order my book, Consulting Fees: A Guide for Independent Consultant s.
Leave a Reply
Your email address will not be published. Required fields are marked *
Save my name, email, and website in this browser for the next time I comment.
Get the Reddit app
A community dedicated to providing users of Microsoft Office PowerPoint tips, tricks, and insightful support.
Auto-running a PowerPoint from a USB.
I’m looking to set up a display screen at the company I intern for. Would it be possible to save a ppt to a flash drive and have it automatically play on the screen as soon as I insert it?
By continuing, you agree to our User Agreement and acknowledge that you understand the Privacy Policy .
Enter the 6-digit code from your authenticator app
You’ve set up two-factor authentication for this account.
Enter a 6-digit backup code
Create your username and password.
Reddit is anonymous, so your username is what you’ll go by here. Choose wisely—because once you get a name, you can’t change it.
Reset your password
Enter your email address or username and we’ll send you a link to reset your password
Check your inbox
An email with a link to reset your password was sent to the email address associated with your account
Choose a Reddit account to continue

Export a presentation
File > Export helps you change your presentation into a different format, such as PDF, video, or Word-based handouts. All these options are covered below.
If you simply want to "export" a file (in its current .pptx format) to a different storage system, such as a flash drive, plug that flash drive into your computer and use File > Save As (or Save a Copy ) to save to that new location.
Create a PDF
You can convert your presentation to PDF or XPS to share with others.
Click the Create PDF/XPS button.
In the File Name box, enter a name for the file, if you haven't already.
In the Save as type list, ensure that PDF (*.pdf) is selected.
If you want the file to open in the selected format after saving, select the Open file after publishing check box.
If the document requires high print quality, click Standard (publishing online and printing) .
If having a smaller file size is more important than print quality, click Minimum size (publishing online) .
Click Options to set the pages to be printed, to choose whether markup should be printed, and to select output options. Click OK when finished.
Click Publish .
Create a video
You can turn your presentation into a video file that can be watched without using PowerPoint.
See Turn your presentation into a video for the details.
Package a presentation for CD
You can create a package for your presentation and save it to a CD or USB drive so that other people can watch your presentation on most any computer.
See Package a presentation for CD or USB flash drive for the details.
Create handouts
If you want to use the editing and formatting features of Word, you can work on and print your handouts using Word.
See Edit or print PowerPoint handouts in Word for the details.
Change the file type
Change File Type is the same feature as the traditional Save As command. You select the underlying type of file you want, then click the Save As button. The original file is kept in its current format and closed, and a new copy of it is opened and saved in the format you've chosen.
Publish to Microsoft Stream
(This feature is available to Microsoft 365 subscribers who are part of an organization .)
After you save your presentation as a video, you can upload the video to a video-sharing site named Microsoft Stream that only people in your school or organization have access to. Those people can watch the video in a browser.
See Save a video to Microsoft Stream for more details.

Need more help?
Want more options.
Explore subscription benefits, browse training courses, learn how to secure your device, and more.

Microsoft 365 subscription benefits

Microsoft 365 training

Microsoft security

Accessibility center
Communities help you ask and answer questions, give feedback, and hear from experts with rich knowledge.

Ask the Microsoft Community

Microsoft Tech Community

Windows Insiders
Microsoft 365 Insiders
Was this information helpful?
Thank you for your feedback.
- SMB Technology
- Mobile Productivity
- Mobile Security
- Computing & Monitors
- Memory & Storage
- Digital Signage
- Trending Tech
- Hospitality
- Manufacturing
- Transportation
- Food & Beverage
- Live Events & Sports
- Spectaculars & DOOH
- Gaming & Esports
- White Papers
- Infographics
- Case Studies
- About Samsung Insights
- Our Experts
Subscribe to Insights
Get the latest insights from Samsung delivered right to your inbox.
See our Privacy Policy
Samsung Business Insights
Featured posts in

5 ways foldables open up better AI experiences for SMBs

6 reasons to switch to Galaxy Z Flip6

Galaxy Z Fold6 vs. Galaxy Z Flip6: Which foldable device is best for your business?
How to take advantage of the s pen on galaxy z fold6.
S Pen compatibility is one of the most exciting features of Samsung’s new Galaxy Z Fold6 , especially for business owners looking to enhance their productivity. When you pair your Galaxy AI *-powered Z Fold6 with the optional S Pen Fold Edition or Bluetooth-capable S Pen Pro , you can unfold new potential and work with precision on the smooth, expansive 7.6-inch interior screen.
In an age of hybrid work, being productive on the go is more important than ever. And with the extra screen space afforded by Galaxy Z Fold6’s unique form factor, combined with the precision of the S Pen, you won’t miss a beat in keeping up with your daily tasks, even if your day takes you to a few different locations. It’s the perfect complement to the device innovation, portable productivity and peace of mind you get with Galaxy Z Fold6.
If you already use an S Pen as an essential part of your workday, you’ll love what it can accomplish on Galaxy Z Fold6. If you haven’t used an S Pen before, prepare to rewrite your definition of efficiency.
1. Take notes instantly — and let Galaxy AI optimize them
The need to write something down can happen at any second — not just in a meeting but while you’re commuting, relaxing or casually chatting. With the S Pen, you don’t even need to unlock your Galaxy Z Fold6 to start taking notes. Just press the side button on the pen and start writing. Then, when you’re done, tap Save, and everything will be safely stored in Samsung Notes . You can also launch Samsung Notes at any time from the Air Command menu (see Tip No. 4 below). And with the availability of Goodnotes on Galaxy, you have more app choices than ever before.
Shop special offers
Find out about offers on the latest Samsung technology.
Speak to a solutions expert
Get expert advice from a solutions consultant.
Who are you buying for?
I'm buying for myself
I'm buying for a small business
I'm buying for a large enterprise
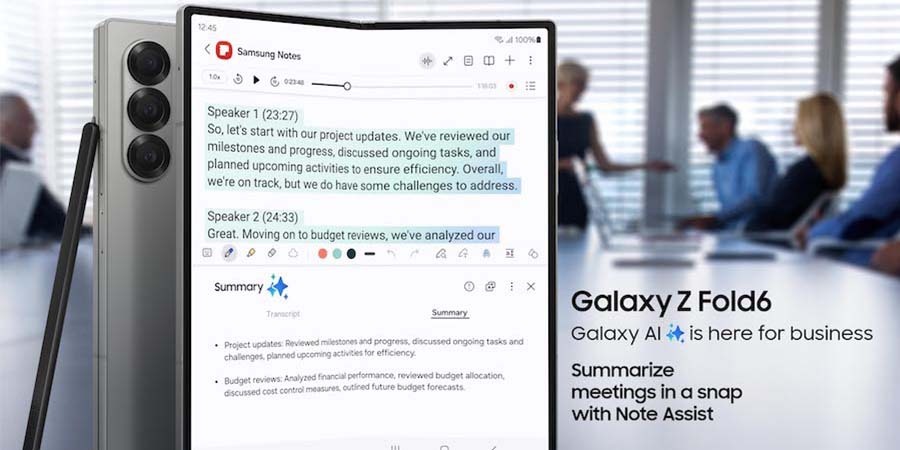
GalaxyZ Fold6 also features Note Assist with Galaxy AI. After you’ve used your S Pen to jot information down, Note Assist can automatically summarize, organize and highlight key takeaways on your behalf.
2. Convert handwriting to text
Use the S Pen to handwrite an email or message and c onvert it to te xt . Microsoft has optimized Outlook for Galaxy Z Fold6’s foldable form factor in FlexMode, so you can use the S Pen to respond to emails by hand. To switch to handwriting mode, just tap the three dots within your on-screen keyboard, then tap “handwriting.” Now, everything you write in the gray box can be converted to text.
Writing a short email and converting it to text is quick and convenient — a refreshingly intuitive departure from thumbing away at a smartphone keyboard. In sectors like healthcare and public safety, taking handwritten notes has long been part of the job, but converting those notes into text saves a lot of time that was once spent inputting into a computer. In Outlook or Samsung Notes, Galaxy Z Fold6’s AI transcription capabilities digitize your message quickly and accurately, even when you write in cursive.
3. Annotate a PDF — or Circle to Search with Google
If you work in a field like wealth management, you’re likely managing a wide variety of business documents that need to be reviewed and occasionally revised. The S Pen is perfect for simplifying that task because you can use it to mark up documents on Galaxy Z Fold6 in tablet mode.
To mark up PDFs, open Samsung Notes and tap the “Import PDFs” icon at the top of the screen. Then, select the PDF and start annotating. You can even add a voice recording to explain your comments further. When you’re finished with your markup, you can save, share and send it with a few taps.
The S Pen works seamlessly in Microsoft Office, too. If you’re creating a presentation or proposal on your own, use the S Pen to drag and drop images or blocks of text in one motion — no need to copy and paste. Or take advantage of the “Draw” functionality within PowerPoint and Word to sketch your ideas within the presentation or document.
If you see something in a PDF you can’t define or don’t understand, Galaxy Z Fold6 also includes Circle to Search with Google. That means you can use your S Pen to draw around a word, image or object on screen and immediately get the necessary answers.
4. Use Air Command
Air Command is a hub for one-tap S Pen shortcuts. With your Galaxy Z Fold6 in tablet mode, tap the floating pen icon on the right side of your screen to access the Air Command toolbar. From Air Command, you can create a new note, write on the screen, translate text, magnify on-screen content, draw on top of live video and more.
Smart Select is one of the most powerful Air Command tools, allowing you to grab on-screen content by drawing a rectangle or freeform shape around it. You can then add annotations, extract text and move the content to another app, and quickly share it with colleagues. Smart Select is a valuable timesaver if you’re often creating business proposals and presentations.
5. Translate
Doing business globally is a little bit easier with the S Pen. With the Translate tool in the Air Command menu, you can instantly translate words, emails, documents and news articles between dozens of languages. Simply open the text you want to translate and then launch Translate in the Air Command menu. Select the source and target languages, and just hover over the text.
Get your free guide to matching the right smartphone with your business and employee needs.

Get your free guide to matching the right smartphone with your business and employee needs. Download Now
You can switch between translating a single word and a full sentence by tapping the “T” in the Translate toolbar. Tap the speaker icon while you hover to hear the word or phrase spoken.
This pairs nicely with Galaxy Z Fold6’s Live Translate with Galaxy AI feature , which offers real-time translation in 16 languages (and more coming soon).
6. Take notes during a videoconference
When you flex Galaxy Z Fold6 and set it on your desk, you can videoconference hands-free. But what if you want to take notes at the same time? Thanks to Multi-Active Windows support, you can simultaneously run the Samsung Notes app on the bottom half of your screen.
Just swipe in the tab on the right of your screen to open the Edge Panel or access the new taskbar at the bottom of the display when you’re working in an app. Then, find Samsung Notes (if you don’t see it, tap the menu at the bottom of the Edge Panel or on the side of the taskbar and select “All apps” to add it), and drag and drop a Notes window to the bottom half of your screen.
Having a mobile videoconferencing suite in your pocket is refreshingly convenient for a business leader on the go. Rather than carrying a pad of paper and an ink pen, your Galaxy Z Fold6 and S Pen are ready to let you connect, listen closely and take notes.
Of course, unless you’re a lightning-fast note-taker, there’s the risk you won’t capture all the key ideas during a videoconference. That risk goes away when using Transcript Assist with Galaxy AI, which can instantly transcribe and summarize your meetings for you. Then, it might just be a matter of using your S Pen to emphasize the points that stand out.
7. Use Sketch to Image and show your creative side
Architects, graphic designers, brand marketers and other creative professionals can use Galaxy Z Fold6 — which now has a reduced crease of 44% — as a canvas and the S Pen as a drawing instrument. Saving your creations digitally keeps them safer than a paper notepad or sketchbook, and easier to revisit as needed. Even if you’re not in a creative field, the S Pen can spark inspiration and ideas through visual brainstorming.
Samsung Notes offers a wide array of drawing modes, including a fountain pen, calligraphy pen, pencil, and calligraphy brush. You can adjust the line’s thickness and color (including Hex and RGB color codes) while adding some real finesse with 4,096 levels of pressure sensitivity.
You can take your drawings to the next level with Sketch to Image, which transforms them into beautiful images worthy of marketing collateral or a sales deck for a client.
Which S Pen should you choose for Galaxy Z Fold6?
Previous-generation S Pens are not compatible with Galaxy Z Fold6. Samsung has introduced two new S Pen options designed to protect the flexible interior display, with a softer tip and built-in springs that lessen the impact on the display as you write.
The S Pen Fold Edition is more compact and works only with Galaxy Z Fold6. It supports all the features above and is ideal for accurate writing and drawing. The S Pen Fold Edition pairs perfectly with Galaxy Z Fold6 Standing Case, which can be used as a stand to prop up your phone for presentations or video viewing.
The S Pen Pro works across most Galaxy devices with S Pen support. It’s larger than the regular S Pen, at just over 6.8 inches, giving you a comfortable grip. The S Pen Pro also features Bluetooth connectivity, so you can use it as a remote control for your device and take advantage of Air Actions, such as swishing your pen to advance slides in PowerPoint. It’s charged via USB-C, and a quick 50-minute charge can get you up to 16 days of battery life (depending on usage).
The natural feel of pen on paper meets the power of Galaxy Z Fold6.
Unleash new ways to stay productive, collaborate and more with Samsung for business . Sign up for a Samsung Business Account to get exclusive offers, including volume pricing discounts, on Galaxy Z Fold6 today.
*Galaxy AI features by Samsung will be provided for free until the end of 2025 on supported Samsung Galaxy devices.

Drew Jackson
Andrew (Drew) Jackson is a strategic B2B Senior Category Manager for Samsung Electronics America, leading the strategy for all Mobile B2B flagship smartphones. His notable achievements include spearheading the B2B product category strategy for the launch of the Galaxy S24 Series, the first AI-enabled smartphone at Samsung. With nearly a decade of experience at Samsung, Drew has contributed significantly to developing go-to-market strategies and managing the complete product lifecycle for numerous devices within Samsung's mobile phone portfolio. He actively collaborates with customers and business leaders to identify use cases for cutting-edge technologies, ensuring that the products in his category deliver value to both consumers and enterprises. Drew's extensive background encompasses stints at The Coca-Cola Company, Delta, and General Electric, as well as service as an Officer in the United States Army. He holds a Bachelor of Science degree in Physics from Florida A&M University and is Six Sigma Black Belt certified. Currently based in Atlanta, Georgia, Drew relishes spending quality time with his family, discovering new places, reading books, and listening to podcasts all while achieving his goal of feeling Better Today.
- Galaxy Z Fold6
- mobile productivity
- New in the Galaxy
Related Posts

How to master Multi-Active Windows on Galaxy Z Fold6
Multi-Active Windows is one of the easiest and most versatile productivity enhancers for Galaxy Z Fold6.

10 ways Galaxy Z Fold6 boosts mobile productivity
Samsung's new Galaxy Z Fold6 can be a game changer for your mobile productivity.

Why Galaxy AI offers IT leaders a secure way forward
How Knox and Galaxy AI devices like Galaxy Q6 and B6 transform the way large enterprises can take advantage of AI.
Featured Posts

AI doesn't have to be complex or intimidating. Learn how Galaxy AI on Galaxy Z Fold6 and Galaxy Z Flip6 can empower SMBs.

Galaxy Z Flip6 is a fresh and exciting business option that provides greater flexibility. Here are six reasons why your team will flip for this phone.

Samsung's new Galaxy Z Fold6 and Galaxy Z Flip6 are here to power your workday in ways only a foldable smartphone can.
How can we help you?
I'm buying for myself
I'm buying for a small business
I'm buying for a large enterprise
Our solutions architects are ready to collaborate with you to address your biggest business challenges.
- Mobile Phones
- Laptops/2-in-1
- Business Services
- Displays & Digital Signage
- Hospitality TVs
- Wireless Networks
- Public Safety

A member of our solutions architect team will be in touch with you soon.
IMAGES
VIDEO
COMMENTS
On the File tab, select Save. Do of the following: To save to your local drive, such as your laptop, a flash drive, CD or DVD drive, select Computer. To save to a SharePoint Library, select SharePoint. Under Save As > Recent Folders, select Browse, pick a path and file folder, and then name the file. Select Save.
Step 8: Click on "Save". After selecting the saving location, specifying the file name, and choosing the file format, click on the "Save" button located at the bottom-right corner of the "Save As" window. PowerPoint will now save your presentation on the USB drive.
Save your package to a USB flash drive. Insert a USB flash drive in a USB slot in your computer. In PowerPoint, click File, click Export, click Package Presentation for CD, and then click Package for CD. In the Package for CD dialog box, type a name for your CD in the Name the CD box. To add one or more presentations to package together, click ...
Hi All! When working in PowerPoint, it is always important to Package the presentation once you are done to ensure that the Presentation is saved with all of...
Exporting Presentations. To export your presentation, open PowerPoint. Click the "File" tab and select "Save As". Choose your USB drive from the menu, specify the file name, and select the file type. Alternatively, you can use the "Export" function under the "File" tab for more advanced options like packaging your presentation.
Saving a PowerPoint presentation to a thumb drive/data-stick is easy. All you need to do is open it up and save it as if you were saving it to your computer. ... This wikiHow article will teach you how to save a PowerPoint presentation to a thumb drive. Steps. Download Article ... Make sure your thumb drive/data-stick is already in the USB port ...
Summary. Insert your flash drive into a USB port on your computer. Open the PowerPoint presentation you wish to transfer. Click on the 'File' tab in PowerPoint. Select 'Save As' from the menu. Choose your flash drive from the list of available locations. Click 'Save' to transfer the presentation to your flash drive.
To save the PowerPoint presentation on your USB flash drive, click on the "File" tab in the top left corner of the PowerPoint window. From the drop-down menu, select "Save As.". A new dialog box will appear, allowing you to choose the destination and format for your presentation. Step 4: Choose the USB Flash Drive as Destination.
In this video, I'll guide you through the step-by-step process of saving your PowerPoint files directly onto a flash drive, ensuring you have your presentati...
To save a PowerPoint presentation to a USB flash drive, open the file and click "File" in the top-left corner. Choose "Save As," select your USB drive as the location, and click "Save.". Safely eject the USB drive when done to ensure your presentation is portable and accessible. Learn the simple steps to save it to a USB flash drive ...
Step 5. Double-click on your flash drive, for example, "J:." Watch the "Computer" window carefully right after you insert the flash drive; the drive icon that changes wording or colors is usually your flash drive. Advertisement.
On the File tab, select Save. Do of the following: To save to your local drive, such as your laptop, a flash drive, CD or DVD drive, select Computer. To save to a SharePoint Library, select SharePoint. Under Save As > Recent Folders, select Browse, pick a path and file folder, and then name the file. Select Save.
To save the PowerPoint presentation as a PDF file, follow the 4 easy steps. Step-1: Click on the "File" Tab. First, click on the " File " tab in PowerPoint to open the back stage view of PowerPoint. Step 2 - Click on the "Save As" option. In the menu ribbon located at the top of the screen, click on the "File" tab.
Transcript. Save your presentation, so you don't lose all your hard work. Then, print it to share it with others. Save your presentation. Click FILE > Save, pick or browse to a folder, type a name for your presentation in the File name box, and click Save. Save your work as you go. Hit Ctrl+S often.
In this video, I am going to tell you about How to Save a Powerpoint to a Flash Drive.
Choose the Save or Save As option. Download Article. Click Save to save to the current file, or Save as to create a new file. If you've already saved the file at some point, you'll have the option to click Save, which simply saves your changes to that file. Otherwise, choose Save as to create a brand new file. 4.
Step-by-Step Guide: Saving Your PowerPoint to a USB Drive. Saving your PowerPoint presentation to a USB drive involves a few straightforward steps. After opening your presentation in PowerPoint, navigate to the "File" menu and select "Save As." Choose your USB drive as the designated location and provide a relevant file name.
Open the USB drive using your file management software (e.g. Windows Explorer). Make sure the file is on the drive. Open it and make sure it works properly. Eject the USB drive. If you are using Windows, you should see an icon on the bottom of your screen. On a Mac, drag the drive to the trash. At the client site, insert the USB drive and open ...
Try-it! Transcript. Save your presentation, so you don't lose all your hard work. Then, print it to share it with others. Save your presentation. Click FILE > Save, pick or browse to a folder, type a name for your presentation in the File name box, and click Save. Save your work as you go. Hit Ctrl+S often.
In this PowerPoint tutorial, you will learn to save your PowerPoint Presentations to either a CD or to a folder. I have seen many students, who prepare their...
You copy the .pps file from wherever it is to the USB thumb drive. on a hard drive. There are several ways to copy. Here's one: In My Computer, go to the folder than contains the .pps file. Click. the file, then press Ctrl-C to copy it. Then, in My Computer, go to the thumb drive. Click within in, then.
Unlikely. Your main stumbling block is getting it to run automatically, pretty much all screens will require the user to select the presentation and play it. From that point onwards, you can leave it on loop, but someone needs to set it up initially. Then you've got the additional issue, that not all screens will run PPT files natively.
You can convert your presentation to PDF or XPS to share with others. Click the Create PDF/XPS button. In the File Name box, enter a name for the file, if you haven't already. In the Save as type list, ensure that PDF (*.pdf) is selected. If you want the file to open in the selected format after saving, select the Open file after publishing ...
The S Pen works seamlessly in Microsoft Office, too. If you're creating a presentation or proposal on your own, use the S Pen to drag and drop images or blocks of text in one motion — no need to copy and paste. Or take advantage of the "Draw" functionality within PowerPoint and Word to sketch your ideas within the presentation or document.