- Product Overview
- Reports & Dashboards
- Google Adwords Configuration
- Visitor Sessions
- UTM Parameters & Fields
- Documentation
- Frequently Asked Questions
- My Account Login
- FREE Lead & Opp Dashboards
- About CloudAmp
- Terms of Service
- Privacy Policy
- News & Resources

How to get a detailed Email about every new lead in Salesforce
October 27, 2020 by David Hecht
Many online marketers and demand generation professionals want to track their leads in Salesforce, and understand the performance and ROI of their efforts in as near real-time as possible. This post is a step by step tutorial on how to receive a detailed email with all of the lead contact information and tracking details, each time a lead is created in Salesforce via the Salesforce web-to-lead forms on your website.
Your Salesforce administrator (or marketing / sales manager with the appropriate permissions) can assign new leads manually. But if you use assignment rules to automatically assign Salesforce leads to a user or queue, you can specify an email template for the notification in the matching entry. This allows you to receive an immediate, custom email with any information you want, every time a lead from your web site is created in Salesforce.

Step 1: Turn off the Notify checkbox in Setup > Lead > Settings
You may have done this already, as it can be annoying if you get a high volume of inquiries and get the standard notification email (above), which provides very little information.

Step 2: Create a Queue
If you don’t already have a Queue set up in Salesforce, I like to create one called “Inbound Web Leads” where everyone or selected people in marketing and sales can be members of the queue so they receive the notification emails.
Queues in Salesforce help teams manage leads, cases and more because records are placed in a queue, instead of being owned by a particular user. And the records remain there until they are assigned to a user or Accepted by a queue member. Any member of that queue or users above them in the role hierarchy can claim ownership of records in a queue.

You don’t technically need to create a queue, you can just assign all the leads to a single user with the same assignment rules we will use below. But a queue will give you far more flexibility now and allow you to easily scale for future growth as well.
- Setup > Manage Users > Queues
- Enter a Name for the Queue, Select the Object you want for the Queue (Lead)
- Leave “Queue Email” blank unless you have a single person or email list you want notified
- Add users as Members of the Queue
Step 3: Create an Email notification template
There is a standard email template called “Leads: New assignment notification (SAMPLE)” that comes with Salesforce and is usually stored in the “Unfiled Public Email Templates” folder. For CloudAmp’s Campaign Tracker application, designed to track lead sources into Salesforce, we created a custom email template and included it in our app
- Setup > Email > My Templates
- Select the correct folder and template
- Customize the template, or create your own
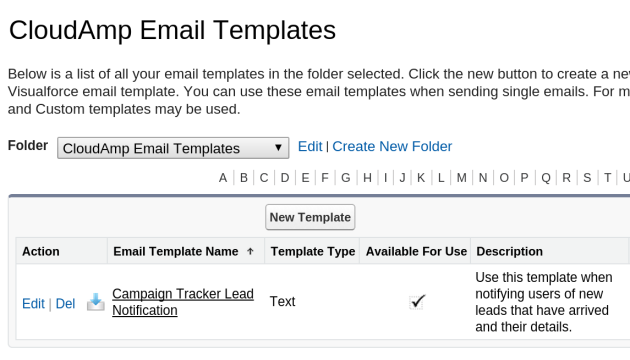
This custom email template, located in the “CloudAmp Email Templates” folder, has a large number of merge fields (the field names in { } brackets) which pull in contact data and all of the Campaign Tracker data into the email notification automatically. This way you can see right away when a new lead comes in how complete their contact information and tracking data is, without having to log into Salesforce.
You can of course clone and edit, or just edit this provided email template to reduce the number of fields in the email notification, or add in other fields from your Salesforce implementation that you think are important (custom fields or otherwise). In addition, if you are not using our Campaign Tracker application (why not?), you can create your own Email template and follow the rest of the instructions in the post.
Step 4: Create assignment rules
Assignment rules automatically assign new web-generated leads that meet certain criteria. Without any lead assignment rules, Salesforce assigns all new web-generated leads to the Default Lead Owner defined on the Lead Settings page.
When you create or edit a lead manually, you can also check a box to assign the lead automatically using your active lead assignment rule, but that is a different process that we won’t cover here.
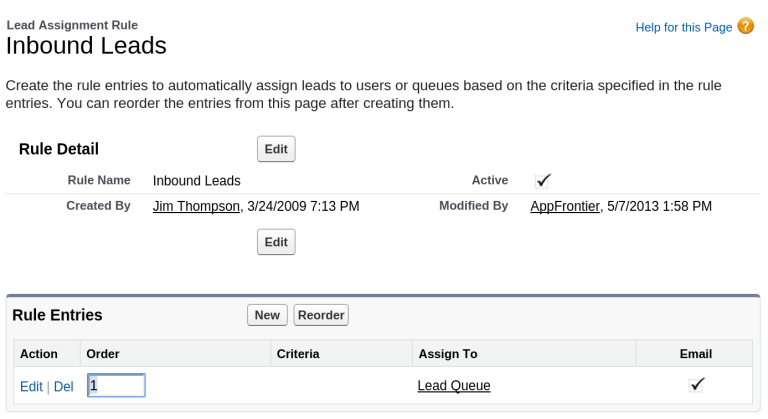
For each rule entry in an assignment rule that is evaluated, an email is automatically sent to the new owner if the rule causes the lead to be reassigned, and you specified an email template. This is where the magic happens, since you can have the assignment rule assign a lead to a queue, and all queue members will receive the email.
- Setup > Customize > Leads > Lead Assignment
- Create a New Lead Assignment Rule (and make it active)
- Create one or more Rule Entries in the assignment rule.
- Choose the Email template from step 3
- Run some tests with your web-to-lead forms

In the screenshot above, we have just created a single rule entry with blank values, so it should capture any web-generated leads. However, in most cases where different types of leads would need to go to different people, you can create multiple Rule Entries and order them so leads fitting various different criteria get assigned differently (and can have different Email notification templates too).
Assignment Rules (combined with Auto-Response Rules) are a great way of managing different types of leads, even leads from completely different web sites in a single Salesforce org. Just use a hidden field in your web-to-lead forms to set a custom value and you can trigger both lead assignment and email auto-responses that are customized with great granularity. But that is a post for another time.
There are other ways of triggering emails when the owner of a lead changes (such as Workflow rules if you have Salesforce Enterprise Edition or above), but this is the most common configuration.

So there you have it. Just follow these steps in Salesforce, and you will be receiving complete and instant Email notifications any time a new web-generated lead is created in Salesforce (just like the one above).
Any questions or feedback, please leave them in the comments below and I will respond. Thanks!
Know where your best Salesforce leads come from, and track marketing ROI more easily.
CloudAmp Campaign Tracker: Source and Campaign Attribution for Salesforce
Featured Posts
- Marketing on Salesforce without Marketing Cloud
- The Ultimate Guide to Salesforce Web-to-Lead Forms
- How to Connect Salesforce and Google Ads
- Which Form or Web Page did a Salesforce lead come from?
- How to be Emailed new leads in Salesforce
- Product Overview
- Select Accounts
- Assign Accounts
- Optimize Coverage
- Dynamic Books
- RevOps Resources
- Documentation

How to use Salesforce lead assignment rules
When your organization gets to the point that you have a) leads coming in on a regular basis and b) multiple sales reps, you quickly realize you need a way to divide up those leads among your reps. If you're using Salesforce, you may have noticed a built-in feature called Lead Assignment Rules. Sounds perfect, right? Sort of. We'll walk you through it.
Here's our agenda:
- The basics of lead assignment rules
Matching and assigning with rule entries
- Issues and challenges with lead assignment rules
The basics of lead assignment rules in Salesforce
Let's take a look at lead assignment rules in Salesforce. Go to your Salesforce org's Setup section and search for "lead assignment" in the Quick Find box. You'll find these buried under Feature Settings > Marketing > Lead Assignment Rules. If you don't see it, make sure you have permissions for "View Setup and Configuration" and "Customize Application".

- Unique names - Every lead assignment rule has a unique name [1].
- A lead assignment rule is really a list of "rule entries" - Salesforce calls each of the individual rules in the list a "rule entry" [2]. Each rule entry allows you to say something along the lines of: "if a lead meets these criteria, assign it to this user (or queue - more on that in a moment)".
- Rule entry order matters - The list of rule entries [2] is processed in a specific order you define. Salesforce will process each rule entry until it finds a match. Once it finds a match, it will assign the lead based on how the rule entry is configured.
- Only one active rule at a time - You can only have one lead assignment rule set to active [3].
Now that we've got a decent idea about what a lead assignment rule looks like, let's dive into rule entries.
Every rule entry has three parts:
- Order - This is a number that indicates where the entry exists in the list. Rule entries are evaluated starting at 1 and then processing until one of the rules matches.
- Matching Criteria - Leads are compared to the matching criteria for each rule to determine if the lead matches. The first rule that matches is used to determine assignment.
- Assignment - This tells Salesforce what you want to do once a lead has matched the matching criteria. Usually, you'll tell Salesforce to assign it to a user or a queue.
Order is pretty straightforward. The complexity really lies in matching criteria and assignment. let's spend some time on those.
Matching criteria
There are two types of matching criteria: filter criteria and formulas. You'll probably use filter criteria the most, so let's start with that one:

One key limitation is that you can only configure criteria using fields from the lead, the current user, and the campaign associated with the lead.
Here's what it looks like to create a formula rule entry:

hbspt.cta._relativeUrls=true;hbspt.cta.load(8216850, 'e84fc167-06c5-4b7b-bb34-42ccff0e2db4', {"useNewLoader":"true","region":"na1"});
Let's go back to the rule entry screen and focus on the assignment section:

So, what's the difference between a user and a queue?
- User - In business terms, this is a particular sales rep who will be responsible for managing the lead. In technical terms, this is an active Salesforce user configured in your Salesforce org.
- Queue - A Queue is a list of records (usually Leads, but not always) that are accessible to a specific group of users. Each of those users can take ownership of a record from the queue, removing it for the others. When you assign ownership of a Lead to a Queue, you're effectively making it first-come, first-serve for a group of users. This is not the same as a "round-robin" assignment where you assign the Lead to one person from a list of users.
There's one last thing to know about assigning ownership. Note the checkbox labeled "Do not Reassign Owner"[3]. This controls what happens when a lead is updated and matches the criteria. If this is checked, the assignment will essentially be ignored. Use this to prevent toggling users back and forth.
The last field, "Email Template" [4] allows you to specify a particular email template to use for notifying the new assignee when the assignment is complete.
Issues and challenges
Lead Assignment Rules are a reasonable choice for a small team with simple rules. They work and the only cost to you is the administrative overhead of creating and maintaining them. Unfortunately, they're extremely limited and don't cover many common use cases. They also become very brittle as your team size and lead velocity increase. Here are a few common issues and challenges:
- Leads only - They only apply to the Lead object (there are Case Assignment Rules for Cases, but that's it). This may make them a poor fit for your sales process if you need to do lead-to-account matching or you're pursuing an account-based strategy . If you need to assign other things besides Leads, you'll need to try a more flexible automation solution like Flow .
- Hard to test - Unlike Process Builder or Flow, your Lead Assignment Rules don't provide any form of versioning or debugging so it's hard to test them without just doing it live.
- Hard to audit - There's no record of why a lead was assigned in a particular way. You'll have to go look through your rule entries to figure it out. This can quickly get painful as the number of rules increases.
- One rule at a time - If your company has very different rules for different leads (e.g. from different campaign sources or applicable to different product lines), it can be very challenging to craft your rule entries in a way that handles more than one lead routing flow.
- No round-robin - It's technically possible to do a very poor version of round-robin with Lead Assignment Rules, we don't recommend it. It's extremely brittle and will break without lots of maintenance.
Where to go from here?
If you've got a small team with simple processes, give Salesforce lead assignment rules a try; they may give you just what you need. If you find yourself needing to assign other objects besides Leads, perform round-robin rep assignments or maintain a full audit trail, you might want to consider Gradient Works.

Hayes Davis
Hayes Davis is co-founder of Gradient Works. Previously, Hayes was SVP of Revenue Operations at Cision, where he ran a global team of 50 supporting nearly 600 sellers. He was also co-founder and CEO of Union Metrics until its successful acquisition by TrendKite in 2018. Hayes has a background in computer science.
CONNECT WITH ME
Related posts.


Admin Tutorials
Chapter 11 - Sales Cloud
- Lead Assignment Rules in Salesforce
Experience Salesforce
What you’ll learn, what are lead assignment rules, example scenario.
- How to Create Salesforce Lead Assignment Rules?
Benefits of Lead Assignment Rules
- What is Sales Cloud in Salesforce?
- Accounts in Salesforce
- Campaign Management in Salesforce
- Contacts in Salesforce
- Salesforce Lead and Lead Processes
- Lead Conversion in Salesforce
- Opportunities in Salesforce
- Products and Pricebooks in Salesforce
- Quotes in Salesforce
Link Copied to Clipboard!
Effective lead management in Salesforce’s changing environment is essential for boosting sales. They are automated processes within Salesforce that determine how newly created leads are assigned to users or queues. Lead assignment rules in Salesforce are essential for making sure that leads are managed and dispersed in your company correctly.
This technical blog will walk readers through the nuances of Salesforce’s lead assignment rules, look at actual cases, and comprehend the significant advantages they provide.
Salesforce Lead Assignment Rules are used to automatically assign lead records to a particular user or queue based on different conditions. It can contain many rule entries that determine the assignee of a lead. Rule entry specifies the following:
- Sort Order, which determines the order of evaluation of rule entries.
- Entry criteria determine which rule entry the response will be sent through.
- Name of the user/queue to which the record should be assigned.
- An email template will be used to send the response.
We can create as many assignment rules as we want, but only one can be active at a time. “Don’t Reassign Owner” determines if the user whose process stack is in use becomes the owner of the rule entity or if it remains owned by its creator user.

Source-Based Assignment – Leads originating from the company’s website forms are assigned to the inside sales team. These leads are automatically directed to the relevant representatives based on the web form source, ensuring a quick response.
Territory-Based Assignment – For leads generated from trade shows, assignment rules are configured to assign them to the field sales representatives responsible for the respective geographic territories. This ensures that local representatives handle leads effectively.
Round-Robin Assignment – Marketing campaigns yield a large volume of leads. To distribute these leads equitably, the organization uses round-robin assignment rules. Leads are systematically rotated among the sales representatives, ensuring a fair distribution of opportunities.
How to Create Salesforce Lead Assignment Rules?
Creating lead and case assignment rules in Salesforce is a relatively straightforward process.
Step 1: After logging in, go to the horizontal navigation bar’s upper right corner and choose Setup.
Step 2: Type “assignment rules” into the Setup search box, then choose Lead Assignment Rules.

Step 3: To add a new assignment rule, select New.

Step 4 : Enter a name in the Rule Name box and Click Save when finished.

Step 5: To specify your rule criteria, click open your newly generated rule and choose New in the Rule Entries.

Here, the “Enter the rule entry” window requires you to enter an Order for your new rule (the Order is the order in which the entry is processed, like a queue).
Next, you need to determine whether your new rule is based on meeting a set of criteria or a formula. In the “Run this rule if the” dropdown box, select either “criteria are met” or “formula evaluates to true.”

Lastly, select the user or queue to whom your rule will assign your new lead (use the lookup feature to find specific users or a queue)

Step 6: After completing these steps, select Save.

Implementing lead assignment rules in Salesforce provides several key benefits:
- Leads are automatically routed to the most suitable representatives or teams, reducing manual assignment efforts.
- It is used to assign the owner to a lead record, which is stored from Web-to-Lead. But while creating lead records manually, the ‘Assign using active assignment rule’ option is visible, which lets the owner be assigned as per the criteria defined in the assignment rule. The owner will be the creator of the record.
- With source-based rules, organizations can ensure that leads are promptly attended to, resulting in faster response times and increased lead-to-opportunity conversion rates.
- Territory-based rules allow organizations to align leads with representatives who have in-depth knowledge of specific regions, increasing the chances of successful conversions.
- Round-robin assignment rules prevent the overload of leads on a single representative and ensure that all sales team members have an equitable opportunity to engage with potential customers.
- Automation reduces the likelihood of manual errors in lead assignment, ensuring that no lead is overlooked.
Lead assignment rules in Salesforce are potent tools for optimizing lead management. Whether it’s routing leads by their source, assigning them to the proper territory, or equitably distributing them among your sales team, these rules streamline the process and enhance efficiency.
By understanding the principles of lead assignment rules and harnessing their capabilities, organizations can ensure that no lead goes unattended, resulting in increased conversion rates and driving sales success.
Need Extra Support? Our FREE study materials have got you covered.
Our expert-prepared study materials provide the answers you need. Clear your doubts and improve your skills with detailed notes from industry professionals.
Sign Up for Free Demo

Create a Round Robin Lead or Case Assignment Rule
First off, what is a “round robin”? Simply put, it’s a rotation through a group. In the context of Salesforce.com, the term round robin frequently comes into play when assigning Lead or Case records to users. For example, you might have five sales reps working new Leads and, as an administrator, you want to divvy out all new Leads equally among the five reps. So if you had a 100 new leads, you would want each rep to get exactly 20 Lead records.
NOTE: This example will be for Leads, but the same concept applies to Case Assignment Rules
A round robin assignment rule allows you to equally distribute new Lead records without having to manually assign them using a rotation as shown below:
- Lead 1 goes to Sales Rep 1
- Lead 2 goes to Sales Rep 2
- Lead 3 goes to Sales Rep 3
- Lead 4 goes to Sales Rep 4
- Lead 5 goes to Sales Rep 5
- Lead 6 goes to Sales Rep 1 (notice the rotation?)
- Lead 7 goes to Sales Rep 2
- Lead 8 goes to Sales Rep 3
- ….and so on
To pull this off in Salesforce you’ll need to create two custom fields on the Lead object. The first is an Auto Number field and the second is a Formula field. You’ll see in a moment how to leverage these two fields to assign Leads.
To create our new fields go to Setup > App Setup > Customize > Leads > Fields
Slide down the page past the “out of the box” fields until you see the “New” button where you can create a custom field.

In Step 1 of the custom field wizard, pick the data type “Auto Number”

- Field Label: Lead Number
- Display Format: {0}
- Starting Number: 1
- Field Name: Lead_Number

Salesforce assigns a number to this field for each new record created in a sequence (and it’s unique). It cannot be edited by a user. As new records are created the number will increment (i.e. the first Lead is “1”, the next Lead created will get the number “2”, and so on). You will also see a checkbox to tell Salesforce to create a number for existing records. If you need to assign existing records a number, go ahead and check this box. If you leave it blank, only new Lead records will receive a number. Don’t worry that the “Display Format” is only showing one digit in length. It will grow as needed as you get to 10, 100, 1000 etc. Continue through the wizard creating the field
Next we are going to create a formula field that will take the number generated by Salesforce and assign it a value in a range you specify in the formula.
In Step 1 of the wizard specify a Formula field.

On Step 2 of the wizard
- Field Label: Round Robin ID
- Field Name: Round_Robin_ID
- Formula Return Type: Number
- Options: 0 Decimal Places

In Step 3 you’ll write a formula with the following value:
MOD(VALUE({!Lead_Number__c}) ,3) +1

The MOD function is going to take our Lead Number, do a bit of math and return a number in a range we specify. The “3” in the formula above means that it will return a number of 1, 2, or 3. This quick Lead View shows how the formula is taking our Lead Number field and creating a Round Robin ID.

For example if you change the “3” in the MOD formula to “5” you’ll get a result of either 1, 2, 3, 4, or 5 for your Round Robin ID.
Now that we have a method to tag each Lead with a Round Robin ID (number), we can leverage this in a Lead Assignment Rule by going to Setup > App Setup > Customize > Leads > Lead Assignment Rules, then click the “New” button.

On the next screen give your Lead Assignment Rule a name and click the Active checkbox and click “Save” as in the screenshot below:

On the next screen click on the Rule Name

Then click the “New” button to start entering rules.
- Sort Order: 1
- Field: Lead: Round Robin ID
- Operator: equals
Select the User to be assigned the Lead and (optionally) select an email template to notify the new owner they have just been assigned a Lead. There is an “out of the box” email template called “Leads: New assignment notification (SAMPLE)” that comes with Salesforce that is usually stored in the “Unfiled Public Email Templates” folder.

Create a rule for each rep that needs to be assigned a Lead based on our Round Robin ID. The Sort Order is the order in which the rules are evaluated.
How does Sort Order come into play?
When you have a set of assignment rules, Salesforce evaluates the rule in the order you specify (i.e. the Sort Order). Salesforce checks the Lead record against the first rule (Sort Order 1), and if the criteria is a match, Salesforce reassigns the Lead to the new Owner. If the Lead record being evaluated does not match the first rule, the Lead assignment rule checks the next rule in the sort order and continues until the criteria makes a match. We’ll expand on how to construct and best practices on Assignment Rules in a later blog post.
When you are finished, you’ll have a rule for each person that you want assigned a lead.

TIP: If you want one person to get a certain percentage of Leads, let’s say 60%, you could change your MOD formula to give you ten results. Then on your assignment rule your rule would look something like this:
That’s it!
If you want to manually test your rule, make sure your page layout has the checkbox “Assign using active assignment rules” displayed. If not, add it to your page layout:

Check that box and save the Lead record. Viola! Your lead should be reassigned based on the rules you have in place.

Guide to lead assignment rules in Salesforce
Use SFDC lead assignment rules to get more done, create a better experience, and close deals faster.

Rachel Burns Jul 24, 2023
15 min read

Table of contents
Experience scheduling automation for yourself!
Create a Calendly account in seconds.
What are Salesforce lead assignment rules?
What if your sales team could spend their valuable time connecting with prospects and closing deals — instead of losing time doing admin work like assigning and organizing leads?
When you automate lead assignment and routing, your sales team can:
Boost sales team productivity and efficiency
Prevent high-quality leads from slipping through the cracks
Create a better experience for potential customers
Speed up your entire sales pipeline to close more deals, faster
In this blog post, we'll discuss the ins and outs of Salesforce lead assignment. We'll cover the benefits, how to plan your lead assignment strategy, and a step-by-step walkthrough of adding lead assignment rules in Salesforce. We'll also explore the power of scheduling automation to simplify and speed up lead assignment, routing, and qualification.
Key takeaways:
Lead assignment rules help sales teams boost productivity, respond to leads faster, and make better data-driven decisions.
Matching leads with the right sales reps and teams creates a better customer experience by responding to leads faster and giving them personalized attention.
Before you set up your lead assignment rules, work with your sales, marketing, and RevOps teams to understand your lead generation processes and sales team structure.
Within Salesforce lead management settings, rule entries are the individual criteria and actions. A “lead assignment rule” refers to a set of rule entries.
Automating lead routing , qualification, and booking with Calendly helps your team be more efficient and organized while creating a better experience for prospective customers.
6 benefits of creating lead assignment rules in Salesforce
Why should your team take the time to set up lead assignment rules in Salesforce? Here are six great reasons:
Ensure leads are assigned to the right reps and teams: Lead assignment rules mean each incoming lead is directed to the salesperson or team who has the relevant expertise and skills to engage and convert that lead. Automated lead assignment also prevents leads from falling through the cracks by making sure each lead is assigned to a rep or team, rather than relying on manual assignment.
Respond to leads faster: With lead assignment rules, leads are automatically assigned to the right salesperson, reducing response time and increasing the chances of converting leads into customers .
Boost sales team productivity: Automating lead assignment reduces manual work for RevOps teams and sales managers. Lead assignment rules also help identify and prioritize leads more likely to convert, saving time and resources that would otherwise be wasted on pursuing poor-fit leads. These time savings let sales teams focus on nurturing leads and closing deals.
Create a better customer experience: Leads can be assigned to sales reps who have relevant industry or product expertise, understand their unique needs, and can provide personalized solutions. This tailored approach creates a better experience for leads, which results in more conversions and higher customer satisfaction.
Improve sales forecasting: With well-defined lead assignment rules, you can gather more accurate data on lead distribution and conversion rates. This data can be used for sales forecasting, data driven decision-making, and resource allocation.
How to create lead assignment rules in Salesforce
Step 1: build your lead assignment strategy.
Before you go into your Salesforce instance and set up lead assignment rules, you need to figure out what exactly those rules will be. The options are limitless — where should you start?
It’s time to bring RevOps, sales, and marketing together to answer some questions:
Lead sources: Where do leads come from? Do we use marketing forms through Salesforce web-to-lead forms or a third-party integration? Are we importing leads via the data import wizard?
Sales team structure: How is the sales team structured? Are different teams or individuals specialized in specific products, industries, use cases, or regions?
Lead data: What info do we request from new leads? Which standard and custom fields do we require?
Sales territories: How are sales territories defined? Are there specific regions, countries, or territories we should take into account for lead assignment?
Integrations : Do we have any third-party integrations with lead assignment or distribution features? Are we using those features?
Special circumstances: Are there any priority levels or tiers for leads that require special attention? For example, do we have a designated rep or queue for leads with complex needs and use cases?
Poor fits: What should we do with leads who don’t meet any of our criteria?
It’s a lot of information to gather and organize, but it’s important to learn as much as possible up front to cover every scenario and equip your sales team with accurate data. Putting this time and effort in now will pay off tenfold in productivity once your lead rules are in place!
Step 2: Set up lead assignment rules in Salesforce
You’re almost ready to enter your lead assignment rules in SFDC . First, let’s go over some terminology. We’ve been talking about lead assignment rules as individual directives: “If the lead matches X, then do Y.” Within Salesforce lead management settings, a “lead assignment rule” refers to a set of rule entries. Rule entries are the individual criteria and actions (“If X, then do Y”). An assignment rule can consist of up to 3,000 rule entries, and you can only have one active assignment rule at a time.
For example, a rule entry can assign all leads interested in a particular product to a queue of reps who are experts on that product. In Salesforce, a lead queue is essentially a bucket for unassigned leads, and you can choose which sales reps can pull leads from each queue.
Another rule entry can assign all leads from companies with over 5,000 employees to your top enterprise sales rep.
To create a lead assignment rule in Salesforce:
From Setup, enter “Assignment Rules” in the Quick Find box, then select Lead Assignment Rules.
Enter the rule name. (Example: 2023 Standard Lead Rules)
Select “Set this as the active lead assignment rule” to activate the rule immediately.
Click Save.
Click the name of the rule you just created.
Click New in the Rule Entries section.
Enter an order number that tells Salesforce when to run this rule entry in relation to other rule entries. For example, if you want this to be the first criteria Salesforce looks at when assigning a lead, enter number one.
Select the rule criteria. What attributes must the lead have before Salesforce applies the rule entry? You can use any standard or custom field in the lead record for your criteria. For example, you want to assign leads to your U.S.-based enterprise sales team, so the company size field must be equal to or greater than 5,000 and the country field must equal the United States. You can include up to 25 filter criteria.
Choose the user or queue to be the assignee if the lead meets the criteria. For example, assign to the U.S.-based enterprise sales team queue.
Optional: Choose an email template to use when notifying the new lead owner. After you set up your lead rules, you can also use Salesforce Flow automations to notify lead owners via other channels. For example, at Calendly, we integrate Salesforce with Slack, and a workflow automatically notifies sales reps via Slack when a lead is assigned to them.

Salesforce goes through the rule entries in order until it finds one that matches the lead's info, then routes the lead accordingly.
Let's say you have small business, mid-market, and enterprise sales team queues. Your first three rule entries would match company size to each of those three queues. If they don't have a company size listed, or the company size doesn't match any of the values in your rule entries, Salesforce will move on to the industry rule entries.
To make sure no leads fall through the cracks, you also need to set a default lead owner. If the assignment rules fail to locate an owner, or you don’t set up assignment rules, web-generated leads are assigned to the default lead owner.
To select a default lead owner:
From Setup, enter “Lead Settings” in the Quick Find box, then select Lead Settings and click Edit.
Define the Default Lead Owner. The Default Lead Owner can be a specific user or a queue.
Save your settings.
Salesforce lead assignment rule examples
As we mentioned earlier, your rule entries can include up to 25 filter criteria.
Simple rules include just one filter criteria:
By country or state/province: Route leads from specific states or countries to sales representatives who understand the regional market. You need this rule if your team uses sales territories to divide leads. For example, if the state/province equals Alaska, Arizona, California, Hawaii, Nevada, Oregon, or Washington, assign the lead to the West Coast queue.
By language: Assign leads to sales reps who speak the same language.
By industry: Assign leads from different industries to salespeople who have experience working with those industries.
By company size: Assign leads based on the size of the company, assigning larger companies to a dedicated enterprise sales team.
Complex rules use two or more filter criteria. For example, you could route leads from specific states or provinces to salespeople based on their sales territory and the company size. If you have a particular rep (Bob) working enterprise leads on the West Coast, your filter criteria could say: If the state/province equals Alaska, Arizona, California, Hawaii, Nevada, Oregon, or Washington, and the company size equals greater than 5,000, assign the lead to Bob.
These are just a few examples. Lead assignment rules can be customized to fit your team’s and customers’ needs. Review your strategy to choose the right combination of criteria for your sales processes, products, and customers.
What does the built-in Salesforce lead process look like in action?
A website visitor named Nora fills out a contact form to learn more about your product. She shares her name, email address, company name (Acme Inc.), and company size. You use Salesforce’s built-in web-to-lead forms , so Nora’s form submission automatically creates a lead record.
Your team has set up lead assignment rules that assign leads to sales queues based on their company size. Acme Inc. has 5,000 employees, so Nora is automatically assigned to the enterprise sales team queue.
Enterprise sales team queue members receive an email notification that a new lead has been added to the queue. Taylor, an enterprise sales rep in Acme Inc.’s territory, assigns Nora’s lead record to themself.
Taylor emails Nora to set up a qualification call.
Nora, who has been waiting to hear back from your team, agrees to meet with Taylor. After some email back-and-forth, they find a time that works.
What are the limitations of Salesforce’s built-in lead assignment rules?
Salesforce’s built-in lead assignment rules are a great place to start, but there are a few critical limitations, especially for enterprise sales teams:
Single level of evaluation: Salesforce assignment rules operate based on a single level of evaluation, meaning that once a rule matches the criteria and assigns a lead, the evaluation process stops. Your team might miss out on important info, like a complex use case or unique industry, when matching the lead with a rep.
No built-in round robin distribution: Round robin lead distribution is the process of assigning leads to reps based on factors like team member availability or equal distribution for a balanced workload. Salesforce lead assignment rules don't include an easy way to set up round robin distribution — you need an additional tool like Pardot, one of the round robin apps on AppExchange , complex Apex code , or a third-party lead routing platform .
No lead escalation settings: Lead escalation is the process of flagging a lead to higher levels of management or specialized teams for further assistance or action. This process comes into play when a lead requires additional attention or intervention beyond the assigned salesperson or team's capabilities. Unfortunately, Salesforce doesn’t have built-in settings for lead escalation rules. If your customer success team uses Service Cloud, you can set up escalation rules for customer support case escalations, but this feature isn’t included in Sales Cloud.
High maintenance for large organizations: Managing and maintaining a comprehensive set of assignment rules can become challenging and time-consuming in large organizations with complex sales structures and multiple teams or regions. Sure, you can include up to 3,000 rule entries in a single lead assignment rule, but that’s a lot to set up and keep up to date — especially if you’re trying to save your team time, not add to their workload.
Built-in Salesforce lead assignment rules and automations are a solid starting point, but what about automating lead qualification and booking? If you use Salesforce on its own, your reps might still spend a ton of time on lead reassignment to balance their workload, manual lead qualification, and email back-and-forths to schedule sales calls.
That’s where Calendly comes in.
How to automate lead assignment, qualification, and booking with Calendly
Your scheduling automation platform can be an excellent lead generation, qualification, and routing tool — especially when it integrates with Salesforce. Calendly’s Salesforce integration helps your team be more efficient and organized while creating a better experience for prospective customers.
When a lead books a meeting via a sales rep or team’s Calendly booking page, Salesforce automatically creates a new lead, contact, or opportunity. If the lead already exists in your Salesforce instance, the event is added to the lead’s existing record, so you don’t end up with duplicate lead records or time-consuming manual reassignment.
What if you don’t want to let just anyone book a meeting with your team? When you add Calendly Routing to your marketing forms, you can show scheduling pages only to leads who meet your qualifications, like prospects from specific industries or companies of a certain size. That way, your busy team can spend time on the most valuable deals.
Calendly Routing works with HubSpot , Marketo , Pardot , and Calendly forms and is built for your Salesforce CRM. You can use any form field (email, domain, company name) in any Salesforce standard object to match visitors with their account owner. Account lookups let you send known leads or customers from your website form directly to their account owner’s booking page, without needing to manually reassign leads to the right rep.

Remember the lead assignment example we walked through earlier featuring Nora from Acme Inc.? Here's what that process looks like when you add Calendly:
Nora fills out your “contact sales” form, which is already built in HubSpot, connected to Calendly Routing , and enriched with Clearbit .
She enters her email address in the form, and Clearbit fills in the company name, size, and industry. This shortens the form, so Nora only has to input her name and job title.
Calendly checks to see if Acme Inc. has an account in your Salesforce instance. They don’t, so the next step is lead qualification .
Based on Nora’s information — company size, industry, job title — she’s a highly qualified lead, so she’s automatically routed to the booking page for your enterprise sales team.
Nora is happy about that, and immediately books a meeting time that works for her, with the exact team she needs to talk to.
On the backend, Calendly’s Round Robin meeting distribution is set to optimize for availability, so it assigns the meeting to the first available sales rep — in this case, Taylor. This automation helps your team respond to meeting requests faster, hold initial sales calls sooner, and balance the workload across reps.
Calendly creates a lead record in Salesforce with the info Nora entered into your website form (including the data from Clearbit) and an activity log of any meetings she books with your team via Calendly. Salesforce automatically makes Taylor the lead owner.
If you were relying on Salesforce’s built-in lead assignment rules, Nora’s lead record would have gone to an enterprise sales queue, and she would have had to wait for a rep to pick up the lead and reach out to her to book a meeting.
“ A good tool is one that’s so simple, sales reps can basically forget about it and let the meetings roll in. That’s essentially what happened when we implemented Calendly. ”

Sales Enablement Manager at SignPost
What happens if a lead doesn’t qualify for a meeting? Instead of sending them to a booking page, you can display a custom message with next steps, ask them for more information, or redirect them to a specific URL, like a piece of gated content or a webinar signup page.

Automating lead assignment with Calendly Routing has been a game changer for RCReports , a compensation analysis solution for accountants and business valuators. Before connecting Calendly Routing with their Salesforce instance, RCReports’ AEs spent at least five hours a month reassigning leads booked on the wrong calendar. This created a disjointed customer experience and frustration for the sales and marketing teams.
“ Now that we’ve implemented Calendly’s routing feature with Salesforce integration, demos are always booked with the correct AE, reducing friction for both our team and the customer. ”

Abbie Deaver
Director of Marketing at RCReports
Users on Calendly’s Teams plan and above can connect Calendly to Salesforce. The full suite of Salesforce routing features , including routing by Salesforce ownership, is available on Calendly’s Enterprise plan.
To learn more about Calendly Routing, get in touch with our sales team .
Spend less time on manual lead assignment and more time closing deals
When you automate Salesforce lead assignment and routing, high-value leads stop slipping through the cracks, the workload is balanced across the team, leads are matched with the sales reps best equipped to help them, and team members have more time to focus on connecting with prospects and closing deals.
The results? A more productive team, faster sales cycle, higher conversion rates, and better customer experience.

Webinar: How Calendly Uses Calendly to Close More Deals
Rachel Burns
Rachel is a Content Marketing Manager at Calendly. When she’s not writing, you can find her rescuing dogs, baking something, or extolling the virtue of the Oxford comma.
Related Articles
![[Blog Hero] How to write sales follow-up emails that keep deals moving](https://images.ctfassets.net/k0lk9kiuza3o/2jnxlw4N57RFSC8QoRZcs1/510f5f21bafe1009b54c1b7a87bfa67f/Sales_follow-up_emails.png?q=85&fm=webp "lead assignment rules email template")
Read Time: 15 minutes
How to write sales follow-up emails that keep deals moving
Connect with prospects and close deals faster with these follow-up email tips and templates.
![[Blog Hero] How to prep for a sales demo with confidence](https://images.ctfassets.net/k0lk9kiuza3o/5vLxYeuZlLf2Dc3AJsQYZz/2df1bd768405698e4c072f2c2cf0f513/-Blog_hero_image-_Prep_for_Sales_Demo.png?q=85&fm=webp "lead assignment rules email template")
How to prep for a sales demo with confidence
Real-world tips to tackle discovery, create agendas, and manage pre-demo anxiety.
![[Blog Hero] Help! What do I do after a sales demo?](https://images.ctfassets.net/k0lk9kiuza3o/6regiThAWU9JwOtJNFWuui/2ba1be53a90265adff77fb38248bf9e2/-Blog_hero_image-_sales_demo_follow_up.png?q=85&fm=webp "lead assignment rules email template")
Help! What do I do after a sales demo?
A timely follow-up keeps sales momentum high and closes deals faster.
Don't leave your prospects, customers, and candidates waiting
Calendly eliminates the scheduling back and forth and helps you hit goals faster. Get started in seconds.
- AppAssessor
Articles by role:
- Consultants
- Business Analysts
By Lucy Mazalon
By Ben McCarthy
- Dreamforce Events
- Courses Login
What’s trending
Agentforce: The Next Evolution in Salesforce’s AI Story
Salesforce Winter ’25 Release Date + Preview Information
Salesforce Winter ‘25 Release: What to Expect and How to Prepare
Salesforce List Views: 7 Best Practices You Should Implement Right Away
10 Hottest Salesforce Winter ’25 Features For Admins
UPCOMING EVENTS
How to build a successful salesforce devops process, streamline lead assignment in salesforce, salesforce revops trends & insights (ask me anything), charity hackathon – third edition.
Wrocław, Poland
Unlocking Einstein Copilot: What You Need to Know
A short but mighty guide to salesforce lead routing.
By Nathan Bellehsen
In this article, we’ll cover how to route your leads and what type of lead routing rules you can set up, while also offering free templates for you to use in your own lead routing process.
What is Lead Routing?
- A form on your website
- Created manually from your customer service
- A list uploaded after a tradeshow.
- Round robin and weighting aren’t supported, which can make it tricky to distribute leads evenly.
- Whenever a sales development rep (SDR) or account executive (AE) leaves the company, you have to manually update the entirety of your routing logic.
- Out-of-office status isn’t taken into consideration and leads could be mistakenly assigned to reps on vacation.
How Not to Route Your Leads
- The real account owner will be frustrated you sent their lead to someone else.
- The fake account owner will be frustrated they wasted their time sending an email to a lead someone else owns.
- The customer is going to be frustrated because they have two sales reps trying to send them one-pagers.
What Types of Lead Routing Rules Should You Set Up?
Geographic territory, company size.
- Company size = 1-50 employees = SMB
- Company size = 51-200 employees = Mid-Market
- Company size = 251-5,000 employees = Enterprise

Product Line
Account ownership vs. lead to account matching vs. round robin.
- Account Ownership refers to a time when a rep owns a specific account in your org’s CRM. This means any existing contact associated with a specific account will automatically be assigned to the current account owner after they fill out a form.
- Lead to Account Matching means any inbound lead that is related in a way to an existing account (e.g. the email domain matches an existing account website domain) will automatically be assigned to the current account owner.
- Round Robin , on the other hand, refers to scenarios when leads are assigned to a queue that alternates recipients. This can either be equal or weighted based on factors such as tenure or performance.

Free Lead Routing Templates You Can Steal
- General use cases
- Routing diagrams for advanced use cases
- Click the link
- Create a free Miro account
- Duplicate board
- Start routing!
Final Thoughts
Nathan bellehsen.

More like this:
4 ways to make the most of document automation in salesforce.
By Chris Mascaro
Increase Your Salesforce Lead Generation at In-Person Events
By Andreea Doroftei
Uncovering Salesforce M&A Trends and Insights in 2024
Leave a reply cancel reply.
Save my name and email in this browser for the next time I comment.
Lead Routing: How to Precisely Implement and Route Key Prospects
Published: January 04, 2023
Correctly routing leads and responding quickly can make or break a deal. The more mature a business gets and the more complex the prospect’s needs, the more challenging maintaining a speedy response and personalized touch become.

Growing businesses require more sophisticated automation to ensure operational efficiency and proper lead distribution.
That’s what makes lead routing a critical component of any scaling sales strategy.

So, what is lead routing?
At its most fundamental, lead routing is the process of automatically assigning leads across a sales team. If your company has more than one sales approach — like self-serve, transactional, and enterprise — lead routing involves passing potential customers to the proper sales model.
Automated lead routing can be simple, such as a round-robin assignment to your sales reps based on who is next in line. Mature lead routing models take multiple factors into account. That includes deal value, territory or geography, use case or specialization, or a combination of multiple factors by a lead scoring system.
Unless you’re in a niche industry, chances are your business attracts more than one type of customer. Lead routing ensures the right prospects reach the right representative at the right time to save your business time and resources.

Seven Lead Routing Examples
1. lead routing by value.
Companies like Slack and Dropbox popularized the hybrid approach of building a self-serve business in tandem with an enterprise one . This approach maximizes operational efficiency by keeping the most expensive resource — the sales rep’s time — focused on building relationships and closing larger deals. Smaller deals are routed to a low-touch, high-volume, one-to-many sales model.
Tools like Clearbit can help pull in data about a customer's company size and value to pre-populate CRM data. Using this data, low-value leads can be handled by self-serve marketing automation. Here, human touch is provided by customer support teams answering incoming questions.

Image Source
High-value leads can be sent directly to sales teams to guide high-value, complex deals through an enterprise sales process.
Pro tip: Consider how long a lead will take to turn into a customer. Before assigning a lead, make sure that the sales rep has the time to take on that amount of work.
2. Lead Routing by Location
For industries tied to brick-and-mortar stores or geographical locations, defining territories is a common practice. Leads are assigned by location, enabling sales teams to divide and conquer regionally.
Routing leads by geography provides certainty that reps aren’t stepping on each other’s toes with double coverage, while completely neglecting others.
If a lead is routed to a salesman in the same time zone, it’s going to be much easier for everyone involved. Meetings can be scheduled without the hassle of finding a time that works for everyone.
Determining lead routing based on location also means that if an in-person sales pitch or meeting is necessary, those included won’t have to travel as far. This foresight saves your organization time and money.
To begin lead routing, you must first define your territories and organize your CRM data around those definitions . With the right CRM and automated toolset, you can sort records into territories. From there, assign leads to any reps working within that territory using round-robin automation.
Pro tip: If a lead has a high value, work harder to gather as much information about that lead as possible using social media (such as LinkedIn). Then, match them with a rep who has similar interests in their territory. This will make your calls more personable and compelling, and a deal more likely.
3. Lead Routing by Use Case or Specialization
Many tools and systems, especially in SaaS, have multiple relevant use cases. Let’s take a tool like HubSpot as an example. HubSpot serves customer service teams, sales teams, and marketing teams. Each group comes with its own buyer personas, choosers, users, and influencers.
Trello offers another example. This virtual whiteboard might be used for anything from wedding planning to software bug triage.
Savvy sales teams know that industry expertise helps establish the trusted advisor relationship requisite to closing the big deals, which makes lead routing by specialization or use case increasingly important for enterprise sales models.
Let’s take an example of software targeted to creative firms, encompassing graphic design, animation, film editing, and illustration. It’s unlikely all sales reps will develop the expertise needed to speak to the needs of all of those varied professionals, even if they do sit under a similar umbrella.
Instead, you may have your top sales reps cover the largest deals that involve multiple products across a company, but route smaller, more specialized deals to reps who specialize in particular areas.
Pro tip: When a specialized or niche lead comes through, be sure to mention other customers you have in the same industry. Consider emailing over glowing reviews from these customers. This will help your leads understand the experience you have with their industry’s concerns and problems.
4. Lead Routing by Lead Score
The most sophisticated sales models implement lead scoring as part of their lead routing process. Lead scoring assigns a quantifiable value to every lead generated for the business, usually by a numerical point system.
Leads can be scored on multiple attributes , including:
- Engagement with your company.
- Company size.
Lead scoring helps sales teams prioritize leads, and apply a more tailored approach to engagement. With this method, you can close more leads with less effort. Lead scoring can also help define whether a lead needs more time being nurtured , could close with a low-touch one-to-many approach, or requires high-touch consultative efforts.
Pro tip: Route only those with scores ready for sales to your sales team to maximize time and effort. This results in a happy and productive sales team by minimizing the frustration of poor leads.
5. Lead Routing by Priority
There are many factors to consider when determining the priority of a lead. The potential sales value is important, but you should also consider the lead’s position within their organization, their buying power, their engagement level with your products and content, and the product type(s) they are interested in.
Pro Tip: Consider adding a form field that asks how urgently they need a product or solution to determine if a lead is casually browsing or seriously looking.
6. Lead Routing by Availability
While this shouldn’t be a first-case scenario, routing leads based on representatives’ availability is still an important factor to consider. If a sales rep has a lot on their plate or is working on a larger deal, they will not have the energy or focus to give new leads their best effort. Initially contacting leads and answering lead questions quickly are both essential to the success of a deal.
Pro Tip: Make sure sales representatives constantly keep their calendars updated with meetings, time off, and other engagements, allowing you to easily automate leads based on availability.
7. Lead Routing by Customer Type
By the time a lead enters your pipeline, you should know if their organization is a current customer or not. This information can be leveraged to assign leads to the best possible point of contact.
For example, if a lead’s organization is already a customer, they should be passed on to a customer success manager who can walk them through the sales agreement their company has.
If their organization is not a customer, then an assigned salesperson can qualify the lead before moving them onto an account executive. This segmentation will streamline and simplify your lead routing process.
Pro tip: Develop a path for former customers looking to return to your organization. Ensure that your representative knows your prior history with the buyer.

Lead Routing Best Practices
Regardless of the lead route(s), you choose for your company, here are some best practices you should keep in mind.
Assign leads to a specific point of contact.
Nurturing leads is essential to increasing both new sales and retention. As leads enter the demand generation pipeline, they should know their point of contact for each step of the journey. If a lead isn’t a current customer, then they should have an assigned salesperson who will reach out and discuss products with them.
If a lead is a current customer, then they should be assigned to a customer success manager. A CSM should be familiar enough with the lead’s organizational needs to reach out with education on new products or current promotions.
Pro tip : Depending on what software you use for managing leads, assigning leads to a salesperson can be automated. As soon as a potential lead expresses interest, they receive an email with the next steps and the name of their point of contact.
Gather important information with form fields.
Your forms are essential to successful conversions. A poorly planned or too personal a form will make you look difficult to work with, turning leads away.
A typical form asks your lead their name, their organization, organization size, location, a phone number to contact them. You may also ask what product(s) they are interested in.
Pro tip: When it comes to form fields, less is more. You can follow up with more specific details down the road.
Keep consistent reassignment rules.
You can improve your customer experience by rerouting leads when a sales rep can’t get to them fast enough. Sales teams will often have a round-robin lead assignment process.
Consider what amount of time makes the most sense for reassignment, and then add that criteria to your lead routing software. Quickly responding to leads can make the conversion process quicker and more seamless for everyone involved.
Pro Tip : Consider publishing personable blurbs about each of your sales reps online and giving leads access to their calendars. This allows customers to choose who they want to speak with.
Have a solid onboarding plan.
As soon as a lead moves past the purchase stage, quick and valuable onboarding is essential.
Make sure an assigned CSM reaches out to new customers with a welcome email that includes specific next steps on how to integrate your product. Consider scheduling a quick phone or video call to review how to navigate any software.
Remember, the bottom of the demand generation pipeline is retention. Quickly offering value during onboarding is a key factor in reducing churn.
Pro tip : Make sure your onboarding process is a personalized experience by celebrating customer milestones. Check out this guide to create a customer onboarding strategy and plan.

Getting Started
Getting started with lead routing is simple if you have the right tools , including a CRM with automation capabilities and a tool for lead scoring, such as HubSpot partner MadKudu .
To develop lead routing paths, you will need to:
- Define your lead routing criteria, like value, use case, territory, or lead score.
- Create workflows or automations based on that criteria.
- Qualify leads and divide them between your reps.
To improve and optimize your lead routing, you need to know what’s working and what’s not. Monitor and report on the successes or shortcomings of routing to understand what’s working.
Want more insight? Learn how to manage and nurture sales leads from HubSpot Academy.

Don't forget to share this post!
Related articles.

Your Guide to Business Development Planning

9 Strategic Planning Models and Tools for the Customer-Focused Business

S&OP: A Comprehensive Overview of Sales and Operations Planning

A Straightforward Guide to Qualitative Forecasting

4 Clever and Effective Ways to Simplify Your Sales Process From Seasoned Sales Experts

Lead Distribution Methods and Best Practices

The 25 Best Lead Distribution Software in 2022

Return on Sales: How to Calculate It and What You Need to Know

30 Key Interview Questions and Answers for Sales Operations Role

How Using a Document Library Can Improve Your Sales Process
Outline your company's sales strategy in one simple, coherent plan.
Powerful and easy-to-use sales software that drives productivity, enables customer connection, and supports growing sales orgs
Getting Started
Learn through 101 guides and easy solutions.
Dive into the weeds with advanced tips.
New Features
Evolve with the Salesforce platform feature updates.
Get to know our community and join the action.

6 Ways to Manage Lead Assignment in Pardot
- Marketing Automations , Pro Tips
- January 13, 2022
min. reading
Pardot lead assignment routing can trip up even the most experienced sales and marketing teams.
There are so many different ways to assign your prospects within Marketing Cloud Account Engagement (Pardot). Whether you want to manually assign prospects or utilize automation rules or completion actions to assign prospects based on their activity or information, the options can seem overwhelming.
In this post, I’ll dive into 6 different ways to manage lead assignment in Pardot and how to determine what the best option is for you. After all, cultivating interest, inspiring action, and responding to people who raise their hands is why we’re here, right?
Six Pardot Lead Routing Methods
Choosing the right lead management strategy and tools to automate the process is challenging, but it’s super important. Read on to understand what you should know to make the right choice for your organization.
There are multiple ways to assign new leads in Pardot ranging from manual assignments to complex and automated assignments based on lead criteria or activity.
- Assign to User
- Assign Prospect Via Salesforce Active Assignment Rule
- Assign to Group
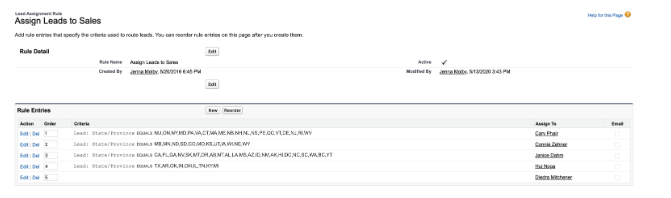
- Assign to Queue in Salesforce
- Assignment via Prospect list actions
- Assign via advanced lead assignment rules in Salesforce

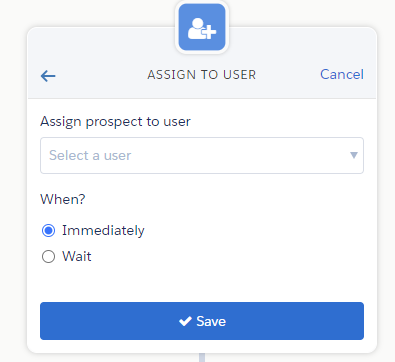
1. Assign to User
Assigns a prospect to the specified user when the requirements of the rule are fulfilled.
How to use it
Completion action:.
Assign to user can be set up as a completion action for your forms, form handlers, files, custom redirects, emails and page actions, by selecting “Assign to user” and selecting the user’s name from the dropdown
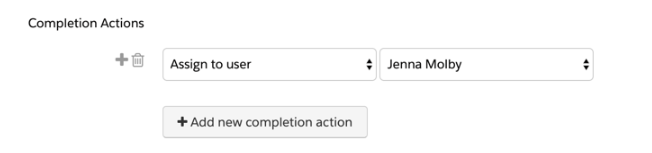
Automation Rule:
Assign prospect to user can be set up as an action within an Automation Rule. This is a great way to assign leads if you have criteria the lead needs to meet before assigning the prospect to Sales.
For example, if you want to only assign leads to sales that meet a certain scoring threshold, use an automation rule.

Engagement Studio Program:
Assign to user can also be set up as an action with an Engagement Studio Program, by selecting add element > action > assign to user .
| Great if you don’t have many usersCan be used without the Salesforce integration | Assignment actions don’t reassign prospects who have an ownerDifficult to manage if you have many usersDifficult to figure out where the “assign to user” action is being used within your Pardot assets |
2. Assign Prospect via Salesforce Active Assignment Rule
Pushes a prospect to your Salesforce active assignment rule when the rule’s criteria are met (see more information on this process below). The prospect syncs to Salesforce without an owner.
The assigned user is synced to Pardot when the active assignment rule determines who to assign it to.
To get started, review this Pardot help article: Assigning Prospects
First, you will need an active lead assignment rule setup in Salesforce. This should include all the criteria for your lead assignment as well as a default user to assign the lead to if the lead does not meet any of the criteria.
Assign via active Salesforce assignment rules can be set up as a completion action for your forms, form handlers, files, custom redirects, emails and page actions, by selecting “Assign prospect via Salesforce active assignment rule”.

Assign prospect via the Salesforce active assignment rule can be set up as an action within an Automation Rule.

Engagement Studio Program
Assign prospect via Salesforce active assignment rule can also be set up as an action with an Engagement Program, by selecting add element > action > assign prospect via Salesforce active assignment rule .
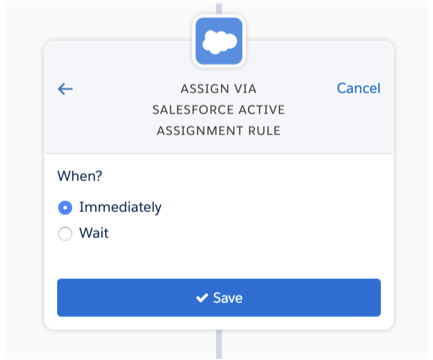
| All lead assignment is set up in one placeNo need to update completion actions or automation rules in Pardot if you have an assignment update actionAssignment can be based off complex criteria and based on any lead field within SalesforceGreat if you have many Sales reps who should receive leads | You must have the Salesforce integration set upAny users assigned to a lead in Salesforce need to have a corresponding Pardot user to track ownership correctly in PardotRequires the “View Setup and Configuration” permission in Salesforce in order to make assignment updates |
3. Assign to Group
Assigns a prospect to a user in a specific group (round robin lead assignment) when the requirements of the rule are met.
First, create a group in Pardot (Admin > User Management > Groups > Add User Group) .
Navigate to the user you should belong to the group (Admin > User Management > Users) and click Edit Groups . Select the group to add the user.
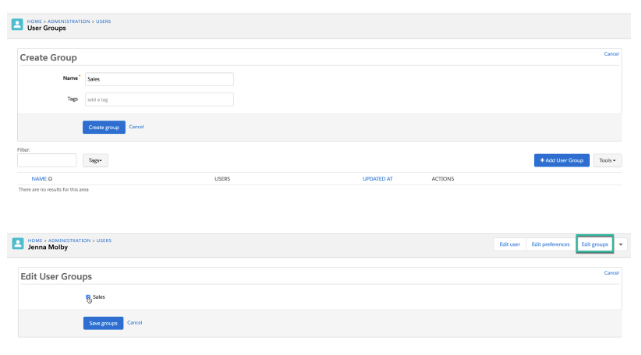
Assign to user can be set up as a completion action for your forms, form handlers, files, custom redirects, emails and page actions, by selecting “Assign to group” and selecting the user’s name from the dropdown

Assign prospect to user in group can be set up as an action within an Automation Rule.

Assign to group can also be set up as an action with an Engagement Program, by selecting add element > action > assign prospect to group .
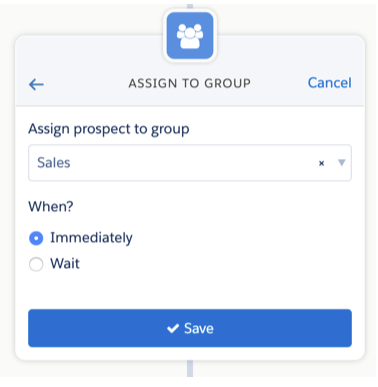
| Allows for round-robin lead assignmentCan be used without the Salesforce integrationGreat if you don’t have many users to assign prospects to | Difficult to manage if you have many usersDifficult to figure out where the “assign to user” action is being used within your Pardot assetsProspects must be assigned via round-robin, unless you create groups with only one user |
4. Assign to Queue in Salesforce
Assigns a prospect to the Sales Cloud lead queue when the rule’s criteria are met. Prospects assigned to a queue are considered assigned to an owner and aren’t reassigned. You can assign only leads to Sales Cloud lead queues.
First, you must have a lead queue set up in Salesforce.

Assign to queue can be set up as an action within an Automation Rule.
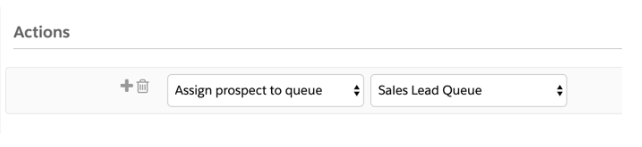
Assign to a queue can also be set up as an action with an Engagement Program, by selecting add element > action > assign to Salesforce queue .
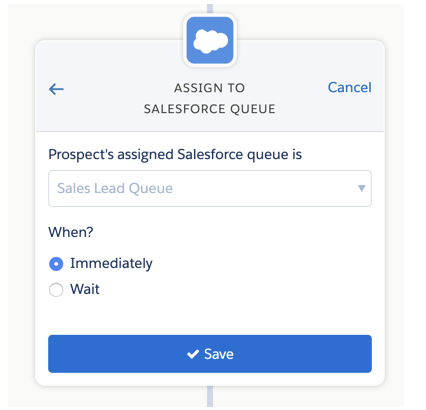
| Queue members can jump in to take ownership of any record in a queueEasy to prioritize, distribute, and assign records to teams who share workloads | This action can not be used if your connector is set up for Pardot to syncs to contacts instead of leadsYou can assign only leads to Salesforce lead queuesDoes not assign prospects to specific owners |
5. Assignment via Prospect list actions
Prospects can be assigned to a User or Group via prospect list actions.
Navigate to the prospect table, select the prospects you want to assign and select one of the options from the drop down menu.

| Good for one-off lead assignmentWill re-assign prospects who are already assigned | Not automated, has to be updated manually |
6. Assign via advanced lead assignment rules in Salesforce
If you have more complex business rules, assigning leads via an app on the Salesforce AppExchange might be a good option. Most apps offer a visual way to view lead assignment rules and some advanced functionality, including auto-merging duplicate leads and lead to account matching.
Traction Complete is a good option we’ve used before.
| Great if you have many users and complex assignment rulesVisual view of lead assignment rulesAbility to assign leads via round robinCan automatically match leads to accountsCan filter records by advanced criteria (using fields from the leads or matched account)Automatically can convert leads from a matched account into a contactAuto-merge duplicate leads | Most apps on the AppExchange come at an additional costIt is another application to manageNot ideal if you have a small sales team or straightforward assignment rules. |
Lead routing in Salesforce
Here are some additional ways Sales Cloud handles lead routing.

Lead assignment rules
In Sales Cloud, you can set up lead assignment rules to automate the assignment of new leads to your sales team or queues based on the specified rule criteria.
The rules will execute and evaluate in the numbered order as leads enter Sales Cloud. Each lead assignment rule consists of multiple rule entries that specify exactly how the leads or cases are assigned. When a lead matches the rule, it will be assigned to the correct person or queue. Only one lead assignment rule can be active at a time.
To get started, review this Salesforce help article: Set Up Assignment Rules
Round-robin lead assignment
The round-robin lead assignment rule in Sales Cloud helps you automate the assignment of new leads in an even way to your sales team or queues.
Here’s how the repeating round robin assignment looks if your sales team for lead assignment has 3 members:
- Lead 1 is assigned to sales person 1
- Lead 2 is assigned to sales person 2
- Lead 3 is assigned to sales person 3
- Lead 4 is assigned to sales person 1
- Lead 5 is assigned to sales person 2
- Lead 6 is assigned to sales person 3
To get started, review this Salesforce help article: Create a Round-Robin Lead Assignment Rule .
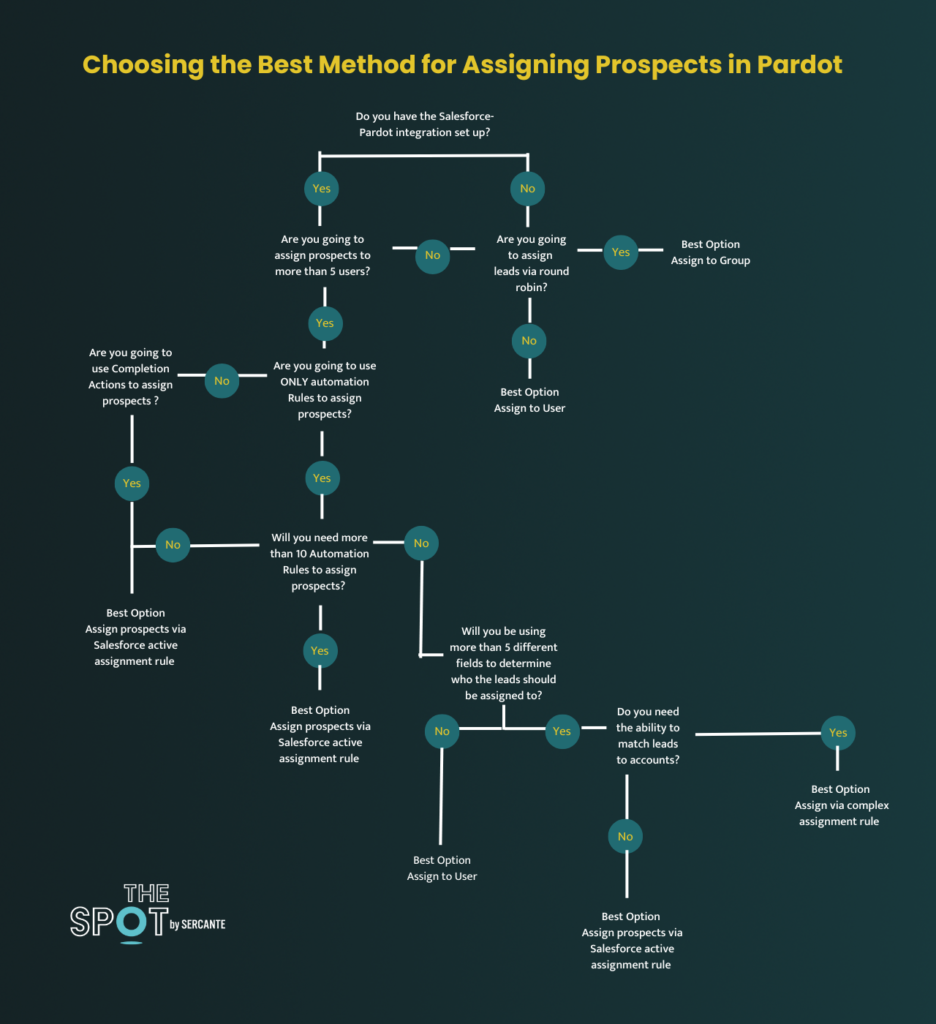
Still not sure what lead assignment method is best? Run through this flow chart to see what the recommended option is for you.
Additional Resources
- Salesforce Lead Assignment Rules Best Practices and Tricks
- Lead Routing in Salesforce
- Trailhead: Qualify and Route Leads to Your Reps
- Trailhead: Grow Your Business with Sales Cloud
- Trailhead: Convert and Assign Leads
- Trailhead: Sell as a Team
- ParDreamin’ on-demand video: Now You See Me, Now You Don’t! Lead Routing Basics for Pardot Admins
- The Three L’s in Pardot: Lists, Location, and Lead Assignment
- 6 Ways to Manage Lead Assignment in Pardot and How to Determine The Best Option
Complex lead routing with third-party tools
Third-party tools enable you to create complex lead routing rules that go beyond out-of-the-box Salesforce and Pardot lead routing features. Different tools serve specific purposes that may be the right fit depending on what you’re trying to accomplish.
Here are the most common ones.
LeanData is a native Salesforce lead matching and routing platform that is easy to use and customize with their visual drag-and-drop interface functionality and complex rule building.
| You can read our full guide to implementing LeanData in . |

RingLead is a native Salesforce lead routing, data normalization, enrichment, and duplicate managing platform.
DemandTools from Validity is a data management platform to help with importing, assigning, standardizing, manipulating, and the deduplication of your Salesforce data quickly.

Feel the Relief of Knowing Your Leads Are In Good Hands
Think you’re a Pardot lead routing pro now? Still have no idea where to start? Either way, tell us about it in the comments! And reach out to Sercante when you need Pardot consultant expertise for extra help and customization.
Subscribe to The Spot
Upcoming Salesforce Events

Salesforce Training Courses

Top 5 Recent Posts

Salesforce Winter ‘25 Highlights: Marketing Cloud Growth Edition
The Salesforce Winter ‘25 Release Notes are out! Let’s dive into what’s new in...

Salesforce Winter ‘25 Highlights: Marketing Cloud Account Engagement
The Salesforce Winter ‘25 release notes are out! Let’s dive into Winter ’25 highlights...

Using Account Engagement for Event Marketing: From Planning to Follow-Up
Event marketing is a fantastic way to connect with your audience, build brand awareness,...

Big News! Account Engagement Users Can Access Marketing Cloud Growth Edition
In February 2024, Salesforce released Marketing Cloud Growth Edition, its first marketing automation platform...

Combating Headwinds in Higher Ed: Part 1 – Real-Time Interaction Management
Student expectations today are vastly different than they were a decade ago. It’s causing...

Jenna is a Marketing Operations leader with over 10 years of experience working with both enterprise organizations and start-ups. She started her career as a consultant, helping B2B and B2C clients get the most out of Marketo, Pardot, Marketing Cloud and Salesforce. She then moved in-house, working with B2B SaaS companies, helping them build their sales and marketing technology stacks and processes from scratch.
Leave Your Comment Cancel Reply
You must be logged in to post a comment.
Related Articles
Event marketing is a fantastic way to connect with your audience, build brand awareness, and generate leads. However, managing event marketing activities can take time and effort. That’s where...
Student expectations today are vastly different than they were a decade ago. It’s causing technology leaders at the most successful educational institutions to rethink their data infrastructure and student...

How to Customize Primary Source on Opportunities with Salesforce Flow
I recently ran into a situation where a client needed to exclude select campaign types from being populated as the Primary Campaign Source field on opportunities. While this might...
Bot Single Post
Martech Resources
Shopping consultants or jobs? Wanna join the action? Here’s everything you need to solve all the marketing technology things.
Consulting Services
Work with certified experts to transform your tech stack.
Training Courses
Develop your Salesforce & Pardot skills from anywhere.
Community Event
Learn from the only virtual Pardot-focused conference.
Virtual Networking
Connect with people in the Pardashian Slack community.
Quick Links
Get The Spot
The Spot for Pardot newsletter delivers a healthy dose of martech to your inbox — and nothing more.
© 2024 The Spot For Pardot | All Rights Reserved Sercante LLC.4
This website uses cookies to improve your browsing experience. By clicking “Accept,” you consent to the use of all cookies.
You can customize your preferences or learn more about our use of cookies in our Privacy Policy .
Let's Get You Unstuck
We’re here to support your growth journey. Let’s connect and find the right solution for you. Fill out the form, and our experts will be in touch!
Stack Exchange Network
Stack Exchange network consists of 183 Q&A communities including Stack Overflow , the largest, most trusted online community for developers to learn, share their knowledge, and build their careers.
Q&A for work
Connect and share knowledge within a single location that is structured and easy to search.
Lead Assignment email alert notification no longer working
Web-to-lead lead assignment notification email alerts have suddenly stopped sending to outlook inbox. I should receive all workflow email alerts as the person cc'd with the lead owner as the main person in the email.
What I have tried
checked SF email log and they are showing as sent however I am not seeing them in my inbox.
checked Deliverability settings and they are correct to show 'all emails'
sent test from email template and is working fine
did IP address checks and have received all that were sent
Any help would be much appreciated
- assignment-rules
As mentioned in documentation , check if 'Stop Automated Field Updates from Suppressing Email Notifications' is enabled in your org and this may resolve the issue if everything else is setup correctly.
Also, review more details on above release update here , along with Ensure you can receive email from the Salesforce application .
- thank you for your help. Managed to figure it out - was an issue with company email software blocking them – AwesomeAdmin8 Commented Jan 20, 2023 at 20:27
You must log in to answer this question.
Not the answer you're looking for browse other questions tagged workflow assignment-rules sales ..
- The Overflow Blog
- Mobile Observability: monitoring performance through cracked screens, old...
- Featured on Meta
- Announcing a change to the data-dump process
- Bringing clarity to status tag usage on meta sites
Hot Network Questions
- Explain how π – 1 + 50 + ⅔ × 1000 is PLONK
- Which Mosaic law was in the backdrop of ceremonial hand-washing in Mark 7?
- How is an inverting opamp adder circuit able to regulate its feedback?
- A strange Lipschitz function
- Do eternal ordinances such as the festival of unleavened bread pose a biblical contradiction?
- Convert HEIC image into JPEG in LWC
- In 1982 Admiral Grace Hopper said "I still haven't found out why helicopter rotors go the way they do". If she were here today, how might one answer?
- Reference request: regularity of non-divergence form elliptic operators with Neumann boundary conditions
- Issues with Python in Ubuntu 24.04 LTS
- How do I backup only changed files on an external hard drive?
- Does a held action have to be an action?
- Does measuring a quantum object collapse the wave function even if the particle is not found in the position where it was measured?
- How do I define the solution to an inequality?
- Solenoid driver circuit with peak hold
- Driving relay without a control Fet: Back EMF consideration when control side is Grounded
- Who owns code contributed to a license-free repository?
- Flight delayed, risk of missing connection, can I cancel and get refund?
- Why is GParted distributed as an ISO image? Is it to accommodate Linux needs as well as Windows needs?
- decode the pipe
- What is this device in my ceiling making out of battery chirps?
- Is consciousness a prerequisite for knowledge?
- What does the equation of the law of conservation of total mechanical energy with deformation energy look like?
- Would it be Balanced to Give Everyone Warlock Slots for Casting Racial Spells?
- What is the difference between "Hubiera" and "Habría"?
IMAGES
VIDEO
COMMENTS
This is where the magic happens, since you can have the assignment rule assign a lead to a queue, and all queue members will receive the email. Setup > Customize > Leads > Lead Assignment; Create a New Lead Assignment Rule (and make it active) Create one or more Rule Entries in the assignment rule. Choose the Email template from step 3
Create a lead auto response rule with the same criteria - "lead state equals CA.". Set the email template on this auto response rule to come from the lead owner designated in your lead assignment rule. Now, when a lead is submitted on your web to lead form with CA as the state, both rules fire and the following happens: Lead owner A gets the lead.
Salesforce Lead Assignment Rule Example. Here's a quick example: Criteria #1: If State = California, assign to Stacy. Criteria #2: If Country = United Kingdom, assign to Ben. Criteria #3: If Country = France, assign to Lucy. Criteria #4: If Annual Revenue is greater than $500,000,000 USD, assign to "High Roller Queue".
In Setup, search for Lead Assignment Rules, and open it. Click New. Name your rule Round Robin Assignment Rule, and click Save. Click to open Round Robin Assignment Rule. In the Rule Entries section, clickNew. In Sort Order, enter 1. Set the rule criteria by choosing Round Robin in the Field dropdown, Equals in the Operator dropdown, and 1 in ...
Create public email templates. You can set up email response rules to use different email templates depending on the information submitted. If you do, make sure to create one default template to send when none of your response rules apply. Set the default status for new and converted leads: Use the Lead Status picklist to do so. Assign leads to ...
The last field, "Email Template" [4] allows you to specify a particular email template to use for notifying the new assignee when the assignment is complete. Issues and challenges Lead Assignment Rules are a reasonable choice for a small team with simple rules.
Creating lead and case assignment rules in Salesforce is a relatively straightforward process. Step 1: After logging in, go to the horizontal navigation bar's upper right corner and choose Setup. Step 2: Type "assignment rules" into the Setup search box, then choose Lead Assignment Rules. Step 3: To add a new assignment rule, select New.
To create our new fields go to Setup > App Setup > Customize > Leads > Fields. Slide down the page past the "out of the box" fields until you see the "New" button where you can create a custom field. In Step 1 of the custom field wizard, pick the data type "Auto Number". In Step 2. Field Label: Lead Number. Display Format: {0}
It all depends on what client is causing the assignment rules to run: Emails will be sent to queue members. Client is the Lead Edit UI where Assign using active assignment rules is checked. Client is a SOAP API client that sets the Assignment Rule Header and Email Header. Client is Web-to-Lead using OOTB /servlet/servlet.WebToLead.
• Set up auto-response rules that determine when to send custom lead-specific email templates. • Consider custom lead fields that you want captured on your web page. Who should have access to leads? It may be important to your company to limit the visibility of leads. Select the sharing model that fits your desired level of visibility:
From Setup, enter "Assignment Rules" in the Quick Find box, then select Lead Assignment Rules. Click New. Enter the rule name. (Example: 2023 Standard Lead Rules) Select "Set this as the active lead assignment rule" to activate the rule immediately. Click Save. Click the name of the rule you just created.
Lead routing is what happens after a lead enters your CRM and before they're in the hands of a sales rep - this is also called Lead Assignment Rules in Salesforce. Leads can come from different sources: A form on your website. Created manually from your customer service. A list uploaded after a tradeshow.
Check the Send Email to Members checkbox on the Queue record page. Add the email template to the Lead or Case assignment rule. Create an email alert with the email template for the object that the queue is related to and add all recipients for email alert. Number 3 is often missed and thus the email is not sent. Hope this helps!
Guidelines and Limits. Email. Email-to-Case Limits. Assignment rules automate your organization's lead generation and support processes. Use lead assignment rules to specify how leads are assigned to users...
Is it possible to simply customize notification email that notifies user (new Lead owner) when I assign Lead to a new owner? I know it's possible to automatically send default notification email, but I need custom mails for almost 20 people.If I use Assignment rules it's so comprehensive (too many assignment rules).
Pro tip: Route only those with scores ready for sales to your sales team to maximize time and effort. This results in a happy and productive sales team by minimizing the frustration of poor leads. 5. Lead Routing by Priority. There are many factors to consider when determining the priority of a lead.
From Setup, enter Leads in the Quick Find box, then select Lead Assignment Rules. Create a lead assignment rule, let's call this All Channel Sales Leads. Create rules to filter leads by record field values or user criteria and assign them to the lead inbox queue. You can also create rules to directly assign leads to partner users.
I've figured out what the issue is. When a lead is created manually and assigned using the assignment rule, Salesforce takes one action - it assigns the lead, so the email based on the template is sent link But when a case is created manually and assigned there are two actions that take place. First it assigns it to the person manually creating the case, and then it reassigns using the ...
Assign Prospect Via Salesforce Active Assignment Rule. Assign to Group. Assign to Queue in Salesforce. Assignment via Prospect list actions. Assign via advanced lead assignment rules in Salesforce. 1. Assign to User. Assigns a prospect to the specified user when the requirements of the rule are fulfilled.
Support Settings: Checked Notify Default Case Owner but that sends the generic email when no assignment rule matches. But in case of matching with case assignment rule no email. Case Creation Template (chosen) Case Assigned Template (chosen) As I am on sandbox so I enabled these settings too: Email->Deliverability->Access level-> All Email.
I've created Lead Assignment Rules and added an active email template (my rules are active as well) I also built my queue and checked "Send Email to Members" I checked my email deliverability, all is good. My assignment rules work well, they are assigned to the correct Queue, but no email is being triggered.
The assignment rules are not configured to send an email, by default when initiated via API. Resolution. When a Lead or Case is created via the API, the API call would need to include: "AssignmentRuleHeader" to trigger the Assignment Rules. "EmailHeader" with " triggerUserEmail" set to 'true' to generate assignment notification emails.
Web-to-lead lead assignment notification email alerts have suddenly stopped sending to outlook inbox. I should receive all workflow email alerts as the person cc'd with the lead owner as the main person in the email. What I have tried. checked SF email log and they are showing as sent however I am not seeing them in my inbox.