SimplySfdc.com
Monday, november 12, 2012, salesforce: assign using active assignment rule.

- Assignment Rules
- 'Assign using active assignment rules' checkbox always checked by default
- Why Salesforce assignment rule is not working?
- Case Assignment Rules not working
- Idea Exchange: Assignment rules don't work with Inline Edits

2 comments:
NOTE: Unlike the Case object, the Lead object requires the 'Show on edit page' checkbox to be enabled when the "Default" checkbox is enabled.
Thanks, because Default will be uncheck when 'Show on edit page' disable in Lead.
Page-level ad
- Salesforce Sales Cloud
- Salesforce CPQ / Revenue Cloud
- Salesforce Service Cloud
- Salesforce Experience Cloud
- HubSpot / Pardot / Marketo
- RevOps Tools
- Advisory & Architecture
- Acquisition Integration (Org Merge)
- Salesforce GTM Techstack Roadmap
- Managed Services / Staff Augmentation
- Implementations & Optimizations
- Custom Development / AppExchange
- Custom Training
- Case Studies
- Your Growth Goals
Configuring the “Assign using active assignment rules” checkbox

There are certain behaviors in Salesforce that I classify as particularly pesky. Like the mosquito buzzing your ear while you sleep, kind of pesky. Invariably with these types of problems it becomes worth turning on the proverbial lights, hunting down the offending pest and… well you know, “dealing” with it. It won’t change the world but sure feels better to have done it.
That being said, one of my favorite pesky Salesforce.com problems to have dealt with is controlling the default setting on the “Assign using active assignment rules” checkbox on Lead and Case records.
Description: This checkbox field allows users who have manually created a new Lead or Case record to use the system’s pre-defined assignment rules to route the record to the correct owner/queue. The field appears on the Edit page layout and seems defaulted to the wrong setting for the situation more often than not.
Problem: Unlike normal checkbox fields in Salesforce.com, setting the default behavior for this field is not done in the field edit list on the object and it is not readily apparent where the behavior is set.
Here is the checkbox on the bottom of the Lead layout in edit mode: (Default set to False in both examples)

Here is the checkbox on the bottom of the (open) Case layout in edit mode:

The Solution: For both the Cases and Leads object the default behavior is set in their respective page layouts and if that is not elusive enough, it is buried in the page layout properties option dialog box.
Once you know where to look it is simple to make the needed changes.
Steps to find the behavior options and set defaults to either True or False: (Using Cases object as the example)
- Your Name: Setup:
- In the left-hand menu list select: Cases: Page Layouts: Choose a Page layout
- In the newly presented dialog box, find the Case Assignment section: Check or Un-check the checkbox labeled “Select by default”
- Save: the Layout
Screenshot of the edit page for a Case Page layout and the default behavior setting:

Commentary: As frustrating as it is to need to manage the default settings for these checkboxes differently than for other checkboxes, there is merit to the method.
Consider now the value of this more granular control of this field that Salesforce has given you. On normal fields you may only default a checkbox field to True or False and that setting applies across all situations. To create anything more dynamic requires custom engineering. (e.g. triggers, VF pages).
So, here is an example of it in action: Imagine you have enabled Lead assignment rules in your organization. Imagine also that you have both Sales Administrators sales reps that manually enter Leads into the system from time to time.
Sales reps create Leads for themselves so they would prefer to have the Active Assignment default to False whereas the Sales Admin that never owns Leads would prefer to have the Active Assignment default to True. If these checkboxes behaved like ordinary checkboxes you could only satisfy the needs of one group. However, by assigning different page layouts and setting the default behaviors on each layout you can meet the needs of both groups–a novel concept I know.

fast-track your mission critical project
Privacy overview.
- December 2020
- November 2020
- February 2020
- January 2020
- December 2019
- Architecture
- Artificial Intelligence
- Aura Component
- Community Cloud
- Integration
- Interview Questions
- Process Builder
- Recommandations
- Uncategorised
- Visualforce
- Web Component
- Entries feed
- Comments feed
- WordPress.org
Trigger assignment rules from apex
Automatically assign the leads or cases to users or queue using assignment rules when they are inserted via api or back-end apex logic..

Being a Salesforce Admin or Developer, I assume you have setup Assignment rules for your projects to auto assign cases or leads to either queue or user based upon some criteria.
The active assignment rules can be automatically triggered by checking the “ Assign using active assignment rules ” checkbox under the properties section of the lead or case page layouts . This option is only available if there are active assignment rules present on either lead or case.

This automation will only applicable if the records is created from Salesforce UI and not through backend, which means through apex or REST API. There is no option in DML statements to assign the owners based on active assignment rules as of now. You need to manually specify active assignment rule to auto assign cases to users/groups.
Explaination:
- Instantiate Database.DMLOptions
- User DMLOptions variable to assign assignment rule id queried by SOQL
- Insert the case/lead record after configuration
- If case/lead is matching the criteria of assignment rule, then it will automatically assigned to user or queue.

Efficient Ways to Call Apex Methods from LWC in Salesforce: Pros and Cons

How to Create Modal Popups in LWC Salesforce: A Step-by-Step Guide

Difference between @Track, @api and @wire LWC decorators
Useful salesforce plugins.

Salesforce Order of Execution

Workflow Vs. Process Builder
Responsive and editable email templates now £299
How to Automate Lead Assignment for Salesforce Platforms
Lead assignment in Salesforce is crucial for making sure sales-ready leads reach the right person to make contact, at the right time.

Exactly how leads are handed over from marketing to sales should never be assumed or taken lightly. Lead assignment is a crucial step in making sure sales-ready leads reach the right person to make contact, at the right time. Which is why automating lead assignment for Salesforce platforms, from Account Engagement to Sales Cloud, or Marketing Cloud to Sales Cloud, is so important.
The aim for any marketer is to assign inbound leads in the most efficient way, and the lead assignment features of Salesforce enable us to do just that.
If you’ve been assigning leads manually until now, you’re about to have your world changed.
And if you’re already assigning leads to sales reps using automated features in your Salesforce accounts, don’t exit just yet. Stick around to ensure you’re following best practices and making lead assignment (also known as lead routing) as seamless as it can be.
For this guide, we’re going to assume you are using Sales Cloud alongside Pardot and/or Marketing Cloud. This means there are two parts to ensuring lead assignment runs smoothly. The first is integrating and configuring your Salesforce products to work together, and the second is the setup of Lead Assignment Rules in Salesforce.
Part 1 - Configuring your Salesforce products
Integration.
It’s somewhat obvious, but the first essential step is to connect your platforms using the Salesforce Connector (for Account Engagement aka Pardot), or Marketing Cloud Connect, depending on which you use.
Connecting Pardot and Sales Cloud using the Salesforce Connector is fairly straightforward, and essentially means the two platforms are able to ‘talk’ and share data, rather than marketers needing to manually export and import lead data.
You’ll find the Salesforce Connector in the AppExchange, and an implementation guide is provided by Salesforce here , including considerations before you install.
You’ll want to use the V2 Connector , so if you’re already using the connector but haven't upgraded yet, be sure to do that.
Marketing Cloud Connect, for connecting Sales Cloud and Marketing Cloud Engagement, is a little more challenging, so we’ve provided a full guide here.
Marketing Data Sharing
After installing the Pardot-Salesforce Connector, you’ll see an option for ‘Marketing Data Sharing’ which allows you to restrict which Leads, Contacts, Opportunities, and/or custom objects are eligible to sync from Salesforce to Pardot. This is ideal for those with multiple Business Units but can work well for those with just one, too.

What’s great about MDS is it gives you more control over when prospect and lead records are created, which is all part and parcel of ensuring correct lead management.
For a deep dive into MDS and to configure the settings in the best way for your business, have a read of this dedicated blog: How to Use Marketing Data Sharing in Pardot & Salesforce .
Understand sync behaviours
With your platforms connected, take some time to understand exactly how the two can and will sync . You can set either Pardot or Salesforce as the ‘master’ values, meaning if there are differences in a record between the two platforms, one will be used to override the other. You can also choose to ‘Use the most recently updated record’.

For Account Engagement and Sales Cloud, as a general rule, prospect records sync every two to four minutes. Most records sync immediately, but Account Engagement processes sync queues with over 400 records in batches. Standard batch processing syncs 12,000 records per hour.
Having said this, certain activities can trigger a sync, and this can be at a prospect, trigger, or system level. We have a full guide to Pardot and Salesforce sync behaviours , which we recommend reading if you’re new to this topic, or to sense check that your current sync behaviours are correct and without errors!
For a free audit of your Account Engagement , Salesforce , or Marketing Cloud account, including checks of your integration and sync behaviours, get in touch .
Part 2 - Setup of lead assignment
Planning lead assignment and criteria.
Let’s assume you have successfully connected and synced accounts. You are now ready to plan and implement your lead assignment, using preset lead criteria.
Remember, there’s a difference between implicit and explicit leads and you can determine this based on your lead scoring and grading .
- Explicit leads: are the right fit for your business because they match the demographics of your ideal customers. For example, they are the right decision-maker within the right type of company and industry.
- Implicit leads: are prospects who show a keen interest in your business and demonstrate buying intent.
The ideal sales-ready lead will meet both your explicit and implicit lead criteria. So, the very first item on your to-do list is to agree and document what makes a qualified lead . This should be a collaborative effort between marketing and sales teams.
Download the ‘ How to Qualify Leads’ eBook for a step-by-step guide to planning and implementing lead qualification.
Only once you have a clear definition of a sales-ready lead, can you plan who should receive such leads, when, and how. Some considerations are:
- Do sales team members have designated regions or countries?
- Are there priority team members who should receive leads first?
- Should leads be assigned by their product or service interest ( Scoring Categories help with this)?
- Are there types of leads we don’t want to contact and what happens to these?
- Do leads from different sources require different teams or treatment?
Use these considerations to map out your precise criteria, such as:
Criteria 1: Unqualified leads - don’t assign those from regions we don’t service.
Criteria 2: ABM leads - high-value targets must be assigned to a specific sales rep.
Criteria 3: Country - all remaining leads must be assigned to their country-specific sales team.
Again, document your lead assignment plan offline first, before implementing anything in your Salesforce accounts. This really helps to get a clear picture of what will happen and allow you to sense check before changing any settings that could cause problems later.
How to create a Lead Assignment Rule in Salesforce
You’ve got your lead assignment criteria sorted and you’re ready to get things set up. Enter the aptly named ‘Lead Assignment Rule’ in Salesforce.
Navigate to the ‘Marketing’ section in Salesforce and select ‘Lead Assignment Rules’.

Here’s where you create your Lead Assignment Rule but heads up, you can only have one active rule at a time.
Now note that when you create a rule, you’ll specify the order that each criteria will be processed. Therefore, it’s easiest to input in priority order, with the most important rule criteria first.
Once you’ve entered your rule criteria (side note, you need to make sure you have the data values to match the rule!) you can choose the assignment action.
There are three options for lead assignment and these are:
- User - assign to a specific Salesforce user, by name.
- Queue - assign to a queue to be distributed among a team.
- Partner user - assign to a user of a partner account .
To assign a lead to a ‘Queue’ you’ll need to first create the Queue in the Administration > Users > Queues section of Salesforce.

For example, you may have Queues for each region’s sales team, with the relevant users selected as members i.e. a Queue for ‘Leads - UK’ and a separate Queue for ‘Leads - Germany’.
Once activated, all leads will be assigned based on the active rule. It’s a good idea to have a final criteria in your rule that catches all other leads and assigns them to a default user, so you can review and update your criteria if required, or manually assign these leads.
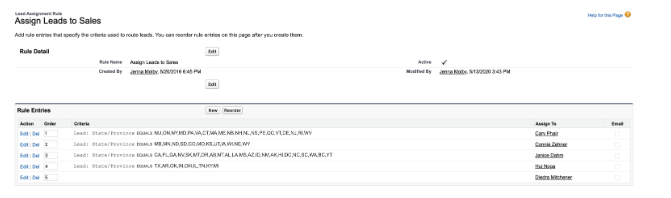
Salesforce Lead Assignment Rule example

In the above screenshot, you can see that the Lead Assignment Rule has three criteria, in order of priority. First, we eliminate leads that should not be assigned, those that are clearly time-wasters. Next, we assign ABM leads to specific sales reps because these are priority leads. Then, we assign all remaining leads to different Queues based on their region: Europe, North America, or Asia Pacific.
Triggering LARs from Pardot/Marketing Cloud
Where things get a little tricky with lead assignment is when we start to consider how leads are assigned in Salesforce when coming from Pardot or Marketing Cloud.
Pardot/Account Engagement
In Pardot, a prospect must have an assigned user to allow them to sync to Salesforce in the first place. The problem is, having an assigned user means the prospect is ignored by the Salesforce Lead Assignment Rule.
This is all well and good if you have just one or two sales reps who handle all leads. You can simply ‘Assign to user’ or ‘Assign to Queue in Salesforce’. The complex Lead Assignment Rule might not be necessary.
For those who prefer a Lead Assignment Rule in Salesforce to better triage and automatically assign large volumes of leads to multiple users though, the solution is to select the ‘Assign Prospect Via Salesforce Active Assignment Rule’ within Completion Actions (for forms, form handlers, custom redirects, emails and page actions), Automation Rules, or Engagement Studio programs.

This will push prospects to the Salesforce Lead Assignment Rule when the criteria is met and the prospect syncs without an owner, allowing the LAR to assign accordingly.
Marketing Cloud
How do you trigger LARs in SFMC?
With Marketing Cloud evolving from a B2C focus, lead assignment is not as well defined as a tool. That’s not to say that effective lead assignment logic can’t be used, it just means you will have to leverage the powerful tools provided by Marketing Cloud Connect in conjunction with Journey Builder.
Journey Builder has a number of actions such as the Create Lead, Convert Lead, and Update Object which can all be configured to update records in Sales Cloud. This means that you can construct a logic flow to determine which route a lead goes down and then have a create lead/update lead action that assigns the lead to a particular salesperson. This could be random, a round-robin, based on working hours, or based on a lead’s profile.
Troubleshooting rules that aren’t working
Finding that your Lead Assignment Rules are not working? Here are a few common reasons why:
- Your LAR isn’t ‘Active’ - select the ‘Active’ checkbox and remember you can only have one active rule at a time.
- When creating leads in Salesforce manually, you must select the ‘Lead Assignment’ checkbox to ensure your new lead triggers the rule.
- Prospects are already assigned to a user in Pardot and therefore, bypass the LAR - use ‘Assign Prospect Via Salesforce Active Assignment Rule’ instead.
- You’re trying to run your LAR on a lead already assigned in Salesforce - LARs trigger for new leads as they are created and using the criteria at that time.
- There’s an error in your rule criteria which means the way you are checking the rule is wrong. Check the ‘Operator’ you are using and the way the rule is run.
Ready to qualify and assign leads?
No lead assignment in Salesforce can be relied on confidently without first agreeing on a shared definition of what a ‘sales-ready lead’ means for your business.
Start with a robust scoring and grading model using our free ‘ Pardot Scoring & Grading That Works ’ eBook, to quickly surface only the most qualified leads and be sure you’re following the best practices for long-term success.
Founder & CEO of MarCloud, Tom has been on both sides of the fence, client-side and agency, working with Salesforce platforms for the best part of a decade. He's a Salesforce Marketing Champion and certified consultant who loves to co-host webinars and pen original guides and articles. A regular contributor to online business and marketing publications, he's passionate about marketing automation and, along with the team, is rapidly making MarCloud the go-to place for Marketing Cloud and Salesforce expertise. He unapologetically uses the terms Pardot, Account Engagement and MCAE interchangeably.
Featured resource

Pardot Scoring & Grading That Works
This handbook gives a straightforward explanation of Pardot grading and scoring. It outlines default versus custom models and provides a basic understanding of lead qualification. If you’ve ever wondered what the difference is between grading and scoring, we cover it.
More recent posts

Breakdown: Marketing Cloud Automation Studio Activities
Marketing Cloud Automation Studio ‘Activities’ help teams automate marketing processes, saving hours that would otherwise be spent doing manual data management.

Anton Minnion

How to Unify Marketing Cloud Data with Third-Party Systems
We’ve all been there: running marketing and advertising activities across multiple channels, each one storing contact data and analytics in siloes. Combining disparate data is a headache, with only 31% of marketers fully satisfied with their ability to unify customer data sources, according to the latest Salesforce State of Marketing Report.

Marketing Cloud Advertising: More Important Than Ever?
According to the latest Salesforce State of Marketing Report, advertising spend has jumped 3% for B2B marketers and 4% for B2C marketers since 2022. What isn’t clear from the report is how many of these marketers are tapping into Marketing Cloud Advertising for centralising their campaigns. If they’re not, they’re missing out.
Ready to reach marketing nirvana?
Our market-leading framework, 'B2BMA Nirvana by MarCloud', addresses every part of Account Engagement (Pardot) and your Salesforce ecosystem. Using this framework, MarCloud experts have the wisdom and experience to guide you on the path to complete marketing and reporting clarity.
Reach the highest state of Salesforce marketing so you can save time, deliver quality leads, and generate more revenue using Marketing Cloud Account Engagement (Pardot) and other Salesforce platforms. Whatever your current circumstance, we'll get you to a place where everything works.
Need a hand getting the most out of your Pardot or Marketing Cloud account?
MarCloud is a team of certified Pardot, Marketing Cloud, and Salesforce specialists. We help businesses to unlock the potential of marketing automation. Ready to save time, deliver more quality leads, and generate more revenue? Here's how we help.
Grow your business with Salesforce Starter
Deepen customer relationships with sales, service, and marketing in one app.
About 15 mins
Create Assignment Rules
Create escalation rules.
- Challenge +100 points
Automate Your Business Process
Accessibility.
This unit requires some additional instructions for screen reader users. To access a detailed screen reader version of this unit, click the link below:
Open Trailhead screen reader instructions .
Assignment rules define conditions that determine how leads or cases are processed. You’ve been asked by Customer Support team manager Kenya Collins to establish case rules so billing cases are routed to the correct queue.
Start by creating a new Billing Support Agents queue.

- Enter Queues in the Quick Find box, then select Queues .
|
|
|---|---|
Label | |
Queue Name | (this field auto-populates) |
Send Email to Members | Deselect |
- From the Available Objects list, select Case .
- Click Add to move Case to the Selected Objects list.
Next, add queue members.
- In the Queue Members section, search Users .
- From the Available Members list, select User: Aaron Hartzler and User: Fumiko Suzuki .

Then add a new rule entry to the Standard Case Assignment rule to route billing cases to the Billing Support Agents queue.
- From Setup, enter Case Assignment Rules in the Quick Find Box, then select Case Assignment Rules .
- Click the Standard case assignment link, then click Edit .
- Select the Active checkbox to ensure this as the active case assignment rule, and click Save .
|
|
|---|---|
Step 1: Sort Order | |
Step 2: Run this rule if the following | criteria are met |
(1st row) Field | Case: Status |
Operator | equals |
Value | New (click the lookup icon, select New and Insert Selected) |
(2nd row) Field | Case: Case Record Type |
Operator | equals |
Value | Billing (click the lookup icon, select Billing and Insert Selected) |
- In Step 3, select the picklist value Queue from the list.
- Click the lookup icon, then search for and select Billing Support Agents .
- Click Save .
Now create a new billing support case to test the assignment rule.

- Click the Cases tab.
- Click New .
- Select Billing and click Next .
|
|
|---|---|
Contact Name | Sean Forbes |
Account Name | |
Product | (choose any product from drop-down) |
Type | Electronic |
Case Origin | Phone |
Subject | |
Description | |
Assign using active assignment rule | Select |
Note: If "Assign using active assignment rule" is not appearing when creating a new case, return to the Case Assignment Rule menu in Setup. Edit the Standard case assignment and uncheck the active checkbox and save. After saving, check the active checkbox again and save. This toggle will ensure "Assign using active assignment rule" appears when creating a new case. Also, verify the Assign using active assignment rule box is checked in the layout properties on case page layouts.
Escalation rules automatically escalate a case when it meets the criteria you choose. Kenya would like her Customer Support team to be notified whenever a case regarding an issue with performance is logged. Set that up for them.
Start by creating a new escalation rule.

- Enter Escalation Rules in the Quick Find Box, then select Escalation Rules .
- Click New and fill in Rule Name: Support .
- Click the Active checkbox and click Save .
- Choose the new Support rule from the Case Escalation Rules list.
|
|
|---|---|
Step 1: Sort Order | |
Step 2: Run this rule if the following | criteria are met |
Field | Case: Case Reason |
Operator | equals |
Value | Performance (click the lookup icon, select Performance and Insert Selected) |
Now update the Rule Entries of the newly created Support escalation rule.
- Click New under Escalation Actions and enter the Age Over value to 1 .
- In the Notify This User field select the Lookup then search for and click on your name.
- For the Notification Template select the Lookup , navigate to the Unfiled Public Classic Email Templates folder, and choose the Support: Escalated Case Notification template.
Create a new Product Support case for Edge Communications and review the escalation actions in the Case Escalations queue.

- Click New , then select Product Support as record type and click Next .
|
|
|---|---|
Contact Name | Sean Forbes |
Account Name | |
Product | (choose any product from the drop-down) |
Type | Electronic |
Case Origin | |
Case Reason | Performance |
Subject | |
Description | |
Assign using active assignment rule | Select |
- Copy the case number of the case you just created.
- From Setup, enter Case Escalations in the Quick Find Box, then select Case Escalations .
- Filter the case escalations queue to show the case you just created by entering the criteria: Case To Escalate equals [case number for the case you just created].
- Click Search . Note the escalation actions in the queue and when can you expect to see an escalation alert email for this case.
Congratulations! You finished the project and customized your org. From setting up users and managing Chatter to creating record types and processes, with these building blocks in your toolbox, you’re well on on your way to becoming an expert Salesforce admin.
- Get personalized recommendations for your career goals
- Practice your skills with hands-on challenges and quizzes
- Track and share your progress with employers
- Connect to mentorship and career opportunities

How to Re-run Salesforce Lead Assignment Rules: Flows & Apex
Salesforce Lead assignment rules ensure Leads are assigned to the appropriate user or queue for follow up. They also liberate marketers from trying to maintain sales territory logic within their Marketing Automation Platform (MAP).
>> Related: How to Build a SLA Alert in Salesforce <<
When a new Lead is created, Salesforce will use logic you’ve configured to assign the record to the appropriate user or queue. But what if you need to re-run that logic on existing records ?
In this post:
Re-running Lead Assignments for just a few Leads
If you only need to do this for a single Lead record, the solution is simple. Edit the record and select the optional “ Assign using active assignment rule “ checkbox.

If you need to do a one-time batch reassignment of a number of records, export the relevant Lead Ids. Then use the Apex Data Loader to trigger assignment rules to fire. You can grab the ID of the appropriate Lead Assignment Rule from the URL bar when viewing the rule in Setup. It will always start with the prefix “01Q” .

But you may want to automatically re-run Salesforce Lead Assignments
But you may want to re-run assignment rules automatically under certain conditions. For example: you may assign Leads under a certain Lead Score to a Queue. When the Lead Score increases over the threshold, you then want to re-run assignment rules to assign to an inside sales rep for follow up.
To do this, we combine Flow and an Apex Invocable method. We take advantage of the power of Apex with the flexibility to declaratively (clicks, not code!) control the logic of when to re-run the assignment rules, without having to edit any code.
Using Apex for Salesforce Lead Assignment Rules
Let’s start with the code.
Since we’re writing code here, we’ll need to start in a sandbox org first before deploying to production. You’re smart and already knew that you’d NEVER make changes in production without first testing in a sandbox ( right?! ), but in this case, Salesforce doesn’t trust you either way and forces you to write your code in a sandbox org before moving to production.
We’ll be creating an Apex class with a single method with the @InvocableMethod annotation, which allows us to call our Apex from within a Flow. The method accepts a single parameter (a list of the Lead Ids to be assigned) that you’ll pass into the method from your Flow.
That’s it. Just those four lines are all you need in your code. The logic for firing the assignment rules will be configured in one or more Flows.
Now, in order to actually deploy this to your production org, you’ll also need to create a test class to cover your code and ensure that it functions as expected in your environment. A sample test class might look like this (but this is extremely basic):
Work with a developer to ensure you’re accounting for any requirements specific to your Salesforce instance.
Using Salesforce Flows for Lead Assignment Rules
Now we’ll create our declarative logic of when to fire the code, using a Flow.
1) Create a new Flow by searching for Flows under Setup and clicking the New Flow button in the top right. This example is for a Record-Triggered Flow , but you can design it a number of ways.
2) Select the Lead object for your Flow and configure the trigger for when a record is created or edited .
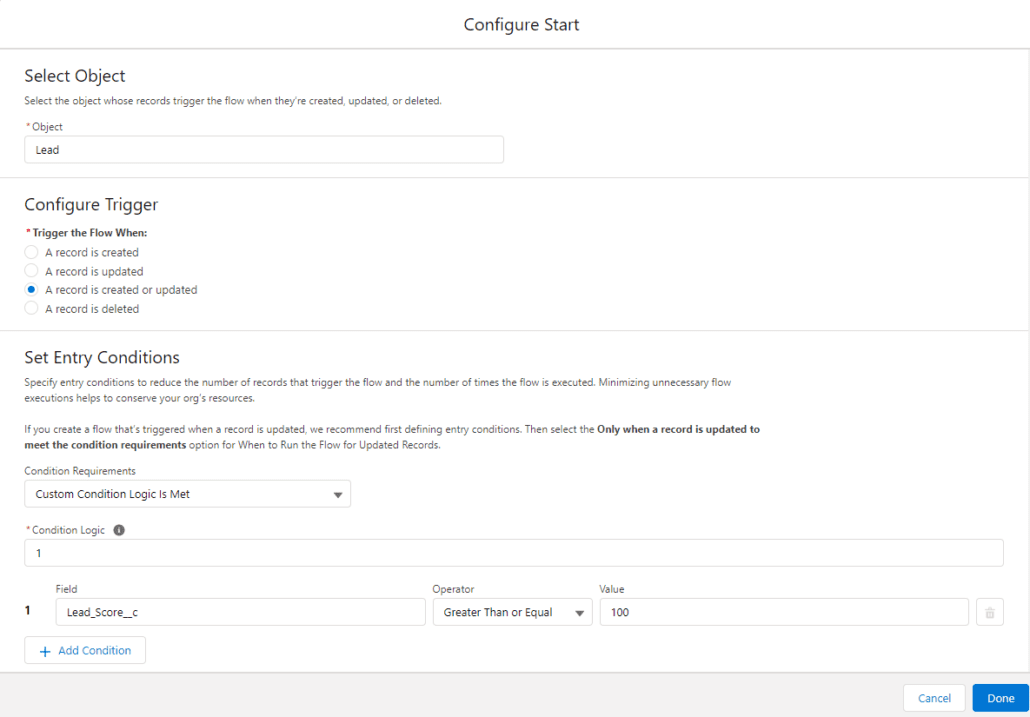
3) Then set the Entry Conditions. In this use case, we want to re-assign Leads after they meet a certain Lead Score. Select “custom condition logic is met. ” Set the condition that the Lead Score is greater than or equal to 100.
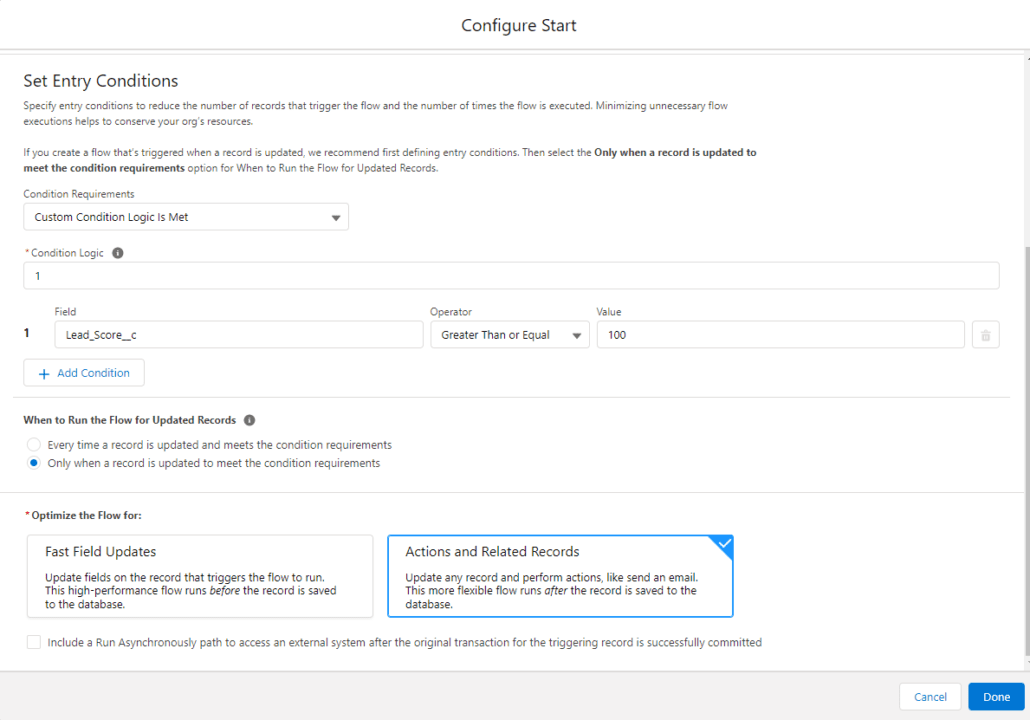
Under the “When to Run the Flow for Updated Records” section, select the option to only execute when a record is updated to meet the condition requirements . This means we’ll only execute the actions if the record previously did not meet the criteria, but now does after being updated.
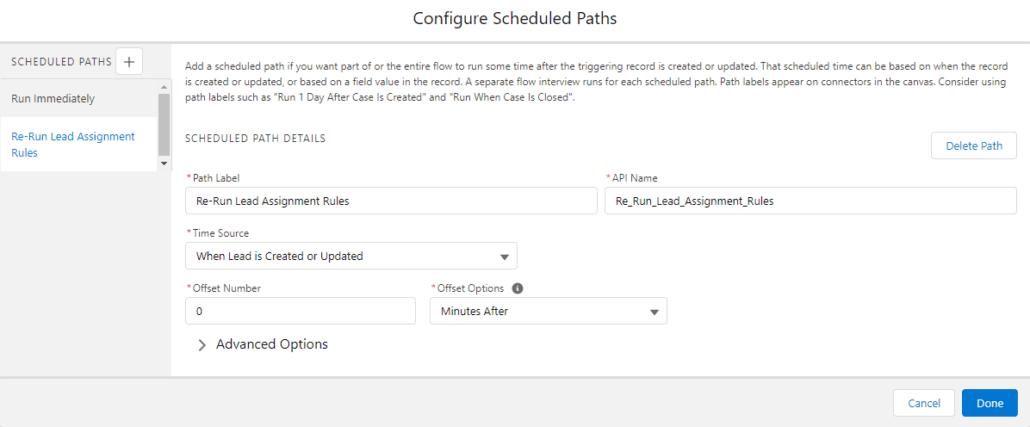
4) Without getting into too much detail, because of Triggers and Order of Execution , we can’t call our code in an immediate action. Instead, we’ll create a scheduled path to call our Apex method.
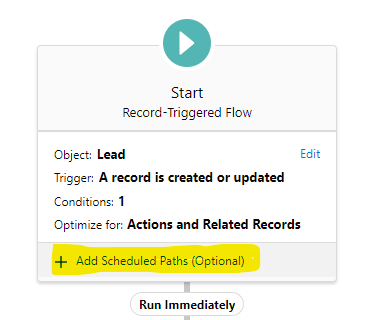
In this case, we want the logic to execute ASAP, so we’ll set the schedule for 0 minutes from now.
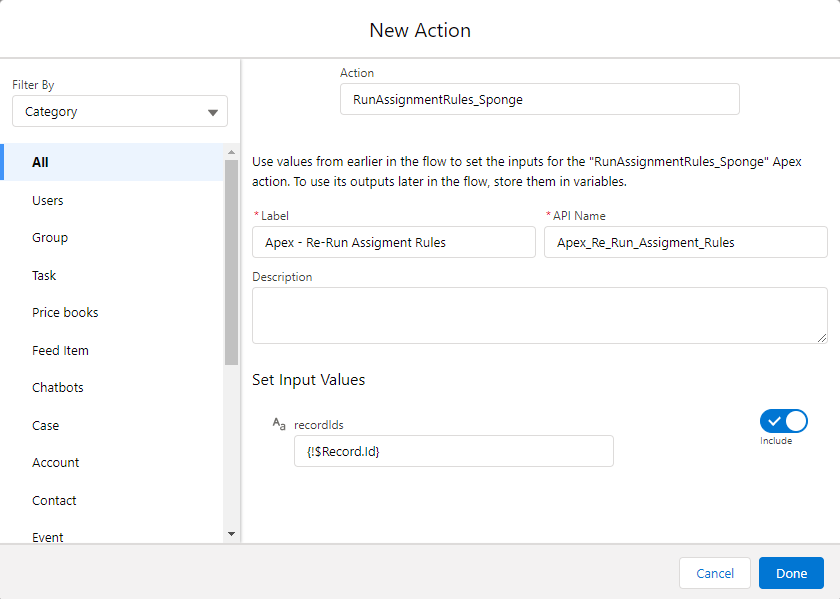
5) Once saved, we can create a new action. Click to Add a New Element , and select an Action type. Give your action a name, and select the Apex class you created earlier. Set the Apex Variables leadIds using the Field Reference of the Lead Id that started the process.
6) After saving, your Flow looks like this:

Activate your flow, test in your sandbox, and deploy to your production org. Since the code is fired under a scheduled action, there is a slight delay before the reassignment happens. In my experience, it’s usually <2 minutes, but you can monitor this under Setup > Flows and viewing the Paused and Waiting Interviews section.

The nice part about this approach is that if your requirements change – for example if your Lead Score threshold changes to 150 instead of 100 – you can change the logic in your Flow (Step 3) without having to touch any code.
You might also like
Sales Funnel ROI Calculator
8 Lead Management Process Samples
How to Measure Lead Follow-Up Beyond First Touch
Get our newsletter.
Get tips, tutorials, best practices, and other cool stuff delivered to your inbox every quarter.
- Name * First Last
Get a System Audit
Whether you inherited a new instance or just want a second opinion, we'll dive in and benchmark your tech stack.
- Full Name *
- Job Title *
- What systems and challenges do you have?* *
- Hidden utm_medium
- Hidden utm_source
- Hidden utm_campaign
- Hidden utm_content
- Hidden utm_term
Download Resource
Use this form to recieve your free resource in your inbox today!
Get the Reddit app
This is an unofficial (no salesforce sponsorship) forum to discuss getting certified and building on salesforce platforms (force.com, heroku, exacttarget, slack, etc.)
Lead - Issue with default Lead Assignment checkbox and Record Types
Goal - I want to have the 'Assign using active assignment rule' box checked by default.
I've been working on a new Lead build. I was using a single page layout and adding required fields but then I began developing a solution for additional record types. I was building everything on a single page layout, setting required fields, etc. I then began building out for the Record Types, and did not set the default Lead Assignment property until after building out the Record Types. This is where the experience got wonky. I'm selecting the checkbox for each Page Layout, but nothing is pushing down to the actual Record Type pages. When I create a New Lead, the box is left unchecked. Has anyone else experienced this? It's a checkbox setting, so I'm unsure where the disconnect is.
I've checked:
Page Layout assignment. This didn't reveal much because every page layout has the default lead assignment checked. So regardless of master/default I expect to see the default Lead Assignment box checked.
Tested a copy and creation of a New Page Layout.
Triple checked my Lead assignment rules, processes, and settings.
I feel like I'm going in circles. This seemingly simple checkbox setting isn't liking the fact that I'm using Record Types. I wonder if I setup the setting prior to creating all the Record Types and if I'd still have this issue? Let me know if anyone has anything helpful I can try and test. I feel I'm overlooking something super simple.
By continuing, you agree to our User Agreement and acknowledge that you understand the Privacy Policy .
Enter the 6-digit code from your authenticator app
You’ve set up two-factor authentication for this account.
Enter a 6-digit backup code
Create your username and password.
Reddit is anonymous, so your username is what you’ll go by here. Choose wisely—because once you get a name, you can’t change it.
Reset your password
Enter your email address or username and we’ll send you a link to reset your password
Check your inbox
An email with a link to reset your password was sent to the email address associated with your account
Choose a Reddit account to continue
Getting Started
Learn through 101 guides and easy solutions.
Dive into the weeds with advanced tips.
New Features
Evolve with the Salesforce platform feature updates.
Get to know our community and join the action.

6 Ways to Manage Lead Assignment in Pardot
- Marketing Automations , Pro Tips
- January 13, 2022
min. reading
Pardot lead assignment routing can trip up even the most experienced sales and marketing teams.
There are so many different ways to assign your prospects within Marketing Cloud Account Engagement (Pardot). Whether you want to manually assign prospects or utilize automation rules or completion actions to assign prospects based on their activity or information, the options can seem overwhelming.
In this post, I’ll dive into 6 different ways to manage lead assignment in Pardot and how to determine what the best option is for you. After all, cultivating interest, inspiring action, and responding to people who raise their hands is why we’re here, right?
Six Pardot Lead Routing Methods
Choosing the right lead management strategy and tools to automate the process is challenging, but it’s super important. Read on to understand what you should know to make the right choice for your organization.
There are multiple ways to assign new leads in Pardot ranging from manual assignments to complex and automated assignments based on lead criteria or activity.
- Assign to User
- Assign Prospect Via Salesforce Active Assignment Rule
- Assign to Group
- Assign to Queue in Salesforce
- Assignment via Prospect list actions
- Assign via advanced lead assignment rules in Salesforce

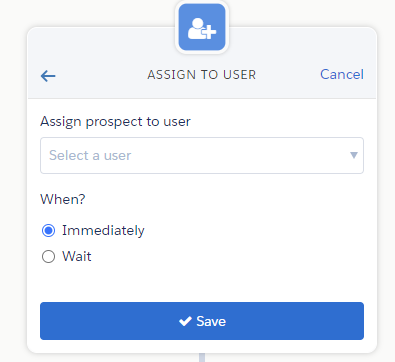
1. Assign to User
Assigns a prospect to the specified user when the requirements of the rule are fulfilled.
How to use it
Completion action:.
Assign to user can be set up as a completion action for your forms, form handlers, files, custom redirects, emails and page actions, by selecting “Assign to user” and selecting the user’s name from the dropdown
Automation Rule:
Assign prospect to user can be set up as an action within an Automation Rule. This is a great way to assign leads if you have criteria the lead needs to meet before assigning the prospect to Sales.
For example, if you want to only assign leads to sales that meet a certain scoring threshold, use an automation rule.

Engagement Studio Program:
Assign to user can also be set up as an action with an Engagement Studio Program, by selecting add element > action > assign to user .
| Great if you don’t have many usersCan be used without the Salesforce integration | Assignment actions don’t reassign prospects who have an ownerDifficult to manage if you have many usersDifficult to figure out where the “assign to user” action is being used within your Pardot assets |
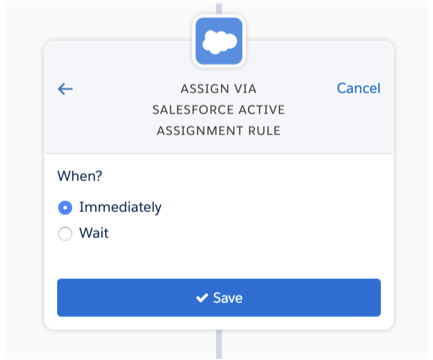
2. Assign Prospect via Salesforce Active Assignment Rule
Pushes a prospect to your Salesforce active assignment rule when the rule’s criteria are met (see more information on this process below). The prospect syncs to Salesforce without an owner.
The assigned user is synced to Pardot when the active assignment rule determines who to assign it to.
To get started, review this Pardot help article: Assigning Prospects
First, you will need an active lead assignment rule setup in Salesforce. This should include all the criteria for your lead assignment as well as a default user to assign the lead to if the lead does not meet any of the criteria.
Assign via active Salesforce assignment rules can be set up as a completion action for your forms, form handlers, files, custom redirects, emails and page actions, by selecting “Assign prospect via Salesforce active assignment rule”.

Assign prospect via the Salesforce active assignment rule can be set up as an action within an Automation Rule.

Engagement Studio Program
Assign prospect via Salesforce active assignment rule can also be set up as an action with an Engagement Program, by selecting add element > action > assign prospect via Salesforce active assignment rule .
| All lead assignment is set up in one placeNo need to update completion actions or automation rules in Pardot if you have an assignment update actionAssignment can be based off complex criteria and based on any lead field within SalesforceGreat if you have many Sales reps who should receive leads | You must have the Salesforce integration set upAny users assigned to a lead in Salesforce need to have a corresponding Pardot user to track ownership correctly in PardotRequires the “View Setup and Configuration” permission in Salesforce in order to make assignment updates |
3. Assign to Group
Assigns a prospect to a user in a specific group (round robin lead assignment) when the requirements of the rule are met.
First, create a group in Pardot (Admin > User Management > Groups > Add User Group) .
Navigate to the user you should belong to the group (Admin > User Management > Users) and click Edit Groups . Select the group to add the user.
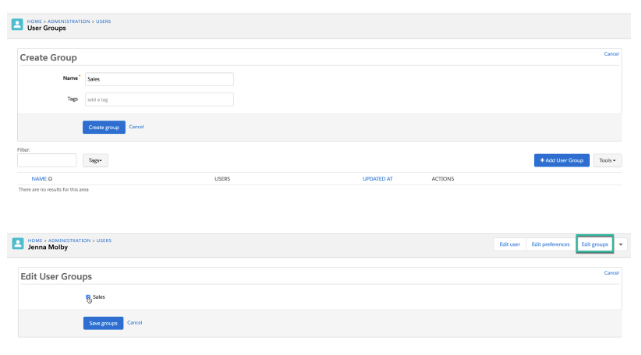
Assign to user can be set up as a completion action for your forms, form handlers, files, custom redirects, emails and page actions, by selecting “Assign to group” and selecting the user’s name from the dropdown

Assign prospect to user in group can be set up as an action within an Automation Rule.

Assign to group can also be set up as an action with an Engagement Program, by selecting add element > action > assign prospect to group .
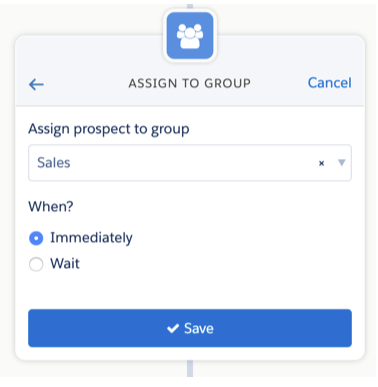
| Allows for round-robin lead assignmentCan be used without the Salesforce integrationGreat if you don’t have many users to assign prospects to | Difficult to manage if you have many usersDifficult to figure out where the “assign to user” action is being used within your Pardot assetsProspects must be assigned via round-robin, unless you create groups with only one user |
4. Assign to Queue in Salesforce
Assigns a prospect to the Sales Cloud lead queue when the rule’s criteria are met. Prospects assigned to a queue are considered assigned to an owner and aren’t reassigned. You can assign only leads to Sales Cloud lead queues.
First, you must have a lead queue set up in Salesforce.

Assign to queue can be set up as an action within an Automation Rule.
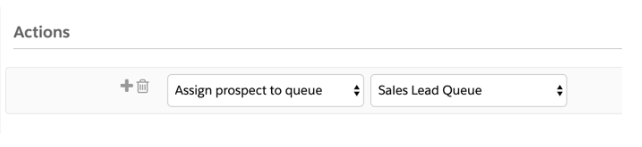
Assign to a queue can also be set up as an action with an Engagement Program, by selecting add element > action > assign to Salesforce queue .
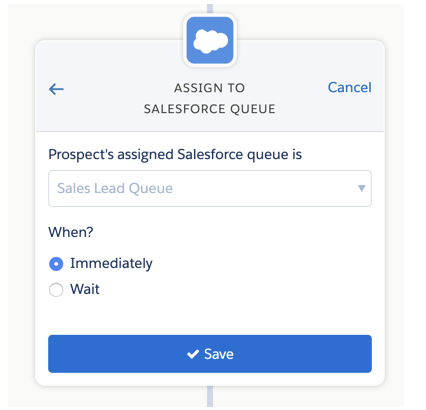
| Queue members can jump in to take ownership of any record in a queueEasy to prioritize, distribute, and assign records to teams who share workloads | This action can not be used if your connector is set up for Pardot to syncs to contacts instead of leadsYou can assign only leads to Salesforce lead queuesDoes not assign prospects to specific owners |
5. Assignment via Prospect list actions
Prospects can be assigned to a User or Group via prospect list actions.
Navigate to the prospect table, select the prospects you want to assign and select one of the options from the drop down menu.

| Good for one-off lead assignmentWill re-assign prospects who are already assigned | Not automated, has to be updated manually |
6. Assign via advanced lead assignment rules in Salesforce
If you have more complex business rules, assigning leads via an app on the Salesforce AppExchange might be a good option. Most apps offer a visual way to view lead assignment rules and some advanced functionality, including auto-merging duplicate leads and lead to account matching.
Traction Complete is a good option we’ve used before.
| Great if you have many users and complex assignment rulesVisual view of lead assignment rulesAbility to assign leads via round robinCan automatically match leads to accountsCan filter records by advanced criteria (using fields from the leads or matched account)Automatically can convert leads from a matched account into a contactAuto-merge duplicate leads | Most apps on the AppExchange come at an additional costIt is another application to manageNot ideal if you have a small sales team or straightforward assignment rules. |
Lead routing in Salesforce
Here are some additional ways Sales Cloud handles lead routing.

Lead assignment rules
In Sales Cloud, you can set up lead assignment rules to automate the assignment of new leads to your sales team or queues based on the specified rule criteria.
The rules will execute and evaluate in the numbered order as leads enter Sales Cloud. Each lead assignment rule consists of multiple rule entries that specify exactly how the leads or cases are assigned. When a lead matches the rule, it will be assigned to the correct person or queue. Only one lead assignment rule can be active at a time.
To get started, review this Salesforce help article: Set Up Assignment Rules
Round-robin lead assignment
The round-robin lead assignment rule in Sales Cloud helps you automate the assignment of new leads in an even way to your sales team or queues.
Here’s how the repeating round robin assignment looks if your sales team for lead assignment has 3 members:
- Lead 1 is assigned to sales person 1
- Lead 2 is assigned to sales person 2
- Lead 3 is assigned to sales person 3
- Lead 4 is assigned to sales person 1
- Lead 5 is assigned to sales person 2
- Lead 6 is assigned to sales person 3
To get started, review this Salesforce help article: Create a Round-Robin Lead Assignment Rule .
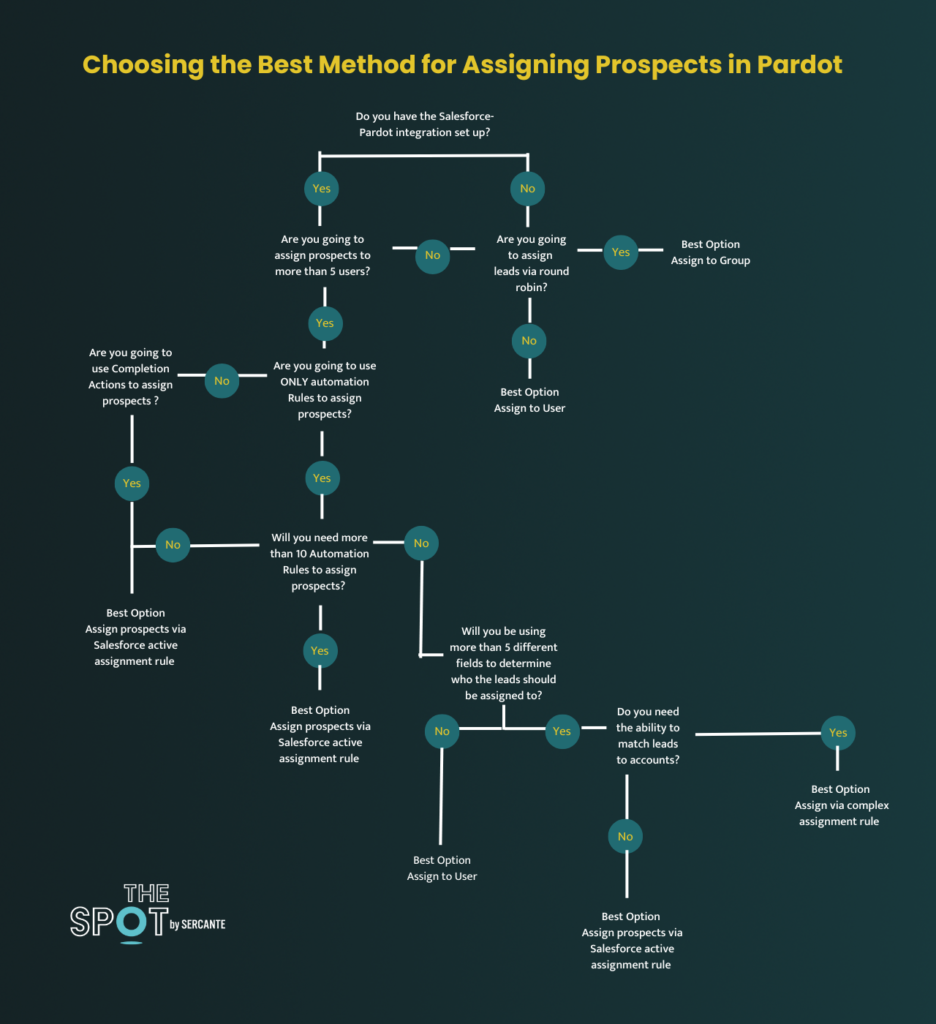
Still not sure what lead assignment method is best? Run through this flow chart to see what the recommended option is for you.
Additional Resources
- Salesforce Lead Assignment Rules Best Practices and Tricks
- Lead Routing in Salesforce
- Trailhead: Qualify and Route Leads to Your Reps
- Trailhead: Grow Your Business with Sales Cloud
- Trailhead: Convert and Assign Leads
- Trailhead: Sell as a Team
- ParDreamin’ on-demand video: Now You See Me, Now You Don’t! Lead Routing Basics for Pardot Admins
- The Three L’s in Pardot: Lists, Location, and Lead Assignment
- 6 Ways to Manage Lead Assignment in Pardot and How to Determine The Best Option
Complex lead routing with third-party tools
Third-party tools enable you to create complex lead routing rules that go beyond out-of-the-box Salesforce and Pardot lead routing features. Different tools serve specific purposes that may be the right fit depending on what you’re trying to accomplish.
Here are the most common ones.
LeanData is a native Salesforce lead matching and routing platform that is easy to use and customize with their visual drag-and-drop interface functionality and complex rule building.
| You can read our full guide to implementing LeanData in . |

RingLead is a native Salesforce lead routing, data normalization, enrichment, and duplicate managing platform.
DemandTools from Validity is a data management platform to help with importing, assigning, standardizing, manipulating, and the deduplication of your Salesforce data quickly.

Feel the Relief of Knowing Your Leads Are In Good Hands
Think you’re a Pardot lead routing pro now? Still have no idea where to start? Either way, tell us about it in the comments! And reach out to Sercante when you need Pardot consultant expertise for extra help and customization.
Subscribe to The Spot
Upcoming Salesforce Events

Salesforce Training Courses

Top 5 Recent Posts

Salesforce Winter ‘25 Highlights: Marketing Cloud Growth Edition
The Salesforce Winter ‘25 Release Notes are out! Let’s dive into what’s new in...

Salesforce Winter ‘25 Highlights: Marketing Cloud Account Engagement
The Salesforce Winter ‘25 release notes are out! Let’s dive into Winter ’25 highlights...

Using Account Engagement for Event Marketing: From Planning to Follow-Up
Event marketing is a fantastic way to connect with your audience, build brand awareness,...

Big News! Account Engagement Users Can Access Marketing Cloud Growth Edition
In February 2024, Salesforce released Marketing Cloud Growth Edition, its first marketing automation platform...

Combating Headwinds in Higher Ed: Part 1 – Real-Time Interaction Management
Student expectations today are vastly different than they were a decade ago. It’s causing...

Jenna is a Marketing Operations leader with over 10 years of experience working with both enterprise organizations and start-ups. She started her career as a consultant, helping B2B and B2C clients get the most out of Marketo, Pardot, Marketing Cloud and Salesforce. She then moved in-house, working with B2B SaaS companies, helping them build their sales and marketing technology stacks and processes from scratch.
Leave Your Comment Cancel Reply
You must be logged in to post a comment.
Related Articles
Event marketing is a fantastic way to connect with your audience, build brand awareness, and generate leads. However, managing event marketing activities can take time and effort. That’s where...
Student expectations today are vastly different than they were a decade ago. It’s causing technology leaders at the most successful educational institutions to rethink their data infrastructure and student...

How to Customize Primary Source on Opportunities with Salesforce Flow
I recently ran into a situation where a client needed to exclude select campaign types from being populated as the Primary Campaign Source field on opportunities. While this might...
Bot Single Post
Martech Resources
Shopping consultants or jobs? Wanna join the action? Here’s everything you need to solve all the marketing technology things.
Consulting Services
Work with certified experts to transform your tech stack.
Training Courses
Develop your Salesforce & Pardot skills from anywhere.
Community Event
Learn from the only virtual Pardot-focused conference.
Virtual Networking
Connect with people in the Pardashian Slack community.
Quick Links
Get The Spot
The Spot for Pardot newsletter delivers a healthy dose of martech to your inbox — and nothing more.
© 2024 The Spot For Pardot | All Rights Reserved Sercante LLC.4
This website uses cookies to improve your browsing experience. By clicking “Accept,” you consent to the use of all cookies.
You can customize your preferences or learn more about our use of cookies in our Privacy Policy .
Let's Get You Unstuck
We’re here to support your growth journey. Let’s connect and find the right solution for you. Fill out the form, and our experts will be in touch!
Stack Exchange Network
Stack Exchange network consists of 183 Q&A communities including Stack Overflow , the largest, most trusted online community for developers to learn, share their knowledge, and build their careers.
Q&A for work
Connect and share knowledge within a single location that is structured and easy to search.
How do I run the default Lead assignment rules on a Lead trigger
Here's my code stripped of the usual professional infrastructure for illustration:
And here's the usual run lead assignment code
Again for illustration, I'm just trying to trigger the autoassign rule in the lead trigger on the leads we've updated. I've tried the code in both these places and it runs, but the assignment doesn't kick it. If I do this outside the Lead and then trigger it, it works. So I must not be putting it in the right place or doing it correctly. What's the right place to set this option?
This guy just gave up. Need help with Apex Trigger to run Lead Assignment Rules
Here's an attempt I did which seems to have worked, but I don't fully understand its implications
I did't understand the recursive function because the recursiveUpdate was, at the very highest, in the scope of the trigger and when you call Database.update, it would be a new boolean in a new instance of the trigger, which means the guard would guard nothing because it's above the reassignment in the new instance. The only way I could understand it is if the boolean was above all the triggers and would prevent other triggers from firing their runAssignmentRules because a prior trigger already made it true. Anyway, my solution still feels to good to be true, so I'm going to keep testing.
- assignment-rules
- lead-assignment
The assignment rule that will run is fixed at the instant the DML operation starts. In other words, by the time your trigger has started running, it is far too late to set an assignment rule. You would instead need to make a recursive update. Further, there are known limitations on the sObject.setOptions method; it would be recommended to use the Database.update(sObjects, dmlOptions) method. This also allows us to bulkify the logic.
First, we check if we're already running recursively, and if so, we return early. Next, we set up the DML options we want to use and set the recursive flag to avoid infinite loops. After that, we run the DML operation. Finally, we reset the recursive flag in order to avoid disabling our trigger logic for legitimate repeat calls (partial save logic, more than 200 records in a transaction, multiple DML operations in the same transaction, etc).
Also, this logic needs to be run in an after update/after insert context. In a before insert/before update context, the record either doesn't yet have an ID, or will be locked against further DML operations.
- I have two questions. 1. What context is this method in? Do I have to have that boolean above the trigger? Second. You’re doing a database update. I know I can’t do update lead in the after trigger. Can I do it with this database update thing? – Henrietta Martingale Commented Jun 14, 2022 at 22:28
- @HenriettaMartingale 1. A trigger helper class. 2. No, it goes in a class (e.g. lc ). And yes, you can recursively update a record in an after trigger. Of course, we have to use the "recursion blocking" technique to avoid an infinite recursion. – sfdcfox ♦ Commented Jun 14, 2022 at 22:58
- I get it. The helper doesn't get reinstantiated when the trigger loops again so the old Boolean remains alive – Henrietta Martingale Commented Jun 15, 2022 at 13:04
You must log in to answer this question.
Not the answer you're looking for browse other questions tagged apex trigger assignment-rules lead-assignment ..
- The Overflow Blog
- Where does Postgres fit in a world of GenAI and vector databases?
- Featured on Meta
- We've made changes to our Terms of Service & Privacy Policy - July 2024
- Bringing clarity to status tag usage on meta sites
Hot Network Questions
- I'm trying to remember a novel about an asteroid threatening to destroy the earth. I remember seeing the phrase "SHIVA IS COMING" on the cover
- Is it advisable to contact faculty members at U.S. universities prior to submitting a PhD application?
- Why is one of the Intel 8042 keyboard controller outputs inverted?
- What explanations can be offered for the extreme see-sawing in Montana's senate race polling?
- What is this strengthening dent called in a sheet metal part?
- How to total time duration for an arbitrary number of tracked tasks in Excel?
- How to volunteer as a temporary research assistant?
- Why an Out Parameter can be left unassigned in .NET 6 but not .NET 8 (CS0177)?
- How much payload could the falcon 9 send to geostationary orbit?
- Is there a faster way of expanding multiple polynomials with power?
- Can you solve this median geometry problem?
- Is every recursively axiomatizable and consistent theory interpretable in the true arithmetic (TA)?
- Does Vexing Bauble counter taxed 0 mana spells?
- I don’t know what to buy! Again!
- What is the name of the book about a boy dressed in layers of clothes who is actually a mouse?
- Is there any video of an air-to-air missile shooting down an aircraft?
- Does the Greek used in 1 Peter 3:7 properly translate as “weaker” and in what way might that be applied?
- How do you determine what order to process chained events/interactions?
- How could Bangladesh protect itself from Indian dams and barrages?
- Topology on a module over a topological ring
- Are there any theoretical reasons why we cannot measure the position of a particle with zero error?
- Can a 2-sphere be squashed flat?
- `Drop` for list of elements of different dimensions
- What happens if all nine Supreme Justices recuse themselves?
COMMENTS
7. Click the 'Layout Properties' button on the palette and disable the 'Show on edit page' and 'Select by default' Case Assignment Check-box and click OK, then click Save. 4. Test and confirm that when a user creates a new case/lead, the 'Assign using active assignment rules' checkbox is set to true. Save the case/lead.
From a standard UI, a user can trigger assignment rules by simply checking the "Assign using active assignment rules" checkbox under the Optional section. The problem arises when your app needs to insert the Case from Apex and wants to trigger assignment rules. Using this script, a Case will be inserted but assignment rules will not be ...
Navigate to Setup by clicking on the Gear icon and clicking Setup. Click the Object Manager tab. Select Case and click Case Page Layouts on the left. Edit the relevant layout. On the Layout console click Layout Properties. Un-check on the 'Default' against the 'Case Assignment Checkbox' to disable. Click OK and save the changes to the Page Layout.
Yes, go to the layout and click "layout properties" at the top and you should be able to set a default value. Share. Improve this answer. edited Jan 5, 2018 at 16:34. answered Jan 5, 2018 at 16:29. gNerb. 9,558 5 27 58. Neat, thank you!
Go to Setup | Object Manager | Leads or Cases | Page Layouts, then click the Layout Properties button, then enable Default. Once you have the assignment rule configured, the best practice is to hide that checkbox "Assign using active assignment rule", so the rule will always run. Although in some scenarios, even if you want to let the checkbox ...
In the left-hand menu list select: Cases: Page Layouts: Choose a Page layout. From the Page layout editor screen: Select Layout Properties Button: In the newly presented dialog box, find the Case Assignment section: Check or Un-check the checkbox labeled "Select by default". Note: The same procedure can be done on the Leads object on a page ...
1. Depends on what you mean by 'bulk records'. If using DataLoader, you have to go to Settings and put the ID of the assignment rule, then Save. If using Apex DML, you need to use the Database.insert or Database.update methods, setting optional parameter dmlOptions as in this example: new Lead(company='ABC', lastname='Smith'), new Lead(company ...
Choose to include the 'Assign using active assignment rules' checkbox by selecting Show on edit page. If both options are chosen, the assignment checkbox is displayed and is checked by default. The default setting will force the assignment rule to run unless the checkbox is deployed and a User manually deselects the checkbox.
Click New and enter the rule details. Rule Name: Standard Case Assignment; Select the Active checkbox to make this the active case assignment rule. Click Save. Add a rule entry that assigns Product Support cases to the Product Support Tier 1 queue. Click the Standard Case Assignment link. Under the Rule Entries, click New and enter the details.
The active assignment rules can be automatically triggered by checking the " Assign using active assignment rules " checkbox under the properties section of the lead or case page layouts. This option is only available if there are active assignment rules present on either lead or case. Enable Assignment Rule Checkbox.
To accomplish this, create a standard case escalation rule. Click the gear icon and select Setup . Enter Escalation Rules in the Quick Find box and select Escalation Rules . Click New . Rule Name: Standard Escalation. Select the Active checkbox to make this an active escalation rule. Click Save .
In order to make the rule trigger for existing records you should "Mass" update the records. If you are creating a record manually, you can check the "Assign using active assignment rule" under options so that the record follows the assignment rule at the time of creation. Share.
To assign a lead to a 'Queue' you'll need to first create the Queue in the Administration > Users > Queues section of Salesforce. For example, you may have Queues for each region's sales team, with the relevant users selected as members i.e. a Queue for 'Leads - UK' and a separate Queue for 'Leads - Germany'.
The problem arises when your app needs to insert the Case from Apex and wants to trigger assignment rules. Using this script, a Case will be inserted but assignment rules will not be triggered as there is no such field "Assign using active assignment rules" on Case. //Instance of case. Case newCase = new Case(Status = 'New') ; //Inserting a Case.
From Setup, enter Case Assignment Rules in the Quick Find Box, then select Case Assignment Rules . Click the Standard case assignment link, then click Edit . Select the Active checkbox to ensure this as the active case assignment rule, and click Save . In Step 3, select the picklist value Queue from the list.
Steps to Reproduce. 1) Login to Salesforce Mobile app (iOS or Android) 2) Tap on Navigation Menu | Cases tab. 3) Create a new case as per the above assignment rule criteria. 4) Select/Check "Assign using active assignment rule". 5) Tap on 'Save'. 6) Notice that Case is created but assigned to the "Created by" user (Salesforce Mobile app user ...
Hi Himanshu,Thanks for yours reply and time .Actually i am not overriding save button of case standard object,i only extending case standard controller.So i want to add check boxes of "Assign using active assignment rules" and "Send notification email to contact" case to my custom visual page.It should be work same as standard new case page.
3) Then set the Entry Conditions. In this use case, we want to re-assign Leads after they meet a certain Lead Score. Select "custom condition logic is met." Set the condition that the Lead Score is greater than or equal to 100.. Under the "When to Run the Flow for Updated Records" section, select the option to only execute when a record is updated to meet the condition requirements.
Guidelines and Limits. Email. Email-to-Case Limits. Assignment rules automate your organization's lead generation and support processes. Use lead assignment rules to specify how leads are assigned to users...
Goal - I want to have the 'Assign using active assignment rule' box checked by default. I've been working on a new Lead build. I was using a single page layout and adding required fields but then I began developing a solution for additional record types. I was building everything on a single page layout, setting required fields, etc.
Assign Prospect Via Salesforce Active Assignment Rule. Assign to Group. Assign to Queue in Salesforce. Assignment via Prospect list actions. Assign via advanced lead assignment rules in Salesforce. 1. Assign to User. Assigns a prospect to the specified user when the requirements of the rule are fulfilled.
2. Go to DataLoader Settings and follow the instructions in the screenshot provided below: Please note, the assignment rule overrides Owner values in your CSV file and works for Leads and Cases. Share. Improve this answer. answered Jun 7, 2015 at 3:54. the_phantom.
for (Lead l:Trigger.new){lc.set(l);} And here's the usual run lead assignment code. AssignmentRule AR = new AssignmentRule(); AR = [select id from AssignmentRule where SobjectType = 'Lead' and Active = true limit 1]; //Creating the DMLOptions for "Assign using active assignment rules" checkbox.