How to Play PowerPoint Slides Automatically

The PowerPoint autoplay feature is an amazing tool for creating slideshows that advance automatically . Self-running PowerPoint presentations are great for leaving in kiosks or publicity booths. You can even show them with recordings or voiceovers to make sure your audience gets the most out of it.
Forget worrying about clicking from slide to slide, today we will teach you how to play PowerPoint slides automatically!

We’ll cover the following topics:

Why should you use the automatic slideshow PowerPoint feature?
- How to Play PowerPoint Slides Automatically without Clicking - Option 1
- How to play slideshow in PowerPoint automatically - Option 2
How to make PowerPoint slides advance automatically with audio
- How to loop slides in PowerPoint
- Check out some experts’ best practices for Automatic slideshows in PowerPoint
How to automatically play PowerPoint presentations across devices
How to play powerpoint slides automatically without clicking on mac, elevate your presentation with professional designs: try 24slides today.
Using the automatic slideshow feature has many benefits . The main one is its practicality; it is a tool you can set up in advance so that you eliminate the need for ongoing attention and your presentation flow is better.
And that’s not all, you can even add voiceovers, recordings, and even laser pointer gestures to make sure your audience gets the most out of your presentation.
It becomes particularly beneficial in the following scenarios:
- Business presentations: An automatically progressing presentation can help you focus on your content without worrying about going slide by slide, which can often be distracting and disrupt your rhythm.
- Publicity: Self-running presentations can be great if you use them for publicity. For example, if you have a kiosk or booth, a self-running PowerPoint slideshow can help you reach more people without them having to speak one-on-one with a salesperson.
- E-Learning: In e-learning modules or training presentations, autoplay can help learners progress through the material while listening to your lecture. However, they can also pause and rewind to go to the specific section they wish to revisit.
- Photo or Video Slideshows: Autoplay is commonly used in photo or video slideshows for events such as weddings or birthdays. It can serve as a background loop, or you can present it at a special moment along with music or narration to enhance the experience.
How to Play PowerPoint Slides Automatically without Clicking: Option 1
There are a couple of different ways to make your slides run automatically, and we'll go over both options. This first option is for when you need a really customized presentation: personalized timing for each slide, voiceovers, or laser pointer gestures .
If this is your case, go ahead with this section, but if you’d like something a bit simpler, proceed to Option 2.
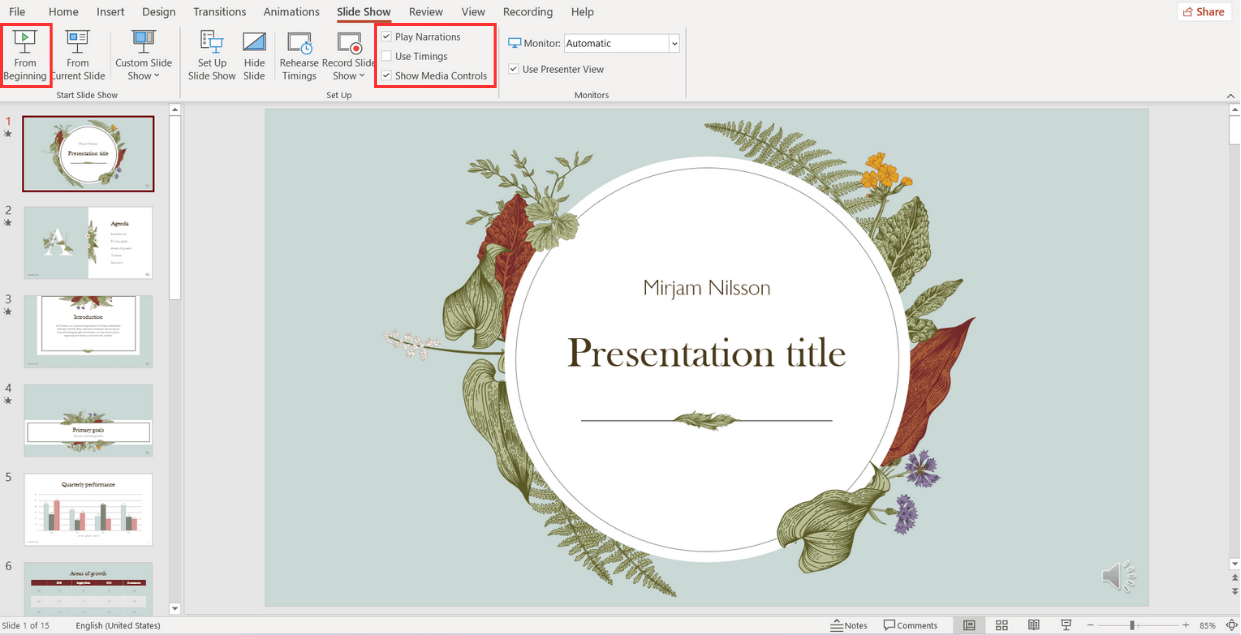
- The first step is to go to the Slide Show Tab. On the Set Up group, you’ll find the Set Up Slide Show option to start customizing your self-running presentation.

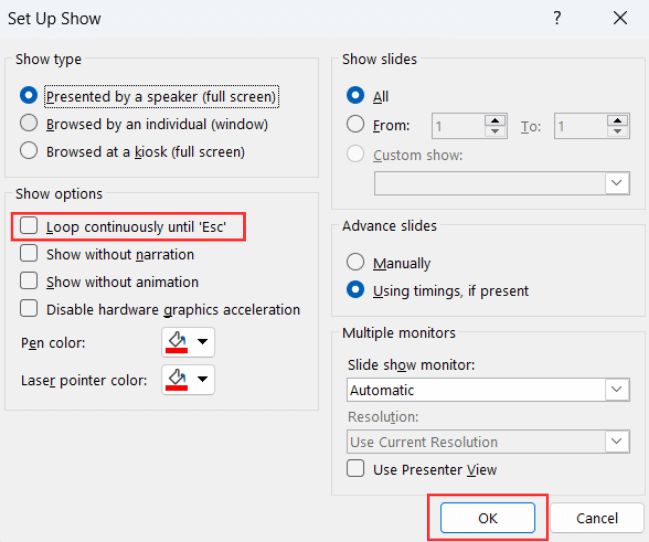
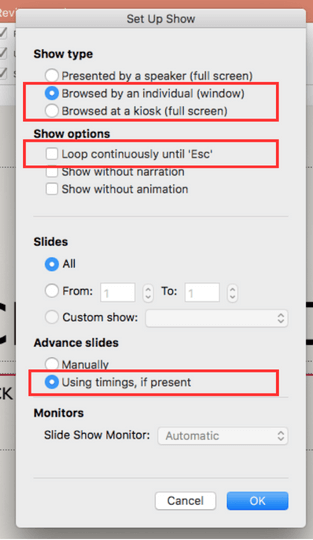
- Once the Set Up Show Window opens, deselect the Presented by a speaker option, as it refers to manually advancing your slides, either by clicking or using keys. Next, consider several options for the automatic slideshow:
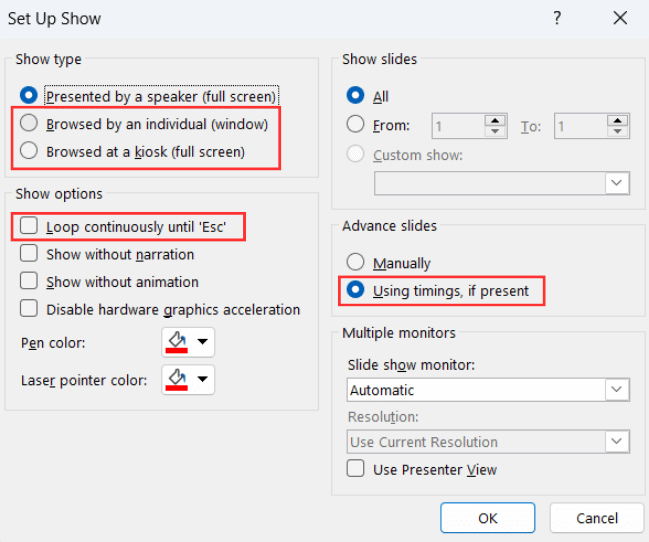
- Browsed by an individual is one choice for creating a self-running PowerPoint presentation. This option permits you to deliver your slides within a window, as opposed to the typical full-screen mode. Ensure that the Use timings, if present option is enabled for this feature to function correctly.
- Another option is the Browsed at a kiosk , which allows you to run a full-screen, continuous slideshow automatically. This option locks in both the looping and timing settings, ensuring that your slideshow will continue until you press the ESC key.
If you’re not sure what option is the best for you, remember you can always select manually the loop and timings option . Try different options with these and try out how your presentation will look like with the different settings.
- The next step is to set your timings. This means defining how much time you want your PowerPoint slideshow to spend on each slide before automatically advancing to the next one.
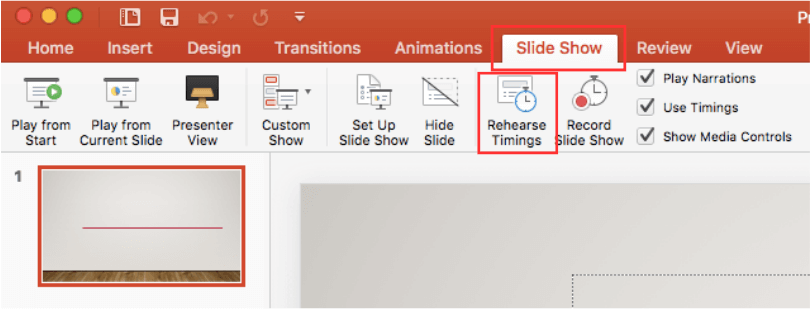
To set your timings, click on Rehearse Timings , which will allow you to go through your presentation slide by slide, and it’ll record how much time you spend on each one.

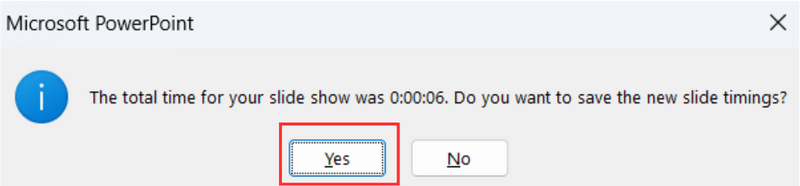
After you finish going through all your slides, a message will pop up to save your timings. Click yes so you can save the time spent on each slide.
How to play slideshow in PowerPoint automatically: Option 2
Let’s take a look at a different way of using the PowerPoint autoplay feature. This option is great if you’re looking for something simple and just want your slides to advance automatically at regular intervals.
- First, open the Transitions Tab and locate the Timing Group.

- Go to the After option and manually add how much time you want to spend on each of your slides.

Select the Apply To All option so all your slides have the same timing.
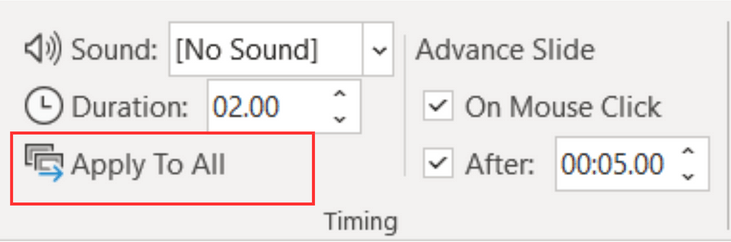
You can also deselect the On Mouse Click option, depending on whether you want to be able to advance your slides by clicking or not.
Adding audio to your automatic PowerPoint is a fantastic feature to enhance your professional image and communicate your content without needing to be present. Let’s take a look at how to do it:
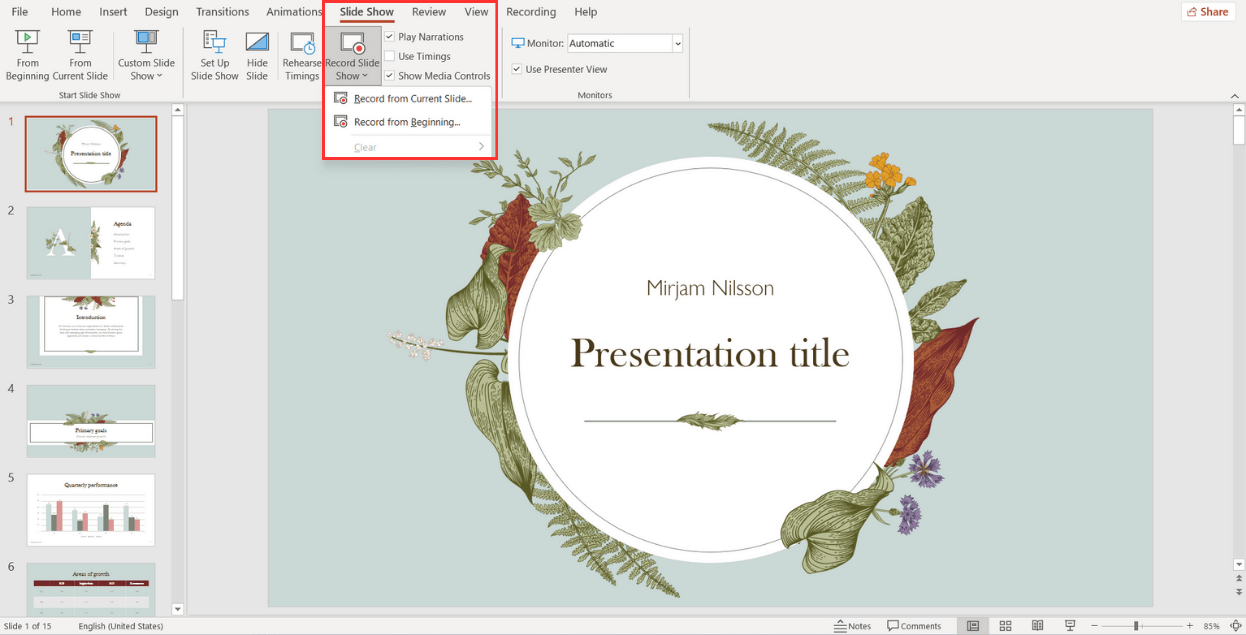
- Go to the Slide Show Tab and select Record Slide Show . Choose Record From Beginning to start with the first slide.
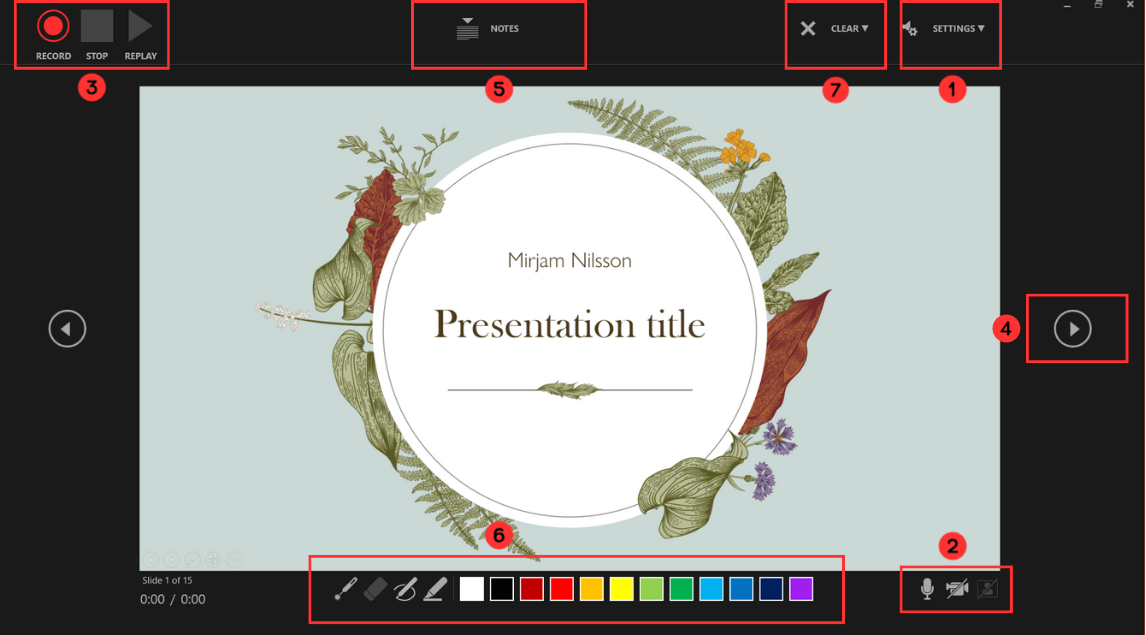
When the fullscreen opens, you will be able to see your first slide along with several options:
- Start in Settings (1) and select the tools you will be using. You have the option to use a microphone, or you can record yourself talking on camera. Choose your microphone and/or camera for recording.
- Next (2) , decide whether you want to have the microphone or camera you selected turned on. You can also choose to have a video preview.
- When you're ready to start recording, go to the top left corner (3) and click Record to start, Stop to pause, and Replay to review how it went.
- Once you finish with a slide, click on the right arrow (4) to move to the next slide.
- If you have Speaker notes in your slides, you can view them in (5) while you record.
- In the Pens and Markers section (6) , you can draw on the screen and make any annotations you want.
- Finally, the Clear option (7) allows you to clear existing recordings on the current slide or on all slides if you are unsatisfied and want to redo your recording.
- Now, to review what you've recorded, go to Set Up and make sure Play Narrations and Use Timings are checked. Then, click on From Beginning to start the presentation.
How to loop slides in PowerPoint
If you want to learn how to loop your slides in PowerPoint, follow these steps:
- Go to the Slide Show tab and select Set Up Slide Show .

- When the Set Up Show window appears, go to the Show options group and tick the Loop continuously until ‘Esc’ option. Don’t forget to click OK to apply the new setup!
And all done! Now, your presentation will loop until you select ‘Esc’.
Check out some expert best practices for Automatic slideshows in PowerPoint
Now that you've learned how to make a PowerPoint slideshow run automatically, we'll give you the secrets to make your presentation stand out . Let's take a look at some insights from our expert designers .
Avoid too much text
Remember that your time per slide is limited , so it is important not to put too much text since your audience will not have time to read it. Try to express your message in the shortest possible text, and if necessary, revise and rewrite it as many times as necessary to synthesize it.
Limit interactive elements
Limit or avoid interactive elements such as hyperlinks that rely on user interaction since they may not function in PowerPoint autoplay mode.
However, if you want your audience or potential clients to take a specific action, consider using a QR code. Only make sure to leave the slide displayed for enough time for them to use it.
Practice, practice, practice
Keep in mind that your speech needs to fit perfectly with your timings for each slide. So, practicing your presentation multiple times is crucial to ensure a seamless and synchronized delivery.
First, go to the Slide Show Tab and select Set Up Slide Show .
- When the Set Up Show Window opens, deselect the Presented by a speaker option and consider the following options to set up your automatic slideshow:
- Browsed by an individual : With this option, you can show your slides within a window instead of the typical full-screen mode. Make sure that the Use timings, if present option is selected.
- Another option is the Browsed at a kiosk : This option locks in both the looping and timing settings, ensuring that your slideshow will continue until you press the ESC key.
- Next, you need to set your timings. This involves determining the duration for each slide so that it advances automatically to the next one when you have finished presenting it.
To set your timings, go to the Slide Show Tab and click on Rehearse Timings.
A window will open, allowing you to go through your presentation slide by slide, and it will record how much time you spend on each one . As you progress through each slide, it will confirm the time spent, and you can either agree or choose to re-record.
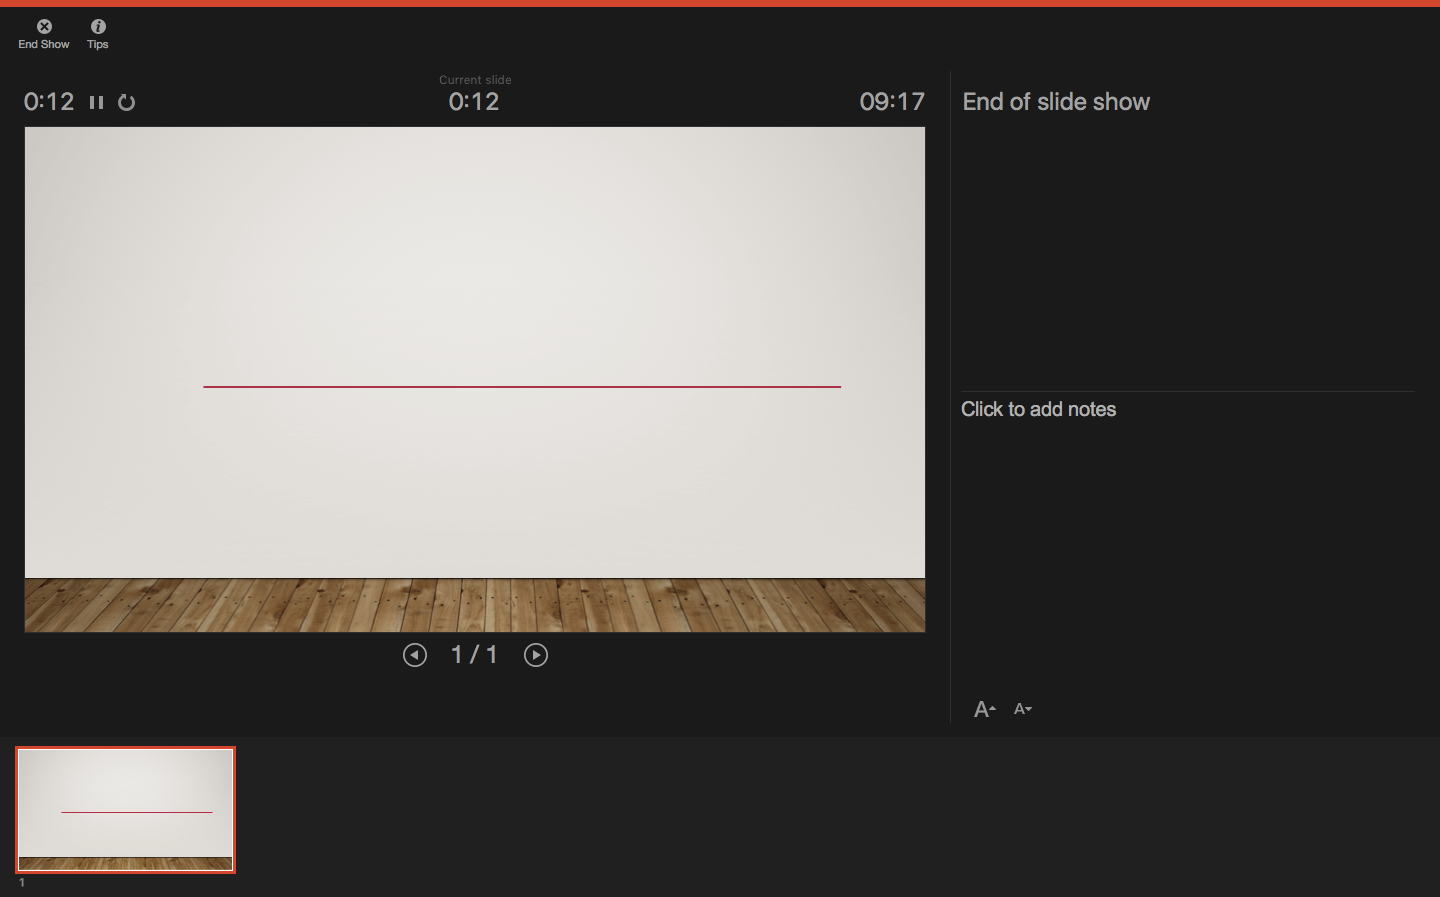
After you finish going through all your slides, a message will pop up to save your timings . Click yes so you can save the time spent on each slide.
If you’re looking to create a presentation that truly wows your audience, you might want to consider professional design assistance for your PowerPoint. Lucky for you, we’re here to help. Check out the fantastic designs 24Slides can help you create today!

You might also like
- How to Add a Timer to Your Powerpoint Presentations
- 11 Time-Saving PowerPoint Hacks For Creating Quick Presentations
- How To Loop a PowerPoint Presentation
- Add a PowerPoint Real-Time Clock to Your Presentations
Create professional presentations online
Other people also read

Tutorial: Save your PowerPoint as a Video
How To Convert Google Slides To PowerPoint and Vice Versa

How To Add Animations To PowerPoint
How to Make a PowerPoint Presentation Play Automatically

PowerPoint remains one of the most versatile and widely used presentation software tools. Thanks to an increasingly diverse suite of tools and capabilities, PowerPoint serves as a sturdy anchor for individuals across a variety of industries during speeches, presentations and just about anything in between.
Advertisement
One of the most helpful tools found inside PowerPoint is the option to play a presentation automatically, which is particularly useful if you are creating a presentation that will run without your oversight or participation, such as at a freestanding kiosk or exhibition. A PowerPoint automatic slideshow can be configured quickly in only a few quick steps.
Video of the Day
Preparing Your PowerPoint Autoplay Functions
After you finish creating the slides for your PowerPoint presentation, you are ready to configure the autoplay functions. First, confirm that all your slides have the desired content and are in the appropriate order. Although you can make changes at a later point, it doesn't hurt to take a moment at this stage of the process to review your presentation as a whole. After you confirm the arrangement and content, open the "Slide Show" tab and press the "Set Up Slide Show" button. You have the option to configure your presentation for three automatic play modes: "Presented by a speaker (full screen)," "Browsed by an individual (window)" and "Browsed at a Kiosk (full screen)." Your selection determines how users can interact with the slides at any given time.
PowerPoint Slideshow Loop Options
If you select "Presented by a speaker," the slideshow runs automatically behind you as you speak to your audience. When you opt for "Browsed by an individual" as your automatic play mode, individuals can manually navigate through your presentation, which then loops and returns to the first slide upon completion of the deck. If "Browsed at a Kiosk" mode is selected, the slides progress automatically on a loop until an individual exits from the presentation entirely by pressing the "Escape" key. When "Browsed at a Kiosk" mode is selected, you configure the amount of time that elapses between slides. For example, if your presentation includes slides that contain a large amount of content, you may want to set a long delay between slide transitions to give the viewers time to review all the content on each slide.
Other Opportunities to Explore
PowerPoint autoplay has proven itself to be an integral component of the software and for good reason. In addition to the customization features mentioned here, you can also automate a variety of additional tasks, including PowerPoint animations during slide transitions and the length of time that these animations occur as one slide transitions to another. Whatever your specific needs may be, the chances are good that PowerPoint's unique set of resources can help you get the job done.
- Microsoft Office: Create a Self-Running Presentation
- Business News Daily: How to Create an Auto-Playing PowerPoint Presentation
April 12, 2024
How to play PowerPoint slides automatically without clicking
Wondering how to make PowerPoint play automatically? We’ll guide you through the process and also show you how Plus AI can help you create the content for your slideshow

Are you setting up a slideshow at a convention or trade show, or maybe in a conference room or waiting area? You can easily set up a Microsoft PowerPoint slideshow to run automatically without a speaker at all. This lets you present your product, service, or company mission to a broad audience without manual intervention.
Here’s how to play PowerPoint slides automatically without clicking to advance through the show as well as how Plus AI can save you time on editing or creating the content.
Set up the slide timings or transitions
Before you set your presentation to play on its own, you’ll want to decide on the timings for your slides.
This allows you to display each slide for a specific amount of time before advancing to the next and is especially important if you use effects for your slides.
For both of the settings below, go to the Slide Show tab and check the box for Use Timings in the Set Up section.

Slide timings
With slide timings, you rehearse and record the timings for all slides. Simply move through the slideshow at a normal pace, use the control to advance to each effect and slide, and save the recorded timings when you finish.
- Go to the Slide Show tab and select Rehearse Timings .

- When the slideshow show begins, stay on the first slide for the amount of time you want and click the Next arrow in the Rehearsal toolbar to advance.

- If necessary, you can use the Rehearsal toolbar to Pause , Play , or Repeat the recording as it progresses.

- At the end of the presentation, press Esc (Escape key) and you’ll see a message letting you know the total duration of the slideshow. To save the recorded timings, click Yes .

You can review the timing for each slide by going to the View tab and choosing Slide Sorter .

When you set up your presentation to play automatically as described below, your slides advance per the timings you recorded.
Slide transitions
Another way to automatically choose the slide advance timings is using the Transitions tab. If you apply slide transitions to enhance the appearance of your presentation , this is a good option. However, you can choose None if you want to advance the slides without an effect between them.
- Select your first slide and go to the Transitions tab.
- Optionally choose an effect in the Transition to This Slide box and set the Duration for the transition to the right. You can enter a number in seconds or use the arrows to move up or down in small increments.

- In the Advance Slide group, uncheck the box for On Mouse Click and check the box for After . Then, enter the seconds for advancing to the next slide to the right.

- Repeat these steps for each slide in the presentation or choose Apply to All .
When you set up your presentation to play automatically as described next, you’ll see your slides advance for the “After” time you entered.
Note : Recording the Slide Timings overrides the Slide Transition “After” settings. If you want to use both, record the timings first and then change the “After” timing for the selected slides.
Make PowerPoint play automatically
Once your slide timings are in place, you can easily set up your PowerPoint presentation to run automatically. Whether you’re revealing a new product or providing an instructional slideshow, you can benefit from this PowerPoint feature.
Tip : New product, new company? Look at these helpful productivity apps for startups .
Open your slideshow in PowerPoint on Windows or Mac and follow these steps to set up automatic play.
- Go to the Slide Show tab and select Set Up Slide Show .

- In the pop-up window, mark Browsed at a kiosk in the Show type section. This automatically loops the slideshow for continuous play and only stops when you press Esc .

- Show options : Check the boxes for those settings you want to use. Note that the Loop setting is marked by default for this Show Type.
- Show slides : Choose all slides, specific slides, or a custom slide show.
- Advance slides : Using Timings is selected by default when you check the box described earlier and works with those timings you set.
- Multiple monitors : Choose the Slide Show Monitor and Resolution (Windows).
- Click OK when you finish.

Edit slides with ease using Plus AI
When you create a self-running presentation, you have to be sure that your slides can speak for themselves. This might require you to adjust the text for clarity or shorten lengthy paragraphs or sentences. Luckily, Plus AI can help you make these types of changes almost effortlessly.
If you are looking at AI presentation makers to speed up your presentation workflow, check out Plus AI. Plus is an add-on that intelligently composes content, arranges slide elements, and more. Once you create or edit a presentation with Plus AI, you can download it as a PowerPoint slideshow and set up autoplay as described above.
Along with rewriting slide content, you can use Plus AI to remix slides for different layouts and create custom designs that you can reuse for future presentations. If you need help from the get-go, you can create slideshows from scratch with attractive templates, custom instructions, and even PDF uploads .
When you can’t be there to walk your audience through the show, you don’t have to postpone or reschedule it; just set it up to play automatically. If that’s not what you need, you can also create informative or entertaining PowerPoint slideshows for patients in a waiting room or meeting attendees who arrive early.
Now that you know how to play a slideshow in PowerPoint automatically, look at how to convert PowerPoint to Google Slides and take advantage of Plus AI.
Latest posts
Latest post.

Announcing Plus AI for PowerPoint
The Plus AI PowerPoint add-in brings Plus AI to the Microsoft 365 ecosystem and offers new ways for teams and individuals to create PowerPoint presentations using AI

PowerPoint Karaoke: Rules, tips, and free slide decks
Overview of PowerPoint Karaoke, rules, and free slide decks for PowerPoint Karaoke
How to use ChatGPT to create a PowerPoint
Looking for ChatGPT for PowerPoint? Here's a step-by-step guide to using AI in PowerPoint and Google Slides
More resources

How to make Google Slides that look good
Six simple rules to make your presentations more visually appealing. Start applying these design principles to your presentations and make beautiful slide decks
How to create a table of contents in PowerPoint
To easily move through your presentation and jump to the slides you’re referencing, here’s how to add a PowerPoint table of contents and link the headings.
How to change the background in Google Slides (step-by-step guide)
This guide walks you through four different methods to change your background in Google Slides.

How to Run a PowerPoint Slide Show Automatically (Set Up a Self-Running Presentation)

Easily Create a Self-Running PowerPoint Slide Show
by Avantix Learning Team | Updated November 12, 2021
Applies to: Microsoft ® PowerPoint ® 2013, 2016, 2019 and 365 (Windows)
You can set up self-running PowerPoint slide shows to run automatically at trade shows, conventions, events or as web-based presentations. Prior to setting up a self-running presentation, you'll need to apply your preferred animations to text and objects as well as any slide transitions to be be included in the show (unless specified otherwise in the Set Up Show dialog box). When you create automatic slide shows, you also have the option of including specific slide timings, narrations or voice over and ink annotations.
Recommended article: How to Draw on PowerPoint Slides on the Fly During a Presentation (Using Ink)
Do you want to learn more about PowerPoint? Check out our virtual classroom or in-person PowerPoint courses >
Setting up a self-running presentation
When you set up a self-running presentation, you can choose 3 options in the Set Up Show dialog box depending on your audience:

To set up a PowerPoint presentation to run automatically, but allow those watching the slide show to have control over when they advance slides:
- Click the Slide Show tab in the Ribbon and then click Set Up Slide Show. A dialog box appears.
- Under Show type, select Presented by a speaker (full screen). This is the default setting for slide shows.
To set up a presentation to run automatically, but those watching the slide show do NOT have control over when slides advance:
- Under Show type, select Browsed by an individual (window).
To set up a presentation to run automatically, but those watching the slide show do NOT have control over when slides advance and the presentation repeats until the people watching press Escape (ESC):
- Under Show type, select Browsed at kiosk (full screen).
Setting slide timings manually
You can choose to rehearse slide timings or you can manually set the slide timings for your PowerPoint slides using the Transitions tab in the Ribbon.
To set slide timings manually:
- Click the View tab in the Ribbon and then click Slide Sorter.
- Select the slide for which you want to set timing.
- Click the Transitions tab in the Ribbon.
- In the Timing group, under Advance Slide, select the After check box and then enter the number of seconds indicating how long the slide should appear on the screen. If you want the next slide to appear either when you click the mouse or automatically after the number of seconds that you enter (whichever comes first), select both the On Mouse Click and the After check boxes.
- Repeat the process for each slide for which you want to set timing.
Rehearsing and recording slide timings
If you choose Browsed by an individual (window) or Browsed at a kiosk (full screen) in the Set Up Show dialog box, you can rehearse and record timings for animations, transitions and advancing slides.
To rehearse timings, you'll use the Rehearsal toolbar shown below:
The toolbar includes the following buttons from left to right:
- Next (advance to next slide)
- Total presentation time
Click the buttons in the Rehearsal toolbar to perform the following actions:
- Click Next to advance to the next slide.
- To temporarily stop recording the time, click Pause.
- To restart recording the time after pausing, click Pause.
- To set an exact length of time for a slide to appear, type the length of time in the Slide Time box.
- To restart recording the time for the current slide, click Repeat.
To rehearse timings:
- Click the Slide Show tab in the Ribbon and then click Rehearse Timings. The Rehearsal toolbar appears and the timer begins immediately. The presentation appears in full screen recording mode.
- Click the desired buttons. Click Next to advance to the next slide or press the right arrow on your keyboard. To temporarily stop recording the time, click Pause. To restart recording the time after pausing, click Pause. To set an exact length of time for a slide to appear, type the length of time in the Slide Time box. To restart recording the time for the current slide, click Repeat.
- Continue clicking on the appropriate buttons until you are satisfied with the timings. The total presentation time appears on the top right of the Rehearsal toolbar.
- After you set the time for the last slide, a dialog box displays the total time for the presentation and another dialog box appears.
- To keep the recorded slide timings, click Yes. To discard the recorded slide timings, click No.
The presentation appears. If you view the presentation in Slide Sorter View, the slide timing is displayed below each slide.
Recording a slide show with timings
Instead of using the Rehearse Timings button, you can record timings (and narrations or voice over) as you record a show. The Record Slide Show button appears on the Slide Show tab in the Ribbon. When you record a slide show, you can start from the beginning or the current slide:

After you choose to record a slide show, you will have the option of including slide and animation timings as well as narrations, ink, and laser pointer (2010 users will not have the option of recording ink annotations):

If you select Slide and animation timings, PowerPoint automatically records the time you spend on each slide, including animations and triggers on each slide. If you have already rehearsed timings, they will be replaced.
If you use the pen, highlighter, eraser or laser pointer, those will also be recorded. Pen, highlighter, and eraser recording are available only if you have PowerPoint 2013 (and run updates) or a later version of PowerPoint. In earlier versions of PowerPoint, pen and highlighter strokes are saved as ink annotation shapes. To learn more about including ink, check out the article How to Draw on PowerPoint Slides on the Fly During a Presentation (Using Ink) .
To record a slide show and include animations and timings:
- Click the Slide Show tab in the Ribbon and then click the arrow beside Record Slide Show. A drop-down menu appears.
- Select Start Recording from Beginning or Start Recording from Current Slide. A dialog box appears.
- Select the option to include slide and animation timings.
- Click Start Recording. The Rehearsal toolbar appears and the timer begins immediately. The presentation appears in full screen recording mode.
- If you want to record timings, click the desired buttons. Click Next to advance to the next slide or press the right arrow on your keyboard. To temporarily stop recording the time, click Pause. To restart recording the time after pausing, click Pause. To set an exact length of time for a slide to appear, type the length of time in the Slide Time box. To restart recording the time for the current slide, click Repeat.
- To end your recording at any time, right-click on a slide and select End Show from the menu.
The presentation appears. In Slide Sorter view, the slide timing is displayed below each slide.
Recording narrations or voice over
In addition to timings, you may want to add narrations or voice over. You can record narrations before you run a presentation or you can record narrations during a presentation and include audience comments. When you add narrations, PowerPoint automatically records your slide timings. Alternatively, you can set the slide timings first. Be sure to test the microphone first. If you do not want narrations throughout your entire presentation, you can record separate sounds or comments on selected slides or objects.
To record narrations, your computer requires a sound card, microphone, speakers and a webcam (optionally). You will also need a microphone connector if the microphone is not part of your computer.
It's not a bad idea to create a script first in Microsoft Word to improve flow and avoid filler words such as "um". You may also want to practice before recording although you can always re-record narration.
To record a slide show with narrations:
- In the Record Slide Show dialog box, select the check box for Narrations and laser pointer and, if required, select or deselect the Slide and animation timings check box.
- Click Start Recording. A Rehearsal toolbar appears.
- Speak into the microphone to record a narration.
- To pause the narration, in the Rehearsal toolbar, click Pause. To resume the narration, click Resume Recording.
- To end your slide show recording at any rime, right-click on the slide and then select End Show.
The recorded slide show timings and narrations are saved. If you view the presentation in Slide Sorter view, timings appear beneath each slide. A sound icon also appears in the lower-right corner of each slide that has narration.
If you re-record your narration (including audio, ink, and laser pointer), PowerPoint erases your previously recorded narration (including audio, ink, and laser pointer) when you start recording again on the same slide.
To use ink, eraser, or the laser pointer during your recording, right-click on the slide, select Pointer options and choose the laser pointer, pen, highlighter or eraser. Ink is not available for 2010 users. If you want to display a laser pointer while you're recording, press Control and your pointer will appear as a small red circle on your screen.
Previewing narration
If you want to listen to the narration on a slide:
- In Normal View, click the sound icon in the lower-right corner of the slide.
- Click Play.
Running a recorded slide show
To run a recorded slide show in Normal View:
- If necessary, on the Slide Show tab in the Ribbon, click Set Up Slide Show. A dialog box appears.
- Under Show type, select the desired option.
- On the Slide Show tab, click From Beginning or From Current Slide. During playback, your animations, inking actions, laser pointer, audio and video play in sync.
- To end the show, press Escape.
Turning timings or narrations off
You can turn off timings and narrations and then turn them on again at any time.
To turn off recorded slide timings, on the Slide Show tab, deselect the Use Timings check box.
To turn off recorded narrations, ink, and the laser pointer, on the Slide Show tab, deselect the Play Narrations check box.

Deleting timings or narration
You can use the Clear command to permanently delete timings or narration from your slide show recording. You have 4 options:
- Delete timings on the current slide
- Delete timings on all slides
- Delete narration on the current slide
- Delete narration on all slides
To clear timings or narrations:
- On the Slide Show tab, click the arrow below Record Slide Show. A menu appears.
- Select Clear and then the appropriate clear option.
Once you have recorded a presentation, you can later save it as a video if you'd like.
Subscribe to get more articles like this one
Did you find this article helpful? If you would like to receive new articles, join our email list.
More resources
A Beginner's Guide to Video Formats in PowerPoint
How to Hide and Unhide Slides in PowerPoint (with Shortcuts)
How to Insert Video in PowerPoint (from a File on Your PC or a Shared Drive)
PowerPoint Keyboard Shortcuts to Play and Control Video During a Slide Show
How to Add Animation in PowerPoint (Animate Images, Text and Other Objects)
Related courses
Microsoft PowerPoint: Intermediate / Advanced
Microsoft PowerPoint: Design for Non-Designers
Microsoft PowerPoint: Animations Bootcamp
Microsoft Excel: Intermediate / Advanced
VIEW MORE COURSES >
Our instructor-led courses are delivered in virtual classroom format or at our downtown Toronto location at 18 King Street East, Suite 1400, Toronto, Ontario, Canada (some in-person classroom courses may also be delivered at an alternate downtown Toronto location). Contact us at [email protected] if you'd like to arrange custom instructor-led virtual classroom or onsite training on a date that's convenient for you.
Copyright 2024 Avantix ® Learning
You may also like

10 Keyboard Shortcuts in PowerPoint's Outline View
The outline has been an integral part of Microsoft PowerPoint for many years. It is dynamically linked to slide placeholders and is organized in a hierarchical way.

How to Change the Thumbnail for a Video in PowerPoint (using the Poster Frame Tool)
If you have inserted a video on a PowerPoint slide, you can display a custom thumbnail (or Poster Frame) for the video during a slide show. The thumbnail will display when you run a PowerPoint slide show and disappears when you start the video. For most videos, the thumbnail that displays is the first frame of the video clip. You can use the Poster Frame command to display a different frame in the video clip or a picture from another source as a thumbnail. A picture thumbnail could be either an image or an icon.

How to Use the Built-in Laser Pointer in PowerPoint (with Shortcuts)
During a PowerPoint slide show, you can change your mouse into a laser pointer to focus attention on a specific area on your slide. You can show or hide the built-in laser pointer using keyboard shortcuts or by using the context menu.
Microsoft, the Microsoft logo, Microsoft Office and related Microsoft applications and logos are registered trademarks of Microsoft Corporation in Canada, US and other countries. All other trademarks are the property of the registered owners.
Avantix Learning |18 King Street East, Suite 1400, Toronto, Ontario, Canada M5C 1C4 | Contact us at [email protected]

Our Courses
Avantix Learning courses are offered online in virtual classroom format or as in-person classroom training. Our hands-on, instructor-led courses are available both as public scheduled courses or on demand as a custom training solution.
All Avantix Learning courses include a comprehensive course manual including tips, tricks and shortcuts as well as sample and exercise files.
VIEW COURSES >
Contact us at [email protected] for more information about any of our courses or to arrange custom training.
Privacy Overview
Pin it on pinterest.
- Print Friendly
How To Play Slides In PowerPoint Without Clicking
Do you want to take your PowerPoint presentations to the next level? Learning how to Play Slides In PowerPoint Without Clicking can save you time, improve the flow of your presentation, and allow you to present hands-free.
Key Takeaways:
Why is it important to learn how to play slides without clicking.
Understanding how to play slides without clicking in PowerPoint can enhance the professionalism of your presentations by streamlining the delivery process and engaging your audience effortlessly.
Another benefit is the ability to incorporate voiceovers, providing a personalized touch and enhancing the overall impact of your slideshows. This automated approach not only saves time but also allows you to deliver a polished and professional presentation seamlessly.
Saves Time and Effort
By configuring slide transitions and rehearsing timings in PowerPoint, presenters can ensure a smooth and seamless delivery of their content. Not only does this feature eliminate the need for manual advancement of slides, but it also allows for a more dynamic and engaging presentation. With the flexibility to control the pace of each slide transition, speakers can align their speech with visual aids effortlessly.
Improves Presentation Flow
Automatic slide transitions enhance the overall presentation flow by seamlessly guiding the audience from one point to the next, maintaining continuity and engagement throughout.
One of the key benefits of incorporating looping options into your PowerPoint presentation is the ability to have certain slides or sections repeat automatically, offering a way to reinforce key points or provide additional emphasis. This feature allows presenters to create a structured and repetitive delivery, ensuring that important information is not missed by the audience.
Allows for Hands-free Presenting
One of the key features that offer this convenience is the kiosk mode in PowerPoint . This mode automatically plays through the slides, eliminating the need for manual advancement. With the inclusion of laser pointer gestures , presenters can emphasize key points on the slides without being restricted by physical pointing devices. This dynamic interaction not only enriches the presentation experience but also fosters a smoother flow of information, keeping the audience engaged and attentive throughout the session.
How to Set Up Slides for Automatic Transition
Entrusting your presentation design to professionals can save you valuable time and energy. Rather than struggling with design elements and transitions on your own, you can focus on crafting the content and fine-tuning your message for maximum impact.
Setting Slide Transitions
After completing the rehearsal, you can choose to save the timings if you are satisfied with the results. This feature allows you to record the timings you practiced and use them for a more polished and professional presentation.
Setting Slide Duration
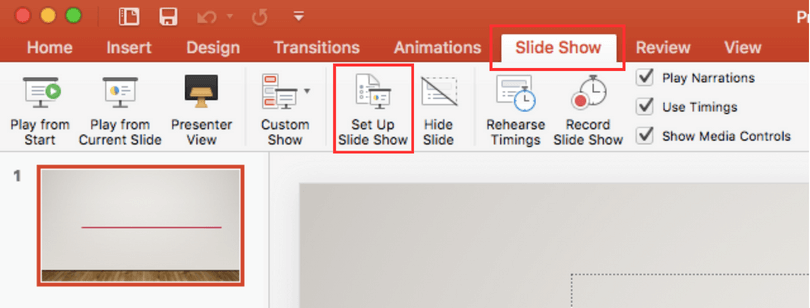
Adjusting slide durations is essential to ensure the content synchronization and pacing align with the presentation flow. Utilize features like Set Up Show, especially for Mac users, and seek guidance from expert designers for optimal results.
Setting Looping Options
Configuring looping options for slides allows for continuous playback, ensuring that key information or messages are reiterated effectively. Use the Show options group and shortcut keys like ESC for seamless control over looping settings.
By defining the number of times a presentation should loop or opting for continuous looping until stopped, you increase the chances of the audience retaining crucial details. The loop feature in PowerPoint aids in creating a dynamic and engaging presentation that drives home your message effectively.
How to Play Slides Automatically during a Presentation
Playing slides automatically during a presentation can elevate the audience’s experience by seamlessly integrating multimedia elements like videos and creating a dynamic, continuous display of information.
Automating the transition between slides not only adds a professional touch to your presentation but also ensures a smooth flow of content delivery.
Incorporating videos strategically within your slides can captivate your audience’s attention and enhance the overall engagement level.
Using the ‘Play from’ Feature
By utilizing this feature, presenters can create more dynamic and interactive presentations by skipping sections or focusing on particular slides based on audience needs. To access the ‘Play from’ feature, simply go to the ‘Slide Show’ tab in PowerPoint and select ‘From Beginning’. Next, right-click on the slide you want to start from, then choose ‘Set as Start Slide’. This simple process gives the power to presenters to tailor their presentations for different audiences and make them more engaging and impactful.
Using the ‘Rehearse Timings’ Feature
Using a remote control.
Utilizing a remote control during a PowerPoint presentation enhances presenter mobility and interaction, allowing for seamless control over slide transitions and receiving instant feedback for troubleshooting.
Common Mistakes to Avoid
Avoiding common mistakes such as overlooking slide transitions , incorrect slide durations, and inadequate presentation testing can significantly enhance the quality and effectiveness of your PowerPoint presentations.
By diligently going through these testing procedures, you can avoid awkward pauses, abrupt changes, or misplaced animations that can detract from your overall message.
Not Checking Slide Transitions
Slide consistency and coherent transitions are key to maintaining engagement and conveying information effectively. By using the ‘Apply To All’ feature, you can efficiently make bulk adjustments to your transitions, saving time and ensuring a polished presentation.
Not Setting Slide Duration Correctly
Not testing the presentation beforehand.
Failing to test the presentation thoroughly before the actual delivery can lead to unexpected issues during the presentation. Rehearse timings, practice narration, and conduct troubleshooting checks in advance to ensure a flawless presentation.
Troubleshooting Tips
When troubleshooting PowerPoint presentations , common issues like slide transitions not working, slides skipping, or sticking can disrupt the flow and effectiveness of your delivery.
To address slide sticking , simplify the content on slides with heavy media or animations that can slow down transitions, and ensure your software is updated to the latest version to prevent glitches.
Slide Transitions Not Working
When troubleshooting redirection problems, double-check the hyperlinks or animations that may be causing the issue. Inspecting the slide transitions individually can pinpoint the exact slide where the redirection error occurs, enabling you to focus your efforts on resolving that specific problem.
Slides Skipping or Sticking
Enabling continuous playback ensures that transitions between slides happen seamlessly, avoiding any abrupt stops or skips. This feature can be found in the ‘Slide Show’ tab under ‘Set Up Show’ by selecting ‘Browsed at a kiosk (full screen),’ then ‘Loop continuously until ‘Esc.”
Remote Control Not Working
Connectivity problems can often be resolved by ensuring that the remote and the computer are properly paired through Bluetooth or IR technology. Checking the battery level is crucial, as a low battery can cause intermittent issues with the remote control. Interference from other electronic devices or obstacles in the room can disrupt the signal transmission.

Frequently Asked Questions
1. how do i play slides in powerpoint without clicking, 2. can i set a specific time for each slide to advance in powerpoint.
Yes, you can set a specific time for each slide to advance by going to the “Transitions” tab and selecting the “After” option. From there, you can enter the desired time for each slide.
3. Is there a way to set a default time for all slides to advance in PowerPoint?
4. can i disable the “auto-play” feature in powerpoint, 5. how can i make sure the “auto-play” feature is working in my powerpoint presentation.
To make sure the “Auto-Play” feature is working, you can go to the “Slideshow” tab and select “From Beginning”. This will start your presentation and automatically advance your slides according to the set time.
6. Is there a way to pause the “Auto-Play” feature in PowerPoint?
Similar posts, how to make lines into a shape in powerpoint, how to put bullet points side by side in powerpoint, how to add new slide in powerpoint, how to move to next slide after animation in powerpoint, how to make a picture transparent in powerpoint, how to switch to normal view in powerpoint.
Your current User-Agent string appears to be from an automated process, if this is incorrect, please click this link:
How to play PowerPoint slides automatically without clicking
Master the art of seamless presentations: Learn how to play PowerPoint slides automatically without clicking
Step 1: Open your PowerPoint presentation

Step 2: Navigate to the "Slide Show" tab

Step 3: Select "Set Up Slide Show"

Step 4: Choose the "Advance slides" option

Step 5: Save your settings
Conclusion:, frequently asked questions:, can i still control the slides manually after setting up automatic playback, will the automatic playback feature work on any version of powerpoint, can i customize the duration for each slide to display before automatically transitioning, what if i want to stop the automatic playback midway through the presentation, create ppt using ai.
Just Enter Topic, Youtube URL, PDF, or Text to get a beautiful PPT in seconds. Use the bulb for AI suggestions.
character count: 0 / 6000 (we can fetch data from google)
upload pdf, docx, .png
less than 2 min
Sanskar Tiwari
Founder at MagicSlides
How to undo changes in PowerPoint
16 April 2024
How to bend text in PowerPoint
How to remove footer in PowerPoint
15 April 2024
How to change opacity in PowerPoint
How to duplicate a PowerPoint slides
13 April 2024
How to insert PPT in new PowerPoint
How to crop a picture into a square in PowerPoint
12 April 2024
How to loop a PowerPoint slideshow
How to turn PowerPoint into notes
10 April 2024
Stunning presentations in seconds with AI
Install MagicSlides app now and start creating beautiful presentations. It's free!

Get AI-Generated Presentations Ready in Seconds
Free AI PPT Tools
Home Blog PowerPoint Tutorials How to Play a Slideshow on PowerPoint
How to Play a Slideshow on PowerPoint

Slide Show mode is one of the most important features of any presentation app. In fact, all the effort presenters put into their slides by endlessly editing PowerPoint templates is ultimately meant for presenting content, which is usually done using Slide Show mode.
To run a slideshow in PowerPoint, use the Slide Show option at the bottom.

Alternatively, you can go to the Slide Show tab and start the slideshow from the beginning, current slide, or customize the slides you wish to present from your PowerPoint presentation via the Custom Slide Show tab.

Once in Slide Show mode, you can move between slides using the arrow keys on your keyboard, a presentation remote, or a mouse click. Numerous options are available either via right-click menu or the bottom of the presentation mode. These include slide navigation and annotation options, camera and subtitle options, the ability to switch to a black or white screen, and the option to end the slideshow or switch to Presenter view .

How to Customize Slideshow Options
The Setup Slide Show option via the Slide Show tab can be used to customize how your slideshow works. From this menu, you can select how the slideshow appears (full screen, window, kiosk fullscreen), select only certain slides to run before an audience, loop the slideshow, and turn off narrations, animations, and hardware graphic acceleration. Other options allow selecting the color for the laser pointer and pen, the ability to enable Presenter view, and the options for selecting between automatic and manual slide advancement.

To start a slideshow: – Click the Slide Show button at the bottom of the PowerPoint window. – Alternatively, go to the Slide Show tab and select From Beginning or From Current Slide.
You can navigate between slides using: – The arrow keys on your keyboard. – A presentation remote. – A mouse click.
Yes, to customize which slides to present: – Go to the Slide Show tab. – Select Custom Slide Show. – Choose New to create a custom slide show by selecting specific slides.
Presenter view is a special view that helps you manage your slideshow: – It shows your current slide, next slide, speaker notes, and a timer. – Go to Slide Show > Set Up Slide Show and check Use Presenter View to enable it.
To loop a slideshow: – Go to the Slide Show tab. – Select Set Up Slide Show. – Check Loop continuously until ‘Esc’.
Yes, to disable animations and narrations: – Go to the Slide Show tab. – Select Set Up Slide Show. – Uncheck Show without narration and/or Show without animation.
To play a slideshow in a window: – Go to the Slide Show tab. – Select Set Up Slide Show. – Choose Browsed by an individual (window).
To adjust the laser pointer and pen color: – Go to the Slide Show tab. – Select Set Up Slide Show. – Choose the desired color for the laser pointer and pen.
To ensure a smooth slideshow: – Disable hardware acceleration, animations, and narrations via Slide Show > Set Up Slide Show, if necessary. – Test your presentation on the equipment you’ll use during the actual presentation.
Final Words
Slideshows are important for presenters to showcase their slides. A bit of customization can help better control how a slide deck works. If a slide deck is causing issues while running, you can disable hardware acceleration, animations, and narrations to try to make the performance of the slide deck more efficient. This is why knowing slideshow-specific options can save a presenter time and effort in ensuring that their slideshow runs smoothly during their presentation.
Like this article? Please share
Microsoft PowerPoint, PowerPoint Tools Filed under PowerPoint Tutorials
Related Articles

Filed under PowerPoint Tutorials • July 30th, 2024
How to Add a Timer to PowerPoint
Generate expectations for your presentation introductions by mastering how to add a timer to PowerPoint. Step-by-step instructions + templates.

Filed under PowerPoint Tutorials • July 23rd, 2024
How to Insert an Excel Sheet into PowerPoint
Optimize your presentation slides with accurate data from spreadsheets. Learn how to insert an Excel Sheet into PowerPoint with this guide.

Filed under PowerPoint Tutorials • July 15th, 2024
How to Select Shape in PowerPoint
Learn how to select any shape in PowerPoint and apply the required transformations. Step-by-step guide.
Leave a Reply

Microsoft PowerPoint

About this app
Data safety.

Ratings and reviews

- Flag inappropriate

- Show review history
What's new
App support, more by microsoft corporation.

Similar apps

How to Fix “Cannot Play Media” Error in PowerPoint
Annoying when it happens in the middle of a presentation
Presentations have become a vital tool for communication and sharing information in schools and offices worldwide. Microsoft PowerPoint allows you to create visually appealing presentations that include various multimedia elements, such as video and audio.
However, you might encounter “cannot play media” errors in PowerPoint, causing video playback issues and preventing the smooth delivery of your presentation. If you want to resolve this problem, follow the steps below.

What Causes the “Cannot Play Media” Error in PowerPoint?
The “cannot play media” error in PowerPoint (or “media not found” error) usually occurs when PowerPoint cannot find or play the media file that you’ve inserted in your presentation.
This can happen for several reasons. The file might be missing, moved, renamed, or deleted from its original location, or it could have become corrupted or damaged in some way. You could also have linked to an external source (such as a website) that’s no longer accessible.

However, not every file is compatible with PowerPoint. Files that don’t have the correct file format, or are too large for PowerPoint to use, won’t load.
Depending on the cause of the error, you may see different messages on your screen, such as no supported file type, an audio codec is needed to play the file, a network error has occurred, or the specified file can’t be played.
To fix this error, you need to identify the cause and apply the appropriate solution using the steps below.
Check the Location and Name of the Media File
One of the simplest solutions is to check if the media file that you inserted in your presentation is still in its original location and has the same name. If you moved, renamed, or deleted the media file after inserting it in PowerPoint, PowerPoint may not be able to find it and will show you the error message.
However, this all depends on how the PowerPoint file has been saved. By default, PowerPoint will likely try to embed media files into the PowerPoint file itself—this makes it easier to move media assets with the file. However, if you’ve only added a link to the file, you’ll need to update the link to the file to the new location.
If you want to update the link, follow these steps:
- Open PowerPoint and press File > Info .
- If you have any media files with links (so they aren’t embedded into the file itself), you’ll see a View Links option listed under Optimize Media Compatibility —select this to proceed.

- In the Audio/Video Options dialog box, select your media file and press Change Source .

- Browse to the new location and name of the file and press Open .
- Press Update Now and then Close to update your links when you’re finished.

Use PowerPoint Media Compatibility Mode
Another possible solution to fix the “cannot play media” error in PowerPoint is to use the media compatibility mode in PowerPoint.
This mode allows you to optimize your presentation for compatibility with older versions of PowerPoint or different devices. It can also help you resolve some issues with video playback and conversion. To use the media compatibility mode in PowerPoint, follow the steps below.
- Press Check for Issues under the Inspect Presentation section.
- In the drop-down menu, press Check Compatibility and wait for PowerPoint to scan your presentation for potential compatibility issues.

- In the Compatibility Report dialog box, look for any issues related to media files and check the boxes next to them.

- Fix the problems manually or, if the option is available to you, press Fix and wait for PowerPoint to fix the issues automatically.
- Save your presentation and see if the media files play without any error.
Note that using the media compatibility mode may change some aspects of your presentation, such as the format, quality, or size of your media files. Make sure to back up a copy of your file before you proceed so that you can restore any changes afterward.
Convert the Media Files Using VLC
Another possible solution is to convert or compress the media file that you inserted in your presentation. PowerPoint may not be able to play certain types of media files or play files that are too large or have a high resolution. This can cause compatibility issues and lead to the error message.
To fix this, you need to either convert the media file to a format that is supported by PowerPoint or compress it to reduce its size and resolution. One possible tool that allows you to convert and compress a media file is VLC Media Player.
To convert a media file using VLC Media Player, follow these steps:
- Download and install VLC Media Player from its official website.
- Open VLC Media Player and press Media > Convert/Save .

- In the Open Media dialog box, press Add and select the media file that you want to convert, then press Convert/Save .

- Choose the output format that you want—this will determine the file size. For example, you can choose Video – H.264 + MP3 (MP4) for video files or Audio – MP3 for audio files. You can also choose video or audio formats such as MKV, WAV or MP4 .
- Select Browse and choose the destination folder and name for the converted file.
- Press Start and wait for the conversion to finish.

Once the file is converted, you can insert the new file into your PowerPoint presentation.
Embed the Media File in Your Presentation
Another possible solution is to embed the media file in your PowerPoint presentation instead of linking to it. As we’ve already mentioned, linking to a media file means that PowerPoint will look for the file in its original location every time you play it.
Embedding a media file means that PowerPoint will instead store a copy of the file within your presentation file. This can prevent the “cannot play media” error from occurring because PowerPoint will always have access to the file regardless of its location or availability.
However, embedding a media file can also increase the size of your presentation file significantly, so you need to be careful about how many and how large media files you embed. To embed a media file in your PowerPoint presentation, follow these steps.
- In PowerPoint, go to the slide where you want to insert the media file and select Insert > Media > Video > This Device .

- Browse to the location of the media file and select it.
- Press the Insert button—this will automatically embed it into your presentation. If this isn’t available, press the dropdown arrow next to your presentation and choose Insert there instead.

Once the file is inserted, resize and place it into the correct position in your presentation. Repeat these steps for any other video files you want to use in your presentation.
Managing Media in PowerPoint
The “cannot play media” error in PowerPoint can be annoying and frustrating, but it can usually be fixed. You’ll just need to check the location and name of the media file, convert or compress it, or embed it in your presentation. You can also try using PowerPoint’s multimedia compatibility mode to help it load on other PCs.
If all else fails, you can also convert your PowerPoint presentation into a video and play it on another device. Lost the changes to your PowerPoint presentation after a restart? Don’t forget to recover your unsaved presentations to recover the changes.

Ben Stockton is a freelance technology writer based in the United Kingdom. In a past life, Ben was a college lecturer in the UK, training teens and adults. Since leaving the classroom, Ben has taken his teaching experience and applied it to writing tech how-to guides and tutorials, specialising in Linux, Windows, and Android. He has a degree in History and a postgraduate qualification in Computing. Read Ben's Full Bio
Read More Posts:

Critical PowerPoint Shortcuts – Claim Your FREE Training Module and Get Your Time Back!
How to Make a PowerPoint Presentation (Step-by-Step)
- PowerPoint Tutorials
- Presentation Design
- January 22, 2024
In this beginner’s guide, you will learn step-by-step how to make a PowerPoint presentation from scratch.
While PowerPoint is designed to be intuitive and accessible, it can be overwhelming if you’ve never gotten any training on it before. As you progress through this guide, you’ll will learn how to move from blank slides to PowerPoint slides that look like these.

Table of Contents
Additionally, as you create your presentation, you’ll also learn tricks for working more efficiently in PowerPoint, including how to:
- Change the slide order
- Reset your layout
- Change the slide dimensions
- Use PowerPoint Designer
- Format text
- Format objects
- Play a presentation (slide show)
With this knowledge under your belt, you’ll be ready to start creating PowerPoint presentations. Moreover, you’ll have taken your skills from beginner to proficient in no time at all. I will also include links to more advanced PowerPoint topics.
Ready to start learning how to make a PowerPoint presentation?
Take your PPT skills to the next level
Start with a blank presentation.
Note: Before you open PowerPoint and start creating your presentation, make sure you’ve collected your thoughts. If you’re going to make your slides compelling, you need to spend some time brainstorming.
For help with this, see our article with tips for nailing your business presentation here .
The first thing you’ll need to do is to open PowerPoint. When you do, you are shown the Start Menu , with the Home tab open.
This is where you can choose either a blank theme (1) or a pre-built theme (2). You can also choose to open an existing presentation (3).
For now, go ahead and click on the Blank Presentation (1) thumbnail.

Doing so launches a brand new and blank presentation for you to work with. Before you start adding content to your presentation, let’s first familiarize ourselves with the PowerPoint interface.
The PowerPoint interface

Here is how the program is laid out:
- The Application Header
- The Ribbon (including the Ribbon tabs)
- The Quick Access Toolbar (either above or below the Ribbon)
- The Slides Pane (slide thumbnails)
The Slide Area
The notes pane.
- The Status Bar (including the View Buttons)
Each one of these areas has options for viewing certain parts of the PowerPoint environment and formatting your presentation.
Below are the important things to know about certain elements of the PowerPoint interface.
The PowerPoint Ribbon

The Ribbon is contextual. That means that it will adapt to what you’re doing in the program.
For example, the Font, Paragraph and Drawing options are greyed out until you select something that has text in it, as in the example below (A).

Furthermore, if you start manipulating certain objects, the Ribbon will display additional tabs, as seen above (B), with more commands and features to help you work with those objects. The following objects have their own additional tabs in the Ribbon which are hidden until you select them:
- Online Pictures
- Screenshots
- Screen Recording
The Slides Pane

This is where you can preview and rearrange all the slides in your presentation.
Right-clicking on a slide in the pane gives you additional options on the slide level that you won’t find on the Ribbon, such as Duplicate Slide , Delete Slide , and Hide Slide .

In addition, you can add sections to your presentation by right-clicking anywhere in this Pane and selecting Add Section . Sections are extremely helpful in large presentations, as they allow you to organize your slides into chunks that you can then rearrange, print or display differently from other slides.

The Slide Area (A) is where you will build out your slides. Anything within the bounds of this area will be visible when you present or print your presentation.
Anything outside of this area (B) will be hidden from view. This means that you can place things here, such as instructions for each slide, without worrying about them being shown to your audience.

The Notes Pane is the space beneath the Slide Area where you can type in the speaker notes for each slide. It’s designed as a fast way to add and edit your slides’ talking points.
To expand your knowledge and learn more about adding, printing, and exporting your PowerPoint speaker notes, read our guide here .
Your speaker notes are visible when you print your slides using the Notes Pages option and when you use the Presenter View . To expand your knowledge and learn the ins and outs of using the Presenter View , read our guide here .

You can resize the Notes Pane by clicking on its edge and dragging it up or down (A). You can also minimize or reopen it by clicking on the Notes button in the Status Bar (B).
Note: Not all text formatting displays in the Notes Pane, even though it will show up when printing your speaker notes. To learn more about printing PowerPoint with notes, read our guide here .
Now that you have a basic grasp of the PowerPoint interface at your disposal, it’s time to make your presentation.
Adding Content to Your PowerPoint Presentation
Notice that in the Slide Area , there are two rectangles with dotted outlines. These are called Placeholders and they’re set on the template in the Slide Master View .
To expand your knowledge and learn how to create a PowerPoint template of your own (which is no small task), read our guide here .

As the prompt text suggests, you can click into each placeholder and start typing text. These types of placeholder prompts are customizable too. That means that if you are using a company template, it might say something different, but the functionality is the same.

Note: For the purposes of this example, I will create a presentation based on the content in the Starbucks 2018 Global Social Impact Report, which is available to the public on their website.
If you type in more text than there is room for, PowerPoint will automatically reduce its font size. You can stop this behavior by clicking on the Autofit Options icon to the left of the placeholder and selecting Stop Fitting Text to this Placeholder .
Next, you can make formatting adjustments to your text by selecting the commands in the Font area and the Paragraph area of the Home tab of the Ribbon.

The Reset Command: If you make any changes to your title and decide you want to go back to how it was originally, you can use the Reset button up in the Home tab .

Insert More Slides into Your Presentation
Now that you have your title slide filled in, it’s time to add more slides. To do that, simply go up to the Home tab and click on New Slide . This inserts a new slide in your presentation right after the one you were on.

You can alternatively hit Ctrl+M on your keyboard to insert a new blank slide in PowerPoint. To learn more about this shortcut, see my guide on using Ctrl+M in PowerPoint .
Instead of clicking the New Slide command, you can also open the New Slide dropdown to see all the slide layouts in your PowerPoint template. Depending on who created your template, your layouts in this dropdown can be radically different.

If you insert a layout and later want to change it to a different layout, you can use the Layout dropdown instead of the New Slide dropdown.
After inserting a few different slide layouts, your presentation might look like the following picture. Don’t worry that it looks blank, next we will start adding content to your presentation.

If you want to follow along exactly with me, your five slides should be as follows:
- Title Slide
- Title and Content
- Section Header
- Two Content
- Picture with Caption
Adding Content to Your Slides
Now let’s go into each slide and start adding our content. You’ll notice some new types of placeholders.

On slide 2 we have a Content Placeholder , which allows you to add any kind of content. That includes:
- A SmartArt graphic,
- A 3D object,
- A picture from the web,
- Or an icon.
To insert text, simply type it in or hit Ctrl+C to Copy and Ctrl+V to Paste from elsewhere. To insert any of the other objects, click on the appropriate icon and follow the steps to insert it.
For my example, I’ll simply type in some text as you can see in the picture below.

Slides 3 and 4 only have text placeholders, so I’ll go ahead and add in my text into each one.

On slide 5 we have a Picture Placeholder . That means that the only elements that can go into it are:
- A picture from the web

To insert a picture into the picture placeholder, simply:
- Click on the Picture icon
- Find a picture on your computer and select it
- Click on Insert
Alternatively, if you already have a picture open somewhere else, you can select the placeholder and paste in (shortcut: Ctrl+V ) the picture. You can also drag the picture in from a file explorer window.

If you do not like the background of the picture you inserted onto your slide, you can remove the background here in PowerPoint. To see how to do this, read my guide here .
Placeholders aren’t the only way to add content to your slides. At any point, you can use the Insert tab to add elements to your slides.
You can use either the Title Only or the Blank slide layout to create slides for content that’s different. For example, a three-layout content slide, or a single picture divider slide, as shown below.

In the first example above, I’ve inserted 6 text boxes, 3 icons, and 3 circles to create this layout. In the second example, I’ve inserted a full-sized picture and then 2 shapes and 2 text boxes.
The Reset Command: Because these slides are built with shapes and text boxes (and not placeholders), hitting the Reset button up in the Home tab won’t do anything.
That is a good thing if you don’t want your layouts to adjust. However, it does mean that it falls on you to make sure everything is aligned and positioned correctly.
For more on how to add and manipulate the different objects in PowerPoint, check out our step-by-step articles here:
- Using graphics in PowerPoint
- Inserting icons onto slides
- Adding pictures to your PowerPoint
- How to embed a video in PowerPoint
- How to add music to your presentation
Using Designer to generate more layouts ideas
If you have Office 365, your version of PowerPoint comes with a new feature called Designer (or Design Ideas). This is a feature that generates slide layout ideas for you. The coolest thing about this feature is that it uses the content you already have.
To use Designer , simply navigate to the Design tab in your Ribbon, and click on Design Ideas .

NOTE: If the PowerPoint Designer is not working for you (it is grey out), see my troubleshooting guide for Designer .
Change the Overall Design (optional)
When you make a PowerPoint presentation, you’ll want to think about the overall design. Now that you have some content in your presentation, you can use the Design tab to change the look and feel of your slides.
For additional help thinking through the design of your presentation, read my guide here .
A. Picking your PowerPoint slide size
If you have PowerPoint 2013 or later, when you create a blank document in PowerPoint, you automatically start with a widescreen layout with a 16:9 ratio. These dimensions are suitable for most presentations as they match the screens of most computers and projectors.
However, you do have the option to change the dimensions.
For example, your presentation might not be presented, but instead converted into a PDF or printed and distributed. In that case, you can easily switch to the standard dimensions with a 4:3 ratio by selecting from the dropdown (A).
You can also choose a custom slide size or change the slide orientation from landscape to portrait in the Custom Slide Size dialog box (B).

To learn all about the different PowerPoint slide sizes, and some of the issues you will face when changing the slide size of a non-blank presentation, read my guide here .
B. Selecting a PowerPoint theme
The next thing you can do is change the theme of your presentation to a pre-built one. For a detailed explanation of what a PowerPoint theme is, and how to best use it, read my article here .
In the beginning of this tutorial, we started with a blank presentation, which uses the default Office theme as you can see in the picture below.

That gives you the most flexibility because it has a blank background and quite simple layouts that work for most presentations. However, it also means that it’s your responsibility to enhance the design.
If you’re comfortable with this, you can stay with the default theme or create your own custom theme ( read my guide here ). But if you would rather not have to think about design, then you can choose a pre-designed theme.
Microsoft provides 46 other pre-built themes, which include slide layouts, color variants and palettes, and fonts. Each one varies quite significantly, so make sure you look through them carefully.
To select a different theme, go to the Design tab in the Ribbon, and click on the dropdown arrow in the Themes section .

For this tutorial, let’s select the Frame theme and then choose the third Variant in the theme. Doing so changes the layout, colors, and fonts of your presentation.

Note: The theme dropdown area is also where you can import or save custom themes. To see my favorite places to find professional PowerPoint templates and themes (and recommendations for why I like them), read my guide here .
C. How to change a slide background in PowerPoint
The next thing to decide is how you want your background to look for the entire presentation. In the Variants area, you can see four background options.

For this example, we want our presentation to have a dark background, so let’s select Style 3. When you do so, you’ll notice that:
- The background color automatically changes across all slides
- The color of the text on most of the slides automatically changes to white so that it’s visible on the dark background
- The colors of the objects on slides #6 and #7 also adjust, in a way we may not want (we’ll likely have to make some manual adjustments to these slides)

Note: If you want to change the slide background for just that one slide, don’t left-click the style. Instead, right-click it and select Apply to Selected Slides .
After you change the background for your entire presentation, you can easily adjust the background for an individual slide.

Inside the Format Background pane, you can see you have the following options:
- Gradient fill
- Picture or texture fill
- Pattern fill
- Hide background
You can explore these options to find the PowerPoint background that best fits your presentation.
D. How to change your color palette in PowerPoint
Another thing you may want to adjust in your presentation, is the color scheme. In the picture below you can see the Theme Colors we are currently using for this presentation.

Each PowerPoint theme comes with its own color palette. By default, the Office theme includes the Office color palette. This affects the colors you are presented with when you format any element within your presentation (text, shapes, SmartArt, etc.).

The good news is that the colors here are easy to change. To switch color palettes, simply:
- Go to the Design tab in the Ribbon
- In the Variants area, click on the dropdown arrow and select Colors
- Select the color palette (or theme colors) you want
You can choose among the pre-built color palettes from Office, or you can customize them to create your own.
As you build your presentation, make sure you use the colors from your theme to format objects. That way, changing the color palette adjusts all the colors in your presentation automatically.
E. How to change your fonts in PowerPoint
Just as we changed the color palette, you can do the same for the fonts.

Each PowerPoint theme comes with its own font combination. By default, the Office theme includes the Office font pairing. This affects the fonts that are automatically assigned to all text in your presentation.

The good news is that the font pairings are easy to change. To switch your Theme Fonts, simply:
- Go to the Design tab in the Ribbon
- Click on the dropdown arrow in the Variants area
- Select Fonts
- Select the font pairing you want
You can choose among the pre-built fonts from Office, or you can customize them to create your own.
If you are working with PowerPoint presentations on both Mac and PC computers, make sure you choose a safe PowerPoint font. To see a list of the safest PowerPoint fonts, read our guide here .
If you receive a PowerPoint presentation and the wrong fonts were used, you can use the Replace Fonts dialog box to change the fonts across your entire presentation. For details, read our guide here .
Adding Animations & Transitions (optional)
The final step to make a PowerPoint presentation compelling, is to consider using animations and transitions. These are by no means necessary to a good presentation, but they may be helpful in your situation.
A. Adding PowerPoint animations
PowerPoint has an incredibly robust animations engine designed to power your creativity. That being said, it’s also easy to get started with basic animations.
Animations are movements that you can apply to individual objects on your slide.

To add a PowerPoint animation to an element of your slide, simply:
- Select the element
- Go to the Animations tab in the Ribbon
- Click on the dropdown arrow to view your options
- Select the animation you want
You can add animations to multiple objects at one time by selecting them all first and then applying the animation.
B. How to preview a PowerPoint animation

There are three ways to preview a PowerPoint animation:
- Click on the Preview button in the Animations tab
- Click on the little star next to the slide
- Play the slide in Slide Show Mode
To learn other ways to run your slide show, see our guide on presenting a PowerPoint slide show with shortcuts .
To adjust the settings of your animations, explore the options in the Effect Options , Advanced Animation and the Timing areas of the Animation tab .

Note: To see how to make objects appear and disappear in your slides by clicking a button, read our guide here .
C. How to manage your animations in PowerPoint

The best way to manage lots of animations on your slide is with the Animation Pane . To open it, simply:
- Navigate to the Animations tab
- Select the Animation Pane
Inside the Animation Pane, you’ll see all of the different animations that have been applied to objects on your slide, with their numbers marked as pictured above.
Note: To see examples of PowerPoint animations that can use in PowerPoint, see our list of PowerPoint animation tutorials here .
D. How to add transitions to your PowerPoint presentation
PowerPoint has an incredibly robust transition engine so that you can dictate how your slides change from one to the other. It is also extremely easy to add transitions to your slides.
In PowerPoint, transitions are the movements (or effects) you see as you move between two slides.

To add a transition to a PowerPoint slide, simply:
- Select the slide
- Go to the Transitions tab in the Ribbon
- In the Transitions to This Slide area, click on the dropdown arrow to view your options
- Select the transition you want
To adjust the settings of the transition, explore the options in the Timing area of the Transitions tab.
You can also add the same transition to multiple slides. To do that, select them in the Slides Pane and apply the transition.
E. How to preview a transition in PowerPoint

There are three ways to preview your PowerPoint transitions (just like your animations):
- Click on the Preview button in the Transitions tab
- Click on the little star beneath the slide number in the thumbnail view
Note: In 2016, PowerPoint added a cool new transition, called Morph. It operates a bit differently from other transitions. For a detailed tutorial on how to use the cool Morph transition, see our step-by-step article here .
Save Your PowerPoint Presentation
After you’ve built your presentation and made all the adjustments to your slides, you’ll want to save your presentation. YOu can do this several different ways.

To save a PowerPoint presentation using your Ribbon, simply:
- Navigate to the File tab
- Select Save As on the left
- Choose where you want to save your presentation
- Name your presentation and/or adjust your file type settings
- Click Save
You can alternatively use the Ctrl+S keyboard shortcut to save your presentation. I recommend using this shortcut frequently as you build your presentation to make sure you don’t lose any of your work.

This is the standard way to save a presentation. However, there may be a situation where you want to save your presentation as a different file type.
To learn how to save your presentation as a PDF, see our guide on converting PowerPoint to a PDF .
How to save your PowerPoint presentation as a template
Once you’ve created a presentation that you like, you may want to turn it into a template. The easiest – but not technically correct – way, is to simply create a copy of your current presentation and then change the content.
But be careful! A PowerPoint template is a special type of document and it has its own parameters and behaviors.
If you’re interested in learning about how to create your own PowerPoint template from scratch, see our guide on how to create a PowerPoint template .
Printing Your PowerPoint Presentation
After finishing your PowerPoint presentation, you may want to print it out on paper. Printing your slides is relatively easy.

To open the Print dialog box, you can either:
- Hit Ctrl+P on your keyboard
- Or go to the Ribbon and click on File and then Print

Inside the Print dialog box, you can choose from the various printing settings:
- Printer: Select a printer to use (or print to PDF or OneNote)
- Slides: Choose which slides you want to print
- Layout: Determine how many slides you want per page (this is where you can print the notes, outline, and handouts)
- Collated or uncollated (learn what collated printing means here )
- Color: Choose to print in color, grayscale or black & white
There are many more options for printing your PowerPoint presentations. Here are links to more in-depth articles:
- How to print multiple slides per page
- How to print your speaker notes in PowerPoint
- How to save PowerPoint as a picture presentation
So that’s how to create a PowerPoint presentation if you are brand new to it. We’ve also included a ton of links to helpful resources to boost your PowerPoint skills further.
When you are creating your presentation, it is critical to first focus on the content (what you are trying to say) before getting lost inserting and playing with elements. The clearer you are on what you want to present, the easier it will be to build it out in PowerPoint.
If you enjoyed this article, you can learn more about our PowerPoint training courses and other presentation resources by visiting us here .
🔒 Unlock the PowerPoint Shortcuts Trusted by Industry Leaders KKR, American Express, HSBC, and More!
Join over 114,880 professionals from diverse fields including consulting, investment banking, advertising, marketing, sales, and business development who have supercharged their PowerPoint game with our proven methods.
✅ Customize compelling presentations effortlessly.
✅ Master time-saving techniques for faster deck creation.
✅ Boost your career prospects with top-notch PowerPoint skills.
Get FREE access to the Critical PowerPoint Shortcuts module of our premium training course by entering your name and email below.
DISCLAIMER: PC Users Only!
We respect your privacy and will keep your info safe and confidential.
About The Author

Popular Tutorials
- How to Strikethrough Text (l̶i̶k̶e̶ ̶t̶h̶i̶s̶) in Word, Excel & PowerPoint
- How to Make Animated Fireworks in PowerPoint (Step-by-Step)
- Strikethrough Shortcut (l̶i̶k̶e̶ ̶t̶h̶i̶s̶) for Word, Excel & PowerPoint
- How to Create a Flash Card Memory Game in PowerPoint (Like Jeopardy)
- Keyboard Shortcuts Not Working: Solved
PowerPoint Tutorial Categories
- Strategies & Opinions
- Shortcuts & Hacks
- Pictures, Icons, Videos, Etc.
- New Features
- Miscellaneous
- Charts & Data Viz
We help busy professionals save hours and gain peace of mind, with corporate workshops, self-paced courses and tutorials for PowerPoint and Word.
Work With Us
- Corporate Training
- Presentation & Template Design
- Courses & Downloads
- PowerPoint Articles
- Word Articles
- Productivity Resources
Find a Tutorial
- Free Training
- For Businesses
We help busy office workers save hours and gain peace of mind, with tips, training and tutorials for Microsoft PowerPoint and Word.
Master Critical PowerPoint Shortcuts – Secure Your FREE Training Module and Save Valuable Time!
⌛ Master time-saving expert techniques.
🔥 Create powerful presentations.
🚀 Propel your career to new heights.
We value your privacy – we keep your info safe.
Discover PowerPoint Hacks Loved by Industry Giants - KKR, AmEx, HSBC!
Over 114,880 professionals in finance, marketing and sales have revolutionized their PPT skills with our proven methods.
Gain FREE access to a full module of our premium PowerPoint training program – Get started today!
We hate spam too and promise to keep your information safe.
You are currently viewing a placeholder content from Facebook . To access the actual content, click the button below. Please note that doing so will share data with third-party providers.
How-To Geek
How to loop a powerpoint presentation.

Your changes have been saved
Email is sent
Email has already been sent
Please verify your email address.
You’ve reached your account maximum for followed topics.
Quick Links
Set up your slideshow to be looped, apply automatic slide transitions.
Slideshows are sometimes used to display images at events, such as weddings or trade shows. Whatever the occasion might be, you’ll want to loop your PowerPoint presentation so your guests aren’t staring at a blank screen. Here’s how it’s done.
First, open your PowerPoint presentation in which you would like to loop. Once open, navigate to the “Set Up” group of the “Slide Show” tab and then select the “Set Up Slide Show” button.

The “Set Up Show” window will appear. In the “Show options” group, check the box next to “Loop Continuously until Esc.” Once selected, click “OK” in the bottom-right corner of the window.

Now, when you play your slideshow, it will end only when you press the “Esc” key instead of when you've finished the last slide.
Related: How to Make YouTube Videos Loop Continuously
One caveat: With the way we currently have it set up, the slideshow will proceed only when someone clicks the mouse button. That’s fine if there will be a speaker present at all times. Otherwise, you’ll need to set up automatic slide transitions.
Head back to the “Set Up Show” window by selecting “Set Up Slide Show” in the “Set Up” group of the “Slide Show” tab.
There are a couple of options you need to select, but one important note is that you must first select “Using Timings, If Present” under the “Advance Slides” group.

The next option we select will lock a few things in place (which is why you need to select “Using Timings, If Present” first).
Under the “Show Type” group, select “Browsed at a Kiosk (Full Screen)." The “Loop Continuously until Esc” option will be enabled automatically if you haven’t already turned it on, and the option you’ve selected under “Advance Slides” will remain unchanged.
Select “OK” when ready to proceed.

Without the “Browsed at a Kiosk” option enabled, the automatic slide progressions would be disabled if someone were to press the Back key. With it enabled, the Forward and Back keys are locked, allowing the slideshow to automatically progress unattended without fear of someone breaking it.
Now it’s time to set the timings of the slides. Head over to the “Transitions” tab. In the “Timing” group, check the box next to “After” and set the timing at which you’d like each slide to progress. Note that it doesn’t matter if the box next to “On Mouse Click” is checked or not---it won’t work.
After that, select the “Apply to All” option in the same group.

Now, when you play your slideshow, it will continuously loop without interruption. To exit the slideshow, press the “Esc” button.
- Microsoft Office
- Create a presentation Article
- Save Article
- Design Article
- Share and collaborate Article
- Give a presentation Article
- Set up your mobile apps Article
- Learn more Article

Create a presentation
Create a presentation in PowerPoint

Create presentations from scratch or start with a professionally designed, fully customizable template from Microsoft Create .
Tip: If you have Microsoft Copilot it can help you create a presentation, add slides or images, and more. To learn more see Create a new presentation with Copilot in PowerPoint.
Open PowerPoint.
In the left pane, select New .
Select an option:
To create a presentation from scratch, select Blank Presentation .
To use a prepared design, select one of the templates.
To see tips for using PowerPoint, select Take a Tour , and then select Create , .

Add a slide
In the thumbnails on the left pane, select the slide you want your new slide to follow.
In the Home tab, in the Slides section, select New Slide .
In the Slides section, select Layout , and then select the layout you want from the menu.

Add and format text
Place the cursor inside a text box, and then type something.
Select the text, and then select one or more options from the Font section of the Home tab, such as Font , Increase Font Size , Decrease Font Size , Bold , Italic , Underline , etc.
To create bulleted or numbered lists, select the text, and then select Bullets or Numbering .

Add a picture, shape, and more
Go to the Insert tab.
To add a picture:
In the Images section, select Pictures .
In the Insert Picture From menu, select the source you want.
Browse for the picture you want, select it, and then select Insert .
To add illustrations:
In the Illustrations section, select Shapes , Icons , 3D Models , SmartArt , or Chart .
In the dialog box that opens when you click one of the illustration types, select the item you want and follow the prompts to insert it.

Need more help?
Want more options.
Explore subscription benefits, browse training courses, learn how to secure your device, and more.

Microsoft 365 subscription benefits

Microsoft 365 training

Microsoft security

Accessibility center
Communities help you ask and answer questions, give feedback, and hear from experts with rich knowledge.

Ask the Microsoft Community

Microsoft Tech Community

Windows Insiders
Microsoft 365 Insiders
Find solutions to common problems or get help from a support agent.

Online support
Was this information helpful?
Thank you for your feedback.
IMAGES
COMMENTS
You can use a self-running presentation to run unattended in a booth or kiosk at a trade show or convention, or you can save it as a video and send it to a client. On the Slide Show tab, select Set Up Slide Show. Presented by a speaker (full screen) Allows the people watching your slide show to have control over when they advance the slides.
Start in Settings (1) and select the tools you will be using. You have the option to use a microphone, or you can record yourself talking on camera. Choose your microphone and/or camera for recording. Next (2), decide whether you want to have the microphone or camera you selected turned on.
Saving a presentation as a PowerPoint Show (.ppsx file) isn't available in PowerPoint for the web. To start a slide show in PowerPoint for the web, open the file, and on the Slide Show tab of the ribbon, select Play from Beginning. (If you've turned off the Simplified Ribbon, you don't have a Slide Show tab; instead use the View tab to start Presenter Coach.)
In the editing view, right click the video you want to automate and select the down arrow to the right of the Start button. Select Automatically from the dropdown menu. Save the PowerPoint presentation. Now, it'll start playing automatically when you advance to the slide with your embedded video while in presenter view.
Open the presentation that you want to play as a slide show. Select the slide that you want to start the slide show from. On the. button, and then click Custom Slide Show on the menu. In the Custom Shows screen, click the custom slide show you want to present. To end the slide show when you finish presenting, press ESC .
After you confirm the arrangement and content, open the "Slide Show" tab and press the "Set Up Slide Show" button. You have the option to configure your presentation for three automatic play modes: "Presented by a speaker (full screen)," "Browsed by an individual (window)" and "Browsed at a Kiosk (full screen)."
To play a slideshow on the web, launch your preferred web browser and access PowerPoint on the web. Then, open your presentation. From PowerPoint's ribbon at the top, select the "Slide Show" tab. In the "Slide Show" tab, start your slideshow from the first slide by clicking the "From Beginning" option. To have your show play from your current ...
Open your slideshow in PowerPoint on Windows or Mac and follow these steps to set up automatic play. Go to the Slide Show tab and select Set Up Slide Show. In the pop-up window, mark Browsed at a kiosk in the Show type section. This automatically loops the slideshow for continuous play and only stops when you press Esc.
To set up a PowerPoint presentation to run automatically, but allow those watching the slide show to have control over when they advance slides: Click the Slide Show tab in the Ribbon and then click Set Up Slide Show. A dialog box appears. Under Show type, select Presented by a speaker (full screen).
In this video, you'll learn the basics of presenting your slide show in PowerPoint 2019, PowerPoint 2016, and Office 365. Visit https://edu.gcfglobal.org/en/...
Share and collaborate. Start with Microsoft Copilot. Generate a presentation outline instantly with Microsoft Copilot for Microsoft 365. Expand your ideas. Ask for more information or a new slide on your topic directly through Copilot in PowerPoint. Use a free template. Choose from thousands of customizable templates to kickstart your slideshow.
To play slides in PowerPoint without clicking, you can use the "Auto-Play" feature. This will automatically advance your slides after a set amount of time. 2. Can I set a specific time for each slide to advance in PowerPoint? Yes, you can set a specific time for each slide to advance by going to the "Transitions" tab and selecting the ...
Six steps for creating a slide show. 1. Plan your slide show. Before getting too deep into your slide show project, it's a good idea to select and save the photos and videos you want to use. This helps you create a slide show more efficiently and purposefully, ensuring a better outcome. 4.
Fortunately, PowerPoint offers a feature that allows you to automate the process, seamlessly transitioning from one slide to the next without the need for manual intervention. In this guide, we'll walk you through the steps to set up your PowerPoint presentation to play automatically, making your delivery smoother and more professional.
To run a slideshow in PowerPoint, use the Slide Show option at the bottom. How to start a slideshow in PowerPoint. Alternatively, you can go to the Slide Show tab and start the slideshow from the beginning, current slide, or customize the slides you wish to present from your PowerPoint presentation via the Custom Slide Show tab.
Click From Beginning. Holding down the Alt key and clicking From Beginning, the Presenter View will launch from the very first (non-hidden) slide in your presentation. You can also launch the presenter view from the beginning of your presentation at any time by clicking Alt + F5 on your keyboard.
Collaborate with Others Easily. • PowerPoint makes it easy for you to collaborate with others. • Make a slideshow & share with your team to get feedback & edits. • View presentation permissions and see who's working on which slides. • Slides can have integrated comments letting you stay on top of changes & feedback.
Setting video to play "Automatically" in the ribbon sets the videos to play "After previous" by default ( ie one after the other.) Open the Animation pane from ANIMATION tab and set both to "With previous" see if that helps. www.pptalchemy.co.uk. 660 people found this reply helpful. Thanks for your feedback, it helps us improve the site.
On the Playback tab, in the Video Options group, from the Start list, select an option: Option. When the video plays during a slide show. Automatically. The video plays automatically when the slide appears. On Click or When Clicked On. The video only plays when you click within the video frame. In Click Sequence.
Presentations have become a vital tool for communication and sharing information in schools and offices worldwide. Microsoft PowerPoint allows you to create visually appealing presentations that include various multimedia elements, such as video and audio. However, you might encounter "cannot play media" errors in PowerPoint, causing video playback issues and preventing the smooth delivery of
To do that, simply go up to the Home tab and click on New Slide. This inserts a new slide in your presentation right after the one you were on. You can alternatively hit Ctrl+M on your keyboard to insert a new blank slide in PowerPoint. To learn more about this shortcut, see my guide on using Ctrl+M in PowerPoint.
First, open your PowerPoint presentation in which you would like to loop. Once open, navigate to the "Set Up" group of the "Slide Show" tab and then select the "Set Up Slide Show" button. The "Set Up Show" window will appear. In the "Show options" group, check the box next to "Loop Continuously until Esc.".
When you click on the video in presentation mode, the play button is there, and the audio button is there, but it will not play. Again, in 'read mode' it works perfect. The videos play perfect, and automatically when I switch from slide to slide. I have Powerpoint 2016 version: 16..6769.2040 Thanks Jim. JE. Jez63.
Hi Ricard, Sorry for what you encountered. To check whether this issue is related to Add-ins, please Start your Office in safe mode to see the outcome. If this issue doesn't happen in safe mode, please click File>Options>Add-ins>To disable Add-ins one by one to check which one caused this case.
The music file is in an mp3 format and plays on my windows laptop, then when I insert into power point but only in design or edit mode, the problem comes in when I select presentation mode >> the music does not play even if the mp3 is shortened to 20 seconds. The application itself seems unstable by showing a message saying "not responsive" at ...
Create a presentation. Open PowerPoint. In the left pane, select New. Select an option: To create a presentation from scratch, select Blank Presentation. To use a prepared design, select one of the templates. To see tips for using PowerPoint, select Take a Tour, and then select Create, . Add a slide.