Your current User-Agent string appears to be from an automated process, if this is incorrect, please click this link:
- PRO Courses Guides New Tech Help Pro Expert Videos About wikiHow Pro Upgrade Sign In
- EDIT Edit this Article
- EXPLORE Tech Help Pro About Us Random Article Quizzes Request a New Article Community Dashboard This Or That Game Happiness Hub Popular Categories Arts and Entertainment Artwork Books Movies Computers and Electronics Computers Phone Skills Technology Hacks Health Men's Health Mental Health Women's Health Relationships Dating Love Relationship Issues Hobbies and Crafts Crafts Drawing Games Education & Communication Communication Skills Personal Development Studying Personal Care and Style Fashion Hair Care Personal Hygiene Youth Personal Care School Stuff Dating All Categories Arts and Entertainment Finance and Business Home and Garden Relationship Quizzes Cars & Other Vehicles Food and Entertaining Personal Care and Style Sports and Fitness Computers and Electronics Health Pets and Animals Travel Education & Communication Hobbies and Crafts Philosophy and Religion Work World Family Life Holidays and Traditions Relationships Youth
- Browse Articles
- Learn Something New
- Quizzes Hot
- Happiness Hub
- This Or That Game
- Train Your Brain
- Explore More
- Support wikiHow
- About wikiHow
- Log in / Sign up
- Education and Communications
- Presentations

How to Create a Photo Slideshow with PowerPoint
Last Updated: February 6, 2023 Fact Checked
This article was co-authored by Mitch Harris . Mitch Harris is a Consumer Technology Expert based in the San Francisco Bay Area. Mitch runs his own IT Consulting company called Mitch the Geek, helping individuals and businesses with home office technology, data security, remote support, and cybersecurity compliance. Mitch earned a BS in Psychology, English, and Physics and graduated Cum Laude from Northern Arizona University. There are 12 references cited in this article, which can be found at the bottom of the page. This article has been fact-checked, ensuring the accuracy of any cited facts and confirming the authority of its sources. This article has been viewed 940,451 times.
With so many fun and accessible ways to take photos, there is no wonder why everyone is so photo-happy these days. As easy as it may be to stock up on photos, it can be a challenge to keep them organized. One great way to keep your photos in a convenient place, that is easy to access when you want to reminisce on special memories, is by uploading them into PowerPoint. By doing this, you can create a slideshow that is a fun-filled way to back up the memories in your life.
Creating Photo Slideshows for PC Computers

- Remember to save your presentation after something that will help you to remember what pictures are in the file. This will help you to locate them later on.

- Select a layout that will accommodate your image, such as a slide with a title box and an image box, a slide with just an image box, or even a blank slide.

- Double-click inside the image box (or go to Insert > Picture > From File ), then browse to the desired image.
- Click "Okay" or "Insert" to add the image. If you don't like the way it looks, select the image and click on "Picture" to change it out for a different one. You can also select the image and hit "Delete" to remove the picture.

- Locate the "Slide Sorter" button near the bottom of the image pane. Then, click and drag the slides to the desired destinations.

- To add music, click on the movies and audio icon located under the "Insert" tab. First, go to "Audio from file", and then, click on "Music" to pull up your music. When you choose the song you want, click on the song, and press "Link to file" before pressing "Insert". [9] X Research source
- You can choose if the song plays for just one slide or the entire presentation by clicking on "Format Audio" next to the "Home" button, and then, clicking on "Play Across Slides" under "Audio Options". [10] X Research source

Creating Photo Slideshows for Mac Computers

- You can scroll through your photos and choose the ones you want to add to your slideshow by double-clicking on them.

- To add music, click on the movies and audio icon located at the top of the PowerPoint screen. Then, click on "Music" and all of your music should appear. When you choose the song you want, drag and drop the file onto one of your slides.
- You can choose if the song plays for just one slide or the entire presentation by clicking on "Format Audio" next to the "Home" button, and then, clicking on "Play Across Slides" under "Audio Options".

Sample Slideshow

Community Q&A
- Choose a theme for the photo slideshow. If the photos are from a summer vacation, choose a bright yellow background or upbeat music. Thanks Helpful 0 Not Helpful 0

You Might Also Like

- ↑ https://support.microsoft.com/en-us/office/create-a-presentation-in-powerpoint-422250f8-5721-4cea-92cc-202fa7b89617
- ↑ https://support.microsoft.com/en-us/office/save-your-presentation-file-34377c9c-a1e5-44e1-9c3f-e6e72ee6c541
- ↑ https://tsengcollege.csun.edu/sites/default/files/PDFs/forWindows/Slide_Titles_in_Microsoft_PowerPoint.pdf
- ↑ https://support.microsoft.com/en-us/office/add-rearrange-duplicate-and-delete-slides-in-powerpoint-e35a232d-3fd0-4ee1-abee-d7d4d6da92fc
- ↑ https://support.microsoft.com/en-us/office/insert-a-picture-in-powerpoint-5f7368d2-ee94-4b94-a6f2-a663646a07e1
- ↑ https://support.microsoft.com/en-us/office/add-transitions-between-slides-e89a076e-ed81-404e-9598-021a918fa1ba
- ↑ https://guides.lib.umich.edu/c.php?g=283149&p=1886370
- ↑ https://support.microsoft.com/en-us/office/play-music-across-multiple-slides-in-your-slide-show-b01ded6a-28c8-473a-971a-6dfa92cc9367
- ↑ http://answers.microsoft.com/en-us/office/forum/officeversion_other-powerpoint/powerpoint-how-to-add-music-throughout-the/10a366a4-9727-4f78-aa06-e9f76c8a5269
- ↑ https://support.microsoft.com/en-us/office/add-rearrange-duplicate-and-delete-slides-in-powerpoint-e35a232d-3fd0-4ee1-abee-d7d4d6da92fc#OfficeVersion=macOS
- ↑ https://support.microsoft.com/en-us/office/insert-a-picture-in-powerpoint-5f7368d2-ee94-4b94-a6f2-a663646a07e1#OfficeVersion=macOS
- ↑ https://support.microsoft.com/en-us/office/play-music-across-multiple-slides-in-your-slide-show-b01ded6a-28c8-473a-971a-6dfa92cc9367#OfficeVersion=macOS
About This Article

- Send fan mail to authors
Reader Success Stories
Zainal Hj Harun
Mar 12, 2017
Did this article help you?
Jaqueline Uribe
Aug 19, 2016
Arturo Amos
Jun 7, 2018

Featured Articles

Trending Articles

Watch Articles

- Terms of Use
- Privacy Policy
- Do Not Sell or Share My Info
- Not Selling Info
Get all the best how-tos!
Sign up for wikiHow's weekly email newsletter
- Customer Help
- X (Twitter)
How to Create a Stunning Photo Slideshow in PowerPoint
A photo slideshow can bring your PowerPoint presentation to life. In this article, you’ll learn step-by-step how to make a compelling photo slideshow in Microsoft PowerPoint. We’ll cover choosing your photos, arranging them, adding transitions, music, and text – everything you need to create a dynamic slideshow your audience will love. Whether you’re a PowerPoint beginner or experienced user, you’ll find tips to take your next slideshow from ordinary to extraordinary.
Getting Started Create Slideshow in PowerPoint

Now you can customize this template slide for your photo slideshow. Change the title, subtitle, and text box colors and fonts to match your brand or theme. You’ll also want to delete any placeholder images and ensure the slide layout works for photos. The title and text boxes should not cover up the main photo area.
Add Photos to Your PowerPoint Slideshow
Step 1: Inserting a Single Photo

- Choose the desired image and confirm to insert it onto your slide. This method is ideal when you’re aiming for a different and selective approach in your presentation.
Step 2: Adding Multiple Photos Simultaneously

- Simply drag the slides from the folder and drop them directly onto the PowerPoint slide. This batch insertion saves time and ensures consistency in your slideshow.
Step 3: Adjusting and Refining Your Photos

Step 4: Ensuring Harmony Between Photos and Slide Elements
- Review each slide to make sure photos don’t overlap with titles, bullet points or short text boxes.
- Adjust the position or size of photos if they obstruct any slide elements. This ensures your slides in PowerPoint are both visually appealing and easy to understand.
Step 5: Exploring Additional Features (Optional)
- For users on a Mac, familiarize yourself with any interface differences.

- For a continuous presentation loop, select the “loop continuously” option in the slideshow settings.
- Dive into the “Slide Layout” or “Picture Layout” options to experiment with different visual arrangements for your content.
Make a Custom Title Slide
Step 2: Inputting Your Title and Subtitle

- Below the title, there’s a space for a subtitle. Use this to provide additional context or a secondary message related to your main theme.
Step 3: Enhancing Text Aesthetics

Step 4: Dabbling in Color Choices
- With your title or subtitle text highlighted, click on the text color option in the “Home” tab. Select a color that complements your presentation’s theme.

Step 5: Embedding a Relevant Image
- To further enhance your title slide, consider adding an image that ties in with your presentation’s theme.

- Once inserted, adjust the image’s size and position it behind your title and subtitle. Ensure the image doesn’t overpower the text but complements it.
How to Add Music into Your Microsoft PowerPoint Presentation
Step 1: Initiating the Audio Addition
- Navigate to the slide where you want the music to start playing.
- Head over to the “Insert” tab located at the top of the interface.

Step 2: Modulating the Audio Volume

- Use this slider to adjust the audio volume. If you’re aiming for background music that doesn’t overpower your presentation’s content, set the volume to a lower level.
Step 3: Selecting the Right Tune for Emotion
- The music you choose plays a pivotal role in setting the mood for your slideshow on PowerPoint.
- Reflect on the emotion or message you want to convey with your slides. Whether it’s nostalgia, excitement, or inspiration, pick a track that heightens this emotion.
- Remember, the right song or instrumental piece can amplify the impact of visual transitions, making slide transitions to your slide more dynamic and engaging.

How to Add Engaging Transitions to Your Presentation Slide Show
Step 1: Exploring the Transition Palette

Step 2: Fine-Tuning the Transition Speed

- By default, the transition duration is set to 1 second. However, if you’re aiming for a more relaxed and deliberate pace, especially for photo slideshows, adjust this to 2-3 seconds. This ensures each photo or slide lingers a bit longer, allowing viewers to fully absorb the content.
Step 3: Maintaining a Uniform Transition Style
- Consistency is key to a professional-looking presentation. Instead of mixing and matching various transitions, which can be jarring, opt for a uniform slide motion effects style.
Step 4: Taking a Sneak Peek of Your Transitions
- Before finalizing your presentation, it’s always a good idea to preview your slide motion effects.
How to Elevate the Visual Appeal of Photos in Your PowerPoint Presentation
Step 1: Fine-Tuning Brightness and Contrast
- Launch Microsoft PowerPoint and navigate to the slide containing the photo you wish to enhance.

- Within this tab, locate the brightness and contrast sliders. Adjusting these can significantly improve the clarity and visibility of your image, ensuring it looks its best on the big screen.
Step 2: Amplifying Color Vibrancy
- Still within the “Picture Format” tab, look for an option labeled “Color Saturation.”
- Boosting this will make the colors in your photo more vivid and pronounced, allowing your images to truly make a photo slideshow stand out and captivate your audience.
Step 3: Thoughtful Application of Filters
- In the same “Picture Format” tab, you’ll find an option labeled “Color.” Clicking on this will reveal a dropdown with various filter effects, such as black & white, sepia, or vintage.
- While these filters can add a unique touch, it’s crucial to use them sparingly. Over-filtered images can appear unprofessional or distract from the content.
Step 4: Incorporating Delicate Visual Effects
- Beyond color adjustments, PowerPoint offers a range of subtle effects to enhance your photos further.

Step 5: Individual Photo Refinement
- As you progress through your slide show in PowerPoint, take the time to enhance each photo individually. This attention to detail ensures a consistent and high-quality visual experience throughout your presentation.
- However, always use restraint. Not every image may need adjustments, especially if they’re already of high quality.
How to Efficiently Save and Distribute Your PPT Presentation
Step 1: Initial Saving of Your Slideshow
- After finalizing your presentation in Microsoft PowerPoint, it’s essential to save it in its native type.

Step 2: Transforming Your Slideshow into a Video
- If you’re looking to share your slideshow in a more dynamic format, Power Point offers the option to export it as a video.
- Click on the “File” menu again and navigate to “Export.”
- Here, you’ll find an option labeled “Create a Video.” Select this and choose the desired video quality, typically MP4 file. This makes your slideshow more accessible and playable on various devices.
Step 3: Broadening Your Audience Reach
- With your slideshow now in video type, you can upload it to popular platforms like YouTube, Vimeo, or even Google Drive.
- Uploading to these platforms allows for wider sharing, making it accessible to colleagues in the workplace, friends, or the general public.
Step 4: Converting to a Portable Format
- Under the “File” menu, find the “Export” option again and select “Create PDF/XPS Document.” This format is perfect for sharing via email, embedding on your website, or posting on social media platforms.
Step 5: Universal Sharing
- With your presentation now available in multiple formats, you’re equipped to share it virtually anywhere! Whether it’s a video link, a downloadable PDF, or the original PowerPoint file, you can distribute your engaging slideshow to a diverse audience across various platforms.
Creating a compelling photo slideshow in PowerPoint just takes a few simple steps. In this guide, we covered choosing an eye-catching template, importing photos, adding animation and music, customizing the title slide, and enhancing image quality.
With the right combination of great visuals, audio, animation, and text, you can make an engaging slideshow. Use these tips to take your PowerPoints photos from bland to brilliant.
Now you have all the tools to make your own dynamic photo slideshow presentation in PowerPoint. Bring your photos to life and impress any audience. Just follow this guide’s step-by-step instructions. Soon you’ll be a PowerPoint slideshow pro!
You must be logged in to post a comment.
- Business articles (22)
- Google Slides (57)
- Keynote (27)
- PowerPoint (83)
- Support (2)
- Shop Now: Amazon Labor Day Tech Sale
- Get These 12 Student Discounts!
How to Make a Slideshow on PowerPoint
Whether for work or private, use slideshows to get your message across
:max_bytes(150000):strip_icc():format(webp)/ColettaTeske-af57404a91b342578a97252b7dbd720f.jpg "how to make a powerpoint presentation with photos and music")
- Central Washington University
Before You Begin
- Step-by-Step: Make a Slideshow on PowerPoint
- Play Music During the Slideshow
- Set up the Slideshow
- Add Timings to Each Slide
- Edit Timings on a Slide
- Create a Video Slideshow
- Save a Slideshow to a CD or Other Removeable Media
When you're ready to present your PowerPoint slides to others, look no further than PowerPoint's slideshow feature. Use this tool for all kinds of slides, but those containing photos work best for most viewers.
Instructions in this article apply to PowerPoint for Microsoft 365 , PowerPoint 2019, PowerPoint 2016, PowerPoint 2013, PowerPoint 2010, and PowerPoint for Mac.
Before you create slides for your slideshow presentation, decide how long to make the slideshow, how it should flow, and the pictures you’ll use.
- Length : A slideshow can be as long or as short as you need. The length of the slideshow should be appropriate for the topic and for your audience’s attention span.
- Outline : It’s always smart to start with an outline; it helps you visualize your slideshow. An outline can be as simple as the list of topics you want to cover.
- Pictures : Choose photos that are clear and tell a story.
With PowerPoint's Photo Album , select the pictures and PowerPoint creates the basic slideshow. Fill your slides with informative text and harmonizing background music, then turn your collection of slides into a self-running photo slideshow with music that can play as a video or be stored on a CD.
When you’re ready to make a photo slideshow with music, PowerPoint gets you up and running quickly. To get started, select Insert > Photo Album > New Photo Album .
Here’s how to add and format pictures for the slideshow using the Photo Album:
Add pictures
Select File/Disk and select the images you want in the picture slideshow.
Enhance photos
Place a checkmark next to the picture you want to enhance and change the orientation, contrast, and brightness. You’ll see the changes in the Preview window.
Add text boxes
To add a slide for text, select the image in the album list you want the text to follow and select New Text Box .
Rearrange slides
Place a checkmark next to the picture you want to move and select the Move Up or Move Down arrows.
Choose a picture layout
Select the Picture layout down arrow and choose how you want the pictures to appear in the slideshow.
Frame the pictures
Select the Frame shape down arrow and choose a frame style. You’ll see a preview in the Album Layout area. This option will not be selectable if the picture layout Fit to slide is enabled.
Select Create when you’re finished.
Your photo slideshow is created in a new file. Add text to the slides and change the look of each slide.
How to Play Music During the Slideshow
Play music in the background during your slideshow to offer an audio counterpoint to all the visuals. The background music starts automatically with the slideshow and plays during all the slides.
To add background music to your presentation, select Insert > Audio > Audio on My PC , choose a music file, then select OK .
The audio icon appears in the middle of the current slide. To move it, drag it to a different place on the slide. When the audio icon is selected, the Playback tab appears. Select Play in Background and make changes to the audio file . Here are some suggestions.
- Preview the music : Select Play to hear what the music will sound like during your slideshow.
- Shorten the duration : Select Trim Audio to remove parts of the beginning and end of the music file.
- Adjust the volume : Select Volume to make the background music louder or softer.
How to Set up the Slideshow
Once your slides are finished, it’s time to set up the slideshow. Start by deciding whether to show the slideshow in a window or full screen.
To set up the slideshow, select Slide Show > Set Up Slide Show and choose one of the following:
- Browsed by an individual (window) : Run the slideshow automatically and inside a window. This option works best when you save the slideshow to a CD.
- Browsed at a kiosk (full screen) : Run the slideshow automatically and at full-screen size. This option works best when you convert the slideshow to a video.
Select OK when you’re finished.
How to Add Timings to Each Slide in the Slideshow
Now it’s time to decide how long each slide will appear in the slideshow. To begin, select Slide Show > Rehearse Timings . The slideshow displays in full screen with a Recording toolbar and a timer.
While timing your presentation, use the Recording toolbar to advance through the presentation.
Select Next (arrow pointing to the right) to go to the next slide when the desired timing has been reached.
Select Pause to start and stop the timing.
Select Repeat to restart recording the time for the selected slide.
When you’re finished and have set the time for the last slide, close the Recording toolbar.
Select Yes to keep the recorded slide timings.
How to Edit Timings on a Slide
If you need to increase or decrease the time for your slideshow, change how long slides appear during the slideshow.
To change the timing for a slide:
Select View > Slide Sorter .
Select Transitions .
Select a slide.
In the Advance Slide After text box, enter how long the slide should appear in the slideshow before proceeding to the next slide, then press Enter .
The new timing applies to the slide.
How to Create a PowerPoint Video Slideshow
The easiest way to distribute and play your slideshow is in video format. This way, anyone can view your slideshow no matter what computer or device they use.
To convert a slideshow into a video:
Save the file.
Select File > Export .
Select Create a Video .
To force a smaller file size, select the Full HD drop-down list and choose a lower quality.
Select Create Video .
Select the destination folder and give the video a descriptive file name.
Select Save . It may take a few minutes to process the file and create the video.
How to Save a Slideshow to a CD or Other Removeable Media
To create a presentation that can be watched on any computer and can be stored on a CD or other removable media:
Select Package Presentation for CD > Package for CD .
Type a name for the CD.
Select Copy to Folder or Copy to CD and follow the on-screen directions.
When you’re finished, select Close .
Get the Latest Tech News Delivered Every Day
- Loop a PowerPoint Slide Show
- How to Use Portrait and Landscape Slides in the Same Presentation
- Tips for Memorial PowerPoint Presentations
- How to Insert PDF Files Into PowerPoint Presentations
- How to Do a Voiceover on PowerPoint
- How to Use Speaker Notes in PowerPoint
- How to Hide and Unhide a Slide in PowerPoint
- 10 Best Places for Free PowerPoint Templates
- 9 PowerPoint Presentation Tips for Students
- The 10 Most Common PowerPoint Terms
- How to Make a Shape Transparent in PowerPoint
- How to Draw Freehand in PowerPoint
- Place Text Over Video to Zest up Your PowerPoint Slides
- What Is Microsoft PowerPoint and How Do I Use It?
- Change a PowerPoint Show File to a Work File
- Troubleshooting Audio Problems With PowerPoint

Create a photo slideshow in PowerPoint

Bryan Jones
- eLearning Development , Posts , PowerPoint

I recently created a photo slideshow (using PowerPoint) of my dad’s life-sized chess set sculpture that’s at Facebook (Go Dad!).
I found that PowerPoint was a surprisingly powerful slideshow creation tool.
And once I learned the basics, I was able to create my next slideshow in under 1 minute!
Below is what I learned, as well as some bonus lessons such as adding music, creating a custom title slide, saving the slideshow as YouTube video, and more.
Let’s go ahead and get started!
Video Tutorial
Here is a video that shows the entire process:
And if you want to watch the published version of the slideshow, you can watch it here:
Sculptures are by my dad, Hardy Jones , and sculpture photos in the source files are courtesy of my good friend Erin Bibeau .
Screenshot and Text Tutorial
The screenshot version of the lessons are below and are organized into these sections:
- Create slideshow in under 1 minute
- Create a custom title slide
- Set slide transitions
- Improve image quality
- Scale images to the edge of the slides
- Add pan and zoom “Ken Burns” effect
- Create scrolling credits
- Save the PowerPoint slideshow as a video that you can upload to YouTube
Create a PowerPoint Slideshow in Under 1 Minute
To watch this section as a YouTube video, click here .
0. Start with a new presentation open in MS Powerpoint.
Note: I’m working in PowerPoint 2016, but the steps are similar for 2013 and 2011.
1. Insert a photo album to your presentation
Go to “insert” → “photo album” → “new photo album”., click on “file disk”., select the photos from your computer.
Note: You can hold down Ctrl while clicking several photos to select them individually
Click “Insert”
Click “create”, 2. add transitions to your slideshow.
Next you want to add transitions to your new photo album.
Click the first slide, then hold Shift while clicking the last slide to select the whole range of slides.
Go to “transitions” → click on the arrow to open up more choices., click on “random”., 3. set the slides to advance automatically, from the “transitions” tab, check the “advance slide” “after” box., set it to 2 seconds (or whatever you want)., 4. set the slideshow to loop continuously, go to “slide show” → “set up show”., turn on “loop continuously until ‘esc’”, then click “ok”., 5. that’s it boom done in under 1 minute.
You’ve created a photo slideshow in PowerPoint in under 1 minute!
You can preview your slideshow with the preview button.
Advanced PowerPoint photo slideshow tips
The lesson above shows you how easy it is to create a photo slideshow in PowerPoint in under a minute.
But if you want to take it to the next level, you should continue reading below.
Advanced Tip 1: Create Custom Title Slide
The default title slide for a slideshow in PowerPoint is just a black slide with a text box.
I’d rather delete it than use the default view.
Or better yet, why not use an image from the slideshow with a text overlay? That’s what I’ll show you how to do below!
To watch this part of the lesson as a YouTube video, click here .
0. Start with the slideshow you created previously.
1. copy and paste a the template slide.
Note: You can download our free template here
The click the slide and using Ctrl + C to copy.
Then go to your own slide show, click on where you want to insert it, and hit Ctrl + V.
2. Click on the new slide to select it and customize it.
You can change the text as you please.
You can also change the image by right-clicking on the image → “Change Picture”.
Click on “Work offline”.
Then select a photo and click “Open”.
Click on the eye icons next to “text” in the “Selection” pane to hide the text.
Click on the box to select it → right-click → “Format Shape”.
Adjust the transparency depending on how bright or dark your background photo is.
Click on the eye icons for “text” again to show the text and see the effect.
Advanced Tip 2: Add Music
0. start with the slideshow you created in ms powerpoint., 1. insert the music.
Go to “Insert” → “Audio” → “Audio on My PC”.
Select a music file and click “Insert”.
2. Adjust the playback settings
Go to “Playback” → select “Automatically” for “Start” so that the music plays on its own.
Check the box for “Play Across Slides”.
To hide the audio icon on the slide during the show, click on it to select it, then go to “Playback” → “Hide During Show”.
You can loop the music if you want by checking the box for “Loop until Stopped”. This is optional.
3. Preview what it sounds like by clicking the preview button.
Advanced tip 3: transitions.
To watch the part of the tutorial as a YouTube video, click here.
0. Start with the slide show you created in MS Powerpoint.
1. select a slide to control the transition to it (from the slide before it)..
Go to “Transitions” → click the arrow for more choices.
Click on the transition style you want (this also previews them so you can see what they look like).
Advanced Tip 4: Image Quality
To watch this part of the tutorial as a YouTube video, click here.
1. Turn off the compression of images
Go to “File” → “Options”.
Then click on the “Advanced” tab and check the box for “Do not compress images in file”. (Directly beneath it, leave the “Default resolution” at “High fidelity” for good quality.) Turning off image compression helps a lot with zoom transitions of photos and when you enlarge photos, so that they don’t look pixelated.
Advanced Tip 5: Scaling Images
To watch this part of the tutorial as a YouTube video, click here .
Scaling photos will allow you to get rid of the empty spaces to the sides, like in the photo beneath.
1. Increase the size of the image to fill the workspace
Drag the image to the left (hold down left click on it) and align its left side with the edge.
Note: You may want to zoom out a little to make the next step easier.
Hold down shift and drag the lower right corner to resize it until it completely covers the empty space on the right. (Holding down shift keeps the image in proportion when resizing it.)
Click on the image and drag it up a bit to position it as you like.
Note: I like to use the thumbnails on the left pane to see what the positioning looks like.
If you’re a perfectionist, you can optionally also crop the overhanging part of the image if you wish by going to “Format” → “Crop”. It’s not really necessary, though.
2. Consider adding multiple photos for portrait oriented images
The image scaling method above is best suited to landscape pictures. If you have a portrait picture, you might wish to try using 2 or more pictures instead to cover up the empty spaces.
Advanced Tip 6: Add “Ken Burns” Pan Zoom Effect
A “Ken Burns” effect is adding some motion to the photos in a storytelling slide show. It’s an in-slide effect, unlike a transition. In this example, the slide starts zoomed in, then zooms out.
1. Create both a “grow/shrink” and a motion path effect to the image
Go to “Animations” → “Animation Pane”
In the Animation Pane, there are 2 things that need to be set up: a grow-shrink animation and a motion path. You then start them at the same time so they both move and grow. (See video linked in show notes on how to do this in detail as this takes some tweaking.)
The image will actually need to be much larger than the viewable area.
To compare the image size to viewable area, go to the Selection Pane and click the eye icon for the picture. This hides it.
You can now see the viewable area, which is quite small in comparison.
Advanced Tip 7: Add Scrolling Credits
Scrolling credits are the credits you list at the end of the video, auto-scrolling up.
1. Add a background color and a text box
Draw a black rectangle (or any color you wish) using the “Insert”->”Shape”->”Rectangle”
Create a text box with a contrasting color and insert your credits using “Insert”-> “Shape” -> “Textbox”
Move the text box below the entire slide
3. Add a line motion path animation to the text box
Note: Powerpoint actually has its own functionality for setting up credits, but it tends to stop in the middle if the credits are long. So it’s more reliable just using a the line motion path described below.
Click on the text box to select it. Then go to “Animations” → click on the arrow to expand the selection of animations.
Select “Lines” under “Motion Paths”.
3. Adjust the animation settings
The line will appear as a small vertical line with a green dot (where it starts) and red dot (where it ends).
You want it to travel up off the screen (scrolling up), so click on the red dot and drag it up above the slide.
Set the duration by going to “Animations” → “Duration”. The duration will depend on how long your credits are.
Remove the “smooth start” and “smooth end” by going to “Animations” → “Animation Pane”.
In the Animation Pane, click on the arrow for the text box → “Effect Options”.
Set “Smooth start” and “Smooth end” to 0 seconds. Click OK.
Advanced Tip 8: Save Slideshow As Video
One of the hidden features of PowerPoint is that you can save it out as a video. In my case, I wanted to save it as a video and upload it to YouTube. But you can also use it for other purposes as well.
1. Save your Powerpoint slideshow as a video
Go to “File” → “Save As” → “Browse”.
Under “Save as type”, change it from the default “PowerPoint Presentation” to “MPEG-4 Video”. (MP4 is a video format that’s compatible with Youtube.) Click “Save”.
You can track the progress for video conversion at the bottom. It usually takes a few minutes, but can take longer depending on the length of your video and the speed of your computer.
Once your video is complete, navigate back to the folder where you saved it.
Bonus Templates and Files
If you’ve made it this far, you’re a rockstar and you deserve something special. 🙂

Get 3 free slideshow templates:
Get your free download.
How to Make a Photo Slideshow in PowerPoint

Creating a photo slideshow in PowerPoint is one of the easiest ways to turn your favorite moments into a beautiful presentation. Whether you want to share your travel photos, cherished memories, or showcase your photography skills, PowerPoint can help you create a professional-looking slideshow.
Table of Contents
Step-by-Step Guide on Creating a Photo Slideshow in PowerPoint
Before starting, make sure that you have all the necessary photos and music files that you want to include in your slideshow. Here is the step by step guide to creating a photo slideshow in PowerPoint:
- Open Microsoft PowerPoint and create a new presentation by selecting the “Blank Presentation” option.
- Click “Insert” and select “Photo Album”. This will open a new window allowing you to select the photos that you want to use in your slideshow. It’s worth noting that you can adjust the order of the photos by dragging and dropping them into the desired position.
- Once you have selected your photos, you can add music to your slideshow. To do this, go to the “Insert” tab, click on “Audio” and select “Audio from file”. This will allow you to select the music file(s) that you want to include in your slideshow.
- Once you have your photos and music in place, you can begin customizing your slideshow. Add slide transitions and animations by clicking on the “Transitions” tab and selecting the effects that you want to use. You can also customize the timing and duration for each slide transition.
- To add captions or titles to your photos, click on the “Insert” tab and select “Text Box”. This will allow you to type in the text that you want to use. You can also adjust the font and size of the text to make it more visible.
- Finally, save your slideshow by selecting “File” > “Save As”. You can choose the destination folder and give your slideshow a name.
Creating a photo slideshow in PowerPoint is a great way to showcase your photos and memories. However, it’s important to keep in mind that the size of your photos and music files can affect the performance of your slideshow. To ensure that your slideshow runs smoothly, it’s recommended to compress your photos and music files before adding them to your presentation.
Another important aspect to consider when creating a photo slideshow is the audience that you will be presenting it to. If you will be presenting to a large group of people, it’s important to make sure that the font size and color of your text is easily readable from a distance. You can also consider adding a voiceover to your slideshow to provide additional context and information about your photos.
Choosing the Right Photos for Your Slideshow
Choosing the right photos to include in your slideshow is essential to creating a memorable presentation. When selecting photos, consider the audience that you are presenting to and choose photos that will resonate with them. You should also ensure that the photos are of good quality and at a resolution that is suitable for the presentation format.
Another important factor to consider when choosing photos for your slideshow is the theme or topic of your presentation. If your presentation is about a specific event or topic, then you should choose photos that are relevant to that theme. For example, if you are creating a slideshow about a wedding, then you should include photos of the bride and groom, the wedding ceremony, and the reception.
Lastly, it’s important to think about the order in which you present your photos. You should aim to tell a story with your photos, so think about the sequence in which you want to present them. You can start with an opening photo that sets the tone for your presentation, then move on to photos that tell a story or highlight key moments. Ending with a memorable photo can leave a lasting impression on your audience.
Tips and Tricks for Editing Your Photos in PowerPoint
PowerPoint includes a wide range of editing tools that allow you to enhance your photos in various ways. For instance, you can adjust the brightness, contrast, and color balance of your photos to make them more visually appealing. You can also crop, resize, and rotate the photos to create a better composition.
Another useful feature in PowerPoint is the ability to add artistic effects to your photos. You can apply filters, such as blur or sepia, to give your photos a unique look. Additionally, you can add borders and frames to your photos to make them stand out.
It’s also important to note that PowerPoint allows you to work with multiple photos at once. You can group them together, align them, and even create a photo album with a slideshow. This can be a great way to showcase a collection of photos in a professional and organized manner.
Adding Transitions and Animations to Your Slideshow
Transitions and animations are a great way to add visual interest to your slideshow. You can add transitions between slides by selecting the “Transitions” tab and selecting the effect that you want to use. Similarly, you can add animations to individual objects by selecting the “Animations” tab and selecting the animation effect that you want to use.
When adding transitions, it’s important to consider the timing and duration of each effect. You can adjust these settings by selecting the “Timing” tab and adjusting the duration and delay options. This can help create a more seamless and polished transition between slides.
Animations can also be used to highlight specific information or create emphasis on certain elements. For example, you can use a “Fly In” animation to bring attention to a specific bullet point or use a “Grow/Shrink” animation to emphasize a particular image. However, it’s important to use animations sparingly and purposefully, as too many can be distracting and take away from the overall message of the slideshow.
Creating Customized Slide Layouts for Your Slideshow
If you want a more customized look for your slideshow, you can create unique slide layouts that best suit your needs. To do this, select the “View” tab, click on “Slide Master” and select a slide layout template that you want to modify. You can then add elements such as text boxes, images, and placeholders to create a unique design.
It is important to note that when creating customized slide layouts, you should keep in mind the overall theme and purpose of your slideshow. Consistency in design and layout can help to enhance the overall visual appeal and effectiveness of your presentation. Additionally, you can save your customized slide layouts as templates for future use, which can save time and effort in creating new slideshows.
Adding Music and Sound Effects to Your Slideshow
Adding music and sound effects to your slideshow can set the right mood for your presentation. To add sound effects to individual objects, you can use the “Animations” tab. Select the object you want to add the sound effect to, then click on “Animation Pane”. In the pane that opens, click on the arrow next to the animation and select “Effect Options”. In the dialog box that opens, go to the “Sound” dropdown menu and select the sound effect you want to use. You can also add music by following the steps described earlier.
It is important to choose music and sound effects that are appropriate for your presentation. For example, if you are giving a presentation about a serious topic, you may want to choose music that is calming and soothing, rather than something that is upbeat and energetic. Additionally, you should make sure that the volume of the music and sound effects is not too loud, as this can be distracting for your audience. By carefully selecting the right music and sound effects, you can enhance the overall impact of your slideshow and make it more engaging for your audience.
Saving and Sharing Your Photo Slideshow in PowerPoint
After creating your slideshow, save your presentation by following the instructions described earlier. You can share your slideshow with others by sending it as an email attachment, uploading it to the cloud, or sharing it on social media platforms. Make sure that you understand the rights and usage restrictions of any photos that you use before sharing your presentation.
Another way to share your photo slideshow is by burning it onto a DVD or USB drive. This is a great option if you want to give a physical copy of your presentation to someone or if you want to play it on a device that doesn’t have internet access. To do this, simply save your presentation as a video file and then use a DVD burning software to create a DVD or copy the file onto a USB drive.
If you want to make your slideshow more interactive, you can add hyperlinks to your presentation. This allows viewers to click on a link and be taken to a website or another slide within your presentation. To add a hyperlink, select the text or object that you want to link, click on the “Insert” tab, and then click on “Hyperlink”. From there, you can choose to link to a website, another slide, or a file on your computer.
Advanced Techniques for Making an Engaging Photo Slideshow
To take your slideshow to the next level, you can use advanced techniques such as creating hyperlinks, using templates and themes, and using the morph transition effect. Hyperlinks can be used to create interactive elements that allow viewers to navigate between slides or open external content. Templates and themes provide a quick and easy way to create a professional-looking slideshow, while the Morph transition effect allows you to create unique visual effects by animating objects between slides.
Troubleshooting Common Issues with Photo Slideshows in PowerPoint
If you encounter any issues while creating your slideshow, such as poor quality images or music not playing correctly, there are several troubleshooting steps that you can take. These include checking the file format of your images and music, adjusting the resolution of your images, and checking the audio settings on your computer.
Best Practices for Using Photos in a Professional Presentation
When using photos in a professional presentation, it’s essential to ensure that they are relevant, appropriate, and high quality. Avoid using low-resolution or blurry images, and make sure that the images are not copyrighted or are licensed for use. Use captions or titles to provide context and information about each image.
How to Use the Morph Transition Effect to Create Unique Visuals in Your Photo Slideshow
The Morph transition effect in PowerPoint allows you to create stunning visual effects by animating objects between slides. To use this effect, create two slides with similar objects in different positions or sizes. Select the first slide, go to the “Transitions” tab, and select the “Morph” option. Repeat this process for the second slide. This will allow you to create a seamless animation that transitions between the two slides.
With these tips and techniques, you can create a beautiful and engaging photo slideshow in PowerPoint that your audience will remember for years to come.
By humans, for humans - Best rated articles:
Excel report templates: build better reports faster, top 9 power bi dashboard examples, excel waterfall charts: how to create one that doesn't suck, beyond ai - discover our handpicked bi resources.
Explore Zebra BI's expert-selected resources combining technology and insight for practical, in-depth BI strategies.

We’ve been experimenting with AI-generated content, and sometimes it gets carried away. Give us a feedback and help us learn and improve! 🤍
Note: This is an experimental AI-generated article. Your help is welcome. Share your feedback with us and help us improve.


Play music across multiple slides in your slide show
You can add a song to a presentation and play it across slides in the background of your slide show.
If you want to use music from the web, you have to download it to your computer before you can use it in a presentation.
Play a song across slides
On the Insert tab, select Audio , and then Audio on My PC.
In the file explorer, browse to the music file you want to use, and then select Insert .
With the audio icon selected on the slide, on the Playback tab, select Play in Background .

Play in Background makes the audio file start automatically during a slide show and also makes the audio play across multiple slides.
Stop audio after a specific number of slides
Follow the procedure above, "Play a song across slides." After the last step, do the following:
Open the slide where you inserted the audio. On the ribbon, select the Animations tab.

In the Animation pane, double-click the item for your audio clip.
In the Play Audio dialog, on the Effects tab, under Stop playing , select After , then specify the number of slides that you want music to play over. (The maximum value is 999.)

Select OK .
Play multiple songs across multiple slides
If your slide show is longer than one song, you can add more songs. However, if you find that you're having trouble synchronizing the music with the slide show, you can use a third-party audio editing tool, such as Audacity® , to string the songs together into one file so they play continuously throughout the slide show.
Video and audio file formats supported in PowerPoint
Add or delete audio in your PowerPoint presentation
Record a slide show with narration and slide timings
Play music and other sounds automatically when a slide appears
On the Insert tab, select Audio , and then Audio from File .
In the Choose Audio dialog, browse to the music file you want to use, select it, and then select Insert .
Near the right end of the toolbar, select Animation Pane .
In the Animation pane, select the item for your audio clip.
Open the Media Options section. Under Stop playing , select After , then specify the number of slides that you want music to play over. (The maximum value is 999.)
To play a song across slides
Supported audio formats in PowerPoint for the web are: MP3, WAV, M4A, AAC, and OGA
On the Insert tab, near the right end, select Audio .
In the file explorer, browse to the audio file you want to use, then select Open .
Select the audio icon on the canvas.
On the Audio tab or the Playback tab, select Play in Background .

Need more help?
Want more options.
Explore subscription benefits, browse training courses, learn how to secure your device, and more.

Microsoft 365 subscription benefits

Microsoft 365 training

Microsoft security

Accessibility center
Communities help you ask and answer questions, give feedback, and hear from experts with rich knowledge.

Ask the Microsoft Community

Microsoft Tech Community

Windows Insiders
Microsoft 365 Insiders
Was this information helpful?
Thank you for your feedback.
How-To Geek
How to add music to your powerpoint presentation.

Your changes have been saved
Email is sent
Email has already been sent
Please verify your email address.
You’ve reached your account maximum for followed topics.
Microsoft Office vs. Google Docs, Sheets, Slides: Which Is Best?
Here are 5 apps i always install when i set up a linux desktop, 15 little improvements coming with android 15, quick links, adding music to your presentation.
There are many ways to improve your PowerPoint presentation---adding animations to objects, customizing slide transition styles, and using interesting themes to name a few. In addition to all that, you can also add music to your presentation.
PowerPoint makes it very simple to add music to your presentation. Adding music to your presentation may be a great idea, but there are also cases where it may be considered unprofessional. We’re not here to tell you when to do it, just how to do it, but make sure it’s appropriate for the situation.
Switch to the "Insert" tab and then click the “Audio” button.

A menu will appear, giving you the option to either upload music from your PC or record your own audio track.

If you’d like to record your own audio, select “Record Audio,” and the “Record Sound” window will appear. Go ahead and give your audio a name, then click the “Record” icon when you’re ready to start.

After the “Record” icon is selected, a timer will start which gives you the total length of the sound being recorded. Once you’re ready to stop recording, press the “Stop” icon. To listen to your recording, you can press the “Play” icon. If you’re happy with what you're recording, select “OK” to insert it into your presentation.

If you prefer to upload music from your PC instead, go back to the audio options menu and select “Audio on My PC.” This will open your PC’s directory. Locate the audio file you’d like to use, then select “Insert” at the bottom-right of the window. PowerPoint supports several popular formats, like MP3, MP4, WAV, and AAC.

Now you’ll see a speaker icon appear in your presentation. Here, you can play the audio, control the volume, and move the audio back or forward 0.25 seconds.

Additionally, the “Playback” tab appears in the ribbon. By default, the “Audio Style” is automatically set to “No Style.” This means that the audio will only play on the slide where you insert it, the icon will appear in the presentation, and the audio will only begin once you click that icon.
But you can change all that. You can use the options here to adjust the default playback volume, choose whether the music starts automatically or on a click, whether it plays across other slides, whether it loops until you stop it, and so on.
We’re going to change this by selecting “Play in Background” in the “Audio Styles” section.

There are a few other options available to you, as well. You can add (or remove) bookmarks for specific times in your audio clip, trim parts of the audio, and give your audio a fade in/out effect.

Use these tools to customize the perfect audio for your presentation.
- Microsoft Office
- Office 2016
- Presentations
- Most Recent
- Infographics
- Data Visualizations
- Forms and Surveys
- Video & Animation
- Case Studies
- Design for Business
- Digital Marketing
- Design Inspiration
- Visual Thinking
- Product Updates
- Visme Webinars
- Artificial Intelligence
How to Make a Slideshow Online for Free (& Free Templates)

Written by: Heleana Tiburca
Slideshows are a great way to help your audience visualize an idea, emotion, story and all sorts of information. But if you feel like creating a slideshow is a difficult and tedious task, you’re in for a sweet surprise.
By the end of this guide, you’ll learn how to make a slideshow that’s fully equipped with images, video clips, background music, text boxes, animated graphics and so much more.
So if you’re ready to learn how to create a high-quality slideshow, then let’s get started. Or, skip the how-to and dive right into our slideshow maker .
7-Step Process for Making a Slideshow for Free
Step #1: determine your slideshow’s objective, step #2: start with a slideshow template, step #3: add photos and videos, step #4: add cohesive font pairs, step #5: add background music and audio clips, step #6: add motion and animated graphic elements.
- Step #7: Download or Share Your Slideshow
18 Slideshow Templates to Help You Get Started
- Slideshows are a great way to organize information, visualize ideas, emotions and stories, engage your audience and get your message across easily.
- Before you create your slideshow, figure out what goals you want to achieve.
- Take advantage of professionally-designed templates from Visme's library to start creating your slideshows.
- Customize your slideshows using photos and videos, stylish fonts, colors, 2D and 3D graphics, animations and other stunning design assets.
- Add music, audio clips or voiceover to elicit emotion, increase depth and capture the audience's attention.
To prepare a slideshow, you first need to determine the type of slideshow you want to create and what it’s meant to do.
Will this be a laid-back picture slideshow of your vacation that doubles as a photo album to show your family? Does it need to be a professional-looking slideshow that you’ll be sharing at work?
Would you rather create a photo slideshow, a video slideshow or a combination of both? Will it be a simple slideshow or a professional-looking slideshow?
Another thing that you need to think about is the end goal for your audience.
What do you want to accomplish? Is there an emotional goal involved to move your crowd to do something or is this a numbers-driven slideshow to focus on accomplishments?
Once you establish the mood and the type of slideshow you want to create, you can then pick out the perfect slideshow template for the job from our slideshow creator.
While you can easily create a slideshow from scratch, if you’re on a tight timeline, we recommend using a slideshow. There are a number of tools available to help you create your own beautiful slideshow, but we of course recommend Visme.
Throughout this tutorial, we’ll use screenshots from Visme’s editor to showcase how you can use our tool. And if you also plan to use Visme, you can get started searching through our selection of photo slideshow templates below.
Slideshow Templates

Brand Visual Identity Presentation

Communication Skills - Keynote Presentation

Product Training Interactive Presentation

Bright Colorful Background Presentation

Real Estate Slideshow Presentation

Creative SWOT Analysis Presentation
Create your slides View more templates
PS: you’ll want to stay tuned to the end of this article because we’ll be showing you 12 photo and video slideshow templates you can use today!
Keep in mind that all templates are fully customizable, from colors and text to background images and stickers. You’re in full control of your slideshow’s design.
Now that you’ve got your slideshow template picked out, it’s time to get into the nitty-gritty of customizing it.
Photos and videos are going to be arguably the most important part of your slideshow. They can encapsulate an idea or provoke a feeling from your audience. It’s all about knowing what photos to add and where.
If you have new photos that you want to add to your slideshow that are on computer hard drives, no problem! Visme makes uploading your photos easy.

Just click on “Photos” on the left-hand side of the editor, then “Upload.” You’ll then be prompted to upload your photos from your computer and they’ll be ready to use in just seconds.
You can set your photo as the background of your slide, or you can make it the focal point by bringing it to the front and adding a frame to it.
Once you have your photo in the editor, you can then edit the colors of it, crop it, adjust the brightness and contrast and more. You can use Visme as your own photo editing app.
If you don’t have photos of your own, you can scroll through millions of photos to find the perfect one to suit your slide. You can use keywords to search for the photo you have in mind, then add it to your slideshow.
Now, if you want to create video slideshows, you’ve come to the right place. Our video slideshow maker is the perfect tool for the job. You can use our video editor to trim and edit your video clips for your slideshow.

To have a look at all of our royalty-free video footage, simply click on “Media” then “Videos.”
You’ll now be able to scroll through tons of professional short video footage to use in your slideshow. You can also use the search bar to use specific keywords to help you find the perfect video footage for your slideshow.
Click on the video you like most to have it added to your slideshow, then play around with the size and duration of the video to suit your needs.
To upload your own video footage, click on “My Videos”, then “Upload.” You can now upload your footage and begin to edit it to fit your slideshow perfectly.
You can create lots of different slides showcasing your beautiful photos and images to show to your audience. As they say, the more the merrier!
Simplify content creation and brand management for your team
- Collaborate on designs , mockups and wireframes with your non-design colleagues
- Lock down your branding to maintain brand consistency throughout your designs
- Why start from scratch? Save time with 1000s of professional branded templates
Sign up. It’s free.

One thing that you’ll really want to focus on is the text of your slideshow.
Not all fonts will work with every slideshow. As mentioned above, it’s important to pick out the mood of your slideshow and plan accordingly.

If you are using this slideshow as a photography portfolio, then you may want to use a romantic cursive font and maybe use contrasting colors like white and red for the font.
If this slideshow will be used in a corporate situation, then you may want to use bold and easily readable fonts with contrasting colors, such as black and white, that pop out from the background.
No matter the mood you set for your slideshow, we have a matching selection of font pairs created just for you, by our professional designers.

To find these font pairs, scroll your cursor to the left-hand side of our editor and click on “Basics”, then “Font pairs”, as seen above. You can then scroll through loads of beautiful font pairs that were hand-picked by professional designers.
To add them to your slideshow, just click on them once and they will be automatically added to your design. You can then further customize your font such as changing the colors, placement and boldness of the font.
You can easily resize your text boxes by typing in your desired size or by dragging the circles surrounding the text in and out until you find the perfect size that works with your slide.
If you have strict brand guidelines that you need to abide by, you can add your personal font into your brand kit so it’s always on hand for you to use in all your designs.
If you want to know how to make a photo slideshow with music, then you’re in luck.
With Visme, you can add your own music track or pick from the many royalty-free music options we have to offer.
Adding music, audio or sound effects to your slideshow is a great way to captivate your audience’s attention. It can change the entire mood and aesthetic of your slideshow, so make sure you choose your audio wisely.

Here’s how to make a slideshow with music in Visme. First off, there are many different options available to users. You can either upload your own music clip or tap into Visme’s library of royalty-free music.
To upload your own music or audio clips, click on “Media” then “Audio”. There you will find an abundance of audio clips and background music to choose from to add some flare to your slideshow.
Have a listen to our royalty-free music, or even upload your own. To add in a voice-over, you can either upload your audio from your computer or, even better, you can record your audio directly within our editor.
By recording the audio directly within our editor, you’ll save an immense amount of time and effort and skip all those extra unnecessary steps.
Adding audio and music to your slideshow is definitely a great way to keep viewers invested. Just make sure the audio isn’t too loud or distracting from the main point you’re trying to get across.

Ready to create your own slideshow in minutes?
- Add your own text, images and more
- Customize colors, fonts and everything else
- Add interactive buttons and animations
Another great way to grow your audience’s interest in your slideshow is by animating your slides and adding animated graphic elements into your design.
When you have multiple slides, you’ll definitely want to add animated transitions between them, for a nice and fluid effect.
We have lots of different slide transitions you can choose from. You can have your slides zoom in, slide in, enter from the top or bottom, fade and more.
Visme makes the process simple for you, and you can apply the same transition to all slides so everything stays cohesive.
To keep your slides exciting, we recommend that you use animated graphic characters. We have lots of animated graphic elements that you can choose from to keep your slideshow interactive.
To access the animated graphic design elements, just click on “Graphics” then scroll down to “Animated Graphics.” There, you’ll be greeted by animated illustrations, characters, gestures, shapes, special effects and more.
You can then add them to your slide and adjust their size, colors, gesture, movement, duration of movement and everything in between.
Adding animated graphic design elements will really elevate your slideshow and take it to the next level. But remember, less is more.
Make sure to use these animated elements sparingly and don’t overcrowd your page with too many moving objects, as you might overwhelm your viewers and have them distracted from your main focal point.
Step #7: Download or Share Your Slideshow
Now that you’ve got a flawless slideshow and you're ready to flaunt it off to the world, it’s time to download it in the correct format.
Now, Visme gives you lots of different download and sharing options, so let’s go over a few of them.

First off, you can download your slideshow in JPG or PNG so you can share the slides individually to social media, send via email, or add to another document.
This is a great way to make sure your slideshow is accessible from your computer, iPhone or Android phone, iPad and other Apple products.
Another way you can download your slideshow is as a PDF. This is a great option if you want to send your slideshow to others via email or if you want to get it printed.
If you’ve created a video slideshow with our video slideshow maker, then you have the option to download your slideshow. You can download it as an MP4 file or a GIF.
And finally, if you want to present your slideshow offline, then you can download it as a PowerPoint, Keynote, or HTML5 to present it on Mac’s Apple Keynote or Microsoft Powerpoint.
You can also easily share your slideshow with an online link or grab an embed code to place within a blog post or webpage for your website visitors to view.
And that’s it! You’ve learned how to create a stunning slideshow from A-Z. Now it’s time for you to browse through 18 slideshow templates to help you get started.
Create a stunning presentation in less time
- Hundreds of premade slides available
- Add animation and interactivity to your slides
- Choose from various presentation options

Slideshow templates are a great way to help you get a jumpstart on your design. Sometimes the creativity just doesn’t flow, and that’s where we come in to help.
You can scroll through our templates and use the one you like the most, or just gather inspiration from looking at multiple different templates.
Whatever you choose to do, here are 12 slideshow templates to help you get started.
Template #1: Animated Valentine’s Day Photo Video Template
This emotional and romantic template is perfect for anyone who wants to celebrate love. It has 5 slides and everything about it is customizable.
The music that has been added suits the vibe perfectly, but you can add your own music to it or choose from our own collection of royalty-free music.
Template #2: Birthday Slideshow Template
Is that birthday cake I smell? If you have a loved one’s birthday coming up soon, creating a birthday slideshow could be the perfect gift.
Add your own personal photos of your friend or family member and give it your own personal touch by adding their favorite quote or some sentimental text to the slideshow.
Template #3: Real Estate Slideshow Template
Show off photos or video clips of upcoming properties you have to sell, or houses that you’ve staged. This format is great for real estate agents as well as anyone who wants to show off their home decor portfolio.
Template #4: Memorial Slideshow Template
Slideshows are also great for personal use, like we see here. Create a slideshow to share old photos of a family member or loved one who has passed in order to honor their memory. Share these with family and friends to honor their life.
Template #5: Corporate Slideshow Template
Slideshows are also great to use in the background at networking events and in the lobby of your place of business. Customize this template with photos of your own team at work to showcase to potential customers.
Template #6: Animated Baby Shower Photo Video Template
Every baby shower deserves a sweet moment for a baby shower slideshow.
If you want to showcase pictures of the parents as babies and make a fun and memorable slideshow for all to enjoy, you’ll want to use this baby shower slideshow template.
Template #7: Wedding Photos Slideshow Template
There’s nothing like a wedding photos slideshow for the bride and groom.
If you’re a photographer and you want to really impress your clients, use this wedding photos slideshow template to remind them of how special their day truly was.
Template #8: Animated Nonprofit Photo Video Template
All nonprofits need amazing slideshows to show to their donors and sponsors. This nonprofit photo video template is the perfect one for the job.
Add in your information and photos to the slideshow and add music to add some moodiness to the slideshow. Pick your favorite transitions and create a professional slideshow in minutes.
Template #9: Beautiful Memories Slideshow Template
Want to share happy memories with loved ones? This is the perfect template for doing so. Showcase it at your wedding, anniversary party, birthday party and more. Or you can simply send it out to friends, Marshall and Lily style.
Template #10: Animated Portfolio Photo Video Template
Nothing showcases your work better than an animated portfolio slideshow.
When you use this stunning portfolio slideshow template, you’ll have clients’ interest quickly peaking. The contrasting colors are show-stopping and the font is just perfect for the task at hand.
Try it out and make your portfolio now!
Template #11: Animated US History Photo Video Template
Whether you’re a teacher or a student that needs to make a slideshow for school, you know the task at hand can be difficult.
There’s a fine line between a boring slideshow and an enthusing one, and you definitely want the latter.
If you’re creating a school project slideshow, use this template and customize it to suit your needs. You’ll have all your colleagues' attention during your entire slideshow.
Template #12: Holiday Slideshow Template
Slideshows are also great for holiday events. Share family or work photos during the holiday season to bring a bit of holiday cheer to everyone who sees it. Easily import your own photos or sprinkle in some holiday stock photos.
Template #13: New Baby Slideshow Template
Announce a new baby via slideshow! Use professional newborn photos or take a few of your own. Easily edit them in Visme with unique crops, photo filters and color overlays.
Template #14: Technology Company Slideshow Template
Put together a stunning slideshow to showcase your product, services or solutions. This easy slideshow template has everything you need to project your startup in the best possible light.
The rich blend of dark and light purple shades mixed with other bright colors makes it visually appealing to the eye. Feel free to add or remove photos and text in your slideshow or tweak elements to suit your needs using Visme’s foolproof editing software.
Template #15: Startup Slideshow Template
Pitching to investors, presenting at a conference or sharing your vision with your team? This startup slideshow has everything you need to make a powerful and persuasive case for your business.
The template features a modern, sleek design that's perfect for showcasing what your company has to offer. You don’t have to be a professional designer to make the template suitable for your need. With a few clicks, you can switch colors, fonts and more to fit your company’s branding.
Template #16: Sales Report Slideshow Template
Looking for the easiest way to make a slideshow? Start with a template like this one from Visme’s library.
Keep your key stakeholders abreast of all the activities in the sales department using this stunning sales report slideshow.
The best part is that our templates aren’t cast in stone. You can tweak them for other purposes, such as presenting financial reports , KPI reports, marketing budgets, project status and much more. Visualize data with customizable charts, graphs and widgets to help your audience. You can understand complex data, identify patterns, and extract valuable insights.
If you’re handling multiple reports, there’s no need to feel overwhelmed. Use Visme’s dynamic fields to update key information across multiple pages of the same project or different projects.
Template #17: Technology Photo Video Template
Customize this video and make it your own! Edit and Download
If you’re looking for a smart way to blow your audience's mind during your product presentation , this slideshow video template is your best bet.
This slideshow template can be fully customized. Visme makes it super easy for anyone regardless of their skill level, to edit the content, change image(s), apply custom colors, fonts, logo and more.
Template #18: Company Culture Photo Video Template
Showcase the fun side of your company with this stunning photo video template.
With our wide range of design assets, tools and features, you can rest assured that your slideshow will be nothing short of amazing. Thanks to Visme’s easy-to-use drag-and-drop editor, you can customize the template by including high-quality photos, exclusive icons and our wide range of 2D and 3D animation features.
So why settle for flat, lifeless visuals when you can have dynamic, engaging 3D that will captivate your audience and leave a lasting impression? Click on this slideshow video template and humanize your company in the best way possible.
How to Make a Slideshow on iPhone and Android
With Visme’s mobile app, there’s no limit to what you can do with your visual content. You can design your slideshows quickly and access them anytime or anywhere.
Whether you own a business owner looking to showcase your work or just someone who wants to create beautiful memories of your special moments, Visme’s mobile app has everything you need to make your slideshow a hit.
Here’s how to turn your photos and videos into amazing slideshows perfect for sharing with your audience
1. Download your mobile app on the iOS app store

2. Create an account if you’re a new user or input your Visme account information to log in if you’re an existing user

3. You’ll find your Visme dashboard, where you can create beautiful projects or edit any existing projects.

4. Search for your preferred slideshow template or create one from scratch. Visme has thousand of slideshow templates to help bring your ideas to life.

Visme has thousand of slideshow templates to help bring your ideas to life.

5. Customize your slideshow by adding your branded fonts, color, and text as well as other stunning design elements like icons, charts, animations, and high-resolution images.

6. When you’re satisfied with the look and feel of your slideshow, you can download and share the project with your audience. Visme lets you share your project with others privately and give them different permissions, such as view, comment or edit.

Additionally, there’s also an option to share your project as a link and grant access to: anyone with the link, only people on your team or specific people. Or you can generate an embed code to place your slideshow on any website or blog.

Create Your Own Slideshow
Now that you’ve learned all the best tips and tricks for creating a beautiful slideshow, we know you just can’t wait to get started on yours. But as we’ve mentioned, you can’t make an amazing slideshow without an equally amazing slideshow maker .
Visme is an all-in-one design tool and slideshow maker, but it's also much more than that. You can create beautiful infographics, interactive social media posts, stunning videos, engaging presentations and so much more.
Ready to get started? Sign up for a free Visme account today and take it for a test drive for as long as you like.
Easily design beautiful and engaging slideshows with Visme

Trusted by leading brands
Recommended content for you:

Create Stunning Content!
Design visual brand experiences for your business whether you are a seasoned designer or a total novice.
About the Author
I’m Heleana and I’m a content creator here at Visme. My passion is to help people find the information they’re looking for in the most fun and enjoyable way possible. Let’s make information beautiful.
How to Make a Photo Slideshow in PowerPoint

Adding photos to a PowerPoint presentation is an excellent way to make your slideshow more visually appealing and engaging for your audience. With PowerPoint’s user-friendly tools, you can easily create a professional photo slideshow in just a few simple steps.
Step 1: Choose your Photos
Step 2: insert photos in powerpoint.
Once you’ve chosen your photos, it’s time to add them to PowerPoint. There are a few ways to insert pictures:
Insert Individual Photos
Repeat for each photo you want to add.
Use Photo Album
Photo Album automatically organizes your images into a slideshow. You can then rearrange or delete slides as needed.
Step 3: Add Captions, Format Images
Step 4: include transitions.
Slide transitions add movement between each photo in your slideshow. Transitions like fades or wipes can make your presentation more dynamic.
Applying the same transition style to every slide creates a cohesive flow.
Step 5: Add Background Music
Complement your photo slideshow by adding background music or sounds. To include audio:
Step 6: Set Up Slideshow
The final step is configuring your slideshow settings for seamless playback:
Test and preview your photo slideshow, making any last tweaks prior to presenting or sharing.
Additional Tips
About the author, vegaslide staff, related posts.

How to Share a PowerPoint Presentation on Any Computer
Powerpoint 2016: creating and opening presentations, how to make your presentations loop in powerpoint.

Convert PowerPoint to eBook Using Free Online Tools and Software
How To Make A Video With Photos And Music In PowerPoint
Looking for a user-friendly and versatile tool to create videos with photos and music?
From gathering and organizing your media to adding custom transitions and effects, we will walk you through the process to help you create a high-quality video.
Key Takeaways:
Why use powerpoint for making videos.
Using PowerPoint for making videos offers a versatile platform with a wide array of features that simplify the video creation process.
One of the main advantages of utilizing PowerPoint for video creation is its user-friendly interface, which allows both beginners and experienced users to navigate through the software effortlessly. The diverse range of features available in PowerPoint enables users to add animations, transitions, audio, and visual effects to their videos, enhancing the overall quality and engagement.
The ease of sharing and distributing videos created in PowerPoint makes it a convenient tool for reaching a wider audience. Users can easily save their creations in various formats and share them through email, and social media platforms, or upload them to websites for broader dissemination.
User-Friendly Interface
For the more experienced users, the advanced features of PowerPoint provide a playground for creativity, enabling them to customize animations, transitions, and multimedia elements with ease. Whether you’re a novice or a seasoned presenter, PowerPoint remains the go-to tool for crafting visually engaging and impactful presentations.
Wide Range of Features
The creative tools in PowerPoint enable users to add animations, effects, and audio to their videos, enhancing engagement and visual appeal. The platform also offers a variety of templates and design layouts to jumpstart the video creation process.
Additionally, PowerPoint boasts unique functionalities such as the ability to easily integrate charts, graphs, and data visualizations into videos, making it a versatile tool for educational and business presentations.
Easy to Share and Distribute
The convenience of utilizing PowerPoint to create videos lies in its user-friendly interface that allows seamless integration of multimedia elements.
Step-by-Step Guide to Making a Video with Photos and Music in PowerPoint
Next, open PowerPoint and start a new presentation slide. Select the ‘Insert’ tab and choose ‘Pictures’ to add the photos from the folder you prepared.
Now, it’s time to add the music . Choose a soundtrack that enhances the mood of your video. Go to the ‘Insert’ tab, select ‘Audio,’ and then ‘Audio on My PC’ to add the music file.
Adjust the timing of the photos and music to sync them perfectly. Select each photo, go to the ‘Transitions’ tab, and set the desired duration.
Gathering and Organizing Photos and Music
Ensuring that the images are of high quality and the music selections align with the theme of the presentation sets the groundwork for a compelling visual narrative. By meticulously sorting through the digital assets and arranging them in a logical sequence, the slideshow gains a sense of flow and story. Proper organization allows for easy access to the required media during the editing process, saving time and enhancing productivity. Adequate preparation with well-organized content sets the stage for a smooth and successful video creation experience in PowerPoint.
Creating a New PowerPoint Presentation
Begin by opening PowerPoint on your computer and selecting a blank presentation template to start fresh. Think about the structure of your video and how you want to convey your message through each slide. Plan the content layout and design elements before diving into slide creation.
Organize your ideas into a logical sequence, ensuring smooth flow and engagement for your audience. Incorporate visually appealing graphics, images, and text to enhance the impact of each slide. Remember, the slides are the building blocks of your video, guiding the viewer through your narrative.
Adding Photos to the Slides
To insert images, simply navigate to the slide where you want to add a picture, click on ‘Insert’ in the menu bar and select ‘Picture’ to choose the desired image file. You can resize, crop, and adjust the positioning of the photo to fit your slide layout perfectly. Utilizing high-quality visuals enhances the overall impact of your presentation, making it more memorable and engaging.
Adding Music to the Slides
Consider the mood and message you want to convey in each slide and choose music that complements these elements. Utilizing the ‘Insert Audio’ feature in PowerPoint, you can seamlessly integrate audio files into your slides, allowing transitions to flow smoothly and enhancing the overall storytelling aspect of your presentation.
Customizing the Slides and Transitions
Incorporating various transitions in PowerPoint between slides can help maintain the viewer’s interest and guide them through the information smoothly. Utilizing visual effects strategically can emphasize key points and keep viewers engaged. These small details can make a significant impact on the overall quality of your video, leaving a lasting impression on your audience.
Recording Narration (Optional)
Through recording a clear and concise narration, you allow your viewers to absorb information not only through visual cues but also through auditory stimulation, catering to different learning preferences and making your content more accessible.
Adding Video Effects (Optional)
With the vast array of built-in video effects tools in PowerPoint, you have the flexibility to customize your slides and make them visually appealing without the need for external software. Whether you want to add a simple fade-in effect or create complex animations, PowerPoint offers a range of options to suit your style and presentation goals.
Saving and Exporting the Video
Tips and tricks for making a high-quality video with powerpoint.
Crafting a high-quality video with PowerPoint requires attention to detail, creative use of visuals, and strategic design elements.
Use High-Quality Photos and Music
When creating a PowerPoint presentation, incorporating stunning images captured in high resolution not only captivates the audience but also adds a professional touch. Choosing the right music can set the mood, evoke emotions, and keep viewers engaged throughout the content. These elements combined heighten the viewing experience, making the presentation more memorable and impactful. Remember, in the realm of visuals and audio in PowerPoint, quality matters for leaving a lasting impression.
Keep the Design Simple and Consistent
Consistency in design helps in establishing a visual flow, making it easier for viewers to focus on the content without distractions. This also aids in reinforcing your brand identity and ensuring a professional look throughout the presentation.
Use Transitions and Animations Wisely
When incorporating transitions between slides, opt for subtle effects that seamlessly connect the content. These can include fade-ins, dissolves, or subtle slides. For animations, aim to highlight key points or add emphasis to crucial information. Use PowerPoint’s animation options to control the entrance, emphasis, and exit of elements, guiding the viewer’s focus. By blending transitions and animations strategically, you can create a visually dynamic presentation that keeps the audience engaged and enhances the overall viewing experience.
Test and Adjust the Timing of the Slides
By meticulously fine-tuning the slide timings, you can ensure a smooth and coherent viewing experience that keeps the audience focused and captivated throughout the presentation.
Preview and Edit the Video Before Finalizing
Previewing your PowerPoint video allows you to catch any errors or inconsistencies that may detract from the overall quality. Editing the video gives you the chance to refine transitions, correct any grammatical mistakes, and enhance the visual appeal.

Frequently Asked Questions
How do i add photos to my powerpoint presentation, can i add music to my powerpoint presentation.
Yes, you can add music to your PowerPoint presentation. Click on the “Insert” tab and then click on “Audio”. Select the audio file you want to use and click “Insert”.
How do I arrange the photos in my PowerPoint presentation?
Can i add transitions between photos in a powerpoint presentation, how do i set the timing for each photo in a powerpoint presentation.
To set the timing for each photo in a PowerPoint presentation, click on the photo and then click on the “Animations” tab. Use the “Duration” option to set the time for each photo.
Can I save my PowerPoint presentation as a video with photos and music?
Similar posts, how to remove background from video in powerpoint, how to crop a picture into a circle in powerpoint, how to add notes in powerpoint, how to name a slide in powerpoint, how to move table under text in powerpoint, how to create a word cloud in powerpoint.
How to Play PowerPoint Slides Automatically

The PowerPoint autoplay feature is an amazing tool for creating slideshows that advance automatically . Self-running PowerPoint presentations are great for leaving in kiosks or publicity booths. You can even show them with recordings or voiceovers to make sure your audience gets the most out of it.
Forget worrying about clicking from slide to slide, today we will teach you how to play PowerPoint slides automatically!

We’ll cover the following topics:
Why should you use the automatic slideshow PowerPoint feature?
- How to Play PowerPoint Slides Automatically without Clicking - Option 1
- How to play slideshow in PowerPoint automatically - Option 2
How to make PowerPoint slides advance automatically with audio
- How to loop slides in PowerPoint
- Check out some experts’ best practices for Automatic slideshows in PowerPoint
How to automatically play PowerPoint presentations across devices
How to play powerpoint slides automatically without clicking on mac, elevate your presentation with professional designs: try 24slides today.
Using the automatic slideshow feature has many benefits . The main one is its practicality; it is a tool you can set up in advance so that you eliminate the need for ongoing attention and your presentation flow is better.
And that’s not all, you can even add voiceovers, recordings, and even laser pointer gestures to make sure your audience gets the most out of your presentation.
It becomes particularly beneficial in the following scenarios:
- Business presentations: An automatically progressing presentation can help you focus on your content without worrying about going slide by slide, which can often be distracting and disrupt your rhythm.
- Publicity: Self-running presentations can be great if you use them for publicity. For example, if you have a kiosk or booth, a self-running PowerPoint slideshow can help you reach more people without them having to speak one-on-one with a salesperson.
- E-Learning: In e-learning modules or training presentations, autoplay can help learners progress through the material while listening to your lecture. However, they can also pause and rewind to go to the specific section they wish to revisit.
- Photo or Video Slideshows: Autoplay is commonly used in photo or video slideshows for events such as weddings or birthdays. It can serve as a background loop, or you can present it at a special moment along with music or narration to enhance the experience.
How to Play PowerPoint Slides Automatically without Clicking: Option 1
There are a couple of different ways to make your slides run automatically, and we'll go over both options. This first option is for when you need a really customized presentation: personalized timing for each slide, voiceovers, or laser pointer gestures .
If this is your case, go ahead with this section, but if you’d like something a bit simpler, proceed to Option 2.
- The first step is to go to the Slide Show Tab. On the Set Up group, you’ll find the Set Up Slide Show option to start customizing your self-running presentation.

- Once the Set Up Show Window opens, deselect the Presented by a speaker option, as it refers to manually advancing your slides, either by clicking or using keys. Next, consider several options for the automatic slideshow:
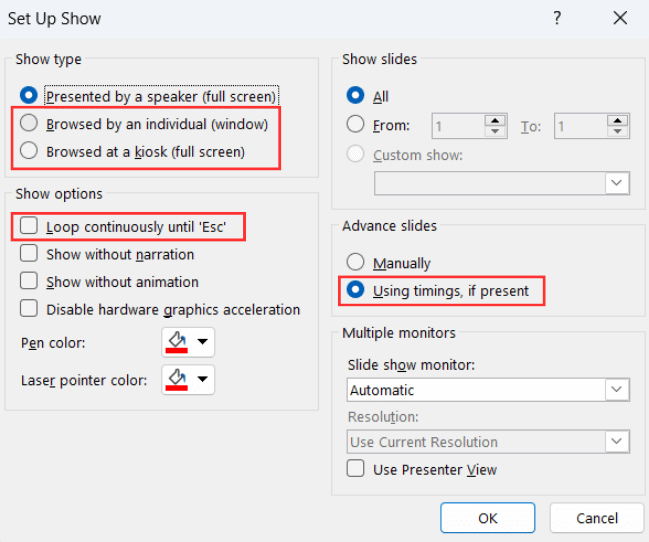
- Browsed by an individual is one choice for creating a self-running PowerPoint presentation. This option permits you to deliver your slides within a window, as opposed to the typical full-screen mode. Ensure that the Use timings, if present option is enabled for this feature to function correctly.
- Another option is the Browsed at a kiosk , which allows you to run a full-screen, continuous slideshow automatically. This option locks in both the looping and timing settings, ensuring that your slideshow will continue until you press the ESC key.
If you’re not sure what option is the best for you, remember you can always select manually the loop and timings option . Try different options with these and try out how your presentation will look like with the different settings.
- The next step is to set your timings. This means defining how much time you want your PowerPoint slideshow to spend on each slide before automatically advancing to the next one.
To set your timings, click on Rehearse Timings , which will allow you to go through your presentation slide by slide, and it’ll record how much time you spend on each one.

After you finish going through all your slides, a message will pop up to save your timings. Click yes so you can save the time spent on each slide.
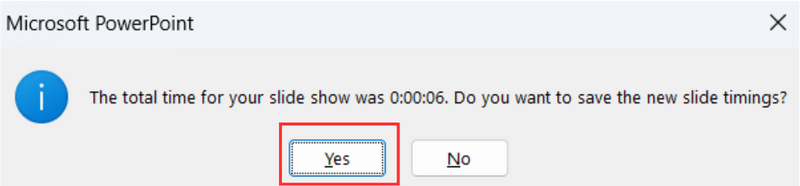
How to play slideshow in PowerPoint automatically: Option 2
Let’s take a look at a different way of using the PowerPoint autoplay feature. This option is great if you’re looking for something simple and just want your slides to advance automatically at regular intervals.
- First, open the Transitions Tab and locate the Timing Group.

- Go to the After option and manually add how much time you want to spend on each of your slides.

Select the Apply To All option so all your slides have the same timing.
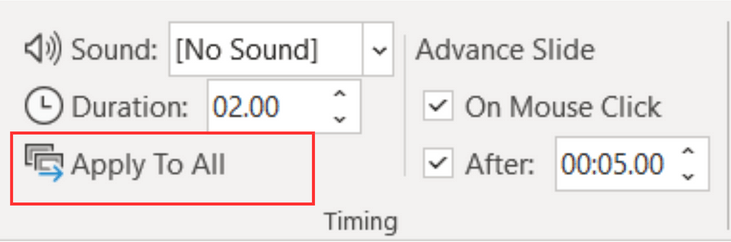
You can also deselect the On Mouse Click option, depending on whether you want to be able to advance your slides by clicking or not.
Adding audio to your automatic PowerPoint is a fantastic feature to enhance your professional image and communicate your content without needing to be present. Let’s take a look at how to do it:
- Go to the Slide Show Tab and select Record Slide Show . Choose Record From Beginning to start with the first slide.
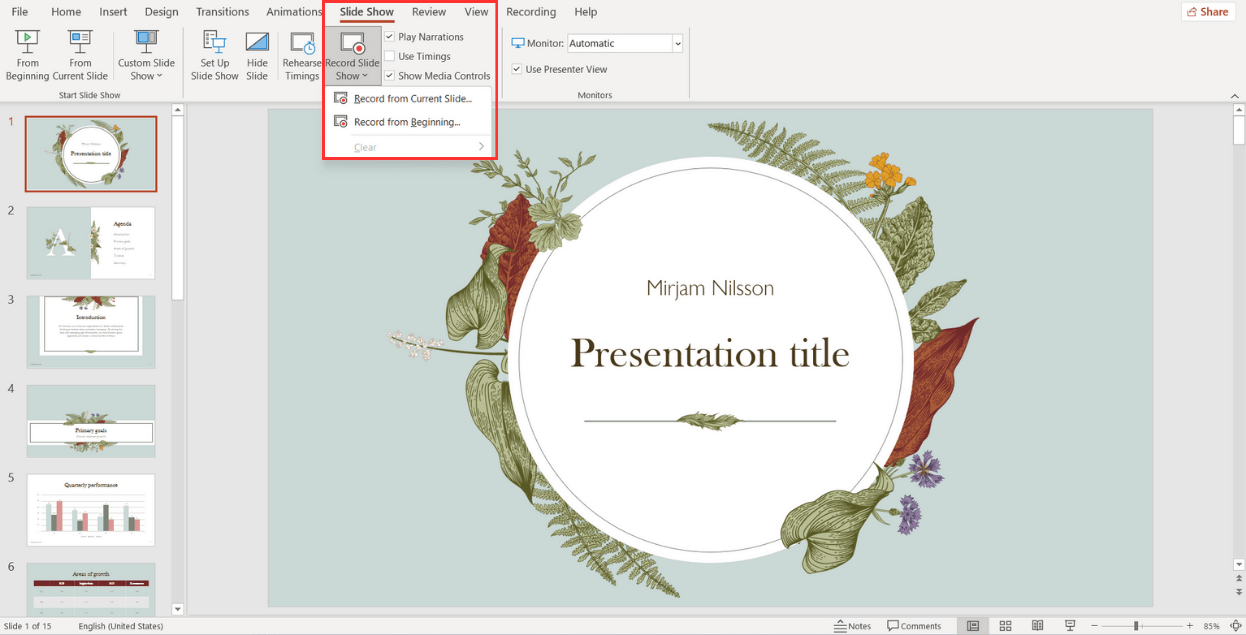
When the fullscreen opens, you will be able to see your first slide along with several options:
- Start in Settings (1) and select the tools you will be using. You have the option to use a microphone, or you can record yourself talking on camera. Choose your microphone and/or camera for recording.
- Next (2) , decide whether you want to have the microphone or camera you selected turned on. You can also choose to have a video preview.
- When you're ready to start recording, go to the top left corner (3) and click Record to start, Stop to pause, and Replay to review how it went.
- Once you finish with a slide, click on the right arrow (4) to move to the next slide.
- If you have Speaker notes in your slides, you can view them in (5) while you record.
- In the Pens and Markers section (6) , you can draw on the screen and make any annotations you want.
- Finally, the Clear option (7) allows you to clear existing recordings on the current slide or on all slides if you are unsatisfied and want to redo your recording.
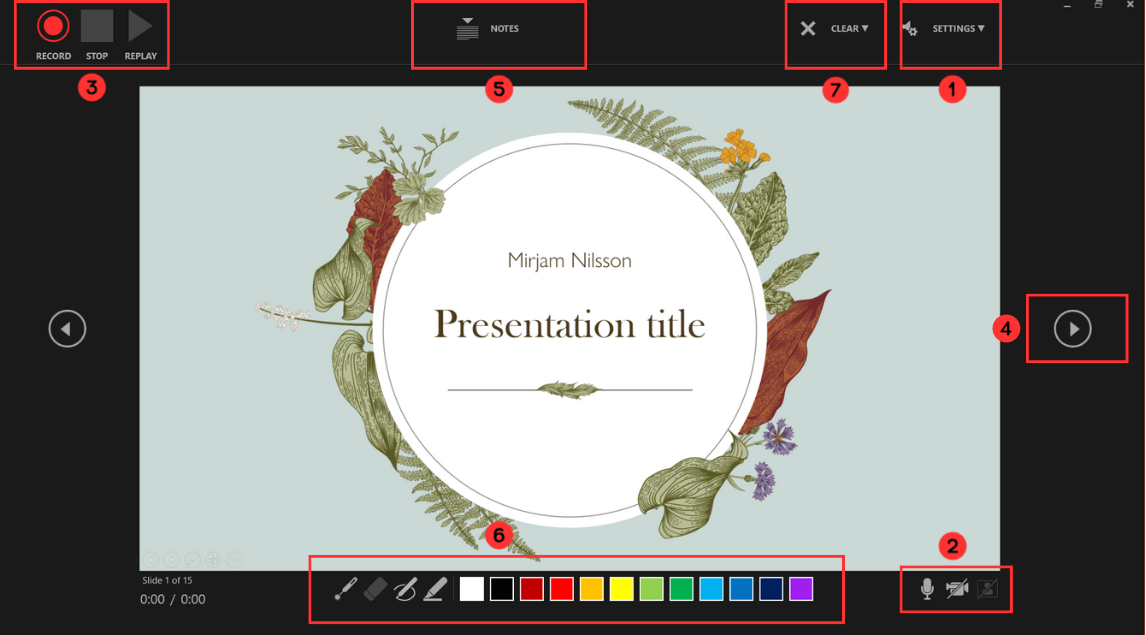
- Now, to review what you've recorded, go to Set Up and make sure Play Narrations and Use Timings are checked. Then, click on From Beginning to start the presentation.
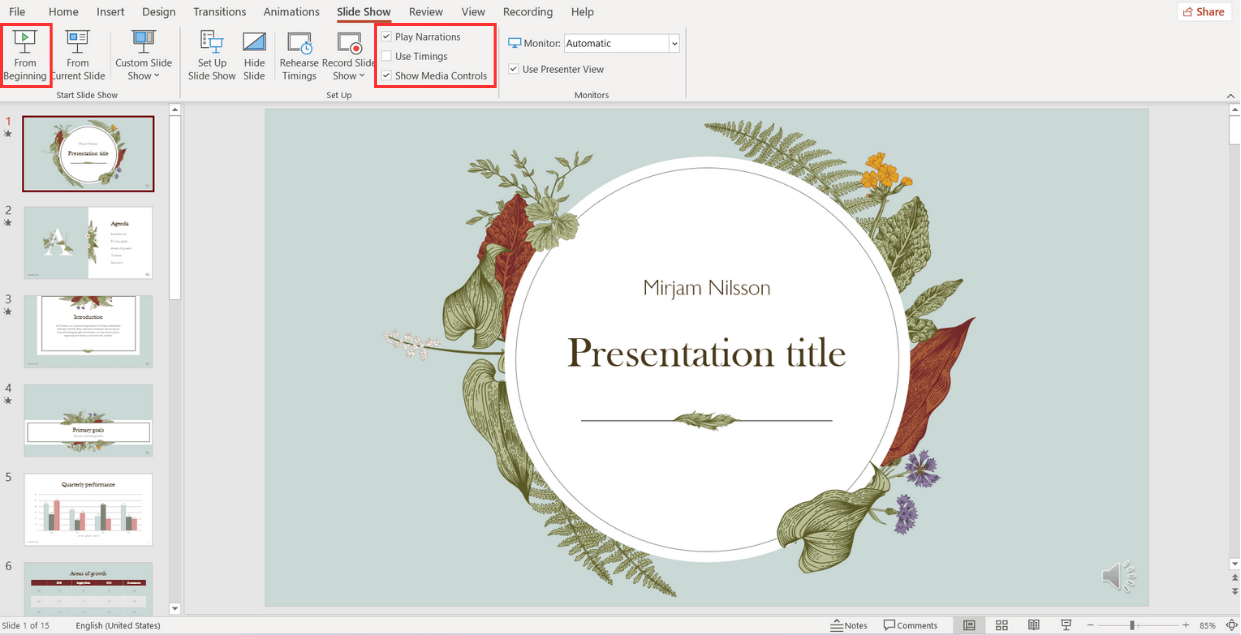
How to loop slides in PowerPoint
If you want to learn how to loop your slides in PowerPoint, follow these steps:
- Go to the Slide Show tab and select Set Up Slide Show .

- When the Set Up Show window appears, go to the Show options group and tick the Loop continuously until ‘Esc’ option. Don’t forget to click OK to apply the new setup!
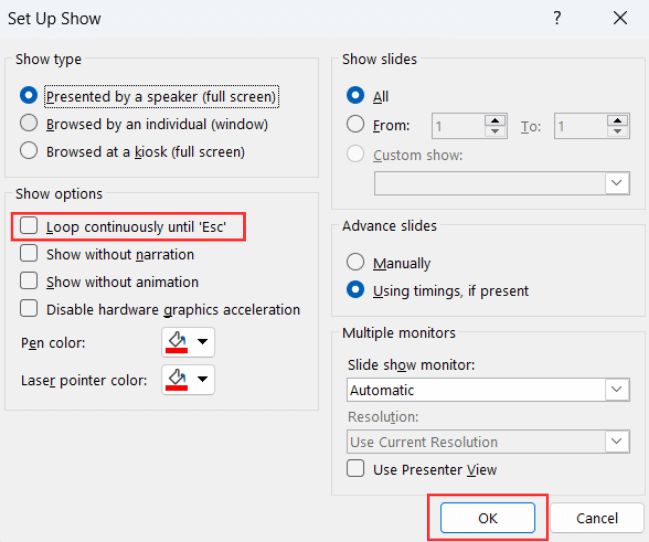
And all done! Now, your presentation will loop until you select ‘Esc’.
Check out some expert best practices for Automatic slideshows in PowerPoint
Now that you've learned how to make a PowerPoint slideshow run automatically, we'll give you the secrets to make your presentation stand out . Let's take a look at some insights from our expert designers .
Avoid too much text
Remember that your time per slide is limited , so it is important not to put too much text since your audience will not have time to read it. Try to express your message in the shortest possible text, and if necessary, revise and rewrite it as many times as necessary to synthesize it.
Limit interactive elements
Limit or avoid interactive elements such as hyperlinks that rely on user interaction since they may not function in PowerPoint autoplay mode.
However, if you want your audience or potential clients to take a specific action, consider using a QR code. Only make sure to leave the slide displayed for enough time for them to use it.
Practice, practice, practice
Keep in mind that your speech needs to fit perfectly with your timings for each slide. So, practicing your presentation multiple times is crucial to ensure a seamless and synchronized delivery.
First, go to the Slide Show Tab and select Set Up Slide Show .
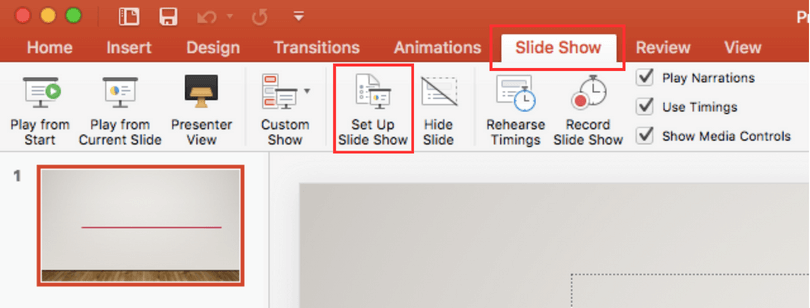
- When the Set Up Show Window opens, deselect the Presented by a speaker option and consider the following options to set up your automatic slideshow:
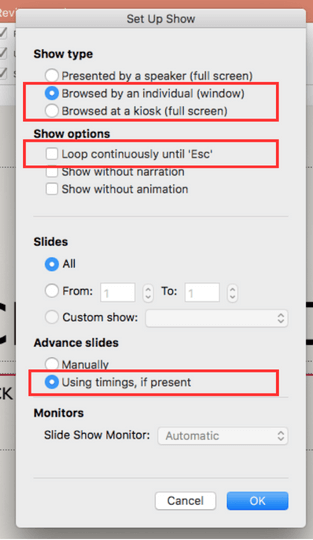
- Browsed by an individual : With this option, you can show your slides within a window instead of the typical full-screen mode. Make sure that the Use timings, if present option is selected.
- Another option is the Browsed at a kiosk : This option locks in both the looping and timing settings, ensuring that your slideshow will continue until you press the ESC key.
- Next, you need to set your timings. This involves determining the duration for each slide so that it advances automatically to the next one when you have finished presenting it.
To set your timings, go to the Slide Show Tab and click on Rehearse Timings.
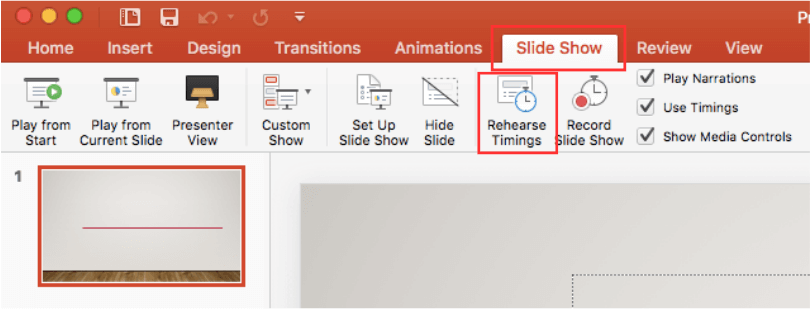
A window will open, allowing you to go through your presentation slide by slide, and it will record how much time you spend on each one . As you progress through each slide, it will confirm the time spent, and you can either agree or choose to re-record.
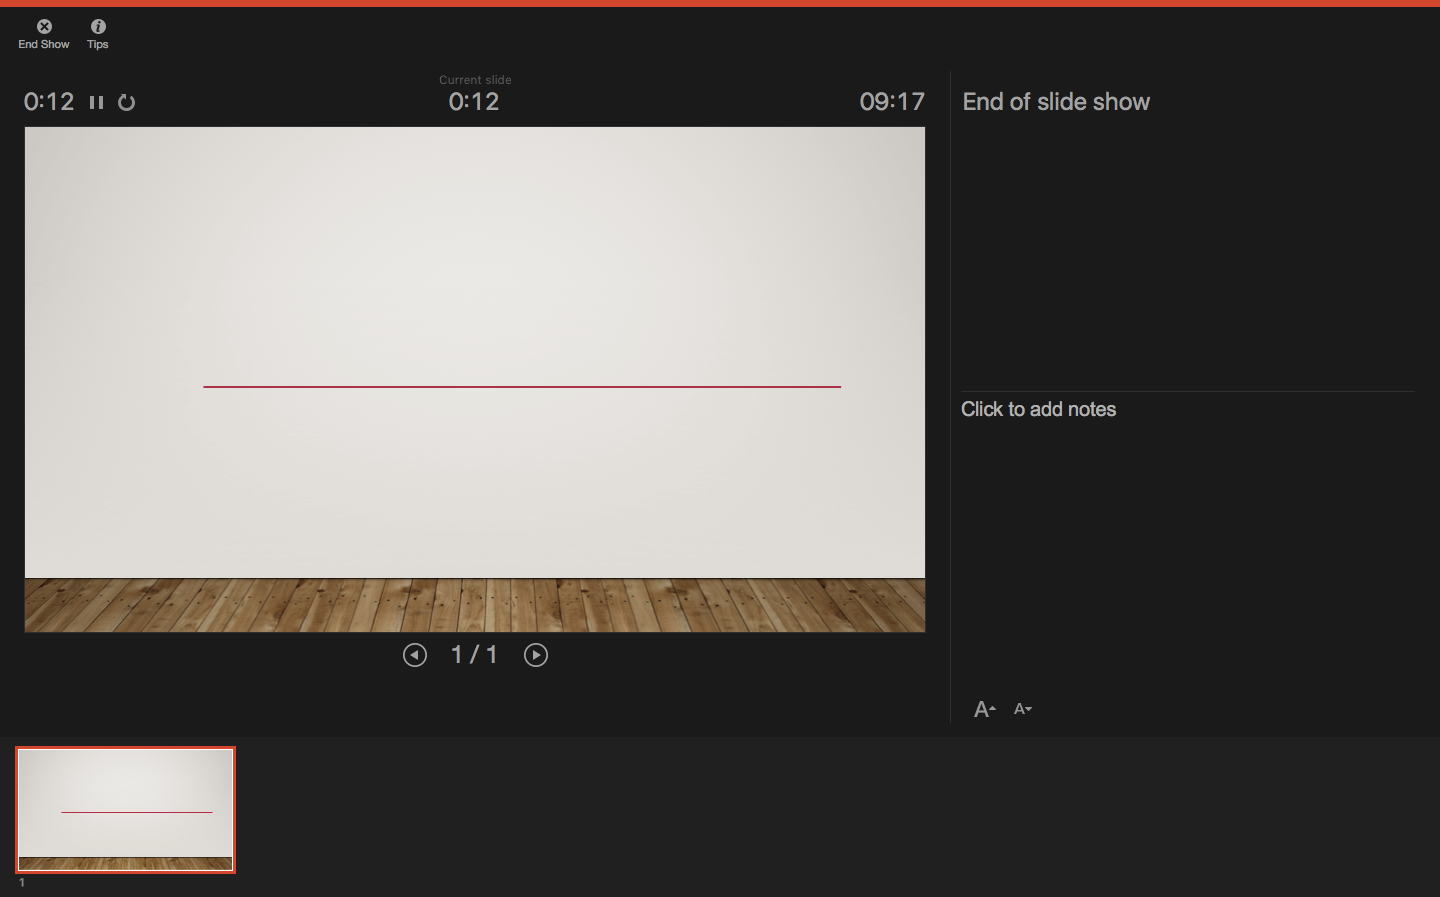
After you finish going through all your slides, a message will pop up to save your timings . Click yes so you can save the time spent on each slide.
If you’re looking to create a presentation that truly wows your audience, you might want to consider professional design assistance for your PowerPoint. Lucky for you, we’re here to help. Check out the fantastic designs 24Slides can help you create today!

You might also like
- How to Add a Timer to Your Powerpoint Presentations
- 11 Time-Saving PowerPoint Hacks For Creating Quick Presentations
- How To Loop a PowerPoint Presentation
- Add a PowerPoint Real-Time Clock to Your Presentations
Create professional presentations online
Other people also read

Tutorial: Save your PowerPoint as a Video
How To Convert Google Slides To PowerPoint and Vice Versa

How To Add Animations To PowerPoint
- Powerpoint Tutorials
How to Apply Image Effects to Your PowerPoint Presentation

A picture is worth a thousand words, but a picture with the right effects is priceless! PowerPoint presentations are a powerful tool for conveying information, and images play a crucial role in making them engaging. Adding effects to your images can transform a dull slide into a visual masterpiece. This guide will walk you through the process of applying various effects to images in PowerPoint.
Basic Image Editing: A Quick Refresher
Before applying effects, it’s essential to have a good-quality image. If your image needs adjustments, you can easily edit it within PowerPoint. To learn more about basic image editing tools, check out our blog on how to edit the images in your PowerPoint presentation.
Step-by-Step Guide to Applying Image Effects
- Select Your Image: Click on the image you want to modify. This will activate the Picture Format tab on the ribbon.
- Access the Picture Effects: In the Picture Format tab, locate the “Picture Effects” group. You’ll find options like Shadow, Reflection, Glow, Soft Edges, Bevel, and 3-D Rotation.
- Experiment with Different Effects: Hover your mouse over each effect to see a preview of how it will look. Click on the effect to apply it.
- Fine-Tune Your Effects: Most effects have options to customize their appearance. Click on “Options” to adjust settings like color, transparency, size, and angle.
- Consider Other Image Enhancements: To further enhance your image, explore options like color correction, artistic effects, and compressions. Learn how to recolor an image in PowerPoint for a unique look from our blog post.
Common Image Effects and Their Uses
- Shadow: Adds depth and dimension to your image, making it appear to float above the slide.
- Reflection: Creates a realistic reflection of the image, often used for product images or to enhance the overall look.
- Glow: Adds a soft, luminous effect around the image, drawing attention to it.
- Soft Edges: Creates a blurred edge around the image, softening its appearance and blending it with the background.
- Bevel: Adds a 3D effect to the image edges, giving it a raised or embossed look.
- 3-D Rotation: Rotates the image in 3D space, creating an interesting perspective.
Additional Tips
- Use high-quality images for optimal results.
- Consider using professional PowerPoint templates to create a cohesive look.
- Ensure your presentation is compatible across various devices, it’s important to test it thoroughly.
Going Beyond PowerPoint: Image Effects in Google Slides
While PowerPoint is a popular choice, Google Slides offers its own set of image editing tools. If you prefer using Google Slides, you can explore similar image effects. Check out our blog on How to Apply Image Effects in Google Slides to learn more.
Mastering image effects can significantly elevate your PowerPoint presentations. By following these steps and experimenting with different features and techniques, you can craft visually captivating slides that will leave a memorable impact on your audience. Remember, practice makes perfect!
Want to learn more presentation hacks? Visit our tips & tricks page for additional insights and inspiration.
Spread Love
Related blogs.

Arockia Mary Amutha
Arockia Mary Amutha is a seasoned senior content writer at SlideEgg, bringing over four years of dedicated experience to the field. Her expertise in presentation tools like PowerPoint, Google Slides, and Canva shines through in her clear, concise, and professional writing style. With a passion for crafting engaging and insightful content, she specializes in creating detailed how-to guides, tutorials, and tips on presentation design that resonate with and empower readers.
Recent Blogs

How Do Mind Maps Play a Major Role in Business Presentations?
When it comes to business presentations, capturing and maintaining the audience’s attention can be a daunting task. One effective tool...

How to Add Music to Google Slides: Simple and Easy Tutorial
Presentations are more engaging and memorable when they include multimedia elements. One such element is music, which can set the...

How to Plan for Non-Profit Projects Using Roadmap Slides?
A non-profit project requires constant tracking. Think of a project in this manner: You are leaving for a journey and...
SIGNUP FOR NEWSLETTER
Unsupported browser
This site was designed for modern browsers and tested with Internet Explorer version 10 and later.
It may not look or work correctly on your browser.
- Presentations
- Presentation Techniques
18+ Best PowerPoint SlideShare Presentation Examples (For 2024)
SlideShare is a great tool to promote your business. Also, you can reach your target market with your amazing PowerPoint presentations. Plus, your audience can review your information at their own leisure through the SlideShare platform.

In this article, you'll learn all about SlideShare:
- We'll explain what SlideShare is and describe what makes a good SlideShare presentation.
- We'll also provide you with some top SlideShare presentation examples for inspiration.
- Next, we'll briefly touch on how to make SlideShare presentations.
- Finally, we'll discuss the importance of using templates to create powerful PowerPoint presentations.
If you're creating a presentation for SlideShare. Then consider using a PowerPoint template from Envato Elements or GraphicRiver .
Guide to Making Great Presentations (Free eBook Download)
Before you read on, grab our free eBook: The Complete Guide to Making Great Presentations . It'll help you master the presentation process, from: initial idea, through to writing, design, and delivering with impact.

Now let's learn more about what SlideShare is, and dive into some great presentation examples with helpful tips:
What Is SlideShare?
If you're not familiar with SlideShare, you may wonder what it is and how it can help your business.

SlideShare is a platform that lets users share slide presentations online. Presentations can be shared publicly, or the share can be limited to a private group. Since SlideShare presentations are viewed online, they can be considered a form of online content. As such, they've got some things in common with other types of online content.
SlideShare was founded in 2006. According to SlideShare's own About page , the website ranks within the top 100 most-visited sites and has over 80 million users. The popularity of SlideShare gives you a chance to reach a lot of potential clients when you use it to share your presentations.
What Makes a Great SlideShare Presentation?
As discussed earlier, SlideShare presentations can be considered a form of online content. As such, they've got much in common with other forms of online content. Perhaps the most notable common factor is that you've got seconds to attract a viewer's attention before they move on to other online content.
So, you may be wondering, what makes a SlideShare presentation great? Why do some SlideShare presentations attract thousands of views while others are skipped over and fail to become popular?
Let's look at some of the most popular SlideShare presentations of all time and see if you notice any patterns or similarities between them?

Of course, there's more than one factor that contributes to a good SlideShare presentation. But here are six of the most important factors that many great SlideShare presentations share:
- Great cover image . This may be one of the most important factors on the list. If your cover slide doesn't draw your audience in, there's little chance that they'll stick around to view the entire slideshow. A compelling cover image is an important part of a compelling cover slide.
- Covers an interesting topic . It may not seem fair, but the topic of a slideshow plays a large part in whether it reaches an audience. The more interesting the topic, the more likely it is to reach its audience. If your SlideShare topic seems dull, figure out a way to make it more interesting.
- Tells a compelling story. It's no secret that we humans love a good story. If your SlideShare is interesting enough, you've increased the odds that readers will stick around long enough to find out how it ends. Don't be afraid to share your company's story.
- Uses clear slide designs. There's good design and there's bad design. Good slide design enhances a slideshow without calling attention to itself. Bad slide design distracts from your message. Bad design is obvious—even to viewers without any design training at all. Good design is often less obvious.
- Reaches a target audience. Not everyone is your potential client. A good SlideShare developer knows exactly who they're addressing. They'll customize your presentation through effective use of design, language, and other means. So that it's optimized for the target audience you're aiming at.
- Hits a marketing goal . A great SlideShare presentation is also an effective SlideShare presentation. That's why nearly every presentation that hits a marketing goal includes one or more of the factors listed above.
For a more in-depth discussion of what makes a great SlideShare presentation, review Eugene Cheng's helpful slideshow, SlideShare Experts Presentation Design Secrets From 7 Experts .
Note: Cheng's slideshow is also a good example of an effective SlideShare.
The Best PowerPoint SlideShare Presentation Examples (+Killer Tips)
There's nothing like a good example to illustrate a point. Here are 14 recent examples of some of the best PowerPoint SlideShare presentations we've seen with this article. I'll include an image and a link to each SlideShare. After each presentation example, I'll briefly explain a few of the factors that make that SlideShare so effective.
In no particular order, let's look at some of the best SlideShare presentations out there, with easy to follow tips included:
1. Use an Engaging Cover Design
If a cover slide catches your attention, chances are good that you're going to explore the rest of the SlideShare. That's exactly what happens with this slideshow from Patrick Stahler of FluidMinds.
Look at the rocket on this presentation's cover slide. Not only does the rocket ship catch your eye, but there's a symbolic meaning there as well. The rocket could mean many things ranging from exploration to soaring success.
Notice also that the cover slide heading is both scannable and concise. The use of highly readable headings and text are consistent throughout the entire presentation.
2. Tell a Compelling Story
When you see the caped figure on the cover slide of this SlideShare presentation from High Spark | Visual Storytelling Agency , your first reaction might be how does this superhero relate to storytelling? You'll want to click through to find the answer.
The SlideShare doesn't disappoint. It takes you through some popular superhero characters and explains why we find them so interesting. Here's an example of some of the storytelling in this presentation:
.jpg "how to make a powerpoint presentation with photos and music")
The picture here tells the story of two humans having a friendly discussion. They're definitely NOT robots.
Note: The characters in the above presentation belong to DC Comics.
3. Use Questions to Draw People In
You may think that a cover slide has to have an image to be compelling. Think again.
This top SlideShare presentation from Tim O'Reilly of O'Reilly Media starts with the three-letter question, WTF? Those three letters against a stark black background are enough to engage the reader. Inquiring minds want to know ... WTF?
The presentation goes on to answer the question of the title slide with a series of predictions about the future. The mood of the presentation is set by the title slide's dark background and is carried throughout the entire slideshow.
4. Good Design Makes a Difference
A good design should enhance a presentation, not distract from it. That's exactly how design is used in this SlideShare presentation from DesignMantic . While the design is attractive, it's not busy. Nor does it compete with the message.
One of my favorite slides in this presentation is this one, where the dots in the slide design are echoed by the round frame around the photo image:
.jpg "how to make a powerpoint presentation with photos and music")
The elegant design worked well. Of all the SlideShare presentations featured in this list, this one had the most views.
5. Add the Human Factor
It's been shown that people are drawn to photos of other people. Wrike makes good use of this principle with this great SlideShare . Nearly every slide in this presentation features a photo of one or more people, usually interacting in a work environment.
For example, who wouldn't want to be part of this fun workgroup?
.jpg "how to make a powerpoint presentation with photos and music")
This looks more like a group of friends at a coffee shop than a business team hard at work. But that's exactly the point.
6. Cover an Interesting Topic
Nearly everyone wants to become more productive. No doubt the authors of this SlideShare on Productivity Secrets from Officevibe knew this when they created this presentation about productivity secrets.
It's full of solutions to common productivity problems such as problems like email overload and time management . Since these are popular obstacles that many people must overcome, most people will click through to find the answers .
7. Icons Can Be Effective
Incorporating icons into your slideshow design can add interest. In this presentation from Yuan Wang of Studio Ninja, colored icons are used to add interest and not overpower the design or the presentation.
This slide is just one example of the effective use of icons throughout this top SlideShare presentation:
.jpg "how to make a powerpoint presentation with photos and music")
8. Reverse Psychology Works
The cover of this interesting SlideShare presentation from Stinson is compelling because it uses reverse psychology. Instead of talking about 10 things you need to do to create an effective presentation, it talks about "10 Things Your Audience Hates..."
Immediately, the reader is hooked. They wonder, "Am I doing any of these things?" If they're part of the target audience for this slideshow, they'll click through to find out.
9. Talk About a Common Problem
Who hasn't faced a difficult conversation in a work environment? The answer is ... probably no one.
Sooner or later most of us will find ourselves in a difficult conversation. But that's what makes this SlideShare topic on Mastering Difficult Conversations so interesting to a broad group of people.
The common problem addressed by Piktochart on this interesting topic with this SlideShare.
10. Share Statistics Effectively
This SlideShare presentation from Rand Fishkin of MOZ is about Google. There are an awful lot of people interested in what Google does. That interest in Google alone is enough to attract a lot of viewers to this SlideShare.
But this SlideShare is also about statistics. Statistics can be hard to share effectively. Fortunately, the SlideShare author makes effective use of charts to illustrate the data visually. Look at the sample slide below:
.jpg "how to make a powerpoint presentation with photos and music")
The slideshow could have buried these statistics in text paragraphs. But instead, we've got this attractive and very scannable chart.
11. Keep It Simple
Often the best slides in a presentation convey a single thought. That's certainly the case with this effective SlideShare from Loic Le Meur .
Nearly every slide in this presentation represents a single idea—sometimes with a phrase and sometimes with a photo.
But those ideas really pack a punch. A reader can see at glance the message that the author is trying to convey.
12. Don't Be Afraid of Color
It's risky, but the use of bright colors can make your presentation stand out from the rest. That's certainly the case with this colorful SlideShare presentation from Weekdone.com .
Look at the pink and purple in this slide about motivation:
.jpg "how to make a powerpoint presentation with photos and music")
It's colorful, but it works.
As a bonus, the entire SlideShare is only 14 slides long. The brevity means the audience is more likely to view the entire presentation.
13. Embrace Minimal Design
This SlideShare presentation from Bonusly proves that less is more with its minimalist design. Each slide focuses on a single concept. It uses short sentences and paragraphs, often without an image. Yet, it works.
The next time you're tempted to overstuff a slideshow with graphics, photos, and text remember this simple presentation and don't do it.
14. Design Consistency Counts
This SlideShare presentation by Barry Feldman starts with an elegant design that makes good use of graphic elements to add visual interest. The design shapes are echoed throughout the entire presentation in various colors.
In fact, the design element is so strong that no photos are needed. And, except for the cover slide, Barry doesn't use any.
This slide illustrates how effective a simple design can be:
.jpg "how to make a powerpoint presentation with photos and music")
15. Always Add a CTA
Make the most out of your SlideShare by including a call to action on the last slide. Let the audience know what you want them to do, whether that’s visiting a related article on your blog, downloading a free report, or booking a call. Be sure that the call to action is directly related to the topic of the SlideShare itself to make it even more effective.
Consider how HubSpot incorporates a call to action on the last slide of their SlideShare about calls-to-action . If you’re currently trying to improve your call to actions and are viewing this SlideShare, chances are you'll be more than interested in downloading their book to learn more about effective CTAs.
16. Make It Clear
A lot of SlideShare presentations are uploaded as an afterthought once the webinar or oral presentation is done and in the past. But, by doing so, you leave out a lot of the context and wind up with a SlideShare that makes very little sense.
If you want your SlideShare to be as effective as possible, you need to make it clear. You want even people who haven't attended your presentation to still understand the topic and the context. Look at how Rand Fishkin makes it easy to understand the SlideShare about content marketing by making the entire presentation look like a comic book.
17. Tease the Content
Keep the users engaged with your SlideShare by teasing the content. This also encourages them to click through to the next slide and the next slide… all the way to the end.
Mark Schaefer , in his SlideShare about social media engagement , does an excellent job of giving you just enough content to pique your interest. Schaefer also teases what’s to come, which just begs you to keep on clicking through the slides.
18. Don’t Underestimate the Power of Images
Aside from icons, you can make your SlideShare more interesting and visually appealing by using quality images and photos. It’s a well-known fact that images help us tell a story, not to mention we absorb information better when it’s visual so use that to your advantage.
Donna Moritz uses eye-catching images to add extra visual appeal to her SlideShare about different ways to stand out on the platform .
19. Learn From SlideShare Itself
An example of what they've got to offer is the SlideShare about different ideas for what to upload on SlideShare to get views on your presentation.
How to Quickly Make Your SlideShare Presentation
Feeling inspired by all those great SlideShare presentations?
Use SlideShare to share your own presentations to a wider audience. Here's what you'll need:
- Internet connection . SlideShare operates through the Internet.
- LinkedIn account. SlideShare is owned by LinkedIn. You'll need to log in to LinkedIn before you can share.
- A great presentation. SlideShare supports PowerPoint, PDF, and document formats. Learn more at SlideShare Help .
Once you're online, logged in, and have selected your presentation, you're ready to download it. To start, click the orange Upload button in the upper right corner of SlideShare:

The Upload File screen displays:

Upload your presentation, and you've done it! You've just created your first SlideShare.
Learn How to Make Your SlideShare PPT Presentation Design in PowerPoint
Do you need more help creating a SlideShare-worthy presentation in PowerPoint? No worries. We've got you covered with a comprehensive series of tutorials on the subject.
Jump into these helpful PowerPoint and SlideShare tutorials to get stared:

You can also find more information about creating a presentation in our new eBook on making great presentations . Grab this PDF Download now for FREE with your subscription to the Tuts+ Business Newsletter:

Or, look at this SlideShare case study from Board of Innovation , which is on “ How I got 2.5 Million views on SlideShare .” This SlideShare presentation has been viewed over 2.5 million times and author Nick Demey is telling how he did it.
Note : This SlideShare is also another example of an effective presentation.
There's one more step you can take to make your presentation great. Let's take a closer look at PowerPoint presentation template design.
Make Great SlideShares Quickly With PPT Presentation Templates
PPT presentation templates are an effective way to ensure that your SlideShare is well-designed. And, as we've discussed above, good design is one of the hallmarks of a great SlideShare PPT presentation.
Using a template gives you a proven design from a professional designer for making your slideshow project. Plus, it can save you from the headache of having to create your own presentation design from scratch if you're not a designer.
Take a look at some of this year's best PowerPoint designs from Envato Elements:

You'll find even more great presentation template designs at GraphicRiver or Envato Elements . Learn how to customize PPT templates quickly to fit your presentation design needs. Get started with using PowerPoint's toolset:
The Best Source for PowerPoint SlideShare Presentation Templates (With Unlimited Use)
You've just learned how to make a good PowerPoint presentation SlideShare. Here's another tool you can use to make your SlideShare PowerPoints great.
Envato Elements is a subscription service where you get access to unlimited digital elements. All you need to do is pay a low monthly fee to become a member.
Envato Elements has hundreds of PowerPoint template that professionals make to look stylish. This subscription service has more than PowerPoint templates. It includes:
- stock images
Explore Envato Elements Now

Envato Elements is a great deal if you work with digital elements or need to make SlideShare presentations often. Since you've got unlimited downloads, you can download a template. And if it doesn’t suit your current project, you can download a new template. It’s that easy!
Free templates aren’t as stylish and are often less attractive than premium templates. Premium templates still allow you to be creative while starting with an attractive template.
5 Top PowerPoint SlideShare from Envato Elements in 2024
Here are some of the top PowerPoint SlideShare templates from Envato Elements:
1. Business Plan PowerPoint Template

The business Plan PowerPoint template can be used as a SlideShare presentation and is fully editable. This template comes with ten color scheme options and 700 slides. The Business Plan PowerPoint template comes with a picture placeholder, making it easier to add an image of your choice.
2. Oriola: Business PowerPoint Template

This SlideShare PPT comes with 100 unique and editable slides. Here are some key features of this template:
- two theme variations
- picture placeholders
This template is an excellent option if you’re looking for a clean business PowerPoint template with a simple design.
3. Business Consulting PowerPoint Template

The Business Consulting PowerPoint Template can be used as a SlideShare presentation. This template has 1,200 total slides with 30 unique slides. Also, you can choose from five different color schemes. If you're looking for a business-themed template with infographics, this is a great choice.
4. PowerPoint Business Presentation Template

PowerPoint Business Presentation Template is a multi-purpose SlideShare PowerPoint template. Here are some highlights of this template:
- total of 38 slides
- all graphics are resizable
- comes with picture placeholders
- includes infographics and graphs
This template is great if you’re looking for a professional business template with a pop of color.
5. Narrow PowerPoint Business Presentation

Narrow PowerPoint Business Presentation is a modern and clean premium template. This SlideShare PowerPoint template comes with over 50 unique slides. Also included in the Narrow PowerPoint Business Presentation is over 100 icons. Easily drag and drop an image of your choice into the picture placeholders.
Use PowerPoint + SlideShare & the Power of the Internet
Use SlideShare and the power of the Internet to reach a much larger audience for your presentation than you normally would. It's not difficult to learn to use SlideShare to showcase your best PowerPoint presentation and reach a wider audience if you know what to do.
The SlideShare presentation examples in this article may seem intimidating at first. But if you take a closer look at what each SlideShare author has done to make their slideshow effective, you'll see that an effective SlideShare isn't beyond your reach.
Turn to this article for inspiration in creating your own PowerPoint presentation for SlideShare. And don't forget to use a template when creating your presentation to save time and for a better design .
Are you ready? Get started on your own SlideShare today.
Editorial Note: This post was originally published in August of 2017. It's been comprehensively revised to make current, accurate, and up to date—with special help from Brenda Barron and Sarah Joy . Brenda and Sarah are freelance instructors with Envato Tuts+.

IMAGES
VIDEO
COMMENTS
Six steps for creating a slide show. 1. Plan your slide show. Before getting too deep into your slide show project, it's a good idea to select and save the photos and videos you want to use. This helps you create a slide show more efficiently and purposefully, ensuring a better outcome. 4.
Double-click inside the image box (or go to Insert > Picture > From File ), then browse to the desired image. Click "Okay" or "Insert" to add the image. If you don't like the way it looks, select the image and click on "Picture" to change it out for a different one.
In this tutorial, you'll learn how to create a Photo Slideshow with Music in Microsoft PowerPoint.powerpoint presentation | powerpoint presentation in hindi ...
Learn how to create a photo slideshow in Microsoft PowerPoint in this tutorial video. See step-by-step how to import photos, how to make quick edits to the p...
Add Photos to Your PowerPoint Slideshow. Step 1: Inserting a Single Photo. Navigate to the "Insert" tab at the top of the PowerPoint interface. Click on the "Pictures" option. This will allow you to browse your computer and select the photo you want to add.
Adding music can really enhance a PowerPoint video and here's where I show you how to do that.The music can be added with a narration or just on its own. You...
Start by deciding whether to show the slideshow in a window or full screen. To set up the slideshow, select Slide Show > Set Up Slide Show and choose one of the following: Browsed by an individual (window): Run the slideshow automatically and inside a window. This option works best when you save the slideshow to a CD.
Go to the Insert tab, select Photo Album > New Photo Album in the Images section of the ribbon. When the Photo Album window opens, start by adding the photos you want to use. On the left, below Insert Picture From, click "File/Disk." You can select one photo at a time or several using Ctrl as you click each one.
Click on the new slide to select it and customize it. You can change the text as you please. You can also change the image by right-clicking on the image → "Change Picture". Click on "Work offline". Then select a photo and click "Open". Click on the eye icons next to "text" in the "Selection" pane to hide the text.
Here is the step by step guide to creating a photo slideshow in PowerPoint: Open Microsoft PowerPoint and create a new presentation by selecting the "Blank Presentation" option. Click "Insert" and select "Photo Album". This will open a new window allowing you to select the photos that you want to use in your slideshow.
to insert the audio file, the file was embedded in the presentation, and that creates a large file size overall. To reduce file size in a presentation with embedded audio, save the presentation, and click the. To make the presentation file smaller and more manageable for sharing, click , and choose a type of compression, in terms of quality.
Open the slide where you inserted the audio. On the ribbon, select the Animations tab. Near the right end of the toolbar, select Animation Pane. In the Animation pane, double-click the item for your audio clip. In the Play Audio dialog, on the Effects tab, under Stop playing, select After, then specify the number of slides that you want music ...
This tutorial will walk you through How to Make A Photo Slideshow. Go to the tools ribbon and click Insert. From the options under Insert, select Photo Album. Once clicked, a pop-up window displays all the settings for adjusting your Photo Album. To insert our pictures, click the button in the upper left corner labeled File/Disk.
Switch to the "Insert" tab and then click the "Audio" button. A menu will appear, giving you the option to either upload music from your PC or record your own audio track. If you'd like to record your own audio, select "Record Audio," and the "Record Sound" window will appear. Go ahead and give your audio a name, then click the ...
In PowerPoint 2010 and 2013, you can go one step further and convert your photos to video format. Follow these steps: Choose Insert> Photo Album. (In 2003, choose Insert> Picture> New Photo Album.) Click the File/Disk button. In the Insert New Pictures dialog box, navigate to a folder with your photos. (It helps if they're all in one folder ...
Here's a step-by-step guide to help you create a photo slideshow with music and pictures in minutes, not hours. ... Customize this presentation template and make it your own! ... then you can download it as a PowerPoint, Keynote, or HTML5 to present it on Mac's Apple Keynote or Microsoft Powerpoint. ...
Use Photo Album. To insert multiple images at once: Go to Insert > Photo Album > New Photo Album. Select all photos you want to use. Click Create. PowerPoint will insert photos into separate slides. Photo Album automatically organizes your images into a slideshow. You can then rearrange or delete slides as needed.
Go to the 'Insert' tab, select 'Audio,' and then 'Audio on My PC' to add the music file. Adjust the timing of the photos and music to sync them perfectly. Select each photo, go to the 'Transitions' tab, and set the desired duration. Add any text, transitions, or animations to enhance the visual appeal of your video.
Learn how to easily and quickly create a photo slideshow in PowerPoint. #powerpoint #learnpowerpoint ***Consider supporting Technology for Teachers and Stude...
Start in Settings (1) and select the tools you will be using. You have the option to use a microphone, or you can record yourself talking on camera. Choose your microphone and/or camera for recording. Next (2), decide whether you want to have the microphone or camera you selected turned on.
Pictures: Pick an image from your device, one of the stock images, or an online picture and select Insert. Shapes : Pick a shape from the menu and use your cursor to draw it on the slide.
PowerPoint presentations are a powerful tool for conveying information, and images play a crucial role in making them engaging. Adding effects to your images can transform a dull slide into a visual masterpiece. This guide will walk you through the process of applying various effects to images in PowerPoint. Basic Image Editing: A Quick Refresher
Note: Cheng's slideshow is also a good example of an effective SlideShare. The Best PowerPoint SlideShare Presentation Examples (+Killer Tips) There's nothing like a good example to illustrate a point. Here are 14 recent examples of some of the best PowerPoint SlideShare presentations we've seen with this article.
Learn how to make a Creative Animated Photo Album in PowerPoint with Music and Video. *Ramgopals PowerPoint Mastery TRAINING Program*https://shop.presentatio...
Ideal for quarterly reviews, strategic planning sessions, and investor meetings, its white and grey palette provides a sleek backdrop for your critical insights. Elevate your presentations and make an impact with this versatile and polished presentation template. Features of this template
Your presentation goals are unique to you, but here are a few tips for making an environment slideshow: Storytelling: make it relatable; Interactive elements: keep it engaging; Visual aids: help people see the road ahead; Clear steps: outline milestones, tasks, and phases; Tie in metrics: staying on the right track; Powerful quotes: motivate ...
In this tutorial, you'll learn how to add background music to your PowerPoint presentation. Adding background music to your PowerPoint presentation can enhan...
In this step-by-step tutorial video, learn how to add music in your Microsoft PowerPoint presentation that plays automatically across all slides and loops un...