- PRO Courses Guides New Tech Help Pro Expert Videos About wikiHow Pro Upgrade Sign In
- EDIT Edit this Article
- EXPLORE Tech Help Pro About Us Random Article Quizzes Request a New Article Community Dashboard This Or That Game Happiness Hub Popular Categories Arts and Entertainment Artwork Books Movies Computers and Electronics Computers Phone Skills Technology Hacks Health Men's Health Mental Health Women's Health Relationships Dating Love Relationship Issues Hobbies and Crafts Crafts Drawing Games Education & Communication Communication Skills Personal Development Studying Personal Care and Style Fashion Hair Care Personal Hygiene Youth Personal Care School Stuff Dating All Categories Arts and Entertainment Finance and Business Home and Garden Relationship Quizzes Cars & Other Vehicles Food and Entertaining Personal Care and Style Sports and Fitness Computers and Electronics Health Pets and Animals Travel Education & Communication Hobbies and Crafts Philosophy and Religion Work World Family Life Holidays and Traditions Relationships Youth
- Browse Articles
- Learn Something New
- Quizzes Hot
- Happiness Hub
- This Or That Game
- Train Your Brain
- Explore More
- Support wikiHow
- About wikiHow
- Log in / Sign up
- Computers and Electronics
- Presentation Software
- PowerPoint Insertions

How to Put a Hyperlink in Microsoft PowerPoint
Last Updated: June 6, 2024
wikiHow is a “wiki,” similar to Wikipedia, which means that many of our articles are co-written by multiple authors. To create this article, 32 people, some anonymous, worked to edit and improve it over time. This article has been viewed 432,374 times. Learn more...
Do you want to add a link to a website or document to your PowerPoint presentation? Adding hyperlinks to PowerPoint slides is incredibly easy. This wikiHow will teach you how to insert hyperlinks into PowerPoint slides using Windows and macOS.
Select a slide.

Select the hyperlink text.

- You can also make an image a hyperlink—just click the desired image to select it.
Click the "Insert" tab.

Click the "Link" icon.

Add a location or address to link to.

- To link to a file or website, select Existing File or Web Page at the top-left. Then, enter the full URL of the website or select the document.
- To link to another location in your presentation, select Place in This Document , then select a slide title.
- To create an email hyperlink, select E-mail address , then enter an email address. Clicking the link will simply compose a new message to this address.
Click "OK" to create the link.

Community Q&A
You Might Also Like

- ↑ https://support.microsoft.com/en-us/office/add-a-hyperlink-to-a-slide-239c6c94-d52f-480c-99ae-8b0acf7df6d9
About This Article
- Send fan mail to authors
Is this article up to date?

Featured Articles

Trending Articles

Watch Articles

- Terms of Use
- Privacy Policy
- Do Not Sell or Share My Info
- Not Selling Info
Keep up with tech in just 5 minutes a week!
How to Insert a Hyperlink in Powerpoint 2019: A Step-by-Step Guide
Adding a hyperlink to your Powerpoint presentation can truly elevate your game. It’s a simple way to direct your audience to additional resources, websites, or email addresses directly from your slides. Want to know how? Just follow along with these quick and easy steps and you’ll be linking away in no time.
Step by Step Tutorial on How to Insert a Hyperlink in Powerpoint 2019
Before we dive into the steps, let’s understand what we are aiming for. Inserting a hyperlink in Powerpoint 2019 allows you to link to another slide, a web page, an email address, or even a file on your computer. This can make your presentation more interactive and accessible.
Step 1: Open Your Powerpoint Presentation
Open the Powerpoint presentation where you want to insert the hyperlink.
This first step is pretty straightforward, right? Just make sure you’re on the slide where you want the hyperlink to be.
Step 2: Select the Text or Object
Click on the text or object that you want to turn into a hyperlink.
Remember, hyperlinks aren’t limited to text only. You can make images or shapes clickable too!
Step 3: Access the Hyperlink Function
Right-click on the selected text or object and choose ‘Hyperlink,’ or go to the ‘Insert’ tab and click on ‘Hyperlink.’
You’ll find the ‘Hyperlink’ option easily on the right-click menu. Alternatively, the ‘Insert’ tab on the ribbon has it all laid out for you.
Step 4: Insert the Link
In the ‘Insert Hyperlink’ dialog box, paste or type in the URL, link to a file, place in the document, or an email address.
Make sure to check that your link works by clicking on the ‘Test this link’ button in the dialog box. It’ll save you from any embarrassment during the presentation.
Step 5: Customize Your Display Text
Customize the text to display if you do not want the URL to show on the slide.
You can get creative here. Instead of showing a long, ugly link, use relevant and catchy phrases like ‘Click Here’ or ‘Learn More.’
After you’ve completed these steps, voila! Your hyperlink is now inserted into your Powerpoint slide. When you’re presenting, all you’ll need to do is click on the hyperlink, and it’ll take you (or your audience) straight to the linked content.
Tips for Inserting a Hyperlink in Powerpoint 2019
- Double-check your URLs to ensure they are correct before adding them to your presentation.
- Use descriptive text for your display link to give your audience a clear idea of where the link will take them.
- If you’re linking to another slide in the same presentation, remember to update the hyperlink if you move the slides around.
- For a more streamlined look, match the hyperlink text color to your presentation’s theme.
- Consider using hyperlinking as a way to create non-linear presentations, allowing you to jump to different sections based on audience interest.
Frequently Asked Questions
Can i link to a specific part of a webpage.
Yes, if the webpage has anchor links set up, you can link directly to a specific section by including the ‘#’ followed by the anchor name in the URL.
Can I remove a hyperlink?
Absolutely, just right-click on the hyperlink, and select ‘Remove Hyperlink’ to delete it.
What if my hyperlink isn’t working?
Check the link for any typos, and ensure that all web addresses begin with ‘http://’ or ‘https://’. Testing the link beforehand always helps.
Can I change the color of the hyperlink text?
Yes, after inserting the hyperlink, you can change the text color through the regular text formatting options.
Can I add a hyperlink to a video?
Indeed, you can hyperlink a video just like text or images. Just make sure the video file is accessible to your audience if you’re sharing the presentation.
- Open your Powerpoint presentation.
- Select the text or object to hyperlink.
- Access the Hyperlink function via right-click or the Insert tab.
- Insert the desired link into the dialog box.
- Customize your display text for the hyperlink.
Mastering the art of hyperlinking in Powerpoint can truly transform your presentations from static slides to dynamic, interactive experiences. Whether it’s guiding your audience to a helpful webpage, cross-referencing to another slide, or providing a quick email contact, the power of a hyperlink is immense. It’s also a fantastic way to keep your presentations clean and organized, ensuring that additional resources are just a click away without cluttering your slides. And remember, practice makes perfect. Don’t hesitate to play around with different types of hyperlinks and their formatting to see what works best for your narrative style. Now that you know how to insert a hyperlink in Powerpoint 2019, the only limit is your creativity. So, go ahead, give it a try, and watch your presentations come to life!

Matt Jacobs has been working as an IT consultant for small businesses since receiving his Master’s degree in 2003. While he still does some consulting work, his primary focus now is on creating technology support content for SupportYourTech.com.
His work can be found on many websites and focuses on topics such as Microsoft Office, Apple devices, Android devices, Photoshop, and more.
Share this:
- Click to share on Twitter (Opens in new window)
- Click to share on Facebook (Opens in new window)
Related Posts
- How to Create a Hyperlink in Powerpoint 2010: A Step-by-Step Guide
- How to Add a Hyperlink on Google Slides
- How to Rotate a Powerpoint Slide Presentation
- How to Download a Google Slides Presentation as a Powerpoint File
- How to Do a Powerpoint Google Slides Presentation Conversion
- How to Make Google Slides Vertical (5 Quick Steps)
- How to Delete a Slide in Powerpoint 2010: Step-by-Step Guide
- How to Remove a Hyperlink in Word 2010: Step-by-Step Guide
- How to Add Hyperlink in Outlook Signature – 2010 Guide
- How to Remove Slide Numbers in Powerpoint 2019: Easy Steps
- How to Convert Powerpoint to Google Slides: A Tech Solution
- How to Hide a Slide in Powerpoint 2010: A Step-by-Step Guide
- Can You Save a Powerpoint as a Video in Powerpoint 2013? Find Out Here!
- How to Make a Powerpoint Slide Vertical in Powerpoint 2013: A Step-by-Step Guide
- How to Add a New Slide in Google Slides: A Step-by-Step Guide
- How to End Powerpoint on Last Slide in Powerpoint 2010: A Step-by-Step Guide
- How to Delete Multiple Slides in Google Slides: A Step-by-Step Guide
- How to Insert a Google Slides Page Number: Step-by-Step Guide
- How to Change Slide Size in Powerpoint 2016
- How to Save Powerpoint as PDF with Notes: A Step-by-Step Guide
Get Our Free Newsletter
How-to guides and tech deals
You may opt out at any time. Read our Privacy Policy
How to Insert Hyperlinks in PowerPoint

Hyperlinks in PowerPoint are easy to implement and can transform your everyday presentations into powerful interactive experiences . In this article, I’ll walk you through some of the basics of adding hyperlinks in PowerPoint. Then, I’ll show you how to change the default colors of your links as well as how to make any object in your slides clickable. So, if you want truly engaging presentations, all you need to do is follow this step-by-step tutorial .

How to Hyperlink in PowerPoint
For starters, PowerPoint has many options to add a hyperlink to your slides depending on your objectives. Do you want to redirect people to a website ? Are you trying to create a non-linear presentation ? Or maybe you want to encourage your audience to send you an e-mail ? Let’s check out the main uses together:
Hyperlink to a website in PowerPoint

- Select the text you want to convert to a hyperlink
- Go to the Insert tab
- Click on the “Link” option
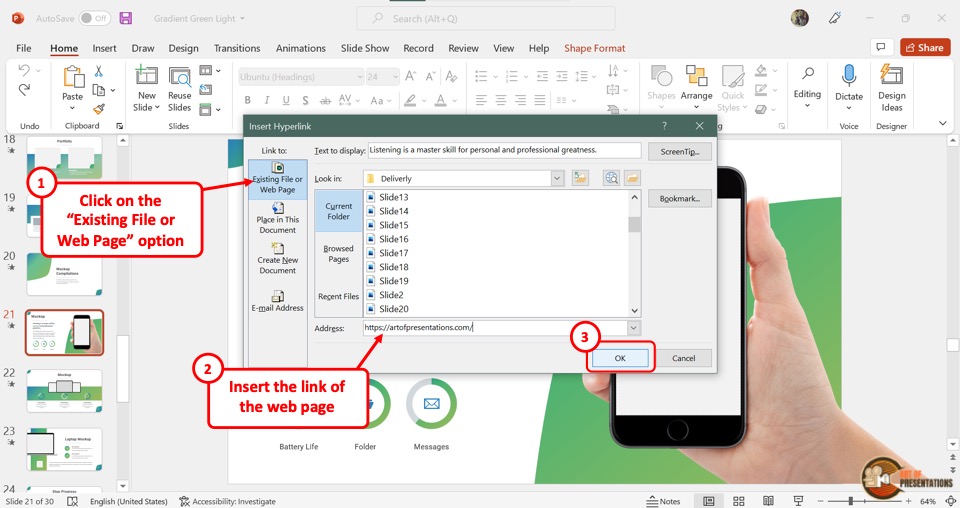
- In the “Insert Hyperlink” window, select “Existing File or Web Page”
- Type the URL in the bar
B. Hyperlink to another slide in PowerPoint

- Select the text you want to change to a hyperlink
- Click on “Link” and a window will pop up
- Select “Place in This Document”
- Pick the slide you want to land on
You can leverage this type of hyperlink in a table of contents for a non-linear presentation. What’s more, if you want to link to another slide to show something and quickly return, tick off the option “Show and return”
C. Hyperlink to an e-mail address in PowerPoint

- Select the text you want to add the hyperlink to.
- Go to the Insert ribbon
- Click on “Link”
- Select the “E-mail address” option
- Type the e-mail you want to link to
- Finally, click “Ok”
Extra: How to Add ScreenTip in PowerPoint
To close the basics on how to hyperlink in PowerPoint, here’s an option to display descriptive texts for your links. They provide quick additional information or instructions for people that hovers over your hyperlink so they know what it is about or what to do immediately. So, once you have opened the “Insert hyperlink” dialog box , do the following:

- Click on the “ScreenTip” button
- Type the text you want to appear when someone hovers over your link
- Click “OK” on the Screentip dialog box
- Click “OK” again to close the hyperlink dialog box.
To check everything is in place, activate Presentation mode ( Shift + F5 ) and hover your mouse over the hyperlink. You should visualize your ScreenTip text.
Now, let’s go to the fun part!
How to Change the Color of a Hyperlink
If you’re adding hyperlinks to a professional presentation, changing the default link color is something you should know. Sometimes your PowerPoint background makes the blue hyperlink barely visible, or it just doesn’t match your presentation color palette, whatever the case, here are the 5 steps you must follow:
- Go to View > Slide Master
- Select Colors > Customize Colors
- A dialog box will open where you can change the “Hyperlink” and “Followed hyperlink” colors to suit the needs of your presentation.
- Close Master View
For a visual explanation, check this out:

How to Make Any Object Clickable in PowerPoint
When it comes to hyperlinks, you don’t have to limit yourself to texts. The truth is you can make any object clickable in PowerPoint, whether it’s a headline, a shape, an image, or a button.
You have the “Link” option to do so - like in the previous sections - but also the “Action” button. So in this part, I’m going to show how to use the second one:

- Select the object in the slide you would like to hyperlink
- Select “Action”
- Click the option “Hyperlink to:” and from the drop-down menu, select where you want the action button to link to. It can be:
- A specific slide within your presentation (Option “Slide…”)
- A web page (Option “URL”)
- Other PowerPoint presentations.
5. Finally, click “Ok”
To test it, start your PowerPoint slideshow ( Shift+F5 on your keyboard ) and click the object with the action button.
Get a Fully Customized Interactive Presentation!
Even if you’re new to PowerPoint, you can quickly add hyperlinks to your slides following this tutorial. But if you want to create a fully interactive presentation to show your work , you might want to learn about our presentation design solutions . At 24Slides, we take presentations from “good” to “extraordinary” saving professionals like you hours of fiddling with PowerPoint. Forget about late-night shifts doing presentations and let our design experts wow you overnight!

You might also like these articles:
- PowerPoint 101: The Ultimate Guide for Beginners
How To Add Animations To PowerPoint
Tutorial: save your powerpoint as a video.
- How To Password Protect PowerPoint
- How to Compress a PowerPoint Presentation
Create professional presentations online
Other people also read

How To Convert Google Slides To PowerPoint and Vice Versa

- Slidesgo School
- PowerPoint Tutorials
How to Insert a Hyperlink in PowerPoint

In this tutorial, you’ll learn how to add links to other documents, websites, multimedia resources, email addresses or even other slides in the same presentation . Any of the resources included in the presentation, such as texts, images or shapes, can be linked.
Adding a Link to a Website
Adding a link to another slide in the same presentation, to another document, to an email address or to a new document.
- Select the resource you want to use as a link.
- On the Insert tab, click Hyperlink. You can also right-click and choose Hyperlink.
- In the “Address” field, enter the URL of the website you want to link to. If you click ScreenTip, you can define the text that will appear on the popup when hovering over the link.
- When you’re done, click OK.
- Select the desired option under “Link to”:

- By clicking the ScreenTip button, you can enter the text that will appear on the popup when hovering over the link.

Do you find this article useful?
Related tutorials.

How to Make a Jeopardy Game in PowerPoint
Thinking about new ways of reviewing concepts for your students? Do you simply want to have fun with your friends? Or are you a medical student and need a helping hand with the names of the different parts of the inner ear? We can help you! Gamification is always a good idea when trying to learn new things, don’t you think? We have created an educational Jeopardy using interactive slides. You can pick different subjects and questions clicking on different buttons! Does it sound like rocket science? In this tutorial, we’ll teach you how to create a funny Jeopardy from scratch....

How to Create a Jeopardy Game in Google Slides
Jeopardy is an American television game show in which contestants have some clues or answers, and they need to give their responses in the form of questions—and, of course, they can get some money! We’re sure you have watched this show several times. Jeopardy games are pretty useful! They are great to have fun with your friends or to play with your students to review some concepts related to different subjects, such as Medicine, English, Maths or sciences. In this tutorial, we are going to teach you how to create a Jeopardy board from scratch. Let’s get the party started!

How to Make a Quiz for Your Online Classes Using PowerPoint
Sometimes it is not easy to get your students involved when giving a presentation. One of the best ways to capture their attention is creating interactive quizzes and questions, so they will interact with the slides. This way, the learning process will turn into something fun and amazing for children. If you want to learn how to make some interactive quizzes for your pupils using PowerPoint presentations, read this tutorial. It’s an easy task, and it will only take you a few minutes!

How to Create a Quiz for Your Online Classes Using Google Slides
Quizzes are great tools to get your audience involved, as they need to participate and give their own answers. In fact, they are particularly useful when teaching children, as their attention gets diverted quite easily. This way, they will learn in an interactive and entertaining way. Creating a quiz is not a complex thing to do, but it requires some time. In this tutorial, we are going to teach you how to create some question slides for your students using Google Slides. Let’s get started!

How to Hyperlink in PowerPoint (Insert, Remove or Edit Links)

Insert and Manage Links or Hyperlinks to Create Interactive PowerPoint Presentations
by Avantix Learning Team | Updated October 14, 2022
Applies to: Microsoft ® PowerPoint ® 2010, 2013, 2016, 2019, 2021 and 365 (Windows)
You can easily add links or hyperlinks in PowerPoint presentations to add interactivity and make it easy for users to click a button or link to jump to another slide in your deck, to another presentation, to an Excel file or to a web site. You can edit hyperlinks at any time and remove hyperlinks if necessary. In PowerPoint, hyperlinks become active when you run a slide show (normally by clicking the Slide Show button on the bottom right of the screen). In newer versions of PowerPoint, the term link is used as an alternative to hyperlink (although the dialog box displays Hyperlink).
Hyperlinks can be displayed as full source URLs or internet addresses such as http://abccompany.ca, as descriptive text, as an image or as a shape.
In this article, we'll be using the Link or Hyperlink command to insert hyperlinks, not Action Settings (an alternative method for adding hyperlinks).
Recommended article: How to Crop a Picture in PowerPoint (4 Ways)
Do you want to learn more about PowerPoint? Check out our virtual classroom or in-person classroom PowerPoint courses >
Insert a text hyperlink
If you select text and use it as a hyperlink on a PowerPoint slide, it appears underlined and in a color (normally blue) and coordinates with the color theme in your document. The text color changes automatically after you click hyperlink text in a slide show (again based on color theme settings). Shapes or images with hyperlinks do not change color.
Insert a hyperlink to a slide in the current presentation
To insert a link or hyperlink to a slide in the current presentation:
- In Normal View or Slide Master View, select the text, shape or image you want to use as a hyperlink. If you are using a shape that contains text, click its edge.
- Click the Insert tab in the Ribbon.
- In the Links group, click Link or Hyperlink. You can also press Ctrl + K. The Edit Hyperlink dialog appears.
- Under Link to, select Place in This Document.
- Under Select a place in this document, select the slide you'd like to link to.
- If you are using a text hyperlink, enter the descriptive text that will become the link text in the Text to display box (if necessary).
- Click Slide Show on the bottom right of the screen to run your slide show. You can also press Shift + F5.
- Click the link to test it.
- Press ESC to exit the slide show.
Below is the Edit Hyperlink dialog box with a link to another slide in the current presentation:

Insert a hyperlink to another PowerPoint presentation
To insert a link or hyperlink to another PowerPoint presentation:
- Under Link to, select Existing File or Web Page.
- Click Browse (yellow file folder icon).
- Navigate to the other presentation and double-click it.
Below is the Edit Hyperlink dialog box with a link to another presentation:

Insert a hyperlink to an Excel workbook
To insert a link or hyperlink to an Excel workbook:
- Navigate to the Excel workbook and double-click it.
Below is the Edit Hyperlink dialog box with a link to an Excel workbook:

Use relative or absolute addresses to external files
If you are creating hyperlinks to external files such as another PowerPoint presentation or an Excel workbook, it's important to understand the difference between a relative and absolute address. A relative hyperlink uses the address relative to the address of the containing document whereas an absolute hyperlink uses the full address of the destination document including the drive location.
The following example uses an absolute hyperlink address (full path address):
C:\Documents\January\Budget.docx
The following relative hyperlink contains only the relative address or path to a Budget document in the same folder as the presentation.
January\Budget.docx
You may want to use a relative hyperlink address or path if you want to move or to copy your files to another location such as another server.
Insert a hyperlink to a web site
To insert a link or hyperlink to a web site:
- In the Address box, enter the web address or url. You can also copy the web address from a browser or select from the drop-down menu of recent web sites.
Below is the Edit Hyperlink dialog box with a link to a web site:

Create a hyperlink using the context menu
Another method of creating or editing hyperlinks is to right-click and use the context menu (you can also press Shift + F10 to display the context menu).
To insert a hyperlink using the context menu:
- Right-click and choose Link or Hyperlink from the dropd-down menu and then select Insert Hyperlink or Insert Link. The hyperlink dialog appears.
- Select the appropriate option under Link to. If you are creating an external link to a webpage or another document, select Existing File or Web Page. If you are creating an internal link within the document, select Place in This Document.
- In the address field, enter or choose the address or location where the link should lead. For external references, enter or copy the URL in the Address field. For place in the same document, select the appropriate item.
Jump to a hyperlink location
Hyperlinks become active when you run a slide show or save your presentation as a PDF (portable document format). Simply click the hyperlink to jump to the hyperlink location.
Edit a hyperlink
To edit a hyperlink:
- In Normal View or Slide Master View, right-click the hyperlink and select Edit Hyperlink or Edit Link from the drop-down menu. The Hyperlink dialog box appears.
- Select the desired options.
You can also select a hyperlink and press Ctrl + K to edit it.
Create a screen tip
You can also create a screen tip that will pop up when you hover over a hyperlink during a slide show.
To create a screen tip for an existing hyperlink:
- In Normal View or Slide Master View, right-click the hyperlink.and select Edit Hyperlink or Edit Link from the drop-down menu. The Edit Hyperlink dialog box appears.
- Click ScreenTip (on the top right). A dialog box appears.
- Enter a screen tip.
- Click OK twice.
Remove a hyperlink
To remove a hyperlink:
- In Normal View or Slide Master View, right-click the hyperlink you want to remove.
- In the context menu, select Remove Hyperlink or Remove Link.
Hyperlinks can add a new dimension of interactivity to your decks and when a PowerPoint file is saved as a PDF, they become active hyperlinks.
Subscribe to get more articles like this one
Did you find this article helpful? If you would like to receive new articles, JOIN our email list.
More resources
How to Insert Slide Numbers in PowerPoint
How to Use the Built-in Laser Pointer in PowerPoint (with Shortcuts)
How to Cut a Shape Out of an Image in PowerPoint (Mask a Picture)
How to Remove the Background of an Image in PowerPoint (2 Ways)
How to Break, Update or Change Links to Excel Charts or Worksheets in PowerPoint
Related courses
Microsoft PowerPoint: Intermediate / Advanced
Microsoft PowerPoint: Design for Non-Designers
Microsoft PowerPoint: Animations Bootcamp
Microsoft PowerPoint: Accessible PowerPoint Presentations
VIEW MORE COURSES >
Our instructor-led courses are delivered in virtual classroom format or at our downtown Toronto location at 18 King Street East, Suite 1400, Toronto, Ontario, Canada (some in-person classroom courses may also be delivered at an alternate downtown Toronto location). Contact us at [email protected] if you'd like to arrange custom instructor-led virtual classroom or onsite training on a date that's convenient for you.
Copyright 2024 Avantix ® Learning
You may also like

How to Insert or Type I with an Accent Mark in Word (Í, í, Ì, ì, Î, î, Ï, or ï)
You can insert or type i with an accent mark in Word using built-in tools or keyboard shortcuts (including Alt code shortcuts). The letter i can be inserted with an accent in both upper or lower case. The following are common accented characters that you can insert or type in Word in upper or lower case: grave (Ì or ì), acute (Í or í), circumflex (Î or î) and umlaut (Ï or ï).

How to Insert or Type A with an Accent Mark in Word (À, Á, Â, Ä, à, á, â, or ä)
You can insert or type a with an accent mark in Word using built-in tools or keyboard shortcuts (including Alt code shortcuts). The letter a can be inserted with an accent in both upper or lower case. The following are common accented characters that you can insert or type in Word in upper or lower case: grave (À or à), acute (Á or á), circumflex (Â or â) and umlaut (Ä or ä).

10 Word Shortcuts to Select Text Using a Keyboard
You can use several shortcuts in Word to select text in your documents using only your keyboard. When you select text, it will typically be highlighted in grey. After you select text, you can cut, copy, or delete the selected text or apply character or paragraph formatting.
Microsoft, the Microsoft logo, Microsoft Office and related Microsoft applications and logos are registered trademarks of Microsoft Corporation in Canada, US and other countries. All other trademarks are the property of the registered owners.
Avantix Learning |18 King Street East, Suite 1400, Toronto, Ontario, Canada M5C 1C4 | Contact us at [email protected]
Our Courses
Avantix Learning courses are offered online in virtual classroom format or as in-person classroom training. Our hands-on, instructor-led courses are available both as public scheduled courses or on demand as a custom training solution.
All Avantix Learning courses include a comprehensive course manual including tips, tricks and shortcuts as well as sample and exercise files.
VIEW COURSES >
Contact us at [email protected] for more information about any of our courses or to arrange custom training.
Privacy Overview
Pin it on pinterest.
- Print Friendly
How to Hyperlink in PowerPoint? [The Complete Guide!]
By: Author Shrot Katewa
![How to Hyperlink in PowerPoint? [The Complete Guide!]](https://artofpresentations.com/wp-content/uploads/2022/03/Featured-Image-How-to-Add-Hyperlink-in-PowerPoint.webp "how to create a link to a powerpoint presentation")
If you wish to jump a few slides when delivering your PowerPoint presentation, you will need to make use of the “Hyperlink” feature in PowerPoint!
To insert a hyperlink in PowerPoint, first, select and highlight the text or object. Next, right-click and choose the “Link” option. Select the destination of the link. You can link to an existing file, web page, or a specific slide within the presentation. Once the destination is chosen, click “OK”.
In this article, you will get to understand the hyperlink feature in PowerPoint in great detail. I’ll share with you how to add a hyperlink (in further detail), how do you edit a hyperlink, and even how to link to files outside of PowerPoint! That and much more!
So, let’s get started!
1. How to Add a Hyperlink in PowerPoint?
Let’s get straight to the key reason why you are here reading this article i.e. how do you insert a hyperlink in PowerPoint?
A hyperlink is a link added to a text or image that leads to a new document or a new section within the document when clicked on.
In Microsoft PowerPoint, even though you can add a hyperlink to texts or images, the process of doing so is quite similar for both.
Let’s take a look at the step-by-step process involved in adding a hyperlink in PowerPoint.
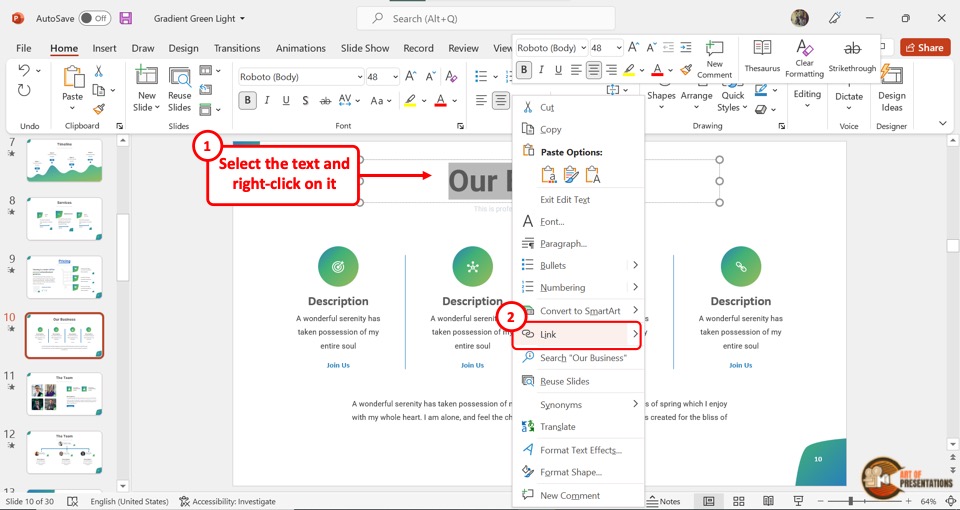
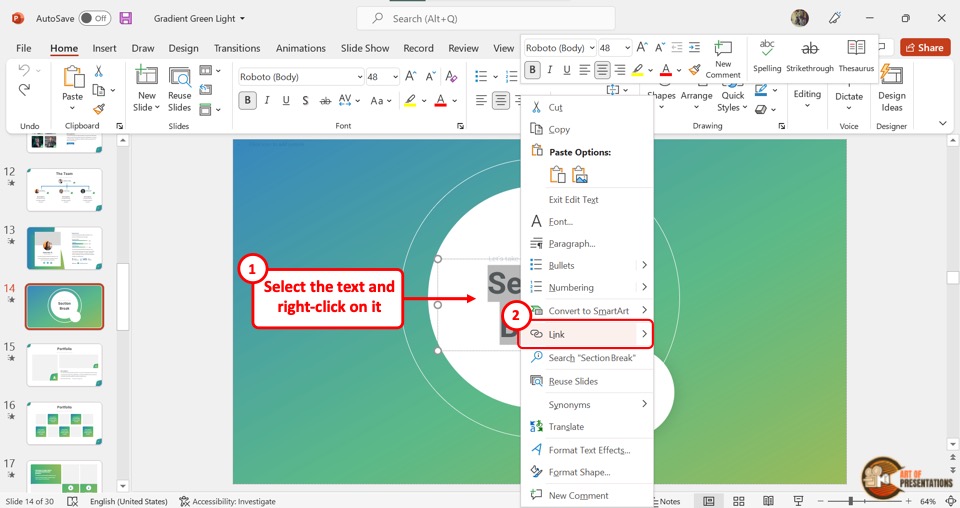
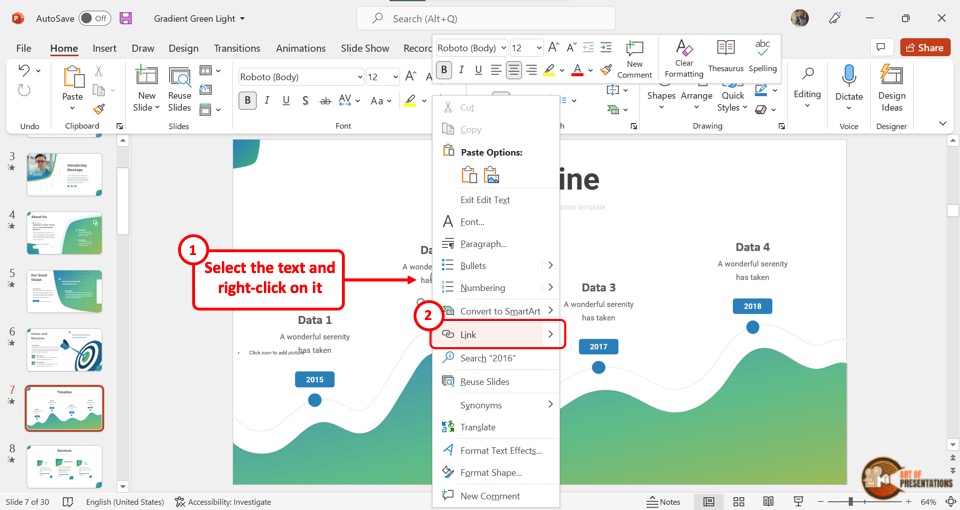
Step-1: Select the Text and Click on the “Link” option

The first step is to “Right Click” on the text or image where you want to add the hyperlink. In the dropdown menu, click on the “Link” option. Alternatively, you can press the “Ctrl+K” keys on your keyboard.
You can also click on the “Insert” tab in PowerPoint , and click on the “Link” option from the ribbon. You can use any of the three methods, and you will be prompted with the “Insert Hyperlink” window.
Step-2: Choose the Destination of the Link
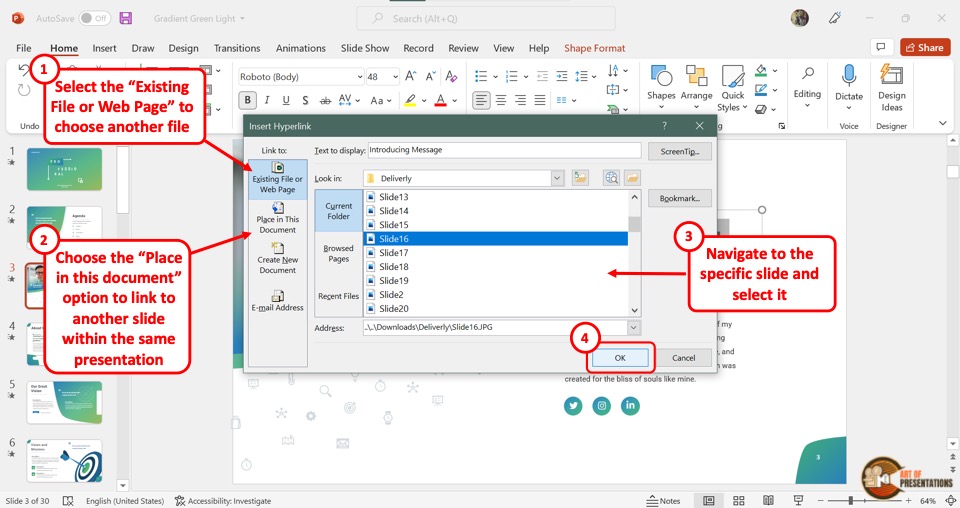
In the “Insert Hyperlink” dialog box, you can either link a file from your computer or an online source by clicking on the “Existing File or Web Page” button. Then, navigate to the folder containing the file, click on the file to select it, and click “ OK “.
Alternatively, you can also click on the “ Place in this document ” option to link to an existing slide. (I shall show the exact steps later in this article).
2. How to Edit Hyperlink Text in PowerPoint?

In PowerPoint, adding a hyperlink does not change the behavior of text or the text box. Thus, the process of editing a hyperlink text is similar to the way you would edit the text in PowerPoint normally.
All you have to do is click inside the text box and delete or add text. You can also change the appearance of the hyperlink text by using the tools in the “Font” section of the “Home” tab in PowerPoint .
3. How to Edit the Hyperlink in PowerPoint?
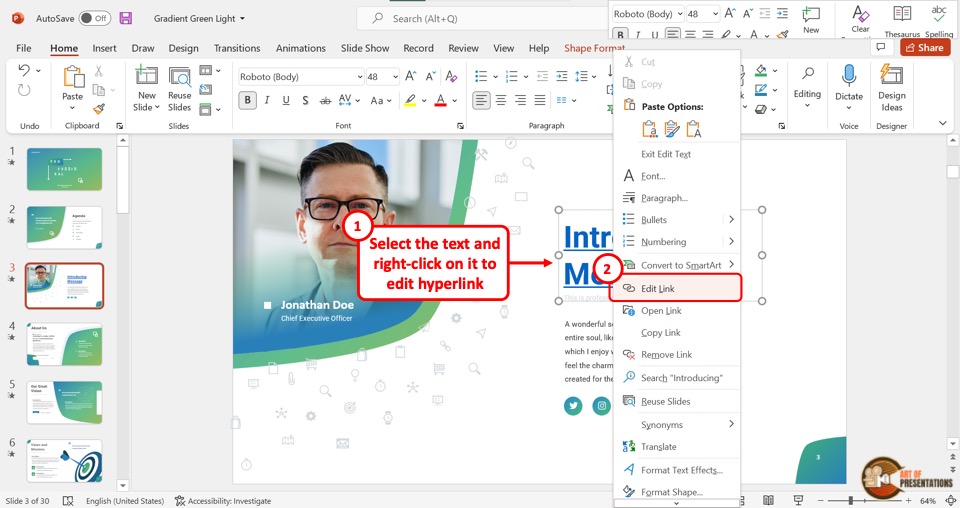
Once a hyperlink is added to a text or image in a PowerPoint slide, you can go back and edit it. To do so, “Right Click” on the hyperlinked text and select the “Edit Link” option from the dropdown menu.
This will open the familiar “Insert Hyperlink” dialog box that we saw in section 1 of this article. Simply select another file or slide from the presentation in order to edit the link.
4. How to Remove Hyperlink in PowerPoint?
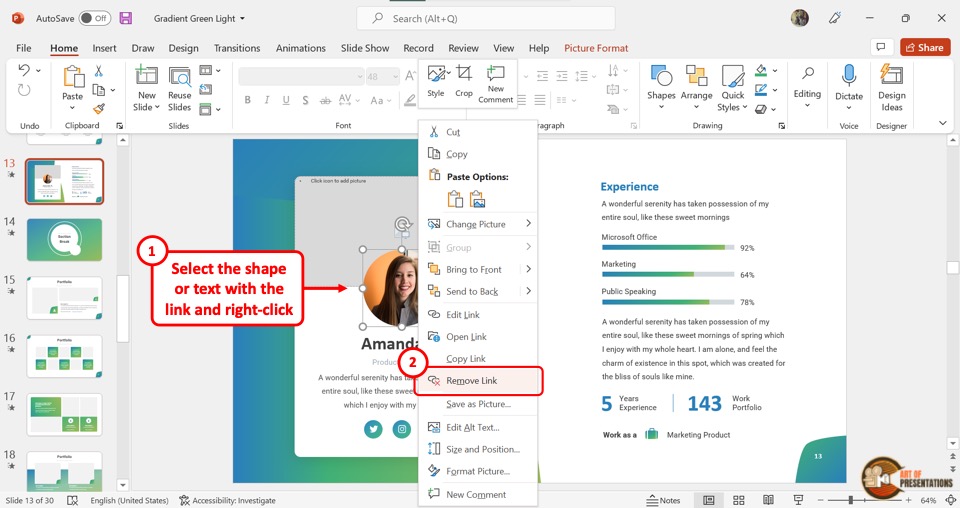
In Microsoft PowerPoint, you can remove the hyperlink from a text or an image with only one click. “Right Click” on the text or image to open the dropdown menu.
Now all you have to do is click on the “Remove Link” option to remove the hyperlink.
5. How to Hyperlink to Another Slide in PowerPoint
As mentioned earlier in the article, you can even link one slide to another within the same presentation using the hyperlink feature. This has great benefits especially when you want to specifically jump to a section in the presentation that you want to show in further detail.
Here’s what you need to do in order to link to another slide within the same presentation using the hyperlink feature in PowerPoint –
Step-1: “Right Click” on the selected text or image
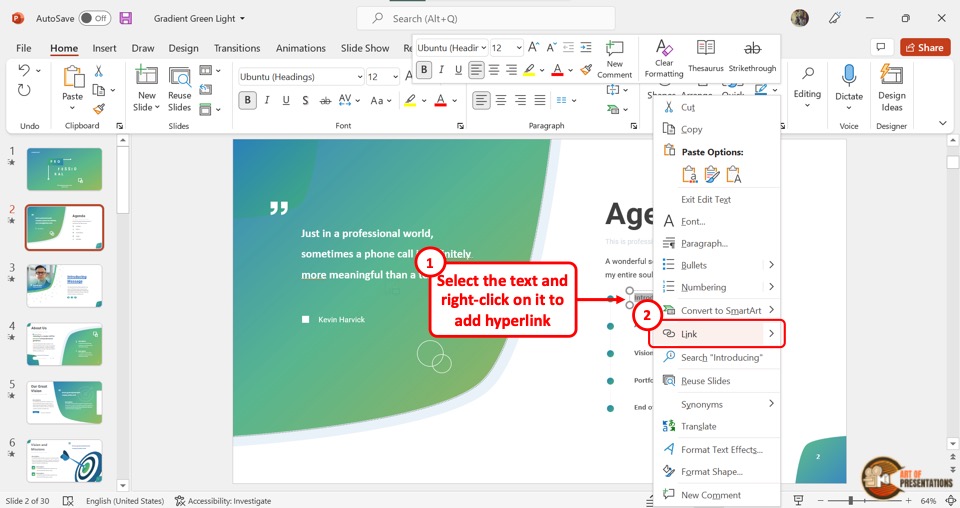
In the selected slide, “Right Click” on the text or image where you want to link another slide. Then click on the “Link” option from the dropdown menu.
You can alternatively press the “Ctrl+K” keys on your keyboard. This will open a dialog box.
Step-2: Click on the “Place in This Document” option
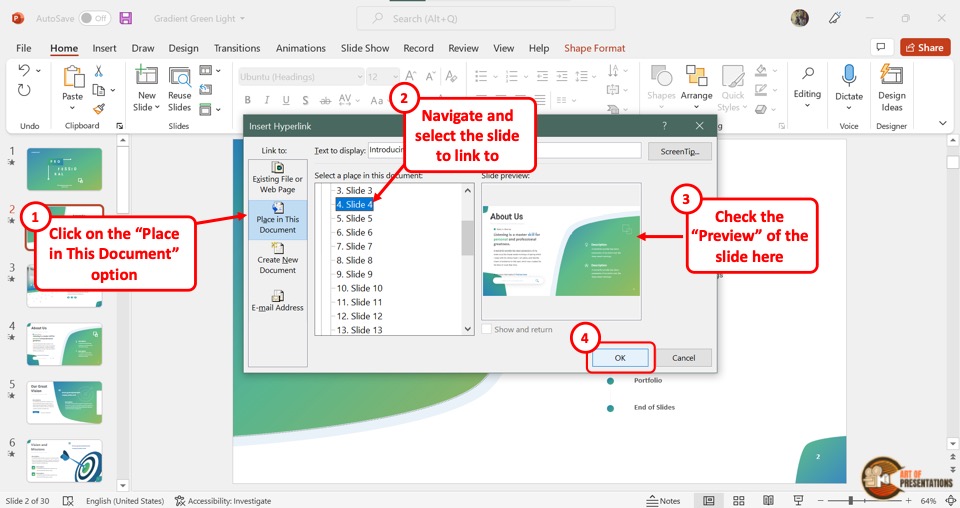
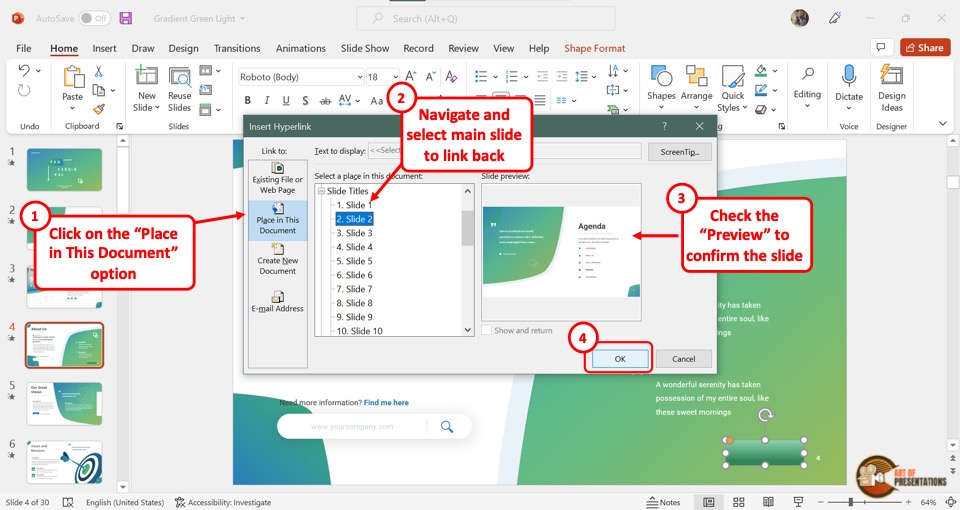
In the “Insert Hyperlink” dialog box, click on the “Place in This Document” option from the left sidebar. Then select the slide you want to link.
You can see the selected slide in the “Slide preview” section in the dialog box. Finally, you have to click on the “OK” button to finish the process.
5a. How to Return Back to the Main Slide?
During a presentation, it may be important to return to the main slide in one click after jumping to the linked slide. To do so, you can add a shape and hyperlink it back to the main slide.
Here’s how to create a hyperlink back to the main slide –
Step-1: Click on the “Shapes” option
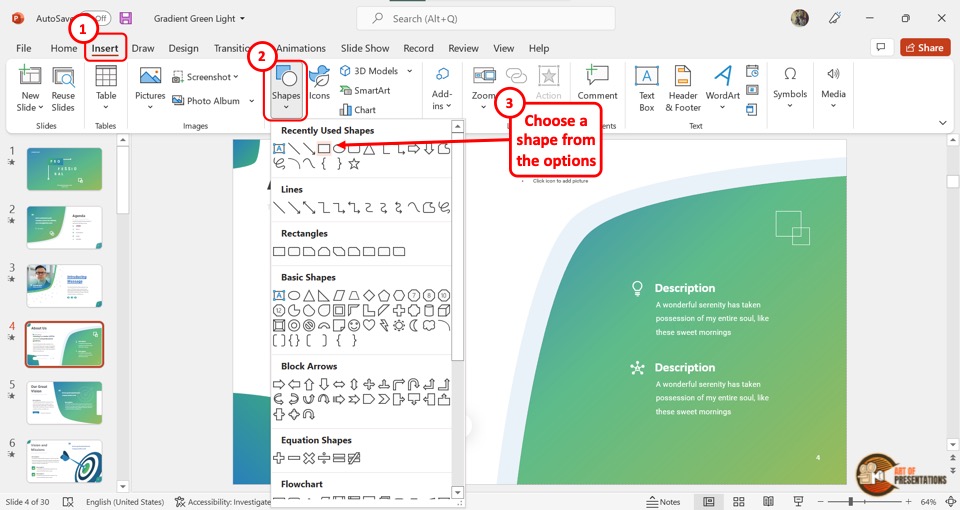
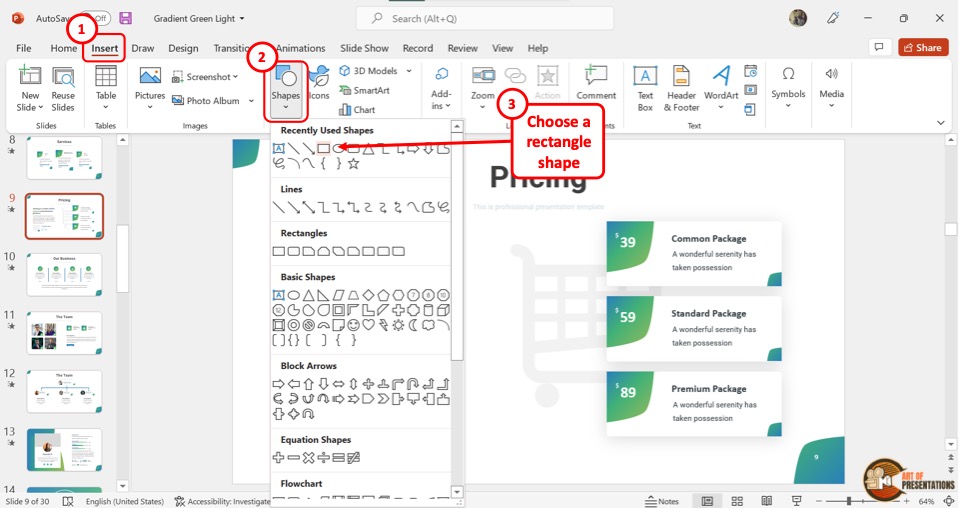
The first step is to open the linked slide. Then click on the “Insert” tab from the menu ribbon located at the top of the screen. In the “Insert” menu, click on the “Shapes” option and select your preferred shape from the dropdown menu.
Step-2: Edit the shape
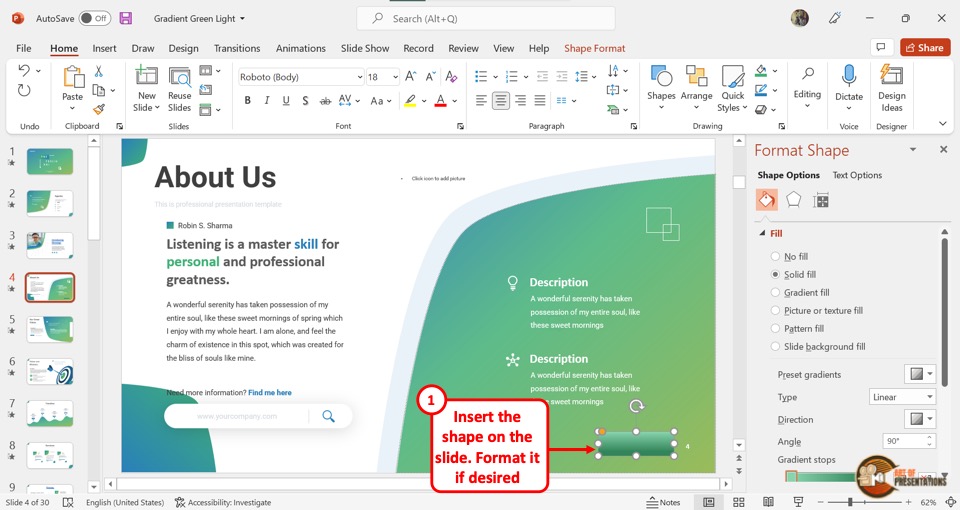
Now you can select the shape and click on the “Shape Format” tab from the menu ribbon. In the “Format Shape” sidebar located on the right side of the screen, edit the color and of the shape to visually match the rest of the slide.
I would highly recommend adding a text to the shape something to the effect of “Go back to slide X” (where “X” is the slide number of the main slide you want to return). This will help you and others take note of why a shape exists on the slide and prevent others from deleting it accidentally.
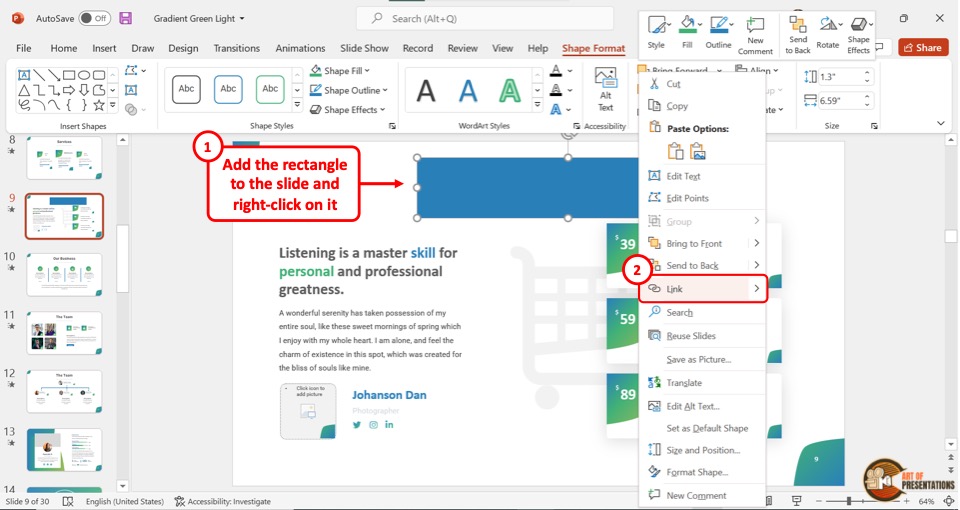
Step-3: “Right Click” on the shape
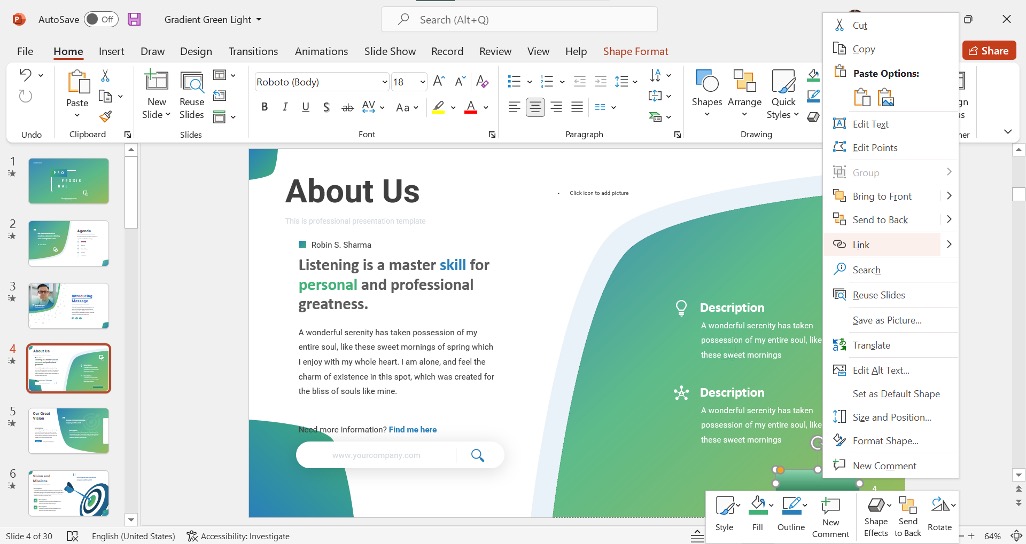
Now, all we need to do is simply create a hyperlink that links back to the original slide.
Select the shape and “Right Click” on the shape. Then, click on the “Link” option. You can alternatively press the “Ctrl+K” keys on your keyboard to open the “Insert Hyperlink” dialog box.
Step-4: Hyperlink the main slide
In the “Insert Hyperlink” dialog box, click on the “Place in This Document” button from the sidebar located on the left side. Then select the main slide and click on the “OK” button.
Now all you have to do is click on the shape to return to the main slide during the presentation.
Note that this link will only work when you are viewing the presentation in slideshow mode!
6. How to Hyperlink Without Underline?
In Microsoft PowerPoint, you cannot hyperlink text without the underline directly. However, there is a workaround.
To add a hyperlink without underlining a text in PowerPoint, you will need to use a transparent shape. Insert a shape over the text. Right-click and add a hyperlink to the shape. Then, select the “No Fill” options to remove the “Fill” and “Line” colors in the “Format Shape” settings.
Here’s a detailed step-by-step process that you will need to follow –
Step-1: Click on the “Remove Link” option

The first step is to remove the hyperlink from the text. “Right Click” on the hyperlink text and select the “Remove Link” option from the dropdown menu.
This will ensure that the underline from the text gets removed.
Step-2: Click on the “Shapes” option
Now click on the “Insert” tab from the menu bar and click on the “Shapes” button in the “Insert” menu. From the dropdown menu, select the “Rectangle” option.
Then insert the rectangle shape over the hyperlink text.
Step-3: Add a hyperlink to the shape
The next step is to add the hyperlink to the shape instead of the text.
“Right Click” on the shape and click on the “Link” option. Alternatively, you can press the “Ctrl+K” keys on your keyboard.
In the “Insert Hyperlink” dialog box, paste the link that was previously on the text (as we did before in the previous sections). Then click on the “OK” button.
Step-4: Click on the “Format Shape” option
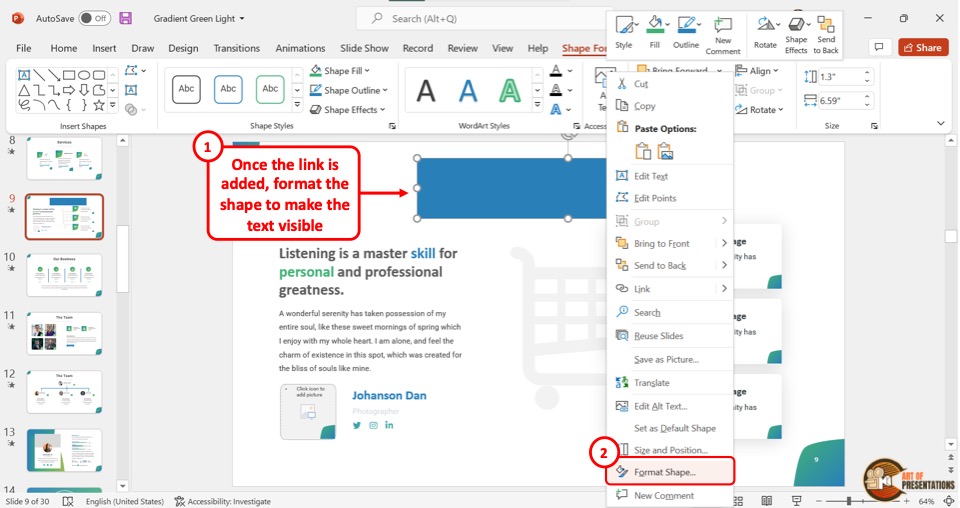
Now all you have to do is “Right Click” on the shape and click on the “Format Shape” option at the bottom of the dropdown menu.
This will open a “Format Shape” sidebar located at the right side of the screen.
Step-5: Click on the “No fill” and “No line” options
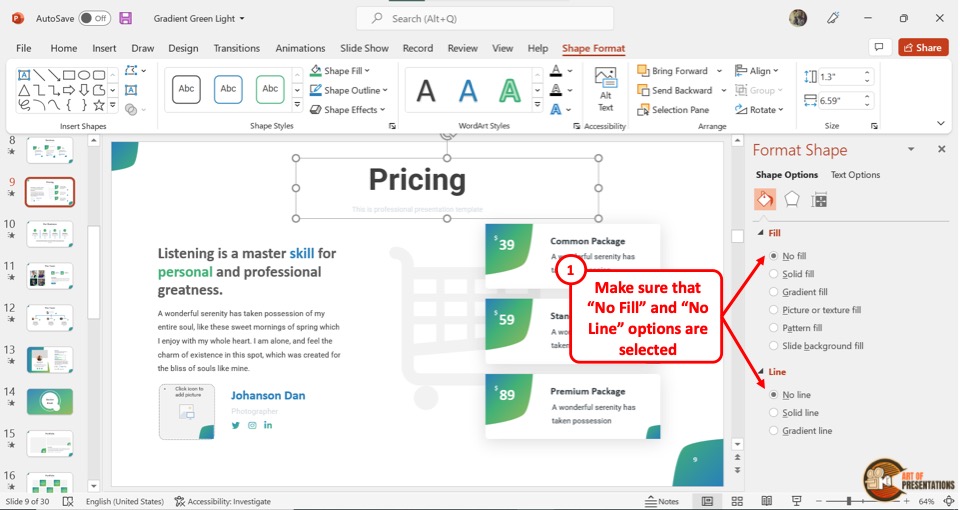
In the “Format Shape” sidebar, click on the “No fill” option under the “Fill” section. Then click on the “No line” option under the “Line” section.
This will make the shape completely transparent and make the text visible while removing the underline from the text. You can now click on the text and access the hyperlink in the slideshow mode.
7. How to Add a YouTube Link in PowerPoint?
To add a Youtube link in a PowerPoint slide, you have to first open the Youtube video that you want to link and copy the link address. Then follow the 2 quick steps.
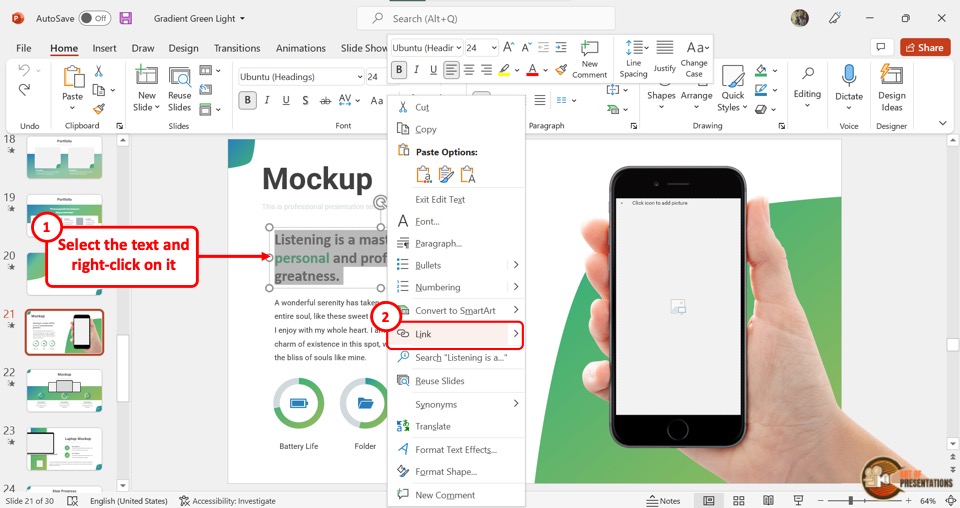
Step-1: Click on the “Link” option
First, you have to select the text to hyperlink. Then “Right Click” on the selected text and click on the “Link” option. Alternatively, you can press the “Ctrl+K” keys on your keyboard.
Step-2: Paste the Youtube link
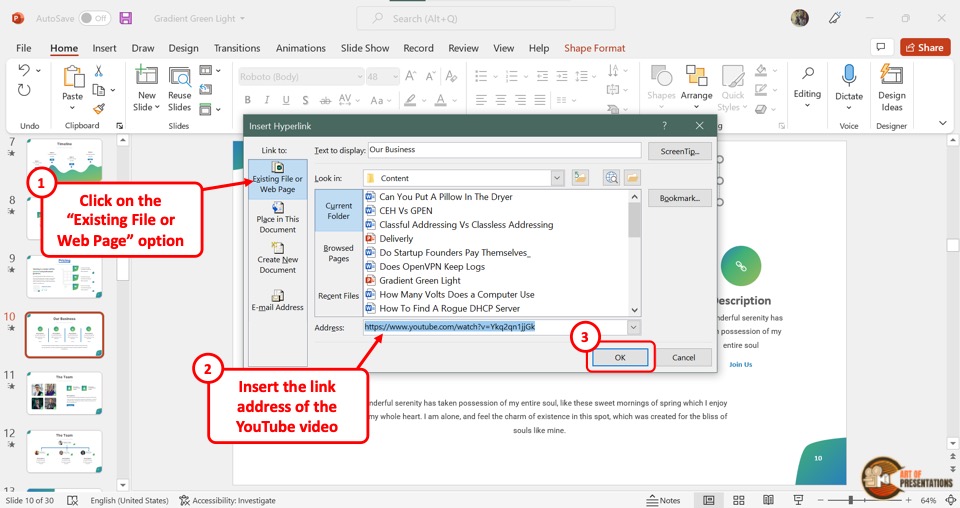
Click on the “Existing File or Web Page” option in the “Insert Hyperlink” dialog box. Then paste the Youtube link in the “Address” box at the bottom.
Now all you have to do is click on the “OK” button to hyperlink the Youtube video.
8. How to Insert a Website Link in PowerPoint?
In Microsoft PowerPoint, you can hyperlink to any resource available on the web. To insert a website link, you have to first obtain the link from the website. Then follow the 3 easy steps.
Step-1: Click on “Link”
In the open slide, select the text or image which you want to hyperlink. Then “Right Click” on the selected text or image. Click on the “Link” option from the dropdown menu. Alternatively, you can press the “Ctrl+K” keys on your keyboard.
Step-2: Paste the link to the website
The next step is to paste the website link in the “Address” box in the “Insert Hyperlink” dialog box. “Right Click” on the “Address” box and click on the “Paste” option from the dropdown menu.
This will paste the copied website link. You can alternatively press the “Ctrl+V” keys on your keyboard.
Step-3: Click on the “OK” option
Now all you have to do is click on the “OK” button at the bottom of the “Insert Hyperlink” dialog box to insert the link to the website (as shown in the image in step 2).
9. How to Hyperlink in PowerPoint to an Excel File?
Microsoft PowerPoint allows you to add both links from the web as well as links to existing files in your computer as a hyperlink. To hyperlink to an Excel file in a slide, follow the 3 simple steps.
Step-1: “Right Click” on the selected text
The first step is to select the text or image where you want to insert the link. Then you have to “Right Click” on it. From the dropdown menu, click on the “Link” option.
Step-2: Click on the “Browse for File” option
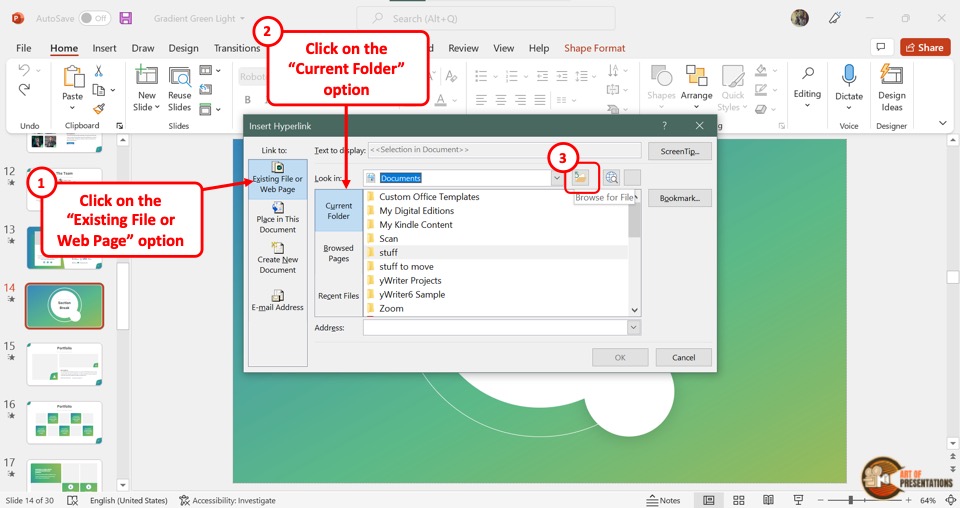
The next step is to click on the “Browse for File” option in the “Insert Hyperlink” dialog box. It is the third icon at the right side of the “Look in” box and looks like a folder.
This will open another dialog box.
Step-3: Click on the “Search Documents” box
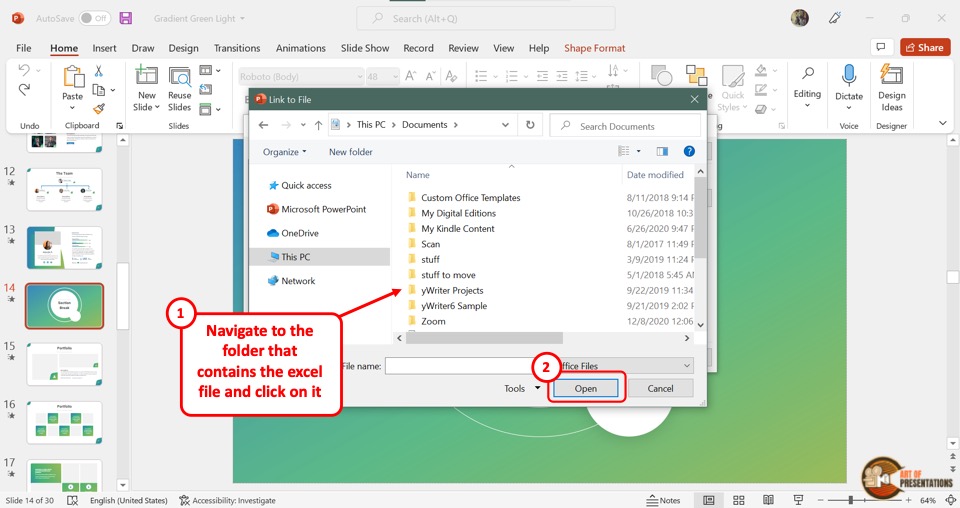
In the “Link to File” dialog box, click on the “Search Documents” box located at the top and right corner. Then type in the name of the Excel file you want to hyperlink.
Select the Excel file and click on the “Open” button at the bottom of the dialog box to insert the link to the Excel file.
10. How to Hyperlink in PowerPoint to a PDF File?
In Microsoft PowerPoint, you can add a hyperlink to a PDF file. This can be an efficient way for you to link to references for your presentation content.
The process is similar to that of adding a link to an excel file. Here’s what you need to do –
You have to first select a text or image and then “Right Click” on it. Click on the “Link” option from the context menu. Alternatively, you can press the “Ctrl+K” keys on your keyboard.
Step-2: Click on “Browse for File”

In the “Insert Hyperlink” dialog, click on the “Browse for File” option which is the icon that looks like a folder. It will open the “Link to File” dialog.
Step-3: Click on “Search This PC”
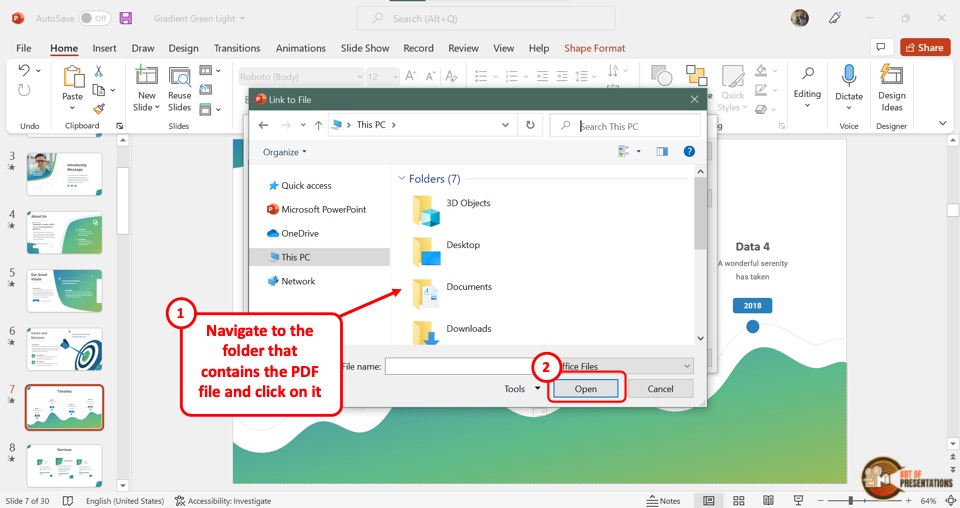
In the “Link to File” dialog box, click on the “Search This PC” option and type in the name of the PDF file you want to link.
Then select the PDF file and click on the “Open” button at the bottom of the dialog box. This will hyperlink the PDF file to the presentation.
11. How to Open a Hyperlink in PowerPoint?
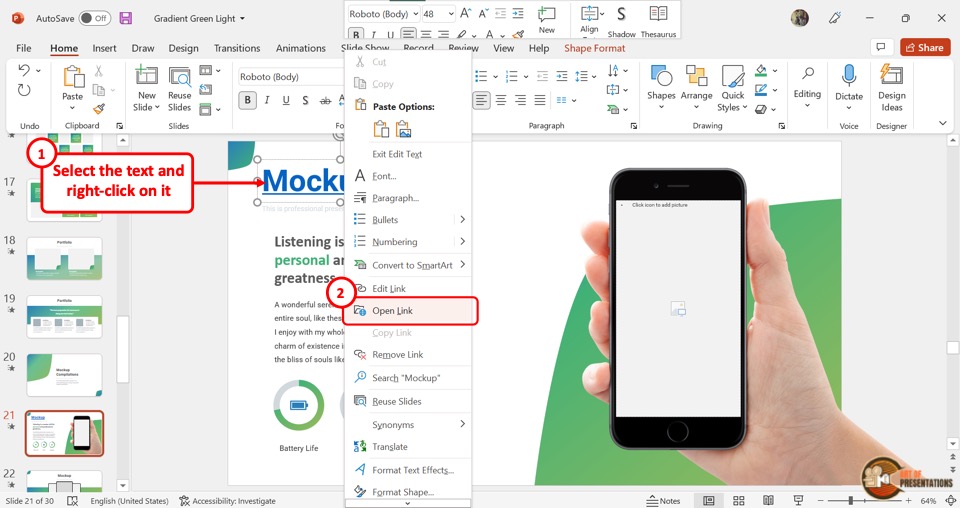
To open a hyperlink, “Right Click” on the hyperlink text or image. From the dropdown menu click on the “Open Link” option. This will open the hyperlink in a new window.
Alternatively, you can press down the “Ctrl” key on your keyboard and click on the hyperlink text or image simultaneously to open the hyperlink.
Using the keyboard shortcut is more practical in the “Slide Show” screen during a presentation.
12. Hyperlink Not Working in PowerPoint
When inserting or accessing a hyperlink in Microsoft PowerPoint, sometimes, you might run into some issues. For instance, the option to hyperlink a text or image may be greyed out and you may not be able to insert a hyperlink.
These and other issues can be solved quite easily.
12a. Hyperlink is Greyed Out
In the “Insert” menu, you may find that the “Link” option is greyed out. But, this problem can be easily fixed! Here’s what you need to do –
Step-1: Click on the “Insert” tab

In the open PowerPoint presentation, click on the “Insert” tab in the menu ribbon located at the top of the screen. In the “Links” section of the “Insert” menu, you will notice that the “Link” option is greyed out.
Step-2: Click on an object
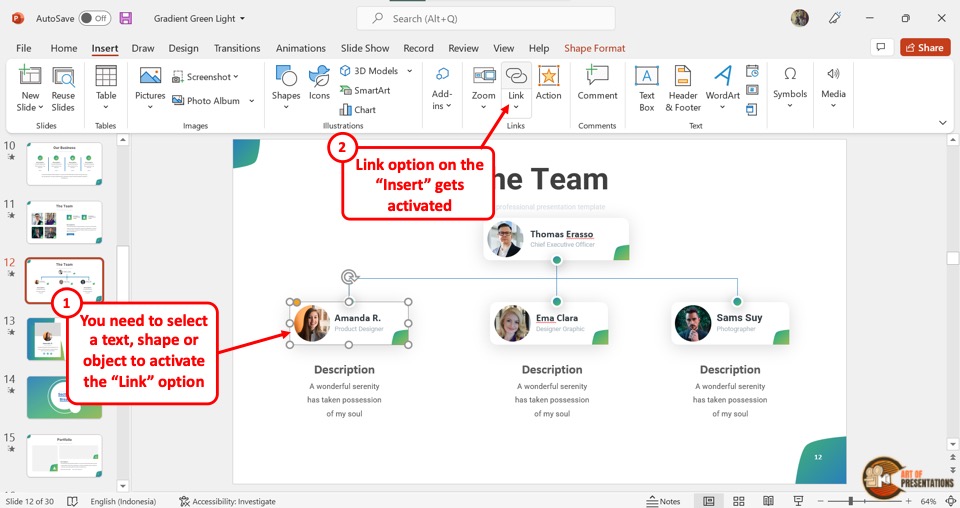
The “Link” option is usually greyed out because there are no objects selected yet. In Microsoft PowerPoint, you cannot insert a hyperlink to a slide. You can only insert hyperlinks to an object.
To be able to insert a hyperlink, all you have to do is click on any object in the open slide. You will now see that the “Link” option is no longer grayed out, and you can click on it.
12b. Hyperlink in PowerPoint is Not Clickable
After inserting a hyperlink in a PowerPoint presentation, you will notice that the hyperlink is not clickable. This is because you cannot click on the hyperlink in “Normal View” .
In Microsoft PowerPoint, “Normal View” is the default view where you can edit the slides. You can fix this problem in 3 easy methods.
Method-1: Click on “Ctrl+Save”
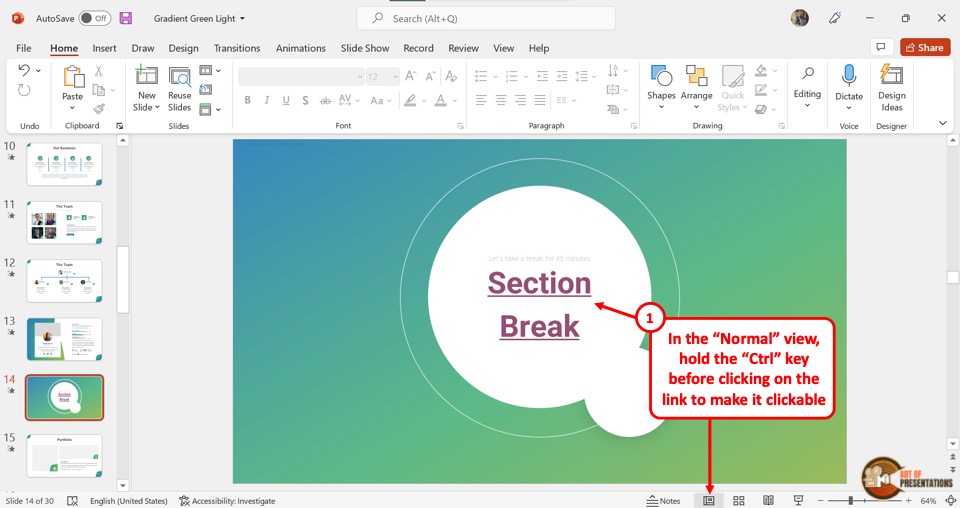
In the “Normal View” , you cannot open a hyperlink with a click. Instead, you have to press the “Ctrl” key on your keyboard and click on the hyperlink simultaneously. This will allow you to access the link.
Method-2: Click on the “Slide Show” tab
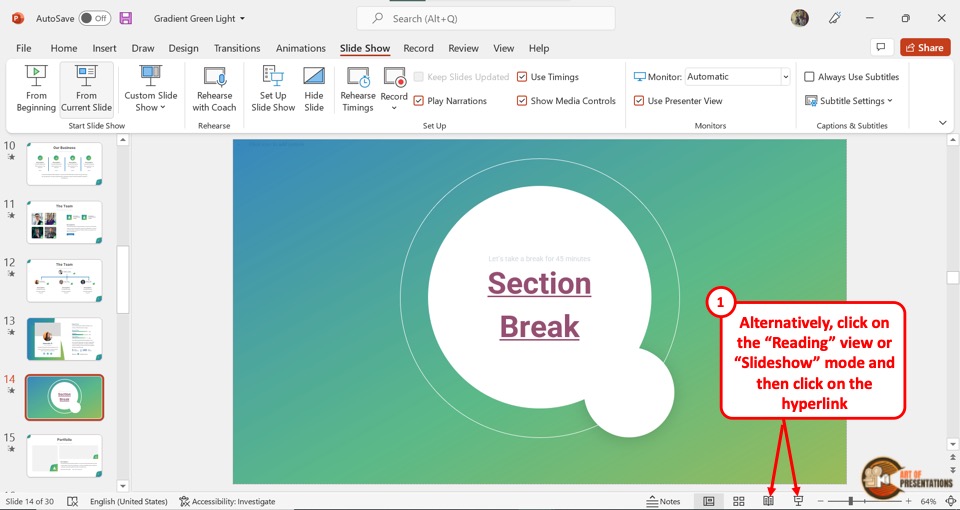
In the menu ribbon located at the top of the screen, click on the “Slide Show” tab. Then click on the “From Current Slide” option in the “Slide Show” menu.
Alternatively, you can press the “Shift+F5” keys on your keyboard. This will start the slideshow where the hyperlink is clickable.
Method-3: Click on the “Reading View” option
In the menu ribbon, click on the “View” tab. Then click on the “Reading View” option from the “Presentation Views” section (as shown in the image in method 2 above).
For the shortcut, all you have to do is click on the “Reading View” option which is the icon that looks like an open book in the status bar located at the bottom of the screen.
This will open the reading view screen where the hyperlinks are clickable.
Credit to cookie_studio (on Freepik) for the featured image of this article (further edited)
Unsupported browser
This site was designed for modern browsers and tested with Internet Explorer version 10 and later.
It may not look or work correctly on your browser.
- Presentations
How to Share Your PowerPoint Presentation Online (For Free)
- Bahasa Indonesia
When you think of PowerPoint presentations, you may think of them as being presented using a projector or large screen display. But when you can't connect in person to give your presentation, posting your PowerPoint online may be the next best alternative.

Maybe your audience doesn't have PowerPoint installed on their device. In that case, it makes sense to use Microsoft PowerPoint Online to share and collaborate. Or, you might have a major message you want to share online with anyone who clicks the link using SlideShare.
In this tutorial, discover a few ways to upload and share a PowerPoint presentation using best practices.
Guide to Making Great Presentations (Free eBook Download)
Before you read on, grab our free eBook: The Complete Guide to Making Great Presentations . It will help you master the presentation process, from: initial idea, through to writing, design, and delivering with impact.

How to Quickly Share PowerPoint Presentations Online (Watch & Learn)
In this quick two-minute screencast video, I'll walk you through using PowerPoint Online and SlideShare to upload your presentation for sharing. I'll show you tips and tricks for each platform to get the most from them.
Both of these services are free when you make an account. You don't need anything other than a PowerPoint file and an account to quickly share your presentation online.

Now, let's dive into some written tips on using these services. I'll show you best practices on getting your PowerPoint online for an audience to see.
Microsoft PowerPoint Online
Do you have a PowerPoint and are you wondering " how to share my PowerPoint online? "
My preferred way to share PowerPoint presentations is to use PowerPoint Online, Microsoft's browser-based version of PowerPoint. If you've used Google Drive and their collaborative apps that live inside your web browser, you can think of this as Microsoft's alternative. Best of all, it's free!

To use PowerPoint Online, you'll need a Microsoft account, which is free to create. Jump over to this link to log in or create a Microsoft account and get started with PowerPoint Online.
1. Upload Your PowerPoint Presentation
Now, you'll need to upload your PowerPoint presentation to make it available online.
There are two ways you can do this:
- Save it to your OneDrive account that's associated with your email address. OneDrive Microsoft's cloud storage app will automatically be available in PowerPoint Online when you log in.
- Log into PowerPoint Online , and click on Upload a Presentation to upload your file from your computer.

2. Invite Viewers to Your Online Presentation
Once your presentation is online, you're ready to invite others to view it. Using PowerPoint Online, click on Share in the right corner above the presentation.
Now, you can add email addresses for anyone to invite to the presentation. Add some email addresses in the To field, along with a message below it to add collaborators.

There are some other key options that you'll want to set each time you add viewers to a presentation:
- On the dropdown options, you can choose between Anyone with the link and Specific people to control who has access to the presentation.
- You can also choose between the permissions Can edit and Can view . If you select the Can edit option, your invitee can make changes to the presentation.
- You can set an expiration date for the share. Or, set a password so that the invitee has to log in to view the presentation.
- You can also copy the link to share it online or through email. (See the steps below.)
3. Optional: Make an Online PowerPoint Presentation Link
Another option is to make the presentation public so that anyone with the URL to your presentation can view it. If you're distributing your PowerPoint presentation to a team online, it's easier to create a link instead of inviting each user's email address.
Here's how to create a link for a PowerPoint:
Click on Copy link on the same sharing window I showed you above. PowerPoint Online creates a URL that you can send to others to collaborate on the presentation with you.

To invite others to make edits using the URL, click on the Anyone with the link can view option. Choose Allow editing from the Other settings section.
Post Your Presentations Online With SlideShare
Besides PowerPoint online, SlideShare is one of the best-known services for posting a PowerPoint online. When Netflix uploaded a slide deck on their culture in 2009, they likely had no idea that it would be viewed 17 million times in the following years.
Just as YouTube is a discovery platform for video, SlideShare is a network where users can discover your slide deck.
SlideShare is now owned by Scribd. You can upload a PowerPoint to SlideShare simply by hopping over to their website and log in (or create) your Scribd account. Or you can still log in through LinkedIn.

SlideShare supports a variety of formats, but it's tailor-made to drop your PowerPoint (PPTX) files into. You can drag and drop a file onto the window or click on a cloud service to quickly add your presentation online.
After you begin uploading your presentation, SlideShare has you add some basic metadata. Add a Title , Category , and Tags to help users discover your content.

Maybe the most important setting on this screen is to choose the Privacy settings for your presentation. A Public presentation appears to anyone who comes across it via search or social, just like the Netflix culture slide deck. You could also choose Limited to make it visible, but not in SlideShare search.
Once you've set the privacy, press Publish . Your presentation will go online, ready to share!
SlideShare is a great choice for when you want to publicize your PowerPoint. But the privacy settings are essential when you're sharing your presentation online.
Learn how to make a great online presentations with SlideShare and PowerPoint in our multi-part tutorial series. Or get started with one of these Envato Tuts+ tutorials:

Send and Share Your PowerPoint Presentations
If your presentation contains sensitive information or you just don't want to publish it online, I still have tips for how to share your presentation effectively.
If you're going to use email or a service like Dropbox to upload your PowerPoint presentation, you might want to reduce the file size of your presentation before you send it. Let's look at two key tips to reduce the file size so that you don't waste someone's inbox space.
1. Compress Images
Images are usually the single largest part of a PowerPoint presentation. Everything else in a presentation is some combination of text and shapes, which don't consume much storage space at all.
Compressing images is the best way I've found to save space. Select a picture and click Picture Format . Choose Compress Pictures.

On the Compress Pictures menu, choose a lower resolution setting from the list of options. I recommend choosing a lower resolution like 150 or 96 PPI. This reduces the space occupied by your images and creates a smaller PowerPoint file.
2. Save a Lower Resolution Copy
Beyond the images in your presentation, you can also save the entire presentation at a lower resolution.
On the File > Save As menu, this time choose the Tools > Save Options menu.

For high-resolution presentations that use premium PowerPoint themes, this step is a must to reduce the file size before you send it to your audience. Find top PowerPoint presentation themes on Envato Elements:

Both of these tricks save some serious storage space when you share your presentation. Even if you're considering uploading it to PowerPoint Online, this is an ideal step to maintain PowerPoint performance.
Five PowerPoint Presentation Templates from Envato Elements for 2022
You've just learned how to share PowerPoint online. But the first step to sharing a presentation is to find the right template.
As you're looking for a PowerPoint template, keep in mind these top template options. Each of these has been selected to give you a stylish presentation template:
1. Permanent

Permanent template has 32 master slides, so there's plenty of room to add all your information. Plus, this template comes with charts, diagrams, tables, and more. Picture placeholders make it easy to add an image by dragging and dropping the image into it.
2. Everlux PowerPoint Template

Everlux is a professional template that comes with a portfolio where you can showcase your previous work. This template comes with over 40 unique slides in total. The minimal design makes it easy to use the template for any purpose. It comes with maps, graphs, icons, and more.
3. Hexas PowerPoint Template

Hexas has a modern design with geometric patterns. It comes with over 120 total slides that you can add information to. Also, this template comes with five premade color schemes making it easily customizable. Quickly add an image by dragging and dropping the image into an image placeholder.
4. Diminished PowerPoint Template

Diminished is a multipurpose PowerPoint template that comes with five color variations. It comes with over 150 total slides. This template comes with graphics, illustrations, and infographics. It also comes with portfolio galley slides to showcase any previous work.
5. Kiran Template

Kiran template has a minimal design that's good for a marketing presentation. This template comes with over 46 unique slides. It also comes with a lookbook where you can showcase your products. Easily drag and drop the image of your choice into the picture placeholder to add it to your slide.
Recap & Keep Learning More Great PowerPoint Presentation Tools
This tutorial showcased three key methods to share your PowerPoint presentation. The decision should come down to whether you're trying to attract a public audience (SlideShare) or collaborate with other PowerPoint users with PowerPoint Online.
If you aren't sold on using PowerPoint Online, check out some of the PowerPoint tutorials below. I'll show you how to use PowerPoint to work together online, and Laura Spencer offers a compelling look at using Google Slides instead.

Need Help? Grab Our Making Great Presentations eBook (Free)
We've got the perfect complement to this tutorial. You can find more information in our new eBook on making great presentations . Download this PDF eBook now for FREE with your subscription to the Tuts+ Business Newsletter.

It'll help you master the presentation process, from: initial creative ideas, through to writing, design, and delivering with impact.
Create and Share Your PowerPoint Online Today!
It can be helpful to share your presentation in many ways. Now that you know how to share a PowerPoint presentation as a link, try it for your next presentation. To save time creating your PowerPoint presentation, consider signing up for Envato Elements.
Editorial Note: This tutorial was originally published in November of 2017. It's been updated by Sarah Joy to make the information relevant and current. Sarah is a freelance instructor for Envato Tuts+.


Free Online Microsoft Training
Free tips and tricks for using Microsoft Office and Windows
How to create links between slides in PowerPoint
- By Belinda Anderson
- 27 May 2024
- Updated: 11 July 2024
- No Comments

Whenever we create a presentation, we want to captivate our audience and highlight the important information we are delivering. While many users are familiar with the basics of creating slides, many users are not aware that you can create links between slides. This process can elevate your presentation to a whole new level of professionalism and interactivity. This is especially important in presentations which are meant to be browsed at the leisure of the audience (sometimes referred to as a kiosk or interactive presentation), rather than delivered by a presenter with a live audience.
Today we are going to explore the use of links between slides in a Microsoft PowerPoint presentation, and provide step-by-step instructions to help you utilise this feature.
Why include Links Between Slides?
- The main reason is enhanced navigation. Including links between slides allows for seamless navigation throughout your presentation. Instead of users starting at slide 1 and working their way through in order, they will be able to jump to specific sections or topics which enhances the flow and organisation of your content.
- Links provide strategic interactivity, engaging your audience on a deeper level. By directing viewers to relevant slides based on their interests or questions, you can create a more personalised and engaging experience.
- The use of link allows you to distribute content across multiple slides and link them together for easy access. This is especially useful for presentations which contain a large amount of information.
Create links between slides
Now that you understand some of the reasons why you might include links in a presentation, let’s get to the important part of how we add links.
- Open Microsoft PowerPoint .
- Open the presentation you would like to add links to, or create a simple opening slide such as below:

- If you are creating a sample file, add 3 x additional slides to add a heading.

- For more in-depth presentations, ensure that your slides are organised in a logical sequence before adding links between them.
- Return to Slide 1, or the slide where you want to insert the link. This could be a title slide, agenda slide, or any other slide where you want to begin navigation.
- Insert an object (such as a text box, image or shape) that you want to use as a link. This could be a word, phrase, or icon that prompts the viewer to navigate to another slide. Create one for each link you plan to create.
I have inserted shapes for my links and have added text to them by right-mouse clicking each shape and choosing Edit Text from the menu. I have also chosen a different Fill Color for each from the Shape Format tab on the Ribbon.

- Click to select text or object, then select the Insert tab from the ribbon.
- Click the Link button, or you can press Ctrl + K on your keyboard.
- The Insert Hyperlink dialog box will appear:

- Select the Place in This Document option on the left-hand side.
- A list of available slides in your presentation will appear.
- Click on the slide you want to link to, then press OK to confirm your selection.
Preview the Slide Show
Now that you have added a link, you will want to test the link to make sure it works as expected.
- Select the Slide Show tab from the Ribbon.
- Choose to run the slideshow From Beginning or From Current Slide . Alternatively you can press F5 on the keyboard to run the slide show from beginning.
- Click and test the links work correctly.
- Press Esc to exit Slide Show mode.
- Continue adding links between slides as necessary.
Create a link back to the start
When adding links to a presentation, you may want to consider if you need/want users to be able to navigate back to the slide they came from. In my example, Slide 1 has the option of choosing between 3 links. But once a user has read each individual slide, I want them to come back to Slide 1 and choose another option.
- Select the first slide where you want to provide a link back to Slide 1 or the equivalent.
- Repeat the process and add a shape, or text box to link back, or alternatively, PowerPoint provides a Home button which will automatically link back to Slide 1.
- Click the Insert tab from the Ribbon.
- Choose Shapes from the ribbon and scroll to the bottom of the Shapes gallery to find the Action Buttons .

- Select the button containing the House icon.
- Click on the Slide to insert the action button.
- The Action Settings dialog box will appear:

- By default, the Hyperlink to option is selected and First Slide is selected. Leave as is, or if you want to link to a different slide, use the drop-down menu to change the setting.
- Copy and paste the button to any other slides where you want users to be able to navigate back to Slide 1.
Save your presentation
Now that all links have been added, and tested, ensure you have saved your presentation.
- Select the File tab and choose Save or press Ctrl + S on the keyboard.
- If you have not saved the presentation before, the Save as dialog will appear.
- Choose a location to save your presentation.
- Enter a File name .
- Click Save .
Other Examples
Another great example of using links between slides is my Concentration Game and my Choose your own adventure game in PowerPoint.
I hope you have enjoyed learning about the use of links within a PowerPoint presentation, comment below with any questions.
- Microsoft PowerPoint
Leave a Reply Cancel reply
Your email address will not be published. Required fields are marked *
Please enter an answer in digits: 4 × 1 =
This site uses Akismet to reduce spam. Learn how your comment data is processed .
Recent Posts

- Microsoft Excel (38)
- Microsoft Forms (9)
- Microsoft OneNote (11)
- Microsoft Outlook (34)
- Microsoft PowerPoint (32)
- Microsoft Sway (9)
- Microsoft Teams (10)
- Microsoft Windows (24)
- Microsoft Word (32)
Critical PowerPoint Shortcuts – Claim Your FREE Training Module and Get Your Time Back!
How to hyperlink in PowerPoint (best practices)
- PowerPoint Tutorials
- Shortcuts & Hacks
- February 14, 2024
In this post you’ll learn how to hyperlink in PowerPoint.
And the reason that hyperlinking in PowerPoint is important is that it allows you to jump around within your presentation or open documents outside of your presentation without leaving Slideshow Mode.
This allows you to create interactive and non-linear presentations. Common things you might use hyperlinks for in PowerPoint are:
- Hyperlinking to another slide in your presentation
- Opening a document or file on your computer Jumping to a page on the internet
- Open another PowerPoint presentation or slide show
- Create the mouseover text effect in PowerPoint (using ScreenTips)
The other great thing about hyperlinks in PowerPoint is that they automatically convert to the PDF file format. For details on how to convert PowerPoint into the PDF file format, read our guide here .
Table of Contents
What is a hyperlink in powerpoint.
A hyperlink is typically clickable text that jumps you to a location online, opens a file on your computer or performs some other action when you click it.
An online hyperlink can be written in two ways:
- As the full URL address you are jumping to: For example, visit our website www.nutsandboltsspeedtraining.com
- As shortened text with the hyperlink embedded inside the text (which is how it works in the Microsoft Office suite): For example: Visit our website here (with the entire URL address embedded in the text ‘ here ‘).
This is an important distinction to make, as most of the hyperlinks you add in PowerPoint, Word and Excel are clickable text or objects, with the hyperlink embedded within.
You can use hyperlinks in the Microsoft Office suite to do a variety of things like:
- Open a web page online
- Open files or documents on your computer
- Jump to a specific section in your document
- Create new documents (that you can begin editing)
- Start an email message
These hyperlinks can be embedded (as you’ll learn to do below) in text, shapes, pictures, charts, etc., allowing you to create interactive documents.
That is, people can click on things within your document to perform certain tasks, navigate to specific sections of your presentation or even open custom slide shows (if you have already set them up).
NOTE: In PowerPoint, you can also use clickable objects to trigger animated effects, but these are NOT hyperlinks. To learn how to set up trigger objects to fire your animations (like making objects appear and disappear), read our guide here .
Take your PPT skills to the next level
How to hyperlink to another slide in powerpoint.
To hyperlink to another slide in PowerPoint, the first thing you need is some text or an object to anchor your hyperlink in. Once you have the object, simply select the text or object and hit Ctrl+K on your keyboard to open the Insert Hyperlink dialog box.

If you do not like keyboard shortcuts, you can alternatively open the Insert Hyperlink dialog box using your Ribbon.

To add a link to an object (or block of text) using the PowerPoint Ribbon, simply:
- Select your text or object that you want to use as the anchor for link
- Click the Insert tab
- Open the Link drop down
- Select Insert Link…

For this example, I have done the following in the Insert Hyperlink dialog box:
- Selected a Place in this Document
- Selected Slide 3 (the slide I want to jump to within this presentation)
You can choose for yourself where you want your hyperlink to link to. Just keep in mind that a hyperlink can only have a single destination. A hyperlink cannot link to multiple locations at the same time.
Instead of using hyperlinks to jump around your presentation, you can also use action buttons. To learn about action buttons, see GFC Global’s blog post here .
Note. To use the Show and Return feature at the bottom of the Slide preview window, you need to hyperlink to a Custom Slideshow. That is, a smaller subset of your slides that you set up.
How to trigger a hyperlink
Once you’ve inserted a hyperlink into PowerPoint, there are two ways to trigger it.
#1. Slideshow mode (Presentation View)
When in any of the Presentation Views (like Presenter View), simply hover your mouse over your hyperlink and click it like you would any online link. Triggering the hyperlink then jumps you to the destination you selected (see details above).
To expand your knowledge and learn the different ways to start a PowerPoint slideshow (including how to start Presenter View), read more about it here .
#2. Normal View
In the Normal View in PowerPoint (the standard editing view), you can trigger a hyperlink by holding the Control key and clicking the hyperlink with your mouse. This creates the same effect as simply clicking a hyperlink in the Presentation View.
Hyperlinking text vso Objects
When given the choice of what to use as your hyperlink trigger, the best practice is to use the object itself, rather than text. That’s because you have little control over the default hyperlink text formatting as pictured below.

All the objects in the graphic above have the same exact hyperlink applied to them. Notice how the hyperlinked text displays formatting, while the hyperlinked objects do not show any formatting.
When you add a hyperlink to text, it not only gets that underlined hyperlink formatting, but it also changes color once you have clicked the hyperlink. In PowerPoint, this is known as the Followed Hyperlink color. On the other hand, when you anchor your hyperlink on an object, the text never displays the hyperlink formatting. This is why most presenters prefer to anchor their hyperlink on their object instead of anchoring it on their text.
If you do decide to use text hyperlinks in your slides, you can always change the used hyperlink formatting by resetting your hyperlinks (see the next section).
When would using text hyperlinks make sense? When you want to see what you’ve already clicked on inside your presentation. That’s because the Followed Hyperlink color (I’ll show you how to change that in a second) shows you exactly what you have already clicked on.
How to reset a hyperlink's color

If you are using text hyperlinks, as you click them in your presentation, the hyperlink color changes to the Followed Hyperlink color. This is fine if you want them to change colors (demonstrating what you have already clicked on), but it’s annoying if you don’t.
If you are using text hyperlinks, this means that after you have tested them out, you will need to reset the hyperlinks, so they start with the unfollowed hyperlink color.
To reset the color of a text hyperlink in PowerPoint, simply:
- Select the hyperlinked text
- Open the Insert Hyperlink dialog box (Ctrl+K)
- Immediately click OK
Clicking OK automatically resets the used hyperlink formatting back to the default unused text hyperlink formatting.
If you do go with text hyperlinks, the used formatting gives you a sense of what you’ve already clicked on. That means you won’t waste time navigating to something you’ve already covered. That said, you will need to reset the text formatting each time before you give your presentation.
How to change your hyperlink color in PowerPoint

To change the colors of your Hyperlinks and Followed Hyperlinks in PowerPoint, simply:
- Navigate to the Design tab
- Open the More option (downward facing arrow)
- Open the Color drop down
- Select Customize Colors
- Set a new Hyperlink and Followed Hyperlink color
- Select Save
Selecting Save saves your new color combination as a PowerPoint Theme and apply it to your current presentation. When selecting your own colors for your hyperlinks, stark colors work best so they stand out from your presentation.
To learn all about creating your PowerPoint template (including selecting your own theme colors, etc.), read our guide here .
Next, you’ll see how to reset your Followed Hyperlink color back to the default color you set.
How to remove a PowerPoint hyperlink

To remove a hyperlink in PowerPoint:
- Select the hyperlinked text or hyperlinked PowerPoint object
- Right-click the object (or text)
- Select Remove Link
Regardless of what the link was pointing to, Remove Link removes the hyperlink formatting and the link.
New Zoom Transition Hyperlink
If you have a Microsoft 365 subscription, there is a new way to add hyperlinks to PowerPoint called the Zoom transition. To make it easier to refer to, I will simply call them Zoom slides below.
To create a Zoom transition, simply click and drag a slide from the Thumbnail view on the left of your presentation, onto the slide you are currently using as pictured below.

Once you have created a Zoom slide, selecting it on your slide opens the Zoom Tools Format tab. From this tab, you have a variety of different formatting and transition options to choose from.
For example, do you want your Zoom transition to return to the slide it started on?
If yes, then in the Zoom Tools Format tab Zoom Options, simply select Return to Zoom (see picture below).

Selecting Return to Zoom means that after jumping to your Zoom slide, when you advance your slideshow, you will automatically return to the jumping off point within your presentation.
That allows you to create a dashboard like effect within your presentation. For example, you could present your audience with options – have them vote – and then click the link to jump to that section of your presentation.
And while this might seem complicated, you are in fact just creating hyperlinks (with a cool zoom effect).
For a FULL walk through of how to create a Zoom link and everything you can do with it, see the Presentation Guild’s full training online seminar here .
How to troubleshoot hyperlinks that are not working
First off, hyperlinks are meant to work in Slideshow Mode or Presentation View of PowerPoint.
So before troubleshooting your hyperlinks, make sure you have tried them out in the proper view first.
If your hyperlinks are still not working, the probable cause is that your hyperlink is broken. That is, whatever you were hyperlinking to has been deleted or moved. If this is the case, you simply need to reset your hyperlink.
To reset (or fix) a hyperlink in PowerPoint, simply:
- Make sure you have access to the file, slide or location you want to hyperlink to
- Select your hyperlinked text or object
- Open the Insert Hyperlink dialog box ( Ctrl+K on your keyboard)
- Set up your hyperlink to the correct slide, document, or location on your computer
Clicking OK , your hyperlink resets, and will properly take you the slide, document, or location that you set it to.
Hyperlink ScreenTip Trick (the Mouseover Text Effect)
Another way to user hyperlinks in PowerPoint is to leverage the ScreenTip functionality to create the mouse pop-up text effect in PowerPoint that you can see in the picture below.

In this case, you are not using the hyperlink to jump around your presentation. Instead, you are leveraging the ScreenTip functionality, to display text as you hover your mouse over an object in PowerPoint.
To expand your knowledge for creating this effect, see my guide on how to create this mouseover text effect in PowerPoint .
As you can see, there is more to hyperlinking in PowerPoint than just inserting the link. There are considerations on what you anchor your link to, how to change the color of your hyperlinks, and how to reset them as well.
I always hyperlink objects instead of text whenever possible as it creates fewer formatting issues as you click through the slides. That said, if you want a visual cue of which links you’ve already clicked in your presentation, you will want to hyperlink your text directly.
In short, hyperlinks are a great way to create choices within your presentation. That is, giving your audience a choice and then jumping to topics within your presentation that they are most interested in learning more about.
If you enjoyed this article, you can learn more about our PowerPoint training and free tutorials here .
🔒 Unlock the PowerPoint Shortcuts Trusted by Industry Leaders KKR, American Express, HSBC, and More!
Join over 114,880 professionals from diverse fields including consulting, investment banking, advertising, marketing, sales, and business development who have supercharged their PowerPoint game with our proven methods.
✅ Customize compelling presentations effortlessly.
✅ Master time-saving techniques for faster deck creation.
✅ Boost your career prospects with top-notch PowerPoint skills.
Get FREE access to the Critical PowerPoint Shortcuts module of our premium training course by entering your name and email below.
DISCLAIMER: PC Users Only!
We respect your privacy and will keep your info safe and confidential.
Related Articles
- What is a broken link chart in PowerPoint (and how to fix it)?
- Bar chart trick: Right aligning categories (PPT, Word, and Excel)
- PowerPoint settings: program level vs. presentation level
- What is a linked Excel chart in PowerPoint?
- Set Up Slide Show: Customize how your PPT presentations run
About The Author

This Post Has One Comment

On a different machine with Powerpoint 2016 Home, my hyperlinks are clickable in Normal Edit View, but on another machine with Powerpoint 2016 Professional I have to view in Slideshow to click the hyperlinks. What gives?
Comments are closed.
Popular Tutorials
- How to Strikethrough Text (l̶i̶k̶e̶ ̶t̶h̶i̶s̶) in Word, Excel & PowerPoint
- How to Make Animated Fireworks in PowerPoint (Step-by-Step)
- Strikethrough Shortcut (l̶i̶k̶e̶ ̶t̶h̶i̶s̶) for Word, Excel & PowerPoint
- How to Create a Flash Card Memory Game in PowerPoint (Like Jeopardy)
- Keyboard Shortcuts Not Working: Solved
PowerPoint Tutorial Categories
- Strategies & Opinions
- Presentation Design
- Pictures, Icons, Videos, Etc.
- New Features
- Miscellaneous
- Charts & Data Viz
We help busy professionals save hours and gain peace of mind, with corporate workshops, self-paced courses and tutorials for PowerPoint and Word.
Work With Us
- Corporate Training
- Presentation & Template Design
- Courses & Downloads
- PowerPoint Articles
- Word Articles
- Productivity Resources
Find a Tutorial
- Free Training
- For Businesses
We help busy office workers save hours and gain peace of mind, with tips, training and tutorials for Microsoft PowerPoint and Word.
Master Critical PowerPoint Shortcuts – Secure Your FREE Training Module and Save Valuable Time!
⌛ Master time-saving expert techniques.
🔥 Create powerful presentations.
🚀 Propel your career to new heights.
We value your privacy – we keep your info safe.
Discover PowerPoint Hacks Loved by Industry Giants - KKR, AmEx, HSBC!
Over 114,880 professionals in finance, marketing and sales have revolutionized their PPT skills with our proven methods.
Gain FREE access to a full module of our premium PowerPoint training program – Get started today!
We hate spam too and promise to keep your information safe.
You are currently viewing a placeholder content from Facebook . To access the actual content, click the button below. Please note that doing so will share data with third-party providers.
How to Add a Hyperlink to a Powerpoint Presentation

Your changes have been saved
Email is sent
Email has already been sent
Please verify your email address.
You’ve reached your account maximum for followed topics.
The 7 Best Obsidian Plugins for Mobile
5 ai-powered language learning apps worth trying, power up your pdfs: these 9 apps turn them into fillable forms.
PowerPoint is a great tool used for presentations and collaborative projects. But sometimes, you might need a bit more than bare slides in your presentation. If you want to make your PowerPoint presentations more effective and informative, adding a hyperlink is a great way to do that.
When your presentations have a hyperlink, you're able to connect your information to a separate resource such as a web page, or a separate document. In this article, we’ll show you various ways to add a hyperlink to your PowerPoint presentation.
How to Add a Hyperlink to a PowerPoint Presentation
If you’re looking for a time-saving hack for Microsoft PowerPoint , this is it. Hyperlinking in PowerPoint allows you to quickly refer to a separate resource as part of your presentation. You’re spoiled for choice when hyperlinking in PowerPoint because there’s more than one method. To hyperlink text, follow these instructions:
- Open your presentation in PowerPoint

- Right-click on the text and select Link .

- If you’re linking the text to a file on your PC, use the Look in box to locate your file.
How to Remove the Underline from Hyperlink Text
The intention behind inserting a hyperlink on a platform like Microsoft PowerPoint is a bit different from inserting a hyperlink in Google Docs , where you’d want your readers to know the text leads to a link. When you’re having a presentation, being unpredictable can work to your advantage, and having an underlined hyperlink in your presentation kills the fun in spontaneity.
PowerPoint doesn’t have a designated setting for removing the underline from a hyperlink text. Luckily, there’s a way around it. You can do this by adding a hyperlinked shape on top of your text instead. To do this, follow these steps:
- Go to the hyperlink text.

- Drag the shape, so it covers the text.

- Insert your link into the address bar and click on OK .

- Under Fill , select No fill , and under Line , select No line .
How to Change the Color of Hyperlink Text Throughout Your Presentation
If you're not a fan of the default color added to hyperlink text, you can change the color of all hyperlink text to fit the mood of your presentation. Here’s how:

- In the Variants section, click on the down arrow.

- Select Save .
How to Use Action Buttons
An action button is something you can create in PowerPoint to link an object or text to a website, another slide within your presentation, a separate presentation, and other resources. To hyperlink an action button, here’s what you need to do:

- In the top menu bar, click on Insert .
- In the Links section, select Action .

- Select OK once you’ve entered the details of the hyperlink.
How to Create a Hyperlinked Custom Show
If you'd like to present a mini slide show as part of your bigger presentation, you are able to hyperlink a custom slide show, but first, you must create one. Here’s how:

- Click on Custom Slide Show , then select Custom Shows .

- Check the boxes of the slides you’d like to appear in your custom show, then click on Add .

- You’ll see the pop-up Custom Shows window again; click on Show to see what your custom slide show looks like.
Now that you’ve created a custom show, you can hyperlink it to a text or object in your presentation.

- Right-click the text and select Link .

- Scroll down and click on Custom Shows .
- Select the custom show you want to present, then check the Show and return box on the right.
Elevate Your PowerPoint Presentation Skills
If you want to add value to your PowerPoint presentation, adding hyperlinks is an easy way to connect your slides to other resources. It’s also a great way to show off your presentation skills and engage your audience.
Whether you want to link text to a web page, or give your audience a subset of slides by linking a custom show, all of that is possible in Microsoft PowerPoint.
- Productivity
- Microsoft PowerPoint
- Presentations

Share a link to a specific slide
Want to ask a colleague to contribute to your slide deck, and want to point them directly to the slide you need help with? In PowerPoint just right-click the slide you want assistance with and choose Link to this Slide .
When the sharing card appears, you can change the share settings—if you only want your colleague to view the slide, and not edit it, for example—or just click Copy to copy the hyperlink to your clipboard.
After the link is copied to the clipboard, you can paste it into an email message, Teams chat, or other method you want to use to share it with your colleague.
Note: The person you share the link with can access your entire slide deck; they'll just be taken to the slide you selected at the start.
Here's a quick video of Link to this Slide in action.

Share your PowerPoint presentation with others in PowerPoint for Windows
Bookmark a slide and link to it from elsewhere in the presentation

Need more help?
Want more options.
Explore subscription benefits, browse training courses, learn how to secure your device, and more.

Microsoft 365 subscription benefits

Microsoft 365 training

Microsoft security

Accessibility center
Communities help you ask and answer questions, give feedback, and hear from experts with rich knowledge.

Ask the Microsoft Community

Microsoft Tech Community

Windows Insiders
Microsoft 365 Insiders
Was this information helpful?
Thank you for your feedback.
How to Use Hyperlinks and Action Buttons in PowerPoint
If you would like to link to an outside source within your PowerPoint presentation, you have the option of using a hyperlink or action button. These instructions are for Office 2016, 2013, 2010, and 2007.
In PowerPoint, you can create a hyperlink using any text within your presentation. When clicked on, a hyperlink can directly link to a specific slide within your presentation, a saved file, a web page, another PowerPoint presentation, or a custom email. To insert a hyperlink into your presentation:
- Open the PowerPoint presentation.
- Highlight the text or object you would like to hyperlink.
- Right-click the highlighted text and select "Hyperlink..."
- For Existing File or Web Page , browse your computer to locate the file you wish to link to.
- For Place in This Document , choose the slide you wish to link to.
- For Create a New Document , type the name of your new PowerPoint presentation and choose when to edit the document.
- For E-mail Addresses , enter the recipient(s) email address and the subject line of the email.
- Click [OK].
- To test the action button, start your PowerPoint slideshow (Click F5 on your keyboard) and click the text with the action button.
A PowerPoint hyperlink can link to a file on one of your drives (with the exception of your C: drive, which will not work in any circumstance) only if you are presenting the PowerPoint on campus. If you are off campus, you can use a path to any portable medium you have on hand (e.g. thumb drive, CD, etc.).
Action Button
In PowerPoint, you can create an action button using shapes, images, and text within your presentation. When activated, an action button can link to either a specific slide within your presentation, a web page, or another PowerPoint presentation. In addition, PowerPoint offers action buttons that play sounds when activated. To insert an action button into your presentation:
- Click the [Insert] tab > From the "Links" group, click [Action].
- Select the "Hyperlink to:" radio button > From the drop-down menu, choose where you would like the action button to link to when activated.
- To test the action button, start your PowerPoint slideshow (Click F5 on your keyboard) and click the text or image with the action button.
To insert an action button that plays a sound into your presentation:
- Highlight the text or object you would like to play a sound when clicked on.
- If you would like the text or object to link to a slide, web page, or file and play a sound, select the "Hyperlink to:" radio button and choose a destination. If not, select the "None" radio button.
- Check the "Play sound:" box > From the drop-down menu, choose what sound you would like the action button to play when activated > Click [OK].
- To test the action button, start your PowerPoint slideshow (Click F5 on your keyboard) and click the text or object with the action button.
You can also create an action button that activates when you hover your mouse over the text or object (as opposed to clicking the action button). In the "Action Settings" dialog box, click the [Mouse Over] tab and choose where you would like the action button to link to.
Share This Post
Free All-in-One Office Suite with PDF Editor
Edit Word, Excel, and PPT for FREE.
Read, edit, and convert PDFs with the powerful PDF toolkit.
Microsoft-like interface, easy to use.
Windows • MacOS • Linux • iOS • Android

- Articles of PPT
How to Add a Link in PowerPoint A Step-by-Step Guide
Mastering the art of hyperlinking in PowerPoint can truly transform your presentations. In this guide, we'll take you through every step, ensuring you understand the ins and outs of this powerful feature. Let's start by exploring the basics and different types of hyperlinks.
Basics of Adding A Link in PowerPoint
What are hyperlinks in powerpoint.
Hyperlinks in PowerPoint are interactive elements that allow you to link to other slides, websites, files, or email addresses. When you click on a hyperlink, you will be taken to the linked destination. Hyperlinks can be added to any text or object on a PowerPoint slide.
Different Types of Hyperlinks in PowerPoint
There are three main types of hyperlinks in PowerPoint:
Text hyperlinks: These are the most common type of hyperlink. To create a text hyperlink, simply select the text you want to link and then click the Link button on the Insert tab. In the Link to dialog box, you can enter the URL of the website or file you want to link to.
Object hyperlinks: Object hyperlinks can be added to shapes, images, and other objects on a PowerPoint slide. To create an object hyperlink, right-click on the object and select Hyperlink. In the Link to dialog box, you can enter the URL of the website or file you want to link to.
Web hyperlinks: Web hyperlinks are automatically created when you type a web address into a PowerPoint slide. For example, if you type https://www.google.com/index.html into a slide, PowerPoint will automatically create a hyperlink to the Google homepage.
The Importance of Adding Links in PowerPoint
Here are the benefits of incorporating links in PowerPoint:
Enhanced Engagement: Integrating hyperlinks into your PowerPoint elevates engagement levels. It empowers viewers to delve deeper into related content at their own pace.
Boosted Credibility: Hyperlinks serve as a testament to your thorough research and source citation, thereby bolstering the credibility of your presentation.
Streamlined Navigation: Hyperlinks facilitate seamless navigation within your PowerPoint, allowing viewers to swiftly move to specific slides or sections, enhancing the overall flow.
Improved Accessibility: By providing alternative navigation methods, hyperlinks make your PowerPoint more accessible to individuals with disabilities, ensuring a inclusive viewing experience.
How to Add a Link in PowerPoint (Step-by-Step)
In this section, we'll guide you through the steps of adding hyperlinks to your PowerPoint presentation. We'll cover three methods: Inserting Text Hyperlinks, Creating Object Hyperlinks, and Adding Web Hyperlinks. Follow along for a seamless integration of these interactive elements into your slides.
1.Inserting Text Hyperlinks
Step 1: Select the text you want to turn into a hyperlink.
Step 2: Go to the "Insert" tab in the ribbon.
Step 3: Click on "Hyperlink" from the dropdown menu.
Step 4 : A dialog box will appear. Here, you can enter the web address or select a slide within your presentation. Click "OK" when finished.
2.Creating Object Hyperlinks
Step 1: Select the object (like a shape or image) that you want to turn into a hyperlink.

Step 2: Go to the "Insert" tab.

Step 3 : Click on "Hyperlink."

Step 4: In the dialog box, enter the web address or select a slide from your presentation. Click "OK" to confirm.
3.Adding Web Hyperlinks
Step 1: Go to the slide where you want to add the hyperlink.
Step 2: Select the object or text you want to turn into a hyperlink.
Step 3: Right-click and choose "Hyperlink" from the menu.

Step 4: Enter the web address or select a slide from your presentation in the dialog box. Click "OK" to complete the process.
Tips for Adding Links in PowerPoint
Here are some tips for adding links in PowerPoint:
Use descriptive text for your hyperlinks. This will help viewers to understand what the link is to before they click on it.
Avoid using underlining and blue text for your hyperlinks. This is the default style for hyperlinks in PowerPoint, and it can make your presentation look unprofessional.
Instead, use a different font color or style for your hyperlinks to make them stand out.
If you are adding a link to a large website or file, consider adding a warning message to your slide. This will let viewers know that the link may take some time to load.
When adding links to external files, be sure to check the links regularly to make sure that they are still working.
By following these tips, you can add professional-looking and effective links to your PowerPoint presentations.
How to Remove a Link in PowerPoint
If you've added a link in your PowerPoint presentation and now want to remove it, follow these simple steps. We'll provide you with a detailed guide accompanied by helpful screenshots to ensure a smooth process.
Step-by-Step Guide with Screenshots
Step 1: Select the hyperlink you want to remove.
Tip: To select a hyperlink, click on it. If the hyperlink is text, you can also select it by dragging your cursor over it.
Step 2: Right-click on the hyperlink.
Step 3: Select Remove Hyperlink.

Step 4: Click Yes to confirm that you want to remove the hyperlink.
My Thoughts on the Process
Removing a hyperlink in PowerPoint is a very simple process. It only takes four steps, and there is no need to open any dialog boxes. I think that the process is well-designed and easy to follow.
One thing I would like to add is that you can also remove a hyperlink by pressing Ctrl + K on your keyboard. This is a quick and easy way to remove hyperlinks from multiple objects at once.
Best Alternative to Microsoft PowerPoint - WPS Presentation

WPS Presentation is a free and open-source presentation software that is part of the WPS Office suite. It is a powerful alternative to Microsoft PowerPoint, offering a wide range of features and functionality.
WPS Office Features and Advantages
File Compatibility: WPS Presentation is fully compatible with Microsoft PowerPoint files, so you can easily open, edit, and save your PowerPoint presentations in WPS Presentation.
PDF Editing: WPS Presentation allows you to edit PDF files directly, without the need for a separate PDF editor.
Built-in Free Delicate Templates Store: WPS Presentation includes a large library of free templates that you can use to create professional-looking presentations.
WPS AI: WPS Presentation is powered by WPS AI, which provides a number of advanced features, including:
Document analysis: WPS AI can analyze your presentations and provide suggestions for improvement.
Efficient formatting: WPS AI can automatically format your presentations to make them look more professional.
Intelligent content recommendations: WPS AI can recommend relevant content to add to your presentations, such as images, charts, and videos.
How to Add a Link in WPS Presentation
To add a link in wps presentation, follow these steps:.
Step 1: Select the text or object you want to link.
Step 2: Click the Insert tab and then click the Hyperlink button.

Step 3: In the Link to dialog box, enter the URL of the website or file you want to link to.
Step 4: Click OK.

Multiple Ways to Use Hyperlinks in WPS Presentation
Hyperlinks can be used in a variety of ways in WPS Presentation, including:
Linking to websites or other online resources
Linking to files on your computer or network
Linking to slides within your presentation
Creating a table of contents with hyperlinks
Adding interactive elements to your presentations, such as quizzes and surveys
WPS Presentation is a powerful and versatile presentation software that is a great alternative to Microsoft PowerPoint. It is packed with features, including file compatibility, PDF editing, and a built-in free delicate templates store. WPS Presentation is also powered by WPS AI, which provides a number of advanced features, such as document analysis, efficient formatting, and intelligent content recommendations.
Use Word, Excel, and PPT for FREE, No Ads.
Edit PDF files with the powerful PDF toolkit.
Microsoft-like interface. Easy to learn. 100% Compatibility.
Boost your productivity with WPS's abundant free Word, Excel, PPT, and CV templates.
FAQs about how to add a link in PowerPoint
How do i make a clickable button in powerpoint.
Step 1: Insert a Shape:
Click "Insert" > "Shapes" and select a shape for your button.

Step 2: Customize:
Adjust its size, color, and add text.
Step 3: Add Hyperlink:
Right-click the shape, select "Hyperlink," and choose your destination (slide, webpage, or email).
Step 4: Test:
Enter slideshow mode and click the button to ensure it works.
That's it! Your clickable button is ready in PowerPoint.
How do I style a hyperlink as a button?
Step 1: Select the hyperlink that you want to style as a button.
Step 2: On the Home tab, in the Shape Styles group, click the Shape Styles button.

Step 3: In the Shape Styles pane, click the Button style that you want to use.
This comprehensive guide delves into the art of incorporating hyperlinks into PowerPoint presentations, from understanding different types to providing step-by-step instructions with screenshots. Hyperlinks enhance engagement and navigation, adding depth to your content. The guide also highlights WPS Presentation as a noteworthy alternative to Microsoft PowerPoint, offering features like advanced PDF editing and a rich template store. With the option of WPS AI for intelligent content recommendations, it provides a compelling presentation experience. Ultimately, this guide empowers you to leverage hyperlinks effectively, whether in PowerPoint or with the feature-rich WPS Presentation.
- 1. How to Link Slides in PowerPoint (A Complete Guide)
- 2. How to Create a Link for a PowerPoint Presentation
- 3. Tips on How to Share PDF as a Link
- 4. How to Download PDF Files from the Link
- 5. How to Add a Link to a PDF Using Different Methods?
- 6. How to Create Link for PDF

15 years of office industry experience, tech lover and copywriter. Follow me for product reviews, comparisons, and recommendations for new apps and software.
Google Slides
Creating Connections: Linking to Specific Slides in Google Slides

Table of Contents
Let’s say you’ve created a fantastic presentation in Google Slides, but your audience might need to find a specific part quickly. Maybe it’s a detailed look at the financials on slide 15, or a product demonstration waiting for them on slide 8. The good news is, that Google Slides has a handy feature that lets you create links within your presentation.
This way, you can guide viewers directly to the information they need. Let’s explore how this works.
How to Link to a Specific Slide in Google Slide?
1. finding your starting point:.
The first step involves opening your Google Slides presentation and selecting the slide where you want to insert the link. This could be your introductory slide, a table of contents, or even within the main body of your presentation. Think about where the link would be most helpful for viewers to access the targeted information.
2. Highlighting the Anchor:
Next, click and drag your mouse to select the text or image you want to function as the link. This will be the clickable element that takes your viewers to the chosen slide. It can be a phrase, a call to action, or even an image – the choice is yours!
3. Accessing the Linking Options:
There are three convenient ways to access the linking options in Google Slides:
- Right-click: Simply right-click on the selected text or image. A pop-up menu will appear, and you can choose “Link” from the options.
- Keyboard Shortcut: For a faster approach, use the keyboard shortcut Ctrl+K (for PCs) or Command+K (for Macs).
- Menu Bar: Alternatively, you can navigate to the “Insert” menu at the top of your screen and select “Link” from the dropdown menu.
4. Choosing Your Destination:
A dialog box titled “Link” will appear. Here’s where the magic happens:
- Look for the dropdown menu labeled “Slides in this presentation.” Select this option.
- A list of all the slides in your current presentation will be displayed. Simply click on the slide you want to link to.
Alternatively:
The “Link” window might offer a search bar. You can type in the name or number of the slide you want to link to and then click on it from the search results.
5. Finalizing the Link:
Once you’ve chosen your destination slide, click the “Apply” button in the “Link” dialog box. Congratulations! Your chosen text or image is now a hyperlink that will transport viewers to the designated slide with just a single click.
Create presentation slides with AI in Seconds in Google Slides
10M+ Installs
Works with Google Slides

Bonus Tip: Linking Beyond the Presentation
While the method above focuses on linking within a single presentation, Google Slides also allows you to create links to slides in other presentations stored on your Drive, or even external web pages. The process remains very similar.
In the “Link” dialog box, instead of choosing “Slides in this presentation,” you can paste the URL of the target presentation or web page into the search bar. If the target presentation is stored in your Drive and uses the same Google account, you can also search for its name directly.
- No design skills required
- 3 presentations/month free
- Don’t need to learn a new software

Frequently Asked Questions
What are the benefits of linking to specific slides in google slides.
Linking to specific slides within your presentation offers several advantages. It improves navigation by letting viewers jump directly to relevant sections, enhancing their experience. Additionally, linking helps with accessibility in presentations with a non-linear flow. Viewers can easily access information they might need to revisit later. Finally, you can create a more interactive experience by linking elements like buttons or images to specific slides.
Can I link to slides outside of the current presentation?
Unfortunately, Google Slides doesn’t currently support linking directly to slides in other presentations.
What can I link to instead of other slides?
Even though you can’t link to external slides, you can link to various resources:
- Webpages: Link text or images to relevant websites for further details.
- Documents: Link to Google Docs or other online documents for deeper dives into specific topics.
- Files: Link to downloadable files like PDFs or images that complement your presentation content.
Are there any other ways to improve navigation in my presentation?
Absolutely! Here are some additional tips:
- Clear Slide Numbering: Use a consistent slide numbering system throughout your presentation.
- Table of Contents Slide: Include a slide at the beginning that lists all the main topics and their corresponding slide numbers.
- Breadcrumbs: Add breadcrumbs to your slides. Breadcrumbs act like a navigation bar, showing viewers their location within the presentation hierarchy.
Related Posts

How to Convert Keynote to Google Slides?
Thinking about switching from Keynote to Google Slides but worried about your presentations? Don’t worry, you’ve come to the right place! Converting presentations from Keynote to Google Slides might seem a bit tricky at first, but it’s actually quite simple once you know the steps.
Save Time and Effortlessly Create Presentations with SlidesAI

- Presentations
- Most Recent
- Infographics
- Data Visualizations
- Forms and Surveys
- Video & Animation
- Case Studies
- Design for Business
- Digital Marketing
- Design Inspiration
- Visual Thinking
- Product Updates
- Visme Webinars
- Artificial Intelligence
How to Create a Successful Project Presentation

Written by: Unenabasi Ekeruke
You’ve spent time working on a project that could be a potential game-changer for your company or client. Now you’re buzzing to present it to your team, investors and other key stakeholders.
Creating and delivering project presentations can be nerve-racking and you probably have one question running through your mind.
How do you get the decision-makers to understand your project or secure their buy-in?
Considering that some companies have had about 12% of failed projects in the past year, you want to create presentations that are not only convincing but memorable.
With the right project presentation deck, you can win and keep your audience’s attention long enough to explain project details and why it’s sure to succeed.
Not sure how to create successful project presentations? We’ve got you covered.
This article will show you how to set project goals and create winning presentations that take your project to the next level.
Here’s a short selection of 8 easy-to-edit project presentation templates you can edit, share and download with Visme. View more templates below:

Let's get to it.
1 Set Goals for Your Project
Before you dive into the main details of your project presentation, you want to answer these questions:
- What is your project set out to achieve?
- Why is it important for you and your team to achieve your set goals?
- How do you plan to communicate your goals to your audience?
If you have to make long guesses before answering these questions, you’ve got a lot of work to do.
Here’s what you should know. Beautiful or well-articulated project presentations aren’t a substitute for project planning. Without clear goals, your project is already set up to fail. And your investors might think, “why bother listening?”
Many project managers tend to rush through the goal-setting phase, but we don't recommend this. That’s because you could be setting yourself up for failure.
Once you clearly define your project goals, you can get stakeholders to buy into them.
Now the question is, how do you set goals for your project and achieve them? One way to do that is by using the SMART goal setting method.
Setting SMART Project Goals
SMART is an acronym that stands for S pecific, M easurable, A chievable, R elevant and T ime-Bound.
SMART goals are a staple for planning and executing successful projects. It takes a deeper look into the finer details your audience care about, such as:
- Project plan and schedule,
- Project timelines,
- Milestones,
- Potential roadblocks and more
For example, let's say your project aims to improve customer experience on web and mobile devices. Notice this example describes the end goal. But it doesn’t specify how you’ll work to enhance customer experience.
Here’s how using SMART goals provides direction for your planned project.
When setting your goals, be clear and specific about what you want to achieve in the end.
A specific goal could be: “We want to build a responsive website and mobile app for our company to improve customer experience. This project will require inputs from our product design, software and marketing department”.
Measurable
During your presentation, you'd have to answer questions like:
- What metrics will you use to determine if you meet the goal?
- How will you know you’re on the right track?
Having metrics in place will help you evaluate your project. Plus, you’d be able to monitor progress and optimize your project to achieve better results.
It doesn’t matter if you’re planning a short-term or long-term project. Ensure you set metrics and milestones that count towards your goal.
From our earlier example, a measurable goal could be to have:
- Over 100,000 mobile app downloads on Google Playstore and Apple App Store.
- A 20% bounce rate on your website and a 15% conversion rate on mobile and web.
Attainable
One of the most critical questions you want to ask during goal-setting is, “Can we achieve our set goal?” Do we have the resources to accomplish the goal within the available time frame?
If the answer is no, then you’d have to consider what it would take to achieve those goals. This may require adjusting your goals or the resources needed to achieve your goal.
Although it’s okay to be ambitious, you should also be realistic. For example, getting 200,000 app downloads in one week could be overly ambitious if you’ve just launched your app. However, if you set out to achieve that goal in three months, that could make your project practicable.
Transform technical, complex information into easy-to-understand reports
- Create detailed diagrams of workflows , systems and processes to see how they interset
- Easily create and share resources for your team , from login credentials to security best practices
- Get more visual with your communication to ensure intricate information is resonating and sinking in
Sign up. It’s free.

Your project goals need to align with your broader business goals. Are your goals relevant to the growth and success of the company? Are they worth allocating resources for?
For instance, if your company is B2B and doesn’t plan to expand to the B2C market, launching an e-commerce website would be an irrelevant goal.
Time-Bound
Regardless of your project type and size, you should set time frames. Setting target dates for deliverables creates a sense of urgency and motivates you to hit your goals.
From our example above, a time-bound goal could be “We aim to achieve 100,000 mobile app downloads and a 15% conversion rate by the end of the fiscal year. Our company will launch the mobile app by Q3 with a robust marketing campaign that will run through the end of next fiscal year.”
Setting SMART goals doesn’t have to be a challenging task. Use the template below to set project goals that position your business for success.

Communicate Project Goals to Your Team Members
After you've set your goals, your team will play a key role in helping you achieve them. So you ensure they understand these things:
- Why the project goals are in place
- What it's supposed to deliver for your business and customers
- How their role, team and department contributes to the success of the project
Unless you’re clear on this, the project can derail and move in all sorts of unwanted directions.
Rather than slam the goals you’ve set on your team, make it a collaborative effort. Spend time talking to your team and stakeholders about the project goals.
Don't limit your communication to people within your department. You can reach out to people in other departments like sales, operations, finance, etc., to see how well your goals align with theirs.

To give your team a better understanding, you can communicate your project goals in a variety of ways, including:
- Visuals (videos, images, charts, infographics, etc.)
- Verbal presentation
- Documentations
By doing that, you’re sure to get their valuable feedback, buy-in and commitment to the project. Plus, getting your team on board with your project plan will up your chances of successful execution.

2 Lay Out Your Project Plan
Once you’ve set your goals, the next big step is to outline how you'll achieve them. An excellent place to start is by organizing your project into an actionable plan and steps for execution.
You might wonder why this step is important for creating a successful project presentation.
Whether you’re planning a small or big project, writing a detailed plan, structure and layout puts everything into perspective. It eliminates vagueness and helps your audience grasp the project roadmap without missing the points.
Your project plan should contain the technical and non-technical project details. Therefore, you want to give yourself an edge by using a project presentation template that clearly explains all the activities and steps.
Not only that, your presentation structure should be simple and easy to follow.
Depending on the project type, your plan could include key details such as:
- The goals and objectives you've outlined earlier
- Your project scope, methodology and framework
- Project milestones, deliverable and acceptance criteria
- Project schedule and timelines
- Resources and budget estimates, etc.

There's no hard and fast rule for laying out your project plan. However, if you want to create a memorable plan that will keep your audience engaged, you could break it down into three parts, including:
Introduction
- Conclusion and key takeaways
Your introduction should provide a brief overview of what you’re going to talk about and why it’s relevant to your audience. You could start by writing down the project name and the executive summary.
Think of your executive summary as an abridged version of the project plan.
If your audience read only your executive summary, would they have all the information they need about your project? If the answer is yes, your executive summary has served its purpose.
The length of your executive summary will depend on what you intend to cover in your project plan. However, we recommend keeping your executive summary one or two pages long.
You can include key information such as:
- Objectives of the project
- Key points of the project plan
- Results, conclusions and project recommendations
Keep in mind that not everyone will have the time to dive into the details of your project plan.
Having a snapshot of your project brings clarity to key stakeholders and collaborators. It also enables people who aren't actively involved in the project to understand it at a glance.
Ready to create your own presentation in minutes?
- Add your own text, images and more
- Customize colors, fonts and everything else
- Choose from hundreds of slide designs and templates
- Add interactive buttons and animations
The body of your project plan is where you have the full project details and everything relevant to its success.
Here you can break your project into deliverables, tasks, milestones and schedules (start and end dates).
Ensure you precisely define the resources you need to complete the project, including finances, team, time, technology, physical resources and more.
This is the part where you sum up your project plan with key takeaways. Your conclusion should include what you expect from your audience, including key action points and next steps.
Writing your intro, body and conclusion may sound like a lot of information. But instead of writing multiple pages of text, incorporating visuals can make your project presentations more effective.
By using images, videos, infographics and charts , you can capture all the vital information and help your audience understand your message better.
Visme presentation templates are effective for visualizing different sections of your project plan. They are professionally designed and easy for anyone to craft high-quality project plans that keep their team on track.
Use the project plan templates below to kickstart your project planning process.

3 Outline the Problem and Solution
You've just spent time crafting your project action plan. Now it’s time to communicate your project plan and goals with your audience.
Project presentations are a lot like sales pitches. Whether you’re presenting your project plan to clients or creating a pitch deck for investors, your job is to keep your audience hooked right from the start till the end.
One of the most potent ways of grabbing your audience's attention is by highlighting their pain points.
It’s not enough to have beautiful slides that showcase your amazing product features and project activities.
Make sure you set up your project presentation to:
- Outline your audience pain points
- Emphasize how your project, product or service works to address their pain points
- Explain how they’ll benefit from using your product or investing in your project
In a nutshell, your audience should have a clear insight into how your project makes their life better. When they’re clear on this, they’ll most likely listen to the solutions you bring to the table and take the desired action.
Don’t make sweeping assumptions about your audience.
If you’re looking to get them on board, dedicate a slide to discuss their problems and solutions. Make them understand how your project benefits them.

Not sure what your audience's pain points are? Go ahead and do these things:
- Run a persona survey or interview existing customers. This will help you build a data-driven user persona that you can use for all types of business and marketing decisions.
- Talk to your customer support and success team. They have close relationships with your customers, so they know their challenges and what they want. If they don’t know these things, do them a favor and create a customer success program .
- Interact with your community, ask for feedback and involvement. The more you engage with your consumers, the more you understand their challenges, work toward solving and get them invested in your brand.
- Keeping an eye on relevant social media trends, Twitter hashtags, Facebook trends
- Join relevant online forums like Quora, Reddit, Stack Exchange, etc.
RELATED: How to Write an Effective Presentation Outline
4 Keep Your Presentation Slides Short
When creating project presentations, prioritize quality over quantity. Be sure to keep your slides short and simple. When you do this, your audience will be glad you value their time.
Remember, this isn’t the time to slam your audience with lengthy and irrelevant jargon. Instead, keep your slides on topics and hit the main points without the boring and unnecessary details.
Here’s why you need to keep your presentation brief:
- Concise presentation slides are not only powerful, but they are also memorable.
- Studies have shown that during project or business presentations, attention levels drop sharply after 30 minutes . By creating lengthy presentations, you risk losing your audience's attention halfway.
- Nobody wants to sit and watch you flip tons of slides for hours. With shorter slides, you can capture your audience's attention and get them to focus on the message.
- Most people might have limited time or have short attention spans. So they’d want to quickly digest information and move on to the next best thing.
How do you keep your project presentations short?
- If your slide doesn’t add value to your presentation, it shouldn’t earn a spot on your deck.
- Supercharge your slide deck with captivating visuals that capture more information
- Adopt proven methods for preparing your slide
For example, the 10/20/30 rule by Guy Kawasaki is one of the most popular methods used by experts. The rule recommends using ten slides for 20 minutes presentations (about two minutes per slide). It also specifies using a font size of at least 30 for text.
This will enable your audience to digest the messages on your screen while you’re talking.

Keep in mind that this isn’t an iron-clad rule for presentation. There are other rules such as Pecha Kucha method , Takahashi method, Lessig method, etc. You can adapt any of these rules to suit your project presentation needs.
5 Use Less Text and More Visuals
Another great way to keep your slides brief yet interesting is using less text and more visuals.
Remember, your slide should aid your verbal presentation and not replace it. So you want to avoid crowding too much information on one slide.
Cluttering your presentation with too much text could:
- Overwhelm your audiences and bore them
- Shift your audience's attention to the text, making your presentation less effective.
Instead, use one slide to present each idea. Marketing guru Seth Godin recommends no more than six words per slide .
People retain more information when it’s presented in bite-size chunks and visuals. This applies to B2B, B2C audiences, project managers and corporate executives.
About 59% of business executives say they’d rather watch a video about a topic than read about it. Hence the need to supercharge your project presentation with compelling visuals that capture and bring your audience’s attention right where you want it.
Steve Jobs’ MacWorld Keynote presentation in 2007 is an excellent example of how to enhance your presentation with compelling visuals.

During the presentation, Steve Jobs used live and interactive visuals to show how the iPhone 1 works.
Read on to learn more tips on creating engaging presentations that will wow your audience.
With Visme's presentation maker , you can make stunning project presentations with a rich blend of text and compelling visuals. Hook your audience and inspire action with stellar project presentation templates like the one below.

6 Use Quality Visuals, Diagrams and Presentation Aids
Visuals are important for making successful project presentations. Beyond grabbing the audience’s attention and keeping them engaged, viewers recall 95% of a message when presented in visual form. But when shared via text, they retain only about 10%.
There are many types of visual aids you can use in your presentations, including:
- Graphs and charts
- Heat and choropleth maps
- Scatter plots
- Screenshots and more
Using images and videos will up your chances of getting audience engagements and positive responses to your call-to-action (CTA).
Gantt charts , whiteboard drawings and mind maps are ideal for visualizing early-stage project designs. You can use charts, diagrams, maps and trees to present the project architecture for technology-related projects.

If you’re working on product development projects, consider adding sketches, flowcharts , models and prototypes to your slide.
Pie charts are excellent for showing percentages. Vertical bar charts indicate changes over time, while horizontal bar charts help you compare quantities.
Infographics are perfect for visualizing data and explaining complex information like market trends.
Here’s the interesting part. Visme has the tools you need for every job. The software allows you to add different visuals, infographics, charts and graphs to your deck and customize them to suit your needs.
You can change design, text and background colors, add or remove legends, animate charts, etc.
You can also use maps to represent geographic information. Or, use progress bars, thermometers, radials and widgets to visualize stats and figures as shown in the template below.

When adding visuals to your slide, don’t go overboard. Stick to a minimum of two images per slide. In addition, make sure your visuals are relevant to your project presentation.
While designing your presentation slides , always stick to high-quality visuals. Blurry or low-resolution images or videos can be a major turn-off for viewers.
With high-quality visuals, your presentations will be crisp and clear, even on large screens.
The slide below is an excellent example of how to power your presentations with compelling visuals.

7 Pay Attention to Design
Want to create impressive presentations that pop? If the answer is yes, you need to pay attention to your design details. Your design can make or break your project presentation.
Whether you are an experienced designer or a novice, design tools like Visme give you an edge. You can create compelling presentation designs for your business in a few minutes.
The beautiful thing is that you don’t have to break the bank to make stunning project presentations. You'll find beautiful ready-made templates and millions of stunning royalty-free images for your slides.
Here are tips you should consider while designing your slides.
Use the Right Color Combination
If you want to make your presentations appealing, use color moderately.
We get it; everyone loves color. But using too many colors can make your presentations look chaotic and unpleasant.
Your color choice can influence how your audience grasps and responds to your presentation. A general rule of thumb is to pick colors that evoke positive emotions in your audience.
For example, warm colors like yellow, orange and red convey feelings of excitement and positivity. On the other hand, cool colors (blue, green and violet) reflect an aura of calmness.
When combining colors, aim for a balanced color scheme. For example, if your slide or image background is dark, your text and design elements should have bright colors. This contrast will make your project presentation legible and visually appealing.
You can learn about color psychology and how to use it in your next presentation design by watching the video below.

Use Clear and Consistent Typography
Optimizing your typography can make a difference in how people perceive your message. So you want to make sure your slide looks organized, professional and sends the right message.
Here’s how you can make this happen:
- Use fonts that embody the spirit of your brand
- Keep your text styles consistent throughout your presentation. We recommend you stick to a maximum of three fonts.
- Avoid fancy fonts and tiny text that strain the reader's eyes. Rather use fonts like Arial, Time News Roman, Calibri and other legible fonts suited for small and large screens.
- Use a font size of at least 30 for the body text and 36 for titles.
In addition, remember to present your text using the color scheme we mentioned earlier. This will keep your text visible over your background.
Take a look at this slide from one of our presentation templates. Notice how the design, fonts and color combination blends in to make the visuals pop.

8 Start With a Presentation Template
Whether you’re a newbie or pro, creating project presentations that pack a punch can be time-consuming.
Let’s say you’ve got a deadline looming. You’d have to deal with writing your project outline, preparing your slide notes, designing your slides, sourcing and incorporating visuals and more.
Handling these things from scratch could slow you down or make your presentations untidy.
Using presentation templates could save you from all the stress. They help you make professional-looking project presentations fast and easy.
Since the slides are pre-designed, you’ll find a place to insert every possible piece of content you need. Be it a progress bar, chart, graph, table, video or image, the design is right there.
All you need to do is type your content, input data or insert the image. And boom, your presentation is ready to go.
In addition, using presentation templates offers brand consistency in terms of font, style, layout, colors and overall design. You can customize and share templates with your project team to keep your presentations uniform.
The title and main body slide, image and chart layout and fonts are set in the template. Therefore formatting your slide becomes a breeze—no more messy or cluttered project presentations.
Visme has a wide selection of templates designed to make your presentations shine. You’ll find millions of pixel-perfect graphics, icons, design elements and professionally designed templates for any purpose, industry and project type.
Regardless of your skill level, you can customize your templates like the one below. Just add your content and your project presentations will be ready in a few minutes.

9 Present Your Project Like a Pro
If you follow all the tips we shared above, you’ve probably got the perfect project presentation on paper. Great stuff, but your job isn’t done yet.
Your delivery is the final piece of the puzzle, and you’ve got to make it count.
Here’s the thing. Your presentation could flop if the delivery isn’t convincing. Hence the need to plan your delivery and drive your message across with passion and enthusiasm.
Here's how to deliver project presentations that leave an impact.
Practice Makes Perfect
Did you know that Steve Jobs used to spend two days prepping for presentations? Yes, you read that right.
Practice is one of the key steps to nailing your delivery.
You can practice by reading out loud in your quiet space. While you’re at it, make audio and video recordings and watch them repeatedly.
Ask your friends and colleagues to serve as a test audience and give feedback on your presentation.
This run-through will help ensure your presentation captures the main points within the allotted time. It will also help you maintain the correct body posture during your project presentation.
Make time to check if the equipment is working and get familiar with the settings and operations. This is especially important if you plan to use video or audio in your slides.
Start With a Strong Opening
Your audiences could have short attention spans, so make those first moments count. With solid openings, you can hook your audience and set the mood for a successful presentation.
Steve Jobs’ 2005 Stanford commencement speech at Stanford is an excellent example of having a solid opening. With over 4 million views on YouTube, it’s one of the most memorable and watched speeches in history.

Notice how he hooks the audience with powerful anecdotes about his life, beginning from dropping out of college. And then, he goes on to share the lessons he learned in his early days at Apple, losing his job in 1985 and reflections on death.
Here’s how to make an excellent opening speech that grabs the audience’s attention and convinces them you’re worth listening to:
- Ask a question
- Tell a compelling story
- Share mind-blowing facts and statistics
- Show captivating video and visuals that spark curiosity
- Open your presentation with humor
Be sure to tailor your opening hook to your audience. To make this effective, it’d help to know about your audiences, including their likes, dislikes, cultural and ethical dispositions, etc.
If you want to learn more about making captivating presentation openings and more, read our guide on starting a presentation .
While presenting your project, focus on your audience’s needs. By doing this, you’ll build an emotional connection and drive action.
However, don’t go overboard. Be genuine and focus on getting the points across to them. This way, you’ll gain their trust and build excitement about your project.
Keep in mind that everything may not go as planned. It’s best to have backup materials and be flexible enough to make necessary adjustments. Preparing for unexpected events will give you more control over them.
End Your Presentation on a High Note
After you've delivered a fantastic presentation, make sure you wrap it up in a memorable way. Doing this will leave a lasting impression and nudge your audiences to take action.
One way to end your project presentation is to use a powerful call to action.
You can also tell memorable stories, summarize the main points and highlight compelling figures about the project.
For example you can mention some really intriguing figures like:
- Expected growth rate, return on investment and profit margin
- Potential company valuation in the next five to ten years.
- Projected earnings and market position etc.
The goal is to hype your audiences and stimulate them to take action.
You can check out our other article to learn more about ending your presentation on a great note.
Get To Work: Create Powerful Project Presentations With Visme
Creating a successful project presentation starts with setting your goals and having a clear plan to achieve them. It also requires crafting compelling content, paying attention to design and excellent delivery.
If you’re going to close those deals, you need a solid pitch deck to explain your project details and why it will succeed. We recommend using an intuitive project presentation software like Visme .
Visme is the perfect design tool for creating stunning and engaging project presentations . With Visme, you’ll have access to a wide range of features and tools to help bring your project ideas to life.
The tool has hundreds of presentation templates, design elements, font styles, built-in stock images and videos, data visualization tools and more to make your project presentation a hit. You can download your design in different formats and share it across multiple social media channels.
Now you have all the tips and tools for nailing your next project presentations. Go ahead and make it memorable with Visme's project presentation software.
Create beautiful presentations faster with Visme.

Trusted by leading brands
Recommended content for you:

Create Stunning Content!
Design visual brand experiences for your business whether you are a seasoned designer or a total novice.
About the Author
Unenabasi is a content expert with many years of experience in digital marketing, business development, and strategy. He loves to help brands tell stories that drive engagement, growth, and competitive advantage. He’s adept at creating compelling content on lifestyle, marketing, business, e-commerce, and technology. When he’s not taking the content world by storm, Unenabasi enjoys playing or watching soccer.
How-To Geek
Everything you need to know about animations and transitions in powerpoint.

Your changes have been saved
Email is sent
Email has already been sent
Please verify your email address.
You’ve reached your account maximum for followed topics.
If Your PC Won't Run Windows 11, Here Are 5 Great Linux Operating Systems to Try Instead
5 ways to get your money's worth out of apple tv+, why everyone should have a spare bootable linux usb disk, quick links, what are animations, what are transitions, things to note before you begin, how to add, amend, and remove an animation, how to add, amend, and remove a transition, using the morph transition.
PowerPoint's animations and transitions can help you grab your audience's attention, present information in bite-sized chunks, and—when used sparingly—deliver a more professional presentation. In this article, we'll run through the nuts and bolts of these useful PowerPoint tools.

Animations are effects you can add to your slides' text, pictures, shapes, graphics, tables, and other elements. There are four different types of animations:
- Entrance animations—These are the effects you can add to make an object appear on your slide in different ways.
- Emphasis animations—You can add an emphasis animation to an object already visible on your slide, such as changing its size or color.
- Exit animations—The opposite to entrance animations, exit animations make objects disappear from your slide through different effects.
- Motion paths animations —You can make an element on your slide move to a different place, with your audience seeing this movement from where it started to where it ends up.
You can use more than one animation on a single object. For example, you can apply an entrance animation to some text, followed by an emphasis animation.

A transition effect dictates how your presentation progresses from one slide to the next, and you can choose from three different levels of complexity:
- Subtle—These are the most basic types of transitions in PowerPoint, aiding speed and slickness as you jump from one slide to the next.
- Exciting—You can make your transitions more visually entertaining.
- Dynamic—A dynamic transition applies to all parts of a slide, except for the background, giving the illusion that the content is rolling through on a single page.
Only one transition effect can be added to each slide, and it's important that you apply the transition to the slide that will be visible once the transition is complete. For example, if you have two slides and want to create a transition effect as you move from slide 1 to slide 2, you will need to apply the transition to slide 2.
Before you add animation and transition effects to your PowerPoint presentation, bear in mind the following tips:
- Don't add too many animations and transitions . Overusing these features can distract your audiences in ways you didn't intend to, and they can also look tacky and unprofessional. Ask yourself, "Does this make my presentation better?" If the answer is no, don't add it.
- Another issue with using too many animations and transitions is that it could significantly slow down your PowerPoint file's processing speed , as it adds volume to your file size.
- Keep things professional in the right contexts. For example, if you're presenting a formal business plan, you don't want to add funky transitions that take ten seconds to complete. Try sticking to slick effects that last less than a second.
- Use the same transition effect for each slide and, if you can, the same animation for each item.
It's a widely shared opinion that Microsoft 365's desktop apps offer more flexibility and functionality than their web-based counterparts. However, the exact opposite can be said for adding animations, which is significantly easier to do on PowerPoint for the web than via the subscription-only app. So, to create the animations for screenshots in this section, we have used PowerPoint online, rather than the desktop app, and we recommend that you do the same.
Before you add any animations, click "Animation Pane" in the Animations tab on the ribbon. This will open a pane on the right side of your window, which will make seeing and managing your animations much easier.

Now, select the item you want to animate. If you want several items on a slide to animate in the same way at the same time, hold Ctrl while clicking them all. Then, click the down arrow in the Animations tab, and choose the appropriate effect.

You will then see an animation card in the Animation Pane for the effect you just added. Here, you can change the animation type, how it is activated (whether via a click, with the previous animation, or after the previous animation), and the duration and delay.

If you have more than one animation on a slide and want to reorder them, click and drag the six dots next to the relevant animation card upwards or downwards.

Finally, to remove an animation, click the trash icon on the appropriate animation card.
You can also animate paragraphs of text within a text box. To do so, select the relevant text, and follow the same process.
Whether you're using PowerPoint's desktop app or the online version of the program, adding transitions involves a very similar process.
First, select the slide you want to transition to (for example, you'll select slide 2 if you want to create a transition from slide 1 to slide 2) in the slide thumbnail pane, and then click the "Transitions" tab on the ribbon.

To see more transitions, click the down arrow on the right-hand side of the Transition To This Slide group.
Clicking any of the transition effects on display will do two things—first, it will show you a preview of what that transition will look like, and second, it will apply that transition to that slide.
You can then amend the options (such as the direction of the transition) and timing of the transition using the settings on the right side of the Transitions tab. This is where you can also add a sound effect to the transition, or decide whether the transition effect occurs when you click your mouse or automatically after a given length of time.

If you want to apply the same transition effect and options to all slides, click "Apply To All" in the Timing group of the Transition tab when you have finished setting up your transition's parameters. You can then select individual slides to make further adjustments if needed.
To remove a transition, select the slide in the slide thumbnail pane, and click "None" in the Transitions tab.

PowerPoint's Morph is a transition effect that recognizes differences between the same items on two slides, and smoothly transitions between them when you proceed from one slide to the next. For example, you might have an image on slide 1, and the same image in a different position on slide 2. The morph transition gives your audience the impression that you're still on the same slide, but the objects are merely moving and resizing.
This is different to the motion path animation, which you can set for different items and activate at different times on your slide. The morph transition, however, moves all items together as you move from one slide to the next, saving you from having to apply motion path animations to individual objects. Any objects on the first slide but not the second will simply fade away during the morph transition. Similarly, any new items on the second slide will appear gradually.
In this example, we have a title and an image on slide 1, and the same objects on slide 2 but in different places and different sizes. We created this scenario by copying and pasting the whole of slide 1, and then changing the text and image on slide 2. However, you can also create a blank slide, and then copy and paste the different elements you want to morph.

Then, we need to select slide 2, and click "Morph" in the Transitions tab on the ribbon.

Then, press F5 to see your presentation, and witness the smooth morph transition from one slide to the next. You can also use this transition effect to zoom into an image or fade an image into the background. Just ensure that you copy and paste from one slide to the next before you create the transition, so that PowerPoint recognizes them as the same.
If animations and transitions are new to you, check out these other tips that you should also know before you design your next presentation.
- Microsoft PowerPoint
- Microsoft 365
Category 9 minutes read
10 creative ideas for presentations
December 8, 2022

Ready to step up your presentation game? Let’s talk about creative ideas for presentations so you can deliver killer presentations every time. Whether you’re preparing a pitch deck for potential investors or onboarding new hires, you’ll need an engaging presentation to keep your audience interested. That’s right: even if you’re already a pro at public speaking, creative Powerpoint presentations can instantly upgrade your next meeting.
So, what’s the secret to creative presentations? You don’t have to spend hours on every slide, but you should design your slides to impact your audience. Well designed slides can add more power to your words, and they can make you feel more confident during presentations.
Why should you make presentations?
Creative ideas for presentations might not be easy to come by, but they’re important. Why? Presentations are all about storytelling. From business ideas to online classes, presentations offer a unique opportunity to inspire, educate, and persuade your audience.
At the same time, they’re an incredibly flexible (and cost-effective!) communication tool. Even if you’re using presentation design templates , you’ll have the flexibility to tweak the design based on your needs. This way, you can create presentations for different audiences—all while easily adding and removing information to pique your listeners’ interest.
Types of presentation slides
There are all kinds of creative ideas for presentations, but they ultimately serve a few similar purposes. Before diving into presentation design, you’ll need to choose the right slides. Remember: you need well designed slides to leave a lasting impact on your audience. Not only that, but your slides should be visually impactful, easy to understand, and convey key information in just a few words.
So, how can you choose the best slides for your next presentation? Here are some of the most common slides to inspire your presentation design.
Informative presentations

Informative presentations are educational, concise, and straight to the point. While other presentations might entertain or inspire their audience, informative presentations share information to educate their audience.
For example, you might create informative slides during an onboarding program. During new hire onboarding, HR needs to explain what benefits employees will receive, how to file complaints, where employees can find information, and other important hiring details.
Educational presentations

While informative presentations are typically used in the business world, educational presentations are usually used in academics. They’re a great communication tool for sharing ideas, detailing study results, or presenting a hypothesis.
In both in-person and online classrooms, teachers give educational presentations daily. Using beautiful presentation slides, eye-catching visuals, and fun design elements can help keep students interested while conveying key information.
Progress reports

Your business builds a new marketing strategy to achieve its long-term goals. After the newest marketing campaign starts driving results, it’s time to report on the campaign’s progress. Progress report presentations share updates, progress toward deadlines, collected data, and potential areas of improvement.
Inspirational presentations

One of the biggest examples of inspirational presentations? TEDTalks. During TEDTalks, motivational speakers inspire people to rethink their approach or change their behavior.
Most inspirational presentations aren’t as life-changing as TEDTalks, but they keep their audience engaged. For example, a company overview presentation might present information about a company, from its origins to values. Most importantly, it tells the company’s story to show listeners what the company stands for.
Infographic presentations

Whether you’re reporting marketing stats or presenting study results, infographics can be your MVP.
Simply put, an infographic is a multimedia graphic that helps you share information through beautiful designs. It’s an amazing tool for highlighting key statistics, visualizing data, and flexing your creative muscles to spark your audience’s curiosity.
Top 10 unique presentation ideas
Right, so let’s get to our creative ideas for presentations section. Most people tune out of presentations within the first 10 minutes . You need an engaging presentation that keeps your audience hooked, but finding creative ideas for presentations isn’t always easy.
The good news? Whether you’re presenting your master thesis or marketing analytics, it’s possible to create exciting presentations that don’t put your audience to sleep. Here are the best creative Powerpoint ideas to upgrade your next presentation.
1. Channel your inner minimalist

When it comes to unique presentation ideas, minimalism is one of the best ways to make an impact. The key to minimalist design is including just enough information and visual detail to keep your audience engaged. When done right, minimalist presentation slides can make your audience feel relaxed and focused.
2. Use a monochrome color palette

A monochrome color palette uses a single hue with different strengths. For example, you might create a presentation with different shades of orange. For the best results, change the background color to the palest shade, and use the strongest shade for the title. You can even make your photos match by adding an orange-tinted filter.
3. Tell an amazing story

If you want to leave a lasting impact on your audience, storytelling is the tool you need to create a memorable presentation. Sharing personal stories, whether they’re funny or inspirational, can help you connect with your audience and make your presentation more meaningful.
4. Make an impact with bold fonts

Want to draw your audience’s attention to the slide title? Use a bold, chunky font to make your title stand out (bonus points if your title is short, sweet, and straight to the point). The best presentation fonts are easy to read with minimal visual decorations and sharp corners.
5. Experiment with different textures

Mix up your presentation design with different textures, like scrunched paper or textile backgrounds. Here, you might experiment with different types of backgrounds to match your topic. For example, if you’re creating a back-to-school presentation , use notebook paper to match your student’s note-taking style.
6. Use a geometric background

A geometric background can add a pop of color to your presentation without distracting your audience. If you’re feeling bold, use dynamic titled polygons to create movement. Meanwhile, if you’re looking for a softer vibe, use circular backgrounds to infuse your slides with creativity.
7. Explain complex concepts with mind maps

Presenting study results? Reporting marketing stats? Instead of playing it safe with snore-worthy slides, keep your presentation fresh with mind maps. By creating mind maps, you’ll be able to showcase complicated information in a visually impactful way.
8. Engage your audience with questions

Make your presentation more interactive by asking questions to your audience. For example, to keep your slides minimal, try displaying only the question on the slide. Once the audience has pitched in their opinions and answers, you can click to the next slide to reveal the actual answer.
9. Stay on brand

Once you’ve captured your audience’s attention, you need a consistent design to keep everyone on the same page. When designing your slides, use your brand’s style guidelines to choose the right color scheme, font styles, and design elements.
10. Replace bullet points with fun design elements

Let’s face it: bullet points can get boring, especially if you’re using them on every slide. Instead of using the same design over and over, create fun slides by replacing boring bullet points with fun designs, like icons, stickers, and pictograms.
Apply creative ideas for presentations through Picsart
Now that we’ve learned all about creative ideas for presentations, it’s time to put that knowledge into practice. An amazing presentation can bring your story to life, helping you keep your audience engaged with pro-grade slides.
Even if you’re not a seasoned designer, you can add fun design elements, bold color palettes, and attention-grabbing visuals with Picsart. Here’s how to bring your creative vision to life with a professional slideshow.
On the web:
1. Open the Picsart Slideshow Maker and start a new project.

2. Choose the desired size for your slideshow. Then, click Upload to upload your own photo or video.

Or, you can explore photos and videos from the Picsart library.

3. After you’ve picked your favorite design, click Text on the left panel sidebar to add text to your slide.

4. To add music, click Audio to explore our library of #FreeToUse music.

5. Click the + button on the right panel sidebar to add a new slide.

6. When you’re finished, click Export , choose the image quality and file type, and download your slideshow.

1. Open the Picsart app and tap on the plus sign (+) to start a new project. 2. Scroll down to Video and choose Slideshow . Then, choose the pictures you’d like to include in your slideshow. Or, you can tap Search to explore the Picsart photo library. 3. After you’ve picked your photos, tap Next .

4. Choose your desired slideshow size and add transition effects to your slides. 5. Upgrade your slideshow with fun effects, music, text, and stickers to engage your audience.

Create at the Speed of Culture
Picsart is a photo and video editing platform and creative community. A top 20 most downloaded app worldwide with over 150 million monthly active users, its AI-powered tools enable creators of all levels to design, edit, draw, and share content anywhere. The platform has amassed one of the largest open-source content collections in the world, including photos, stickers, backgrounds, templates, and more. Used by consumers, marketers, content creators and businesses , Picsart tools fulfill both personal and professional design needs. Picsart has collaborated with major artists and brands like BLACKPINK, Taylor Swift, Lizzo, Ariana Grande, Warner Bros. Entertainment, iHeartMedia, Condé Nast, and more. Download the app or start editing on web today, and upgrade to Gold for premium perks!
Related articles

Inspirational Marketing
The ‘demure’ TikTok trend explained

Inspirational
From Burn to Bloom: A Queer Writer’s Journey to Self Discovery, Community and Starting a Business

Inspirational News
Happy Birthday Picsart Spaces! Celebrating One Year of Community and Creativity

Design Inspirational
The best 11 free handwriting fonts in 2024
Related tags
IMAGES
COMMENTS
Share your PowerPoint presentation with others. Windows macOS. Select Share. If your presentation isn't already stored on OneDrive, select where to save your presentation to the cloud. Choose a permission level, like Anyone with a link, or maybe just people in your company. You can also control if people can edit or just view the doc.
Select the text, shape, or picture that you want to use as a hyperlink. Select Insert > Link > Insert Link and select an option: Place in This Document: Link to a specific slide in your presentation. Create New Document: Link from your presentation to another presentation. E-mail Address: Link a displayed email address to open up a user's email ...
The first thing to note is the "Share" section. Here, you'll see the two methods for sharing the presentation, and anyone with whom you've already shared it. With the "Invite People" method of sharing, you can do the following: Type the email addresses of those with whom you'd like to collaborate. Leave a note for the recipients.
To link to a file or website, select Existing File or Web Page at the top-left. Then, enter the full URL of the website or select the document. To link to another location in your presentation, select Place in This Document, then select a slide title. To create an email hyperlink, select E-mail address, then enter an email address.
Step 3: Access the Hyperlink Function. Right-click on the selected text or object and choose 'Hyperlink,' or go to the 'Insert' tab and click on 'Hyperlink.'. You'll find the 'Hyperlink' option easily on the right-click menu. Alternatively, the 'Insert' tab on the ribbon has it all laid out for you.
Select Insert > Link. The drop-down menu shows any links copied to your clipboard and recent files. Choose what you want or select Insert Link at the bottom. Select Existing File or Web Page, and add the: Text to display - Type the text that you want to appear for your hyperlink. ScreenTip - Type the text that you want to appear when the user ...
Go to the Insert ribbon. Select "Action". Click the option "Hyperlink to:" and from the drop-down menu, select where you want the action button to link to. It can be: A specific slide within your presentation (Option "Slide…") A web page (Option "URL") Other PowerPoint presentations. 5.
Select the resource you want to use as a link. On the Insert tab, click Hyperlink. You can also right-click and choose Hyperlink. Inserting hyperlinks in PowerPoint. Select the desired option under "Link to": Linking to an existing file or website. Linking to another slide in the same presentation.
If you are using a shape that contains text, click its edge. Click the Insert tab in the Ribbon. In the Links group, click Link or Hyperlink. You can also press Ctrl + K. The Edit Hyperlink dialog appears. Under Link to, select Existing File or Web Page. In the Address box, enter the web address or url.
Step-1: Click on the "Insert" tab. In the open PowerPoint presentation, click on the "Insert" tab in the menu ribbon located at the top of the screen. In the "Links" section of the "Insert" menu, you will notice that the "Link" option is greyed out. Step-2: Click on an object.
Here's how to create a link for a PowerPoint: Click on Copy link on the same sharing window I showed you above. PowerPoint Online creates a URL that you can send to others to collaborate on the presentation with you. Create a link to view the PowerPoint presentation using the Get a link option.
Click the Link button, or you can press Ctrl + K on your keyboard. The Insert Hyperlink dialog box will appear: Select the Place in This Document option on the left-hand side. A list of available slides in your presentation will appear. Click on the slide you want to link to, then press OK to confirm your selection.
If you do not like keyboard shortcuts, you can alternatively open the Insert Hyperlink dialog box using your Ribbon. To add a link to an object (or block of text) using the PowerPoint Ribbon, simply: Select your text or object that you want to use as the anchor for link. Click the Insert tab. Open the Link drop down.
To hyperlink text, follow these instructions: Open your presentation in PowerPoint. Select the text you want to hyperlink. Right-click on the text and select Link . Insert the website link in the address box and click on OK . If you're linking the text to a file on your PC, use the Look in box to locate your file.
First, open the PowerPoint presentation that you'd like to share. At the top-right corner of the window, you'll see a "Share" button. Go ahead and select it. Once selected, the "Share" window will appear. You have a few different options here. In the "Attach a copy instead" group, you can choose to send your presentation as a ...
Thank you for choosing Microsoft Community. To share a presentation online as a slide show, you need to create a view-only copy of it. To do that, Right click on the Presentation and click on Share. Click on Get Link. In the Choose an option drop down select View Only and then click on Create Link. Now copy the link and share it with your friends.
Click the "OK" button. Next, you'll be greeted with a list of the slides from the presentation you're linking to. Select the slide that you'd like to go to and click "OK." You'll now notice the file path of the second presentation appears under the "Hyperlink To" box. Once you're ready, select the "OK" button.
In PowerPoint just right-click the slide you want assistance with and choose Link to this Slide. When the sharing card appears, you can change the share settings—if you only want your colleague to view the slide, and not edit it, for example—or just click Copy to copy the hyperlink to your clipboard. After the link is copied to the ...
Open the PowerPoint presentation. Highlight the text or object you would like to hyperlink. Click the [Insert] tab > From the "Links" group, click [Action]. Select the "Hyperlink to:" radio button > From the drop-down menu, choose where you would like the action button to link to when activated. Click [OK].
Select the text or object that you want to turn into a hyperlink. Open the Insert tab in the PowerPoint ribbon. Click on the "Hyperlink" button in the Links group. In the "Link to" section, select ...
To add a link in WPS Presentation, follow these steps: Step 1: Select the text or object you want to link. Step 2: Click the Insert tab and then click the Hyperlink button. the Insert tab. Step 3: In the Link to dialog box, enter the URL of the website or file you want to link to. Step 4: Click OK. Click OK.
Nothing Says 'Party!' to Gen Z Quite Like a 50-Deck PowerPoint and a Remote Clicker Forget beer pong and karaoke, 20-somethings are throwing presentation parties. 'I felt seen.'
Click on "Blank presentation" to create your presentation from scratch, or pick your preferred free PowerPoint template from the options at the top (there's also a host of editable templates you ...
Audio file link - Multiple lines of text; You've now created the track list with data. Next, you'll create the picture library. Step 2: Create the SharePoint Picture Library to Hold Your Images. Create a picture library to hold all your audio image covers. To do this, navigate to the site where you want to create the picture library.
Linking to Another Slide in the Same Presentation. Open your presentation and navigate to the slide that will contain the hyperlink. Once there, highlight the text, object, shape, or image to which you want to attach the link. Next, head over to the "Insert" tab and click the "Link" button. In the Insert Hyperlink window that opens ...
Bonus Tip: Linking Beyond the Presentation. While the method above focuses on linking within a single presentation, Google Slides also allows you to create links to slides in other presentations stored on your Drive, or even external web pages. The process remains very similar.
Your design can make or break your project presentation. Whether you are an experienced designer or a novice, design tools like Visme give you an edge. You can create compelling presentation designs for your business in a few minutes. The beautiful thing is that you don't have to break the bank to make stunning project presentations.
However, the exact opposite can be said for adding animations, which is significantly easier to do on PowerPoint for the web than via the subscription-only app. So, to create the animations for screenshots in this section, we have used PowerPoint online, rather than the desktop app, and we recommend that you do the same.
When done right, minimalist presentation slides can make your audience feel relaxed and focused. 2. Use a monochrome color palette. A monochrome color palette uses a single hue with different strengths. For example, you might create a presentation with different shades of orange.
Here we use pptx package to create PowerPoint slides. The list of JSON objects contains the information to add slides to the presentation. ... Creating Your PowerPoint Presentation. With the UI up and running, follow these simple steps to generate your presentation: 1.