How to Present PowerPoint Slides in Zoom

Your changes have been saved
Email is sent
Email has already been sent
Please verify your email address.
You’ve reached your account maximum for followed topics.
Preparing to present PowerPoint slides in Zoom for the first time can feel overwhelming. It's a different experience than face-to-face presentations, and naturally, you want to get it right. But don't worry, we've all been there, and we're here to help.
In this article, we’ll guide you through the process step-by-step, so you can deliver your presentation with confidence and avoid awkward pitfalls. Let’s dive in.

Present PowerPoint Slides in Zoom by Sharing Your Entire Screen
One of the easiest ways to share your PowerPoint slide deck is by sharing your entire screen. Here’s how to go about it.
- Open your PowerPoint presentation.
- Start or Join a Zoom meeting . Knowing how to use Zoom like an expert makes this step easy.

When you hide the toolbar, it may appear as a minimized window in your taskbar. Click the window icon to reveal it when you’re ready to stop sharing.

- Press the Esc key on your keyboard to exit the slideshow after your presentation.
- Click Stop sharing .
Sharing your entire screen lets you seamlessly switch between your PowerPoint window and other windows while bringing your audience along. However, it has a downside—your audience will see sensitive details or notifications if they pop up.
Present PowerPoint Slides in Zoom by Sharing a Window
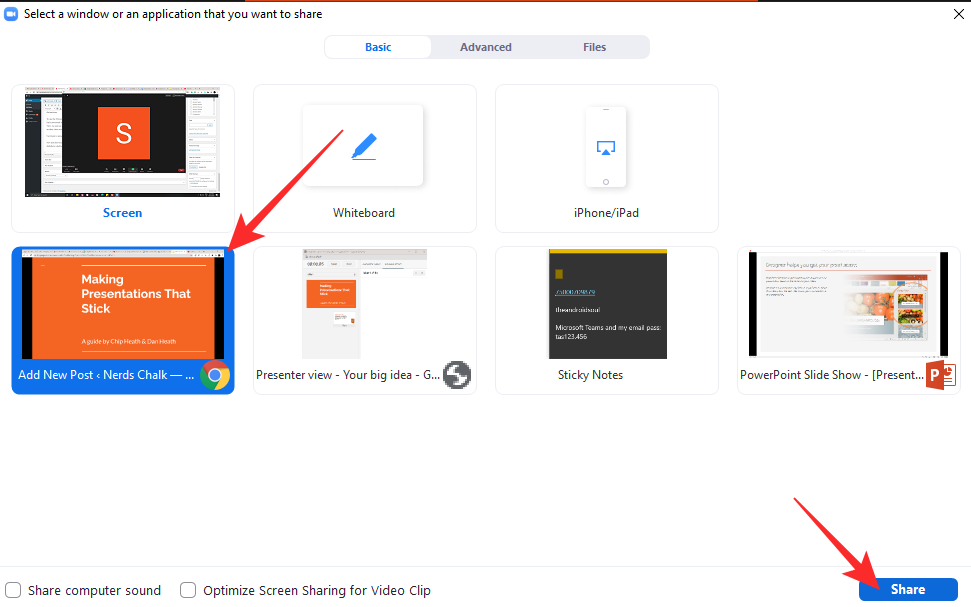
With this method, you share only your PowerPoint window, so your audience won't see other areas of your desktop, including popup notifications. Here’s how to get it done.

- Join the Zoom meeting.

Ensure your PowerPoint window is maximized and running in the background, or it won't appear under the Window tab.

- Click Stop sharing or Stop share when you’re done presenting.
This method is perfect for multi-tasking—that is, sharing your PowerPoint window while viewing your notes (in a separate document) or seeing what’s happening in Zoom.
Rock Your PowerPoint Presentation in Zoom Like a Pro
And that's a wrap! You now know all the key steps to present PowerPoint slides effectively in Zoom. Remember, you have two main options: share your entire screen when you need to switch between different windows during the presentation or share a specific PowerPoint window if you're multitasking and want to keep the rest of your desktop private.
Practice using these features before your next presentation, so you're comfortable and ready. Alongside this, using a whiteboard in Zoom can make your presentations more interesting.
- Productivity
- Microsoft PowerPoint
- Shop Now: Amazon Labor Day Tech Sale
- Get These 12 Student Discounts!
How to Share a PowerPoint on Zoom
Share your screen, whether or not you're the presenter
:max_bytes(150000):strip_icc():format(webp)/DanSeitz-212239-b7461a6af1964919a88b89c04d193d8c.jpg "how to put a powerpoint presentation on zoom")
- University of Vermont, Emerson College
:max_bytes(150000):strip_icc():format(webp)/headshot-00415ba557444a8a9b6bb139498b97c5.jpg "how to put a powerpoint presentation on zoom")
- The Ultimate Guide to Shopping Online
- The Ultimate Guide to Online Learning at Home
- Two-Factor Authentication
- The Ultimate Guide to Skype
What to Know
- Anybody can share a PowerPoint on a Zoom call but may need permission from the call’s organizer.
- To see notes, you’ll need a second screen to divide the view or have your notes on a separate device.
In this article, we’ll discuss how to share a PowerPoint, or any presentation, on Zoom. You can do this in a few clicks for more straightforward presentations, but for more complex presentations, you may want some more tools.
How Do You Share a PowerPoint in a Zoom Meeting?
For a presentation where you don’t need to see your notes, sharing a PowerPoint is a quick process.
Open your presentation, and close any windows you won't need. This will limit clutter and distractions.
Log into your Zoom call and when you’re ready to present, click Share Screen at the bottom. Choose your presentation from the menu.
When using a single screen, you should always pick the specific program you want to share. Doing this will protect your data and prevent pop-ups and other interruptions.
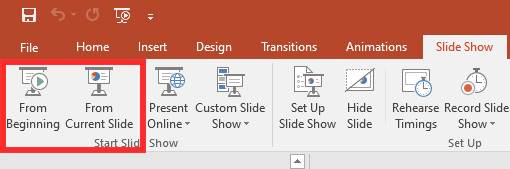
Go to the Slide Show tab in PowerPoint and click From Beginning . For the smoothest presentation, do this before anyone else joins the call, where possible.
Use the controls in the lower left-hand corner or keyboard controls to move through your presentation as usual.
Be sure to click on the Presentation window if you’re going to use keyboard controls. PowerPoint won’t acknowledge inputs from the keyboard unless you’ve deliberately clicked on the window.
How Do You Share a PowerPoint With Zoom and Still See Notes?
The best way to see your notes is to use a second monitor and PowerPoint’s Presenter View tools. Then your notes and controls are on one screen, visible only to you, and your presentation is on the other.
Open your PowerPoint and go to Presenter View to see your notes . This mode opens two windows: The presentation and the control panel.
Drag the control panel to your primary screen and the presentation window to your second screen. You’ll be able to see and control your presentation while looking directly into your webcam if you’re using it, and you won’t have to hold your neck at an angle to use the controls.
Log into the Zoom call and click Share Screen at the bottom. Choose your presentation window.
If you’ll need to present other documents or materials in addition to your presentation, have them open and minimized on your screen and share your second monitor instead. Then you can quickly bring those materials up without disrupting your flow.
Tips for a Better Zoom Presentation
If you're not the call organizer, contact them and ask what permissions they've set up and whether you'll need permission to share your screen.
For meetings with multiple people sharing the same presentation, book a call a day before and practice "handing off" control of the slides in Zoom. Alternately, the person sharing their screen should prepare to move to the next slide when cued. Everyone should also have an up-to-date copy of the presentation, so it can continue if somebody drops out of the meeting.
Keeping Murphy's Law in mind, having your notes in one or two other places is a good idea. Consider using your phone and a printed copy to ensure that you can rely on one of the two additional sources for your notes if everything goes wrong.
To record yourself giving a PowerPoint presentation on Zoom, launch Zoom and PowerPoint; be sure to close all other applications. Create a new Zoom meeting, select Share Screen , select your PowerPoint presentation, and click Share . Launch your PowerPoint slideshow. In Zoom, choose Record > Record on This Computer . Your computer is now recording.
Join the Zoom meeting from your iPad using Zoom's mobile app for iOS. Open your PowerPoint presentation and tap Share Content from the meeting controls. You can use PowerPoint's annotation and drawing tools to make notations on your slides if you like.
Get the Latest Tech News Delivered Every Day
- Zoom: What It Is, History, and How It Works
- How to Use Dual Displays When Working With Microsoft Office
- How to Make Someone Else a Presenter in a Microsoft Teams Meeting
- How to Create a Loomie 3D Avatar For All Your Zoom Meetings
- How to Fix It When a Zoom Microphone Is Not Working
- 7 Benefits of Video Conferencing
- How to Change the Host on Zoom
- Top 5 Free Web Conferencing Tools
- How to Share a Digital Business Card
- How to Connect Two Home Computers Through a Network
- How to Connect an iPhone to a Projector
- The 10 Best Working From Home Tips in 2024
- Wi-Fi Tutorial: How to Connect to a Wireless Network
- What Is a Digital Business Card?
- Google Meet Screen Sharing Not Working? How to Fix the Problem
- What Is a LAN (Local Area Network)?
- PC & Mobile
How to Share a PowerPoint Presentation on Zoom
Jordan Read more March 7, 2021
PowerPoint presentations are a handy, practical tool in any corporate environment. When you present a problem or a plan visually, people often find it easier to remember or assimilate it. And when you combine a PowerPoint presentation with Zoom, you make business meetings even better.
But how do PowerPoint and Zoom work together exactly? Well, you can do it in three different ways. All of which we’ll cover in detail in this article.
Method 1 – Dual Monitors
One of the great things about Zoom is that the hardware equipment isn’t overpriced. Depending on the size and needs of your company, your Zoom meetings can stay as small or as big as you need them to be.
For example, if your Zoom meeting room has a dual monitor system, one screen can show the entire PowerPoint presentation full screen. While the other monitor can contain presenter’s notes or anything else that can contribute to the meeting.

Here’s how you share a PowerPoint presentation on dual monitors in Zoom:

That’s all there is to it. However, if it turns out that the monitor you’re sharing isn’t the correct one, go to Display Settings, and click “Swap Presenter View and Slide Show”. Therefore, you don’t have to start the whole process from the beginning.

Method 2 – Single Monitor in a Window
The first method is very practical and gives you a clear view of the presentation and the presenter. But not every Zoom meeting room has dual monitors, nor does it need them. A smaller meeting room works just fine with a single monitor, and fortunately, you can share a PowerPoint slide show with just a single monitor.
Either in a window or with a full screen. The window option is very useful when it comes to multitasking while sharing a presentation. Here’s how you share a PowerPoint presentation in a window:

That should do it. Now you have a PowerPoint presentation in a single window, and you can still access the in-meeting chats or any other application or file that you need for the meeting.

Method 3 – Single Monitor in Full Screen
If you’re dealing with a single-monitor situation in your Zoom meeting, and a very important PowerPoint presentation is on its way, the full-screen option is a great idea. The full screen slide show means that there’ll be no onscreen distractions. With no chatting, or opening other files, your focus stays on the presentation itself. Here’s how you make the full screen PowerPoint slide show in Zoom:

And now your presentation is in full screen, and everyone can see it clearly.
Sharing Sound with Zoom
Did you know that the Zoom screen sharing feature lets you share the audio as well? That’s right. People who attend the meetings remotely can now receive both the video and audio. But the one pre-requisite is that you have to use Zoom for Desktop for Windows or Mac.

Therefore, if you want to share a YouTube clip, for example, you just have to click “Share sound”. However, there is one disadvantage. You can’t share the computer sound when the meeting is shared on multiple screens at the same time. It only works when one screen at a time is being shared. Still, it’s a pretty useful feature.

Present Your Work More Efficiently with Zoom
PowerPoint slide shows have been around forever. Once you figure out how to make the most of them, the sky is the limit. It’s one of the most creative software options from Microsoft Office. In comparison, Zoom is new. But it’s taken the corporate world by the storm. The company emphasized that it “just works”, and what more can you ask from a tool that is designed to make work meetings run smoothly? Time is the most precious commodity, and PowerPoint, together with Zoom helps you make significant savings in this regard.
Let us know what you think about PowerPoint and Zoom in the comments section below.
Related Posts

Disclaimer: Some pages on this site may include an affiliate link. This does not effect our editorial in any way.

Ronald Rajan February 25, 2024

Aman Kumar February 12, 2024

Evan Gower September 19, 2023
Send To Someone
Missing device.
Please enable JavaScript to submit this form.
Search results for
Affiliate links on Android Authority may earn us a commission. Learn more.
How to share PowerPoint presentations on Zoom
Published on March 1, 2023
A quality PowerPoint presentation can add immeasurably to an online meeting, so it’s essential to know how to share PowerPoint on Zoom . You can even check your notes while your meeting partners see your presentation. The only prerequisite is having permission to share your screen with the meeting. If you scheduled the meeting, then there’s no need to ask. But if it isn’t your meeting, you’ll need to ensure whoever called the meeting allows other participants to share their screens. Then follow the instructions below, and you can share your carefully constructed PowerPoint presentation over Zoom.
QUICK ANSWER
To share a PowerPoint presentation on Zoom, open your PowerPoint presentation and select the Slide Show tab. Start the slide show by clicking From Beginning. In Zoom, click the Share Screen button, and select the PowerPoint slideshow window. Click Share to begin sharing this window with the meeting.
KEY SECTIONS
How to present PowerPoint on Zoom with notes
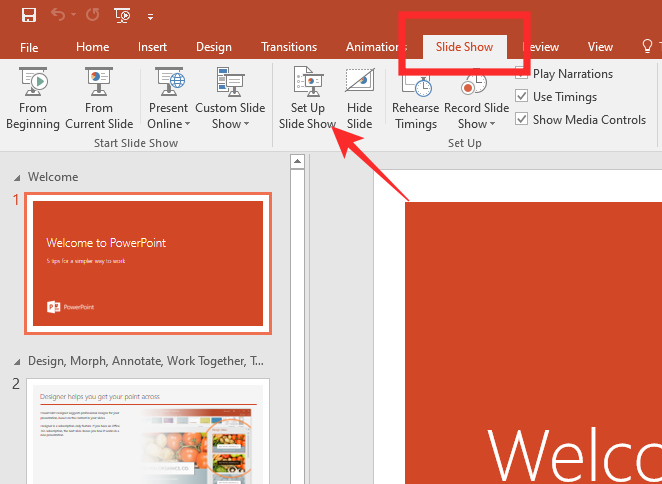
First, open the presentation you want to share in PowerPoint and open the Slide Show tab. Click Set Up Slide Show.

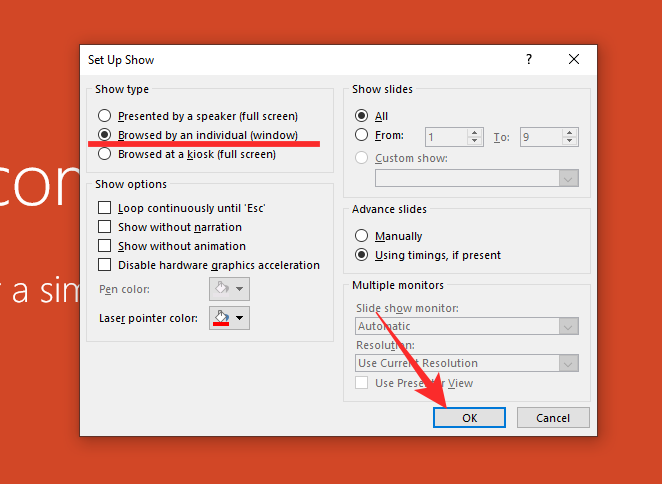
The menu that comes up will let you set important parameters for your presentation. You can choose:
- Whether to present in a window or full-screen.
- Whether to operate the presentation manually or let it run automatically.
- Which monitor will have the presentation on it (for multiple-monitor setups.)
Set your preferences and click OK.

Next, open Zoom and either set up or join a meeting (again, make sure you have permission to share.) Click the Share Screen button at the bottom.

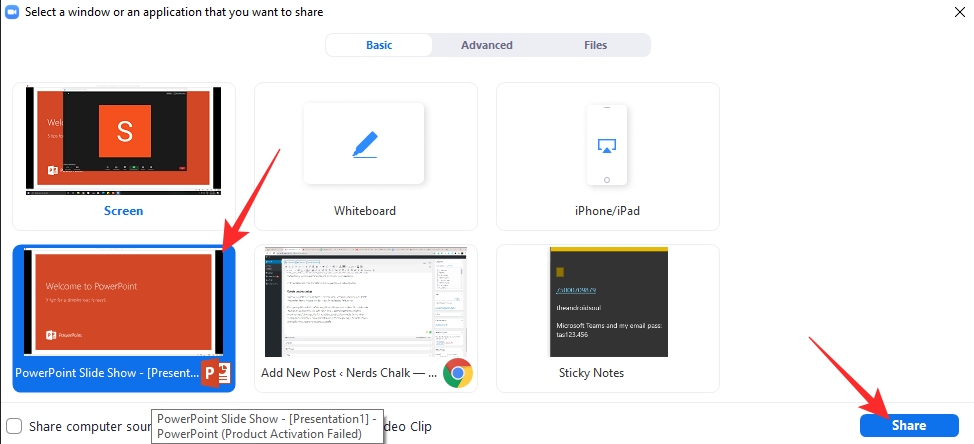
Use the menu that comes up to choose which window you want to share. You can also choose to share or not share audio in this window. Choose the PowerPoint window and click the blue Share button.

You will now be sharing your PowerPoint window with the meeting. Click one of the Begin Slide Show buttons in PowerPoint to begin your presentation.

At the top of the screen, there will be controls for screen sharing. When your slide show ends, click Stop Share to return to the meeting.

Presenting a PowerPoint presentation on Zoom works great with pre-recorded narrations. But what if you want to use your PowerPoint notes as you present live?
There are two situations to consider when you want to use your notes as you proceed through the slides in your presentation. One situation is when you have two monitors (a monitor and a projector), and the other is when you only have one screen.
With two monitors
It’s easy to see your notes when you have two screens to work with. Begin in PowerPoint by clicking Set Up Slide Show.
Set your show type to Presented by a speaker (full screen). Decide whether to advance through the slides manually or by using timings, and click OK. Now go to the Slide Show menu in PowerPoint and click the box that says Use Presenter View. Select the monitor to display the presentation in the drop-down box above it.

Now it’s time to start or join a Zoom meeting. When in the meeting, click Share Screen at the bottom.
From the menu of open windows on your computer that comes up, select the one named PowerPoint Slide Show .

You are now sharing one of your two screens with your Zoom meeting while, through your use of Presenter View, your other screen has your PowerPoint notes on each slide, controls for the presentation, a timer, and a preview of the next slide. It will look like this.

When your slide show has ended, you can use the End Slide Show control at the top of the page to return to your Zoom meeting. As you can see, using two monitors to share a PowerPoint presentation is convenient. But in a one-monitor situation, it can still be done.
With one monitor
To present with only one monitor and still have access to your PowerPoint speaker notes and controls, you will again use Presenter View, but differently. Start by opening Zoom, then continue by setting up your PowerPoint slide show to be full-screen.

Then start your slide show. It will begin in full screen.
In the lower left hand of the full-screen slide show, you will see a three-dot menu. Click the three dots, and a menu will come up. From that menu, select Show Presenter View.

Presenter View will now open in a separate window. Use Alt-Tab on your keyboard to navigate to Zoom, where you can start or join a meeting. When you’re in the meeting, click Share Screen.

From the window that opens, select the PowerPoint Slide Show window, and click the blue Share button.

You will now be sharing the full-screen presentation you started in PowerPoint with your Zoom meeting. Now use Alt-Tab again to navigate to the window whose name contains the words “PowerPoint Presenter View.” Use the sizing icon in the upper right to reduce the window size.

With the window reduced, you can see the full-screen slide show playing behind the Presenter View window while still having access to your notes and presentation controls.

If it’s your meeting, set up the PowerPoint presentation before the meeting’s start time for a more polished presentation so the invitees don’t see you setting up the slide show. If it’s someone else’s meeting, ask for permission to enter before they do, so you will have time to go through the abovementioned procedures.
Check out our list of the best PowerPoint tools and apps for Android for more presentation options on mobile.
Yes, they do. Since the presentation is still controlled by PowerPoint and merely shared over Zoom, all your animations, morphs, and transitions remain in your control.
The presentation can be as long as the meeting can be, which varies according to what Zoom plan you have.
To see your PowerPoint notes while presenting with one monitor on Zoom, you can use the Presenter View option in PowerPoint, which allows you to view your notes and presentation on separate screens. Open your PowerPoint presentation, and then click on the Slide Show tab at the top of the screen. Next, click the Presenter View button to display your presentation on one screen and your notes on the other. Then, start your Zoom meeting and share your screen with your presentation in Presenter View. This will enable you to see your notes and presentation simultaneously on Zoom.
Yes, you can share a PowerPoint on Zoom if you are not the host, as long as the host has permitted you to share your screen. Once you are in the meeting, click on the Share Screen button at the bottom of the screen and then select the PowerPoint window from the list of available options. This will share your PowerPoint presentation with the other participants in the Zoom meeting.
How To Present Powerpoint On Zoom

- How-To Guides
- Software Tutorials

Choosing the Right Presentation Format
When it comes to presenting your PowerPoint on Zoom, choosing the right format is crucial to ensure that your audience can view and interact with your slides effectively. Whether you’re conducting a business meeting, delivering a training session, or giving a presentation, consider the following factors when deciding on the best format for your presentation:
- Full Screen: This format allows you to occupy the entire Zoom window with your slides. It’s ideal for presentations that heavily rely on visuals or require your audience to focus solely on the content.
- Presenter View: If you need to access your notes, manage your slides, or view upcoming slides while presenting, the Presenter View format is your best bet. It gives you a separate window with additional tools and features.
- Side-by-Side: This format enables you to display your PowerPoint slides alongside other applications or materials, such as a video conferencing window or a shared document. It’s useful if you need to refer to external resources during your presentation.
- Custom Layout: Zoom allows you to customize the layout of your presentation, allowing you to combine multiple formats or adjust the size and position of your slides and other elements on the screen.
Consider the nature of your presentation, your objectives, and the visual elements you plan to incorporate when selecting the presentation format. Additionally, take into account the size of your audience, the devices they’ll be using, and the level of interactivity you wish to achieve.
Remember, a well-chosen presentation format can enhance your delivery and engage your audience more effectively. Spend some time experimenting with different formats in Zoom’s settings before your presentation to determine the layout that works best for your needs.
Preparing Your PowerPoint Slides
Before presenting your PowerPoint on Zoom, it’s important to ensure that your slides are well-prepared and optimized for the virtual environment. Here are some essential tips to consider:
- Simplify Your Content: Keep your slides concise and focused. Use bullet points, short sentences, and key phrases to convey your message effectively. Avoid overcrowding slides with excessive text or complex images.
- Use High-Quality Visuals: Choose high-resolution images and graphics that align with your topic and enhance understanding. Avoid pixelated or distorted visuals that may hinder audience comprehension.
- Consider Font Size and Typeface: Use a clear and legible font size, typically around 24-32 points, to ensure readability on different screen sizes. Stick to standard fonts like Arial or Calibri to avoid technical issues.
- Contrast Colors: Opt for high contrast between the background and text colors to ensure visibility. Dark text on a light background or vice versa works best. Avoid using color combinations that strain the eyes or make text illegible.
- Include Engaging Multimedia: Incorporate videos, animations, or interactive elements to enhance audience engagement. However, ensure that the multimedia elements are relevant, purposeful, and do not distract from your main points.
- Consistent Design: Maintain a consistent design across your slides for a professional and cohesive look. Use the same font styles, colors, and layout throughout your presentation to create a visually appealing and easily navigable experience for your audience.
- Proofread and Edit: Check for spelling, grammar, and content errors in your slides. Ensure that all text is grammatically correct and appropriate for your target audience. Consider seeking feedback from colleagues or friends to validate the clarity and effectiveness of your slides.
By following these tips, you can create visually appealing and well-structured PowerPoint slides for your Zoom presentations. Investing time and effort in the preparation phase will translate into a more engaging and impactful virtual presentation experience.
Optimizing Your Zoom Settings
Before you start presenting your PowerPoint on Zoom, it’s essential to optimize your Zoom settings to ensure a smooth and hassle-free experience for both you and your audience. Consider the following settings to enhance the quality and functionality of your presentation:
- Audio Settings: Test your microphone and speakers to ensure clear audio. Adjust the microphone sensitivity and speaker volume as needed. Consider using an external microphone for better sound quality.
- Video Settings: Check your camera settings and ensure that you’re well-lit and in focus. Adjust the video resolution based on your internet connection to maintain a stable presentation stream.
- Screen Sharing: Familiarize yourself with the screen sharing options in Zoom. Choose the appropriate settings to optimize the display of your PowerPoint slides. Select the “Optimize for full screen video” option for a smoother playback experience.
- Virtual Background: If desired, experiment with Zoom’s virtual background feature to create a professional and distraction-free backdrop. Choose a background image that aligns with your presentation topic and enhances your visual presence.
- Chat and Q&A: Decide whether you want to enable the chat or Q&A feature during your presentation. This allows your audience to ask questions or provide feedback. Determine how you want to manage and address these interactions during your presentation.
- Recording: If you plan to record your presentation, ensure that you have sufficient storage space and that you’ve enabled the recording function in Zoom. Inform your audience in advance if you intend to record the session.
- Mute and Unmute: Familiarize yourself with the mute and unmute controls in Zoom. During your presentation, be mindful of muting yourself when not speaking to minimize background noise and distractions.
- Practice and Test: Before your actual presentation, conduct a practice session to test your Zoom settings. Ensure that everything is working as expected, including audio, video, screen sharing, and any interactive features you plan to use.
By optimizing your Zoom settings in advance, you can ensure a seamless and professional presentation experience. Paying attention to audio, video, screen sharing, and other essential settings will help you deliver a high-quality presentation that engages your audience effectively.
Sharing Your Screen on Zoom
One of the key features of Zoom is the ability to share your screen, allowing you to display your PowerPoint slides to your audience. Follow these steps to successfully share your screen during a Zoom presentation:
- Start a Zoom Meeting: Open Zoom and start a meeting. You can choose to start a new meeting or join an existing one.
- Open Your PowerPoint Presentation: Open the PowerPoint file that contains your presentation. Make sure it’s ready to be displayed.
- Click the “Share Screen” Button: In the Zoom meeting window, locate the green “Share Screen” button at the bottom of the screen and click on it.
- Select Your PowerPoint Window: A dialog box will appear with a list of available screens and windows to share. Choose the window that has your PowerPoint presentation open.
- Ensure “Share Computer Sound” is Checked: If your PowerPoint presentation includes audio or video, make sure to check the “Share computer sound” checkbox in the dialog box. This will transmit the audio along with your slides.
- Click “Share”: Once you have selected the appropriate window, click on the “Share” button in the bottom right corner of the dialog box.
- Start Presenting: Your PowerPoint presentation will now be visible to your audience in the Zoom meeting. Begin presenting your slides as you normally would.
- Stop Sharing: To stop sharing your screen, locate the “Stop Share” button at the top of your screen or in the Zoom meeting controls and click on it.
Remember to ensure that your PowerPoint slides are visible and legible to your audience. Check the Zoom meeting preview window to verify the quality of your shared screen. Adjust the size and position of your slides if necessary to optimize visibility.
Sharing your screen on Zoom allows your audience to view your PowerPoint presentation in real-time, enhancing their engagement and understanding of your content. Practice this process before your actual presentation to become familiar with the steps and ensure a smooth screen sharing experience.
Using Presenter View
Presenter View is a powerful feature in PowerPoint that allows you to view your speaker notes, manage your slides, and have better control over your presentation while presenting on Zoom. Follow these steps to use Presenter View effectively:
- Enable Presenter View: Before you start your presentation, click on the “Slide Show” tab in PowerPoint and check the “Use Presenter View” box. This will activate Presenter View on your screen.
- Start the Slide Show: Begin your presentation by selecting the “From Beginning” or “From Current Slide” option under the “Slide Show” tab, depending on where you want to start.
- Access Presenter View: Once your presentation starts, you’ll see two different windows. The main window displays the current slide that your audience sees, while the Presenter View window contains your speaker notes, thumbnails of upcoming slides, and slide navigation controls.
- View Speaker Notes: In the Presenter View window, you can see your speaker notes for each slide, allowing you to stay on track with your talking points and key information.
- Preview Upcoming Slides: Take advantage of the thumbnail view in Presenter View to preview the next few slides. This helps you anticipate and smoothly transition to the next topic without losing your flow.
- Annotate Slides: Use the annotation tools available in Presenter View to highlight important points or draw attention to specific areas of your slides. This can enhance your audience’s understanding and engagement during your presentation.
- Manage Slides: In Presenter View, you can easily navigate between slides using the arrow keys or the slide navigation controls. This allows you to jump back and forth between slides or quickly go to a specific slide as needed.
- End the Presentation: Once you’ve completed your presentation, press the Esc key or click on the “End Slide Show” button in the Presenter View window to exit the presentation mode.
Presenter View in PowerPoint and Zoom provides you with the tools and flexibility to deliver a seamless and professional presentation. Take advantage of its features to stay organized, deliver your content effectively, and engage your audience during your Zoom presentation.
Navigating Slide Show Controls
When presenting your PowerPoint on Zoom, it’s important to familiarize yourself with the slide show controls to navigate through your slides smoothly and deliver an engaging presentation. Here are the key controls you can use while in slide show mode:
- Advance to Next Slide: To proceed to the next slide, simply press the right arrow key on your keyboard, click the mouse, or use a presenter remote if available. This allows you to progress through your presentation at your desired pace.
- Go Back to Previous Slide: If you need to revisit a previous slide, press the left arrow key on your keyboard or click the mouse’s left button. This enables you to go back and address questions or clarify information for your audience.
- Jump to a Specific Slide: If you want to navigate to a specific slide in your presentation, press the slide number on your keyboard followed by the Enter key. Alternatively, you can right-click on the slide and choose the desired slide from the context menu.
- Access Slide Thumbnails: In PowerPoint’s slide show mode, you can access a thumbnail view of your slides by pressing the Ctrl key and clicking on any slide. This enables you to quickly navigate to a specific slide without disrupting the flow of your presentation.
- Zoom In and Out: If you need to highlight specific details or make text more readable to your audience, use the Ctrl key and the plus (+) or minus (-) keys to zoom in and out, respectively. This feature is especially useful when showing complex diagrams or small texts.
- End the Slide Show: To exit the slide show mode, press the Esc key on your keyboard or right-click anywhere on the screen and select “End Show” from the context menu. This will bring you back to the normal editing view in PowerPoint.
- Use Presenter View: If you have enabled Presenter View, you can access additional controls and features to manage your presentation more effectively. Refer to the “Using Presenter View” section for more details on how to utilize this feature.
By familiarizing yourself with these slide show controls, you can navigate through your PowerPoint presentation confidently and deliver a more dynamic and interactive experience for your audience on Zoom.
Engaging Your Audience in a Zoom Presentation
Engaging your audience is crucial when presenting on Zoom to maintain their attention and ensure the effectiveness of your message. Here are some strategies to actively involve your audience and make your Zoom presentation interactive:
- Ask Questions: Pose questions to your audience throughout your presentation to encourage participation. You can use the chat feature in Zoom or ask attendees to unmute themselves and speak up.
- Use Polls: Take advantage of Zoom’s polling feature to gather instant feedback or opinions from your audience. Create engaging poll questions related to your presentation topic to encourage active participation.
- Encourage Chat Participation: Remind your audience to use the chat feature to ask questions, share insights, or provide feedback. Monitor the chat regularly and respond to messages to make attendees feel heard and valued.
- Incorporate Interactive Activities: Break up your presentation with interactive activities to keep your audience engaged. This could include case studies, brainstorming sessions, group discussions, or virtual simulations.
- Share Relevant Resources: Provide links to additional resources related to your topic in the chat or through screen sharing. This encourages further exploration and engagement even after the presentation ends.
- Use Visual Aid: Utilize visual aids such as charts, graphs, and images to enhance understanding and engagement. Visuals can help convey complex information in a more digestible and memorable way.
- Tell Stories: Incorporate relevant stories or anecdotes to make your content more relatable and captivating. Personal experiences are powerful tools for capturing your audience’s attention and keeping them engaged.
- Interact with Body Language: Use appropriate facial expressions, gestures, and body language to convey enthusiasm and connect with your audience. Non-verbal cues can enhance engagement and create a more memorable experience.
- Pause for Questions: Give your audience regular opportunities to ask questions or seek clarification. Pause after key points or at designated breaks to allow for interaction and address any queries.
- Display Empathy: Be attentive and empathetic towards your audience’s needs and emotions. Show genuine interest in their thoughts and perspectives, and create a safe and inclusive environment for discussion and interaction.
By incorporating these strategies, you can create a more interactive and engaging Zoom presentation that captivates your audience’s attention and encourages their active participation throughout the session.
Troubleshooting Audio and Video Issues
Technical difficulties with audio and video can disrupt the flow of your Zoom presentation. To ensure a smooth experience, it’s important to be familiar with troubleshooting common issues that may arise. Here are some troubleshooting tips for audio and video problems during your Zoom presentation:
- Check Your Internet Connection: A stable and reliable internet connection is crucial for smooth audio and video. Ensure that you have a strong connection and consider connecting via an Ethernet cable for a more stable connection.
- Test Your Audio and Video Devices: Before your presentation, test your microphone and camera to ensure they are functioning properly. Use the Zoom audio and video settings to select the correct devices and adjust their settings if needed.
- Adjust Your Audio Settings: If your audio is distorted, low, or inconsistent, check the audio settings in Zoom. Increase the volume, adjust the microphone sensitivity, and ensure that the correct audio device is selected.
- Restart Your Devices: If you experience audio or video issues during your presentation, try restarting your computer and reopening the Zoom application. This can resolve any temporary glitches that may be affecting your devices.
- Close Unnecessary Applications: Close any unnecessary applications or software running in the background during your presentation. This can free up system resources and prevent audio or video lag or interference.
- Use Headphones or External Microphones: If you are experiencing audio issues, consider using headphones or an external microphone. This can help eliminate background noise, improve audio quality, and minimize the chance of audio feedback.
- Optimize Camera Placement: Ensure that your camera is positioned correctly and at eye level. Avoid backlighting or excessive lighting that may affect the quality of your video. Adjust the camera angle and lighting as needed for the best visual appearance.
- Update Your Software: Keep your Zoom application and other relevant software up to date. Updates often include bug fixes and performance enhancements that can solve audio and video issues.
- Seek Technical Support: If you encounter persistent audio or video issues that you cannot resolve, consider contacting Zoom technical support or consulting with a technical expert for assistance.
By following these troubleshooting tips, you can minimize audio and video issues during your Zoom presentation and deliver a seamless and professional experience for your audience.
Tips for a Successful PowerPoint Presentation on Zoom
When delivering a PowerPoint presentation on Zoom, it’s essential to adapt your approach to the virtual environment. Here are some valuable tips to help you create a successful and impactful presentation:
- Practice and Rehearse: Familiarize yourself with your presentation and practice it multiple times before your actual Zoom presentation. This will boost your confidence, help you refine your delivery, and ensure a smoother flow.
- Create a Engaging Opening: Capture your audience’s attention with a strong opening that introduces the topic and highlights its relevance. Use a compelling anecdote, surprising statistic, or thought-provoking question to hook your audience from the start.
- Use Visuals Wisely: Leverage the power of visuals to support your message. Incorporate impactful images, charts, and graphs that enhance understanding and engagement. Avoid overwhelming your slides with excessive text or cluttered visuals.
- Speak Clearly and Slowly: Pay attention to your diction and pace of speech. Enunciate your words clearly and speak slowly and deliberately to ensure that every participant can follow along easily.
- Engage with Eye Contact: Look directly into the camera to establish eye contact with your virtual audience. This creates a stronger connection and helps maintain engagement throughout your presentation.
- Use Gestures and Body Language: Incorporate appropriate gestures and body language to enhance your presentation. It adds dynamism and visual interest, making your delivery more engaging and authentic.
- Encourage Interaction: Foster audience engagement by inviting questions, encouraging comments, or conducting interactive activities. This promotes a two-way communication and keeps participants actively involved.
- Time Management: Keep track of time and pace yourself accordingly. Avoid rushing through slides or going over time. Practice beforehand to ensure your presentation fits within the allocated timeframe.
- Use Breaks Strategically: Incorporate short breaks throughout your presentation to give your audience a chance to process information, ask questions, or engage in discussions. This helps maintain energy and prevents Zoom fatigue.
- Be Mindful of Your Background: Choose a clean and uncluttered background for your video. Consider using a virtual background or a well-organized physical setting that is visually appealing and free from distractions.
- Technical Backup: Have a backup plan in case of technical issues. Keep a secondary device ready, ensure you have a stable internet connection, and have a contact person to help troubleshoot any unforeseen problems.
By implementing these tips, you can maximize the impact of your PowerPoint presentation on Zoom. Remember to adapt to the virtual medium while maintaining your confidence, engaging your audience, and delivering a compelling presentation.
Leave a Reply Cancel reply
Your email address will not be published. Required fields are marked *
Save my name, email, and website in this browser for the next time I comment.
- Crowdfunding
- Cryptocurrency
- Digital Banking
- Digital Payments
- Investments
- Console Gaming
- Mobile Gaming
- VR/AR Gaming
- Gadget Usage
- Gaming Tips
- Online Safety
- Tech Setup & Troubleshooting
- Buyer’s Guides
- Comparative Analysis
- Gadget Reviews
- Service Reviews
- Software Reviews
- Mobile Devices
- PCs & Laptops
- Smart Home Gadgets
- Content Creation Tools
- Digital Photography
- Video & Music Streaming
- Online Security
- Online Services
- Web Hosting
- WiFi & Ethernet
- Browsers & Extensions
- Communication Platforms
- Operating Systems
- Productivity Tools
- AI & Machine Learning
- Cybersecurity
- Emerging Tech
- IoT & Smart Devices
- Virtual & Augmented Reality
- Latest News
- AI Developments
- Fintech Updates
- Gaming News
- New Product Launches
- 12 Best Free AI Image Sharpeners in 2024 WebPCMobile
Sanjuksha Nirgude Soaring High with Robotics
Related post, unveiling the secrets of sls printing and its role in robotics, unleashing efficiency: the role of robotic process automation in industry 4.0, advancing cybersecurity: the integration of robotics with emerging sms phishing alert tools – innovations, challenges, and future perspectives, robotics redefining long-term investment horizons, bridging software development and robotics for enhanced automation, the role of robotics in cnc machining for large part production, related posts.

How To Make A Zoom Background

How To Connect Powerpoint To Projector

How To Make A Powerpoint On A Tablet

How To Share A Document On Zoom

How To Download Images From Powerpoint

How To Zoom Out On A PC

How To Zoom In With Keyboard

How To Zoom Out On Dell Laptop
Recent stories.

12 Best Free AI Image Sharpeners in 2024 (Web/PC/Mobile)

OpenStack Backup and Recovery Software

Apple Wallet Availability in the PocketGuard App: Sync your Apple Card, Apple Cash, and Savings from Apple Card Accounts

5 Ways to Improve IT Automation

What is Building Information Modelling?

How to Use Email Blasts Marketing To Take Control of Your Market

Learn To Convert Scanned Documents Into Editable Text With OCR
- Privacy Overview
- Strictly Necessary Cookies
This website uses cookies so that we can provide you with the best user experience possible. Cookie information is stored in your browser and performs functions such as recognising you when you return to our website and helping our team to understand which sections of the website you find most interesting and useful.
Strictly Necessary Cookie should be enabled at all times so that we can save your preferences for cookie settings.
If you disable this cookie, we will not be able to save your preferences. This means that every time you visit this website you will need to enable or disable cookies again.
How to Present on Zoom: Google Slides and Powerpoint Presentation Guide & Tips

Presenting in front of your peers and superiors has to be one of the most daunting tasks ever. You’re never quite sure about the feedback you’d be getting, which only adds to the tension. However, in this pandemic season, the task of presenting has somehow gotten even more challenging. There are a lot of technical hurdles to overcome, which can seriously take the winds out of someone’s sail — especially if they are not very experienced on the matter.
Zoom, of course, has been the most popular video conferencing application over the last few months and offers a plethora of tools to put our minds at ease. Today, we’ll take you through all of them and even give you a couple of pointers to improve your presentation in Zoom.
Related: Awesome Halloween Zoom Backgrounds To Download
What is Zoom Screen Share and why is it important?
Screen Share is one of the most used and most important features of Zoom. It allows you to demonstrate your thoughts, give your peers a glimpse of your ideas. You can either share an application window, your entire desktop, or even a whiteboard — the possibilities are limitless here.
You can also start a screen sharing session without jumping through hoops of creating a separate meeting. Simply click/tap on the ‘Share Screen’ button in the Zoom client — both PC and mobile — and you’re good to go.
Related: How to use Zoom Filters
Remember you’ll need a sharing key or meeting key for this to work. If you don’t have access to either, you must share your screen while you’re in a meeting.

To share your screen during a meeting, first, log in with the appropriate credentials and start a meeting. Then, hit the ‘Share Screen’ — ‘Share’ while on mobile — button right in the middle of the meeting options panel and what you want to share with the class.

We’ve covered the topic of screen sharing on Zoom quite extensively in a separate article. So, be sure to check that out .
Related: What Does Pin Video on Zoom Mean? Do They Know If You Pin a Video?
How to present a Powerpoint PPT in Zoom?
Microsoft Office suite is, without a doubt, the most widely-used presentation applications on the planet. It’s been on our computers for ages and it’s likely to stay put for a considerable amount of time.
With that said, Zoom doesn’t straight up give you the option to load the Microsoft Office component in the application. Still, there’s a pretty straightforward method of presenting in front of the class.
Related: 50+ Best Zoom Games
You can achieve the desired results with the help of Zoom’s Screen Sharing feature — yes, the bit we covered in the previous section. It simply allows you to pick a window of your choice and share it with the class.
What’s even more awesome is that the participants could even pitch in and share their thoughts if they see fit. Alternatively, you can also share your entire desktop screen, which is the best way to get more screen real estate.
With the basics out of the way, let’s see how you can present a slide on Zoom.
Related: Zoom Error Code 3113 Fix
1. Create a separate slideshow window
If you have a traditional single-screen setup, this is the only guide you need to concern yourself with. The methodology is split into two bits — one: PowerPoint and two: Zoom.
First, open up Microsoft PowerPoint and pick the slide you want to share. Now, click on the ‘Slide show’ tab and hit ‘Set Up Slide Show.’
Then, select ‘Browsed by an individual (window)’ under ‘Show type.’ Hit ‘Ok’ to confirm.
Finally, switch to slide show mode by clicking on the ‘Slide Show’ tab and selecting either ‘From Beginning’ or ‘From Next Slide.’
This would open a slide show window, separately. If you do not want to show the slideshow in a separate window, all you have to do is skip the previous step — ‘Browsed by an individual (window)’
2. Present PPT on Zoom
Now, go back to your Zoom meeting and click on the ‘Share Screen’ option.

Now that the PPT has been launched in a separate window, you can easily select that window on the next screen and commence the slideshow. Click on ‘Share’ to begin.
Here’s how it’d look:
How to present using Google Slides on Zoom?
If Microsoft PowerPoint is a little too heavy for you, you could always opt for Google’s adequately powerful alternative called Slides. It allows you to create interesting yet simple presentations and share as you see fit. Of course, it also needs Zoom’s Screen Share feature to work as intended, which, at this point, should feel pretty natural to you.
Related: How to Mute on Zoom
1. Use Presenter View
Now, if you want a more immersive experience and also keep track of the notes you might have, we recommend using the ‘Presenter View.’ With the View enabled, Google Slides would create a separate window for all your notes, which only you’d be able to see. The main presentation window, on the other hand, would remain clutter-free and free from distractions.
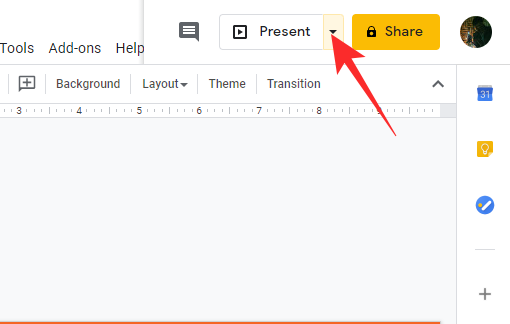
To use the ‘Presenter View,’ first, you simply need to go to your presentation page, click on the little downward arrow right next to the ‘Present’ button at the top-right.
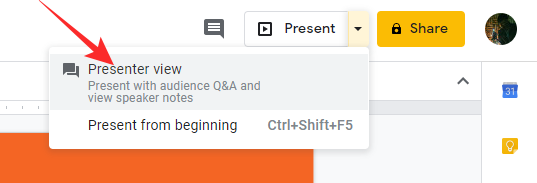
Now, hit ‘Presenter View.’
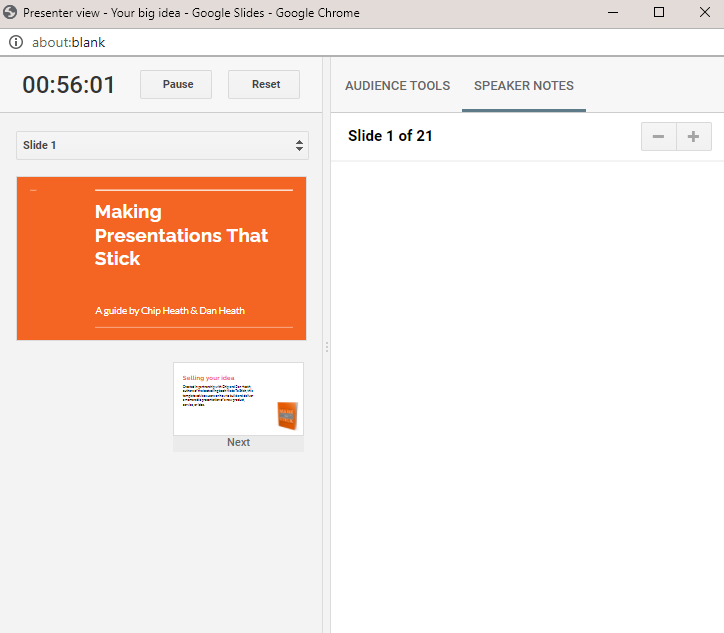
As soon as you click that button, you’ll get a separate space for all your notes, while another clean window would appear for slideshows.
2. Use Zoom to present
Now that the windows have been separated, you can easily use Zoom to present the slideshow window. While in a meeting, click on the ‘Share Screen’ button and select the browser window with Google Slides on top.
Finally, hit ‘Share’ to start the screen-sharing session.
Some tips for a successful presentation
As we’ve discussed, presenting is one of the most daunting tasks in the world for most, even virtually. The techy jargon often only adds to the tension, making many people dread the sessions, even when they are completely prepared. Below are some basic handy tips for your next presentation.
Related: How to annotate on Zoom
1. Master your craft
Knowing the material is always the best way to prepare for a hectic presentation. If you know what you’re presenting and have complete faith in the report, you’re ought to do exceptionally well. However, when it comes to Zoom presentations, knowing just the material isn’t enough. You also need to make sure all your components are in order and you’re presenting with confidence.
Try a couple of dry runs, see if your presentation is working just as it’s supposed to. Practice the pitch if you have to. Checking all of these boxes would improve your chances of success, remarkably.
2. Dress for the occasion
When you’re not forced to present in a swanky conference room, it’s not difficult to lose track of the dressing etiquette. However, you must remember the scale of your presentation and try your best to look the part. Wearing a perfectly ironed shirt and fitted trousers would not only impress your peers and superiors, but it’ll also instill a sense of confidence in you.
Related: How to see everyone on Zoom
3. Create a quiet environment
Zoom is quite capable of filtering some noise out of video chats. However, it doesn’t have the quality to cancel out everything you throw at it. So, before you start a video conferencing session and go about your presentation, make sure you’re in a relatively quiet environment. There can be a bit of noise, here and there, but make sure your subtle points aren’t drowned by some rogue barks from the street below.
- How to Watch Netflix on Zoom With Your SO and Friends
- How to blur your background on Zoom
- Change Your Name on Zoom
- Zoom virtual background not working problem fixes
- How to record a Zoom meeting without host permission
- What Does Pin Video on Zoom Mean? Do They Know If You Pin a Video?
- How to Change Zoom Background on Chromebook: Step-By-Step Guide
- How to download poll reports during a Zoom meeting

A mediocre engineer hoping to do something extraordinary with his pen (well, keyboard). Loves Pink Floyd, lives football, and is always up for a cup of Americano.
You may also like
How to Transfer Google Photos to iCloud

How to Search Your Calls in iPhone in iOS 18

How to Run Microsoft Phi-3 AI on Windows Locally

YouTube Premium Users Can Now Skip Sponsored Segments Using ‘Jump Ahead’
This is scary
Comments are closed.
Easy PowerPoint Zoom Tutorial (Free Templates & Examples)

Sara Wanasek

Tired of navigating your slides in a chronological order? Looking for ways to spice up the way you interact with your presentation and engage your audience?
Transform your boring presentations into something more engaging and captivating with PowerPoint’s Zoom feature. PowerPoint Zoom allows you to create dynamic, non-linear presentations. Think of it as building a Prezi inside PowerPoint. Jump from one point in your presentation to the next seamlessly by creating links to the different sections of your presentation.
By utilizing PowerPoint’s Slide Zoom, Section Zoom, and Summary Zoom, you can easily create an entertaining and engaging presentation for your audience. There are many different ways to add these to your presentation, so read on to learn how to use PowerPoint Zoom and implement it in the best ways!
Table of Contents
What is powerpoint zoom.
PowerPoint’s Zoom feature is a tool that allows you to create interactive PowerPoint presentations . It enables you to zoom in and out of specific sections or slides, creating a more dynamic and immersive experience for your audience. With PowerPoint Zoom , you can easily create links or “zoom areas” on your slides such that when clicked during a presentation, can allow you to navigate to specific slides or sections and focus on the content that is most relevant at any given time—there’s no need to be stuck with whatever slide is chronologically next.
Why Use PowerPoint Zoom?
PowerPoint Zoom lets you present in a more flexible and interactive way. For instance, you can create a dynamic menu that allows your audience to help you choose which topics to cover first. With just a click, you can jump to that slide or section and relay that information.
PowerPoint Zoom is also particularly useful for storytelling , guiding your audience through a series of complex information without being restricted to a traditional linear slide progression.
No need for hyperlinks, tedious work, or coding—PowerPoint Zoom allows for a seamless setup and flow of your presentation.
Let’s dive right in and discover how to make a zoom effect in PowerPoint!
How to Make a Zoom Effect in PowerPoint?
PowerPoint’s Zoom feature consists of three different options: Slide Zoom, Section Zoom, and Summary Zoom. While their setups are similar, the reasons for using each one vary.

Below we will delve into each of these PowerPoint Zoom options in depth.
Download our FREE PowerPoint Zoom template to follow along! 👇
Slide Zoom PowerPoint Templates
Turn your PowerPoint into an interactive experience today with this Slide Zoom template!
When to use Slide Zoom? ⏲️
Slide Zoom, as the name suggests, allows you to create links and “zoom in” on the content of another slide without following the traditional slide-to-slide progression. This comes in especially handy when you want to direct your audience’s attention to a particular image, chart, or piece of information on a slide instantly.
How to use Slide Zoom? 💻
1. Select the Main Starting Slide : To use PowerPoint Slide Zoom, first select the starting slide where you intend to apply the Zoom effect. In our example, we are using the Iceberg Model illustration as our starting slide. We want to zoom into the different description slides from our Iceberg Model slide.
2. Access the Slide Zoom Feature : Next, click Insert > Zoom > Slide Zoom . From here, choose the slide, or slides, that you want to zoom into. Click Insert and a thumbnail or thumbnails of the slides will appear on your current slide.

3. Rearrange the Thumbnails : Rearrange the thumbnails on your slide to match your design and layout.
4. Test the Slide Zoom: Now, in presentation mode, when you click on the slide thumbnails, you can zoom into the particular slides!
With a smooth Slide Zoom effect, you will notice that transitioning from slide to slide has become significantly more engaging!
Zoom Option: Zoom Background

Notice the thick outline of each slide you added to Zoom? Let’s remove that for a cleaner, more professional look on your slides.
To do that, click on the added Zoom slide thumbnail , then click the Zoom tab in the PowerPoint ribbon. Now, click on the Zoom Background option to hide the default background and match the background of the thumbnail to the background of your current slide.
Zoom Option: Return to Zoom
Another customizable option is the Return to Zoom feature.
With the current setup of Slide Zoom, once you click on the Zoom thumbnail and navigate to the zoomed in slide, you cannot return to the main starting slide. In other words, you will move on to the next slide in a linear order, with essentially an added zoom transition.
On the other hand, by applying Return to Zoom, you will be brought back to your main starting slide every time instead. This way you can click change the order of your slides. For example, with Return to Zoom enabled, when I can click on next slide after clicking on the “Phase #3 The Structure” slide, I will be brought back to the main starting slide instead of the “Phase #4 Mental Models” slide.

To make this happen, after selecting each of your Zoom slide thumbnails, simply click on the Return to Zoom option from the Zoom tab.
Section Zoom
When to use section zoom ⏲️.
While Slide Zoom allows you to zoom into one slide at a time, Section Zoom allows you to zoom into a specific section containing multiple related slides of your presentation. This is especially helpful for longer presentations or presentations with multiple topics.
How to use Section Zoom? 💻
Here, we have a deck about the Solar System. Each planet has its own section with a couple slides underneath each section. Our main slide has an overview of the whole Solar System. In this case, I would like to be able to click on a planet, then be able to learn more about that planet. You can easily do this with Section Zoom!
1. Select the Main Starting Slide : Similar to PowerPoint Slide Zoom, you have to select a starting slide where you intend to apply the Zoom effect for Section Zoom. Here we are using the Solar System slide as our main starting slide where we can zoom into the different planet sections.
2. Access the Section Zoom Feature : On the overview slide, click Insert > Zoom > Section Zoom . Then choose the sections you would like to Zoom into and click Insert . The thumbnails of the first slide of each section will appear in your current slide.
Zoom Option: Change the Image
Don’t like how the different thumbnails are making your slide looks cluttered, fret not, you can change the thumbnail image of your slides for easier viewing.
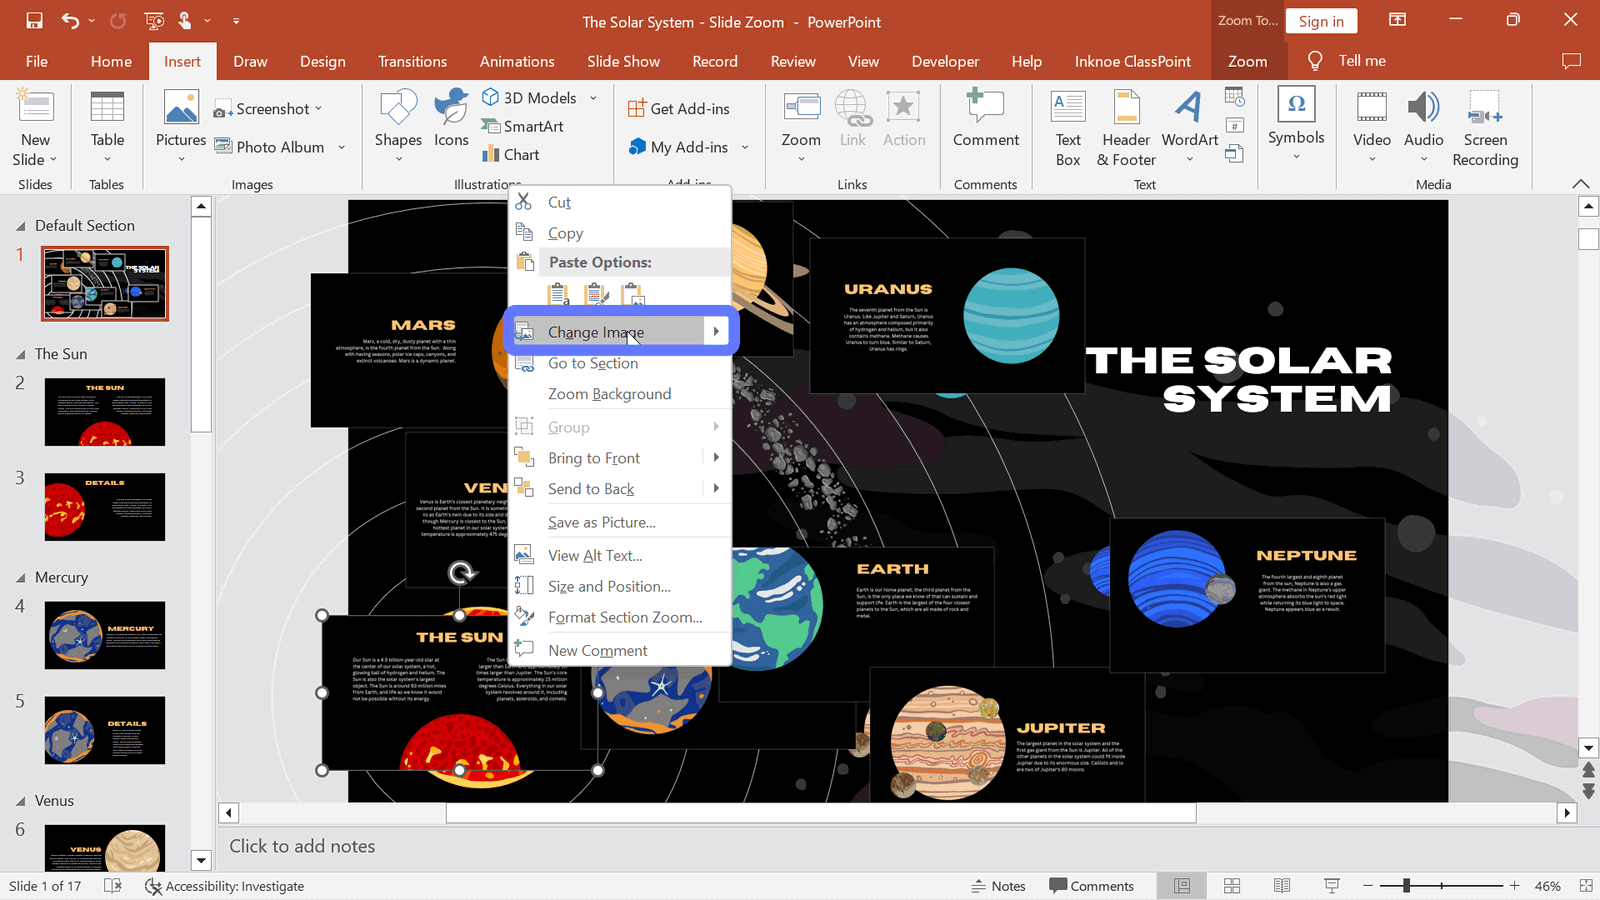
To do this, right-click on the zoom slide thumbnail and select Change Image . Then, substitute it with an image or screenshot from your device. For instance, you can take screenshots of the different segments in your slide to “hide” the zoom slide thumbnails underneath these screenshots.
Now, when you enter presentation mode, instead of clicking z zoom slide thumbnail, you can click on a planet to zoom into a desired section! Watch this video to learn exactly how to do it!
Summary Zoom
When to use summary zoom ⏲️.
The third and final PowerPoint Zoom feature is Summary Zoom. It lets you create a summary or overview slide that acts as a hub for your presentation. It is perfect for those times when you want to give your audience a quick recap or provide them with a visual roadmap of your presentation.
Similar to Section Zoom, Summary Zoom contains links to specific sections or slides in your presentation, allowing you to navigate to the most relevant parts of your presentation. The main distinction lies in the fact that the Summary Zoom feature will automatically generate a summary slide containing thumbnails of each section or slide for your convenience.
How to use Summary Zoom? 💻
1. Select the Main Starting Slide : Similar to both PowerPoint Slide Zoom and Section Zoom, you have to select a starting slide where you intend to apply the Zoom effect for Summary
2. Access the Summary Soon Feature : To use PowerPoint Summary Zoom, click Insert > Zoom > Summary Zoom . This will create a new slide that displays a summary of your presentation, with thumbnails of each slide.
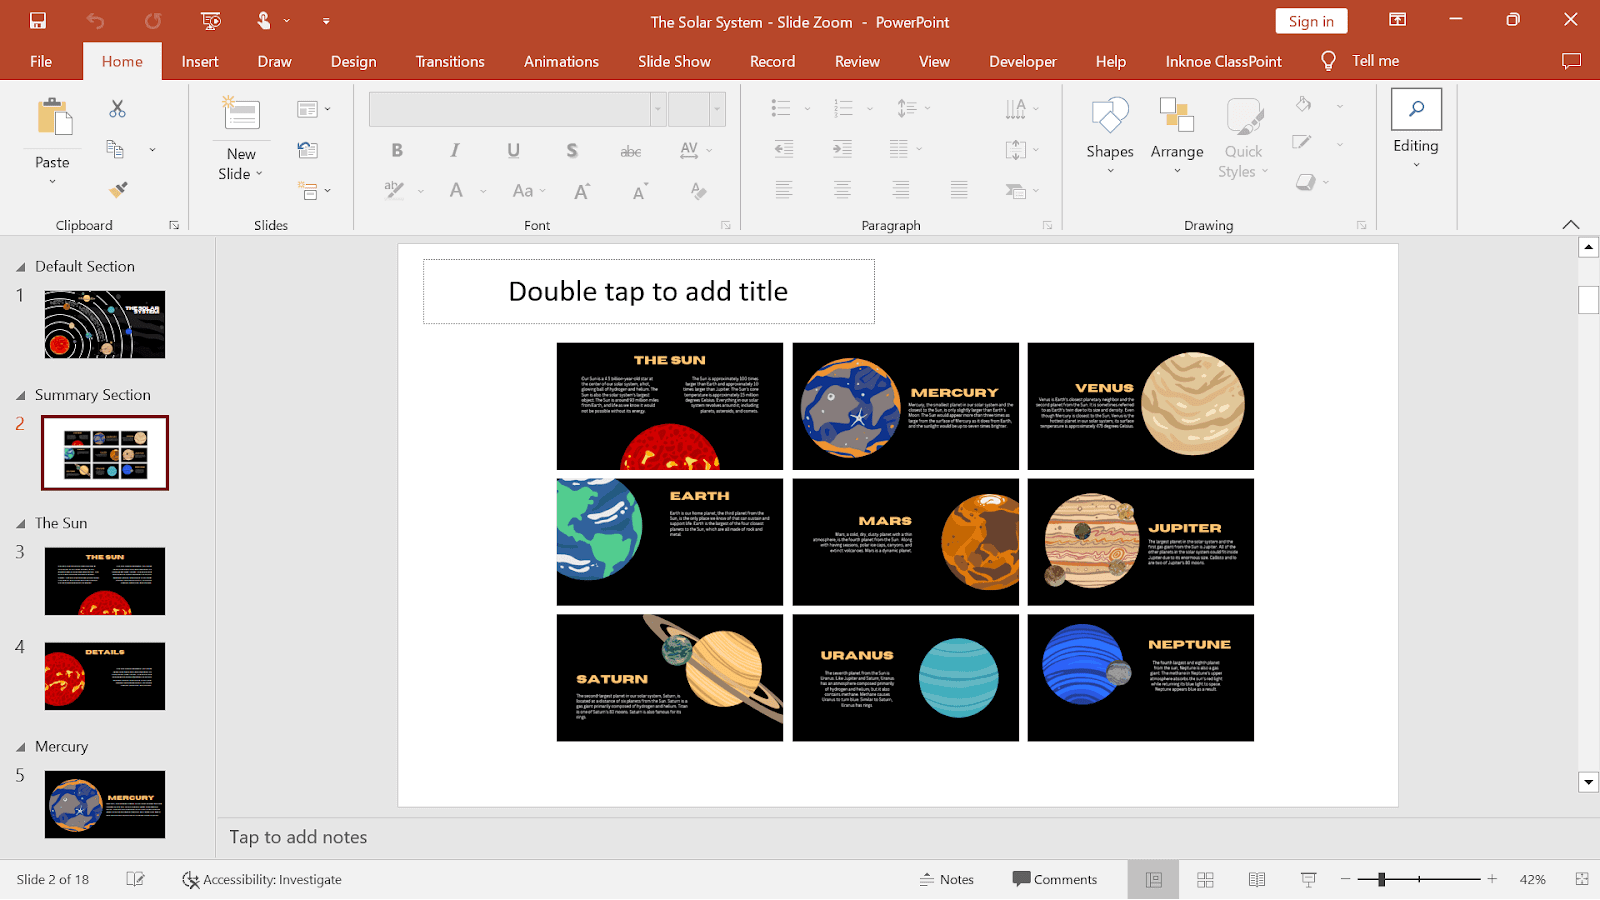
3. Customize Appearance : You can customize the appearance of the Summary Zoom slide by selecting the Format tab. Here, you can choose from various layouts, fonts, and colors to make the slide visually appealing and aligned with your presentation’s theme.
During your presentation, easily navigate to any slide by clicking on the different Zoom slide thumbnails. It’s a great way to give your audience an easy-to-follow roadmap and ensure they stay engaged and focused throughout your presentation.
Real-World PowerPoint Zoom Examples to Engage Your Audience
Here are some real-life examples of how to use PowerPoint Zoom to create engaging and immersive presentations:
- Sales Pitch
Create interactive slides with zoomed-in images and key features for your products or services. By allowing the audience to explore products in detail, you can generate more interest and engagement during a pitch.
- Educational Lecture with Organised Sections
Similar to our Solar System deck, you can organize your presentation into sections so that students can go through the presentations at their own pace starting with what interests them the most.
Add interactive questions to the presentation using ClassPoint , to make it even more engaging.
- Team Meeting Roadmap
Create an engaging team meeting with Summary Zoom. Highlight key milestones and deliverables in a visual and clear roadmap to help the team stay focused and engaged throughout the meeting.
- Interactive Visuals
Use maps and charts as your overview slide and add zoom slide thumbnails of added information to showcase further data, information, and analytics.
- Virtual Tours or Walkthroughs
Simulate a virtual tour or walkthrough using images on your slides. Add the Zoom feature to replicate “moving” from one “location” to another.
PowerPoint Zoom FAQ
Here are some common FAQ’s about this powerful tool:
What are the differences between the PowerPoint Zoom Options?
Slide Zoom zooms from one slide to the next while Section Zoom zooms into a whole section of your presentation before bringing you back to the overview slide. The Summary Zoom option provides you with a Table-of-Contents-like slide for an easy overview of your whole presentation.
How to make Prezi in PowerPoint?
You can make a PowerPoint that looks similar to Prezi with PowerPoint’s Zoom feature. With your selected slide to Zoom into, click on the Insert tab, Zoom, and select Slide, Section, or Summary Zoom.
Can I use PowerPoint Zoom on any version of PowerPoint?
PowerPoint Zoom is available on PowerPoint 2019, PowerPoint 2016, and PowerPoint for Microsoft 365. Make sure you have the latest version to take advantage of this feature.
Will my audience need any special software to view the Zoom features?
No, your audience does not need any special software. The Zoom features will work seamlessly when you present your PowerPoint file on any device with PowerPoint installed.
Can I use Zoom in combination with other PowerPoint animations and transitions?
Yes, you can! PowerPoint Zoom works well with other animations and transitions, allowing you to create a truly immersive and engaging presentation.
Can I edit or remove Zoom features from my presentation?
Absolutely! You can easily edit or remove Zoom features from your presentation at any time. Just follow the steps outlined in this blog post to make any necessary changes.
Yay! You now can create an even more engaging presentation with PowerPoint’s Zoom feature.
The versatility and impact of PowerPoint Zoom can be used in various settings. By incorporating this feature into your presentations, you can captivate your audience, enhance information retention, and create a memorable experience for your listeners.
Experience the power of PowerPoint Slide Zoom firsthand! Begin by exploring our templates and seamlessly integrate this feature into your upcoming presentations.
About Sara Wanasek
Try classpoint for free.
All-in-one teaching and student engagement in PowerPoint.
Supercharge your PowerPoint. Start today.
800,000+ people like you use ClassPoint to boost student engagement in PowerPoint presentations.

Use zoom for PowerPoint to bring your presentation to life
If you would like to make your presentations more dynamic and exciting, try using zoom for PowerPoint .

To add a zoom, go to Insert > Zoom .
To summarize the entire presentation on one slide, choose Summary Zoom
To show selected slides only, choose Slide Zoom
To show a single section only, choose Section Zoom

When you create a zoom in PowerPoint, you can jump to and from specific slides, sections, and portions of your presentation in an order you decide while you're presenting.
Note: See the Requirements table below regarding which versions of PowerPoint support the features described in this article.
Summary zoom
A summary zoom is like a landing page where you can see the pieces of your presentation all at once. When you're presenting, you can use the zoom to go from one place in your presentation to another in any order you like. You can get creative, skip ahead, or revisit pieces of your slide show without interrupting the flow of your presentation.
Create a summary zoom
Go to Insert > Zoom .

Select Summary Zoom .
The Insert Summary Zoom dialog box opens.
Select slides you want to include in your summary zoom. These become the first slides of your summary zoom sections . To learn more about using sections in PowerPoint, see Organize your PowerPoint slides into sections .

If you already have sections in your presentation, the first slide of each section is preselected by default. If you don't want to include certain sections in your zoom, deselect them. Then, if you want PowerPoint to get rid of any sections you didn't include in your summary zoom, clear the check box next to Keep unused sections in your presentation . Don't worry—the slides in the sections you're discarding will still be part of your presentation.

Once you've selected all the slides you want to use for your summary zoom, select Insert . Your summary zoom is created, and it appears as a new slide just before the first slide you included in your summary zoom.

Add or remove sections from your summary zoom
Once you've created a summary zoom, you might still want to add or remove sections of your presentation. If you've made changes since first making your summary zoom that you want to capture, you don't have to start from scratch—just update your summary zoom.
Select your zoom, and then select the Format tab on the ribbon.

Select Edit Summary , choose the sections you want to have in your summary zoom, and then select Update .
Note: You won't be able to add or remove sections from your presentation in this view, just from your summary zoom.
A slide zoom can help you make your presentation more dynamic, allowing you to navigate freely between slides in any order you choose without interrupting the flow of your presentation. They're a good option for shorter presentations without lots of sections, but you can use slide zooms for lots of different presentation scenarios.
Slide zooms help you drill down into multiple pieces of information while feeling as though you're staying on the same canvas.
Create a slide zoom
Select Slide Zoom .
The Slide Zoom dialog box opens. Select the slides you want to use in your slide zoom.
Once you've selected all the slides you want to use, select Insert .
An item for each slide you selected in step 3 is added to the slide. Select each item in turn and drag to arrange them on the slide.
Tip: If you want to, you can create a slide zoom quickly by simply selecting the slide you want from the thumbnail pane and dragging it onto the slide you'd like to have your slide zoom on. This way, you can create slide zooms and change them quickly, and arrange them however you like simply by clicking and dragging.
Change the preview image of your slide zoom
Your slide zoom by default will be a preview thumbnail image of the slide, but you can choose a new image from your PC or the web to represent the section or slide you'll be going to.

Select Change Image to choose a new picture from the web or your PC to use instead of the thumbnail.

Choose or search the web for the image you want. When you've selected the image you want, select Insert .

You can also choose various looks for your zooms from Zoom Styles —you can change the border, add visual effects, or pick from any of the border and effect combinations in the gallery.

Section zoom
A section zoom is a link to a section already in your presentation. You can use them to go back to sections you want to really emphasize, or to highlight how certain pieces of your presentation connect. To learn more about using sections in PowerPoint, see Organize your PowerPoint slides into sections .
Create a section zoom
Select Section Zoom .
Select the section you want to use as a section zoom.
Select Insert . Your section zoom will be created.
Tip: If you want to, you can create a section zoom quickly by simply selecting the section name you want in the thumbnail pane and dragging it onto the slide you'd like to have a section zoom on.
Change the preview image of your section zoom
Your section zoom by default will be a preview thumbnail image of the slide, but you can choose a new image from your PC or the web to represent the section or slide you'll be going to.
More zoom options
Zoom for PowerPoint truly lights up when you make it your own. Select the Format tab of the ribbon to get to the Zoom Tools , which you can choose to create just the look and feel you're going for when you present.
Choose to return to the home page or continue through your presentation
If you want to return to the zoom slide after viewing sections or slides in your summary, slide, or section zoom, make sure the Return to Zoom check box is selected. If you want to move on to the next slide after viewing part of your zoom, uncheck it.
(If you're working with a summary zoom or a section zoom, you'll return to the zoom slide by default when you're presenting after going to the section. If you're using a slide zoom, you'll move on to the next slide by default after viewing your slide zoom.)
Make the background of your zoom transparent
Another way you can change the look of your zoom is by choosing to adopt the background of the slide where your zoom lives to make the zoom almost indistinguishable from the main canvas while you present. Select Zoom Background to make your summary, section, or slide zooms blend in to their home slide.
In the Zoom Styles group, select Zoom Background . The zoom will adopt the background of the home slide.
Change the transition options of your zoom
By default, your zooms will use the zoom transition when you present, which is what helps make the zooms feel so lively. However, if you don't want to use the zoom transition, or if you want to change the duration of the transition, you can do so.
In the Zoom Options group, make sure the box next to Zoom Transition is checked if you want to use the zoom transition when presenting your zoom.
If you don't want to use the zoom transition when presenting, uncheck the box next to Zoom Transition .
To change the timing of the zoom transition, use the up and down arrows next to the Duration indicator to change how long the zoom transition lasts.
Requirements
See the following table for details on the minimum version numbers required in PowerPoint to create or play zoom links.
| PowerPoint version | What you can do with Zoom |
|---|---|
| or newer PowerPoint 2019 | Create and play zoom |
| or newer | Play zoom |
| PowerPoint 2016 | Play zoom as hyperlinks with no zooming transition. |
| PowerPoint for the web PowerPoint Live in Teams | None None |
| PowerPoint for Android PowerPoint for iOS PowerPoint Mobile for Windows | Play zoom |

Need more help?
Want more options.
Explore subscription benefits, browse training courses, learn how to secure your device, and more.

Microsoft 365 subscription benefits

Microsoft 365 training

Microsoft security

Accessibility center
Communities help you ask and answer questions, give feedback, and hear from experts with rich knowledge.

Ask the Microsoft Community

Microsoft Tech Community

Windows Insiders
Microsoft 365 Insiders
Was this information helpful?
Thank you for your feedback.
How-To Geek
How to add section and slide zooms in microsoft powerpoint.

Your changes have been saved
Email is sent
Email has already been sent
Please verify your email address.
You’ve reached your account maximum for followed topics.
Microsoft Office vs. Google Docs, Sheets, Slides: Which Is Best?
How to connect an hdmi device to your meta quest headset, i always use excel to create heat maps: here's how you can too, quick links, create a section zoom in powerpoint, create a slide zoom in powerpoint, customize a section or slide zoom.
If you want to move to a different slide or section in your presentation, you can easily add a link on your slide . But by using a Section or Slide Zoom in PowerPoint, you can make that move look professional.
In Microsoft PowerPoint, a Section or Slide Zoom places an image on your slide instead of linked text. In addition, when you click to visit that section or slide, you'll see a nice zoom effect. You can customize the displayed image, duration of the zoom effect, and additional actions.
As of this writing at the beginning of April 2022, you can create a Section or Slide Zoom on Windows with Microsoft 365 and in PowerPoint 2019 or later. For Mac and mobile PowerPoint users, you can play a Zoom, but not create one.
Using sections in PowerPoint is a good way to divide your presentation into separate portions. Whether you use it to organize your slideshow or show only particular sections to certain audiences, sections are handy tools.
Related: How to Organize a Microsoft PowerPoint Slideshow Using Sections
To create a Section Zoom, you'll need your sections set up ahead of time. When you're ready, go to the slide where you want to add the Section Zoom.
Head to the Insert tab and Links section of the ribbon. Click the Zoom drop-down arrow and pick "Section Zoom."

In the Insert Section Zoom window that appears, check the box next to the section you want to use. You can also include zooms for multiple sections. Click "Insert."

You'll see the Section Zoom pop onto your slide. It's similar in appearance to a static image of the first slide in that section. You can move the zoom by selecting and dragging it or resize it by dragging a corner or edge.

When you present the slideshow, click the Section Zoom. You'll see the zoom effect as you land on the first slide in that section. By default, you'll advance through each slide in the section and return to the zoom. This can be changed as described in the customization options below.
Similar to a Section Zoom in PowerPoint is the Slide Zoom. If you don't use sections in your slideshow or simply want the ability to jump to a certain slide , this is the way to go.
Related: How to Link to Another Slide in the Same PowerPoint Presentation
Go to the slide where you want the Slide Zoom. Then, head to the Insert tab and Links section of the ribbon. Click the Zoom drop-down arrow and pick "Slide Zoom."

In the Insert Slide Zoom window that opens, check the box next to the slide you want to use. You can also include zooms for multiple slides; however, you might consider using a Summary Zoom in this case instead. Click "Insert."

Like the Section Zoom, you'll see the Slide Zoom on your slide where you can drag to move or resize it.

When you present the slideshow, click the Slide Zoom. You'll see the zoom effect as you land on the slide. You'll then advance through the remainder of your slideshow. However, you can return to the zoom if you prefer using a customization option below.
The customization options for Section and Slide Zooms are the same. You can adjust the zoom's actions, change the appearance, or use additional formatting tools .
Zoom Options
Select the Section or Slide Zoom you want to edit. Then, visit the Zoom tab that displays. On the left side, you have the following actions you can adjust in the Zoom Options section.

Change Image : If you prefer to display an image rather than the slide for the zoom, select this option. You can then insert a picture from a file, stock images, online pictures, or from icons.
Return to Zoom : To go back to the zoom on the slide, check this box. For a Section Zoom, you'll return after advancing to the last slide in the section. For a Slide Zoom, you'll return after viewing that particular slide.
Zoom Transition : While the intent of a Section or Slide Zoom is to provide a transition effect, you may prefer to use the feature without that effect. Uncheck the Zoom Transition box to remove the effect.
Duration : If you decide to keep the Zoom Transition , you can use the Duration field to change the length of the effect. Enter a number in seconds or use the arrows to increase or decrease the duration.
Related: How to Use the Morph Transition in PowerPoint
Zoom Tab Tools
Along with the above actions, you can change the zoom style, border, background, alt text, and more. Select the Section or Slide Zoom and use the tools on the Zoom tab.

Zoom Format Options
To change the fill or line, add a shadow or reflection, or scale the zoom, right-click and pick "Zoom Format Options" from the menu. The Format Section/Slide Zoom sidebar opens for you to adjust the formatting.

For a unique way to jump to a particular section or different slide in your PowerPoint presentation, check out the Section and Slide Zoom features.
- Microsoft Office
- Microsoft PowerPoint
Zoom Feature in PowerPoint – How to Use it Correctly!
By: Author Shrot Katewa

It is hard to accept but even the most seasoned PowerPoint users find it hard to create a table of contents that is visually modern-looking and interactive! The “ Zoom ” feature can help not only with the table of contents but much more than that!
The zoom feature in PowerPoint helps create visual links between sections of your presentation. It makes the presentation interactive by adding a clickable thumbnail of a slide or a section in your presentation and allowing you to easily navigate within your presentation with cool effects!
Even if you use PowerPoint regularly, chances are you aren’t fully aware of the “Zoom” feature in PowerPoint.
And, by now if you are thinking about zooming in on the slides using the functions provided at the bottom-right corner of PowerPoint, then you really need to go through this article as you might not be aware of one of the most awesome features in PowerPoint called “ Zoom “.
1. What is Zoom in PowerPoint?
Imagine if you could just click on an image on your slide and it just zooms into that image, opening the section of your presentation that provides more information about that image! The “Zoom” feature in PowerPoint, does exactly that!
The zoom feature in Microsoft PowerPoint is a new feature that makes your presentations interactive and dynamic. Using the zoom feature in PowerPoint, you can create a zoom slide from which you can jump to and from specific slides or sections in any order you may need during the presentation.
Let’s explore this feature by checking out some of the different types of “zoom” that you can add to your presentation –
1a. Summary Zoom
The “Summary Zoom” in Microsoft PowerPoint is a landing page where you can see the summarized slides within a page.
In the summary zoom, you can select which slides to show. You can even create summary slides to show on the summary zoom. During the presentation, you can click on any slide on the summary to proceed according to the need of the audience rather than the preset slide progression.
1b. Section Zoom
In Microsoft PowerPoint, “Section Zoom” is a slide that contains the preview and the link to the sections within the presentation.
You can click on them to jump from one section to another to highlight the important parts of your presentation.
1c. Slide Zoom
The “Slide Zoom” feature in PowerPoint allows you to navigate freely through the slides in a presentation. In the slide zoom, you can add all the slides or a few selected slides.
From this section, you can move freely between slides, emphasize the important slides, and even cut the presentation short without seeming so to the audience.
2. How to Insert Slide Zoom in Microsoft PowerPoint?
To use the “Zoom” feature in PowerPoint, first, click on the “Insert” tab. Then, click on the “Zoom” button from the ribbon. Choose the type of zoom from “Summary”, “Section”, and “Slide” zoom. Next, select the slides from the window that pops up by holding the “Ctrl” key, and click on “Insert”.
Here’s a step-by-step process with visual aids on what you need to do –
Step-1: Click on the “Insert” tab
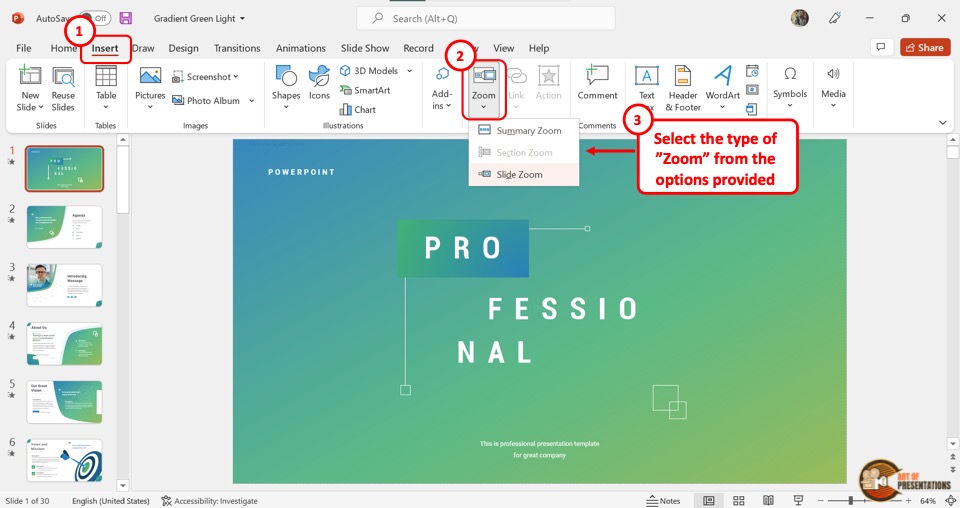
The first step is to open the “Insert” menu. Click on the “Insert” tab which is located in the menu ribbon at the top of the screen.
Step-2: Click on the “Zoom” button
In the “Links” section of the “Insert” menu, click on the “Zoom” button. This will open a dropdown menu. Click on the “Slide Zoom” option from the dropdown menu.
Step-3: Choose the Slide and Click on “Insert”
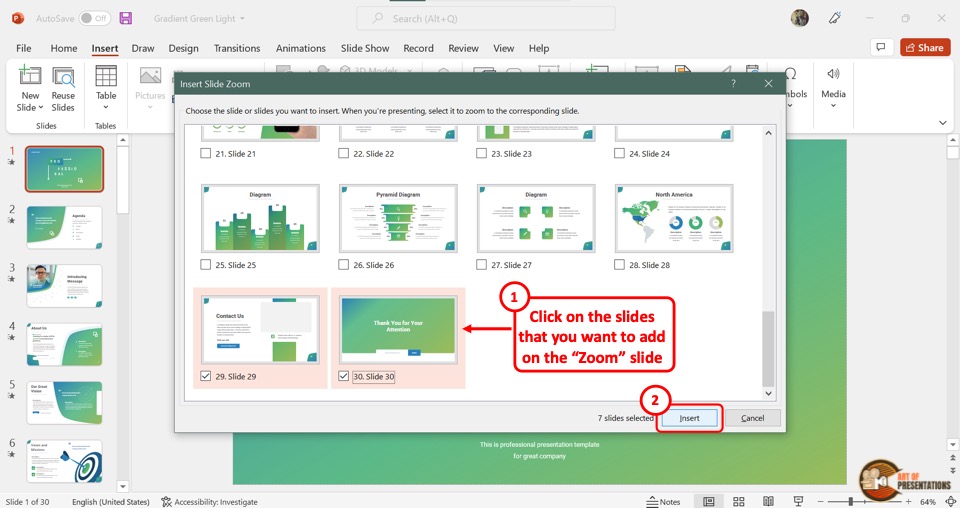
Clicking on the “Slide Zoom” option will open the “Insert Slide Zoom” dialog box.
Select the slides you want to include in the slide zoom and then click on the “Insert” button at the bottom of the dialog box. Now all you have to do is arrange the slides in the slide zoom according to your preference.
3. How to Edit Slide Zoom in PowerPoint?
Once you add the slide zoom to your presentation, you can easily edit it. To access the editing pane, all you have to do is click on the slide zoom. Then click on the “Zoom” tab in the menu ribbon.
3a. Change Borders in Slide Zoom
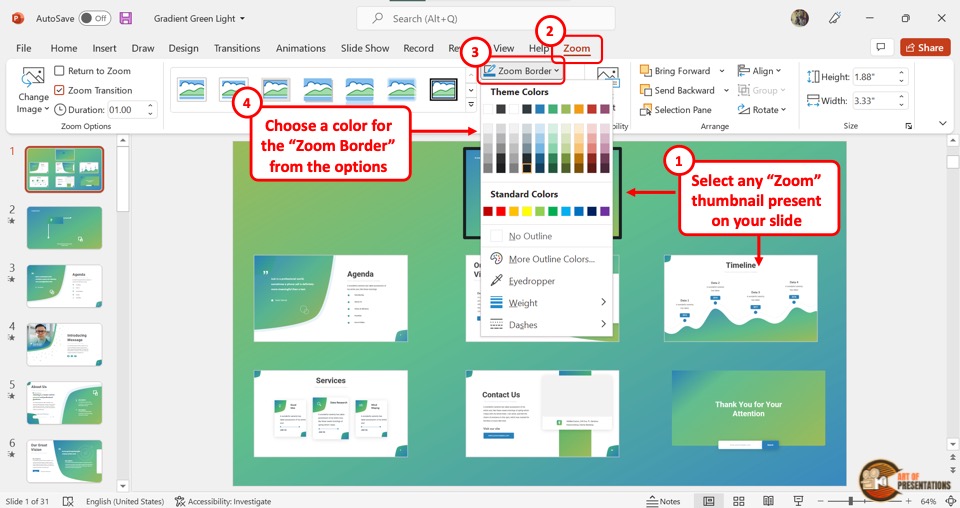
To add or change the border of the slides in slide zoom, click on the “Zoom Border” option. In the dropdown menu, you can click on your preferred color for the border.
You can also click on the “Weight” option and select the border width from the secondary menu. To change the border design, click on the “Dashes” option.
3b. Add Effects in Slide Zoom
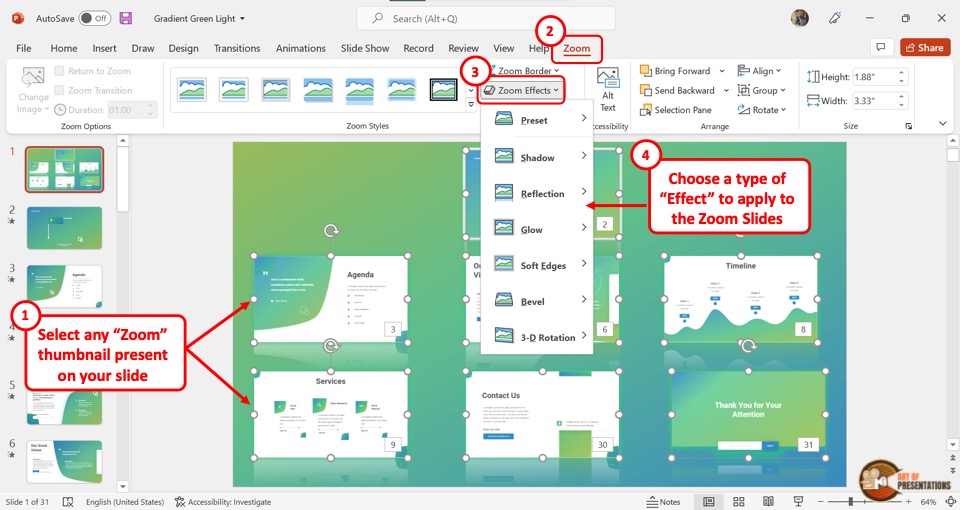
You can add various effects in the slide zoom. To do so, you have to first click on a single or multiple slides in the slide zooms where you want to add effects.
Then click on the “Zoom Effects” option. In the dropdown menu, you can click on any effect option to open a secondary pop-up menu. Click on your preferred effect. You can add multiple effects on a single zoom slide.
3c. Remove Background in Slide Zoom

In Microsoft PowerPoint slide zoom, you can remove the slide background of each slide in the slide zoom. Click on the “Zoom Background” option in the “Zoom Styles” section under the “Zoom” tab. This will remove the background of the selected slide.
4. How to Change Picture in Slide Zoom?
In Slide Zoom, the default thumbnail pictures are a screenshot of the slides. However, you can change the pictures if you want. All you have to do is follow the 4 easy steps.
Step-1: Click on the “Zoom” tab
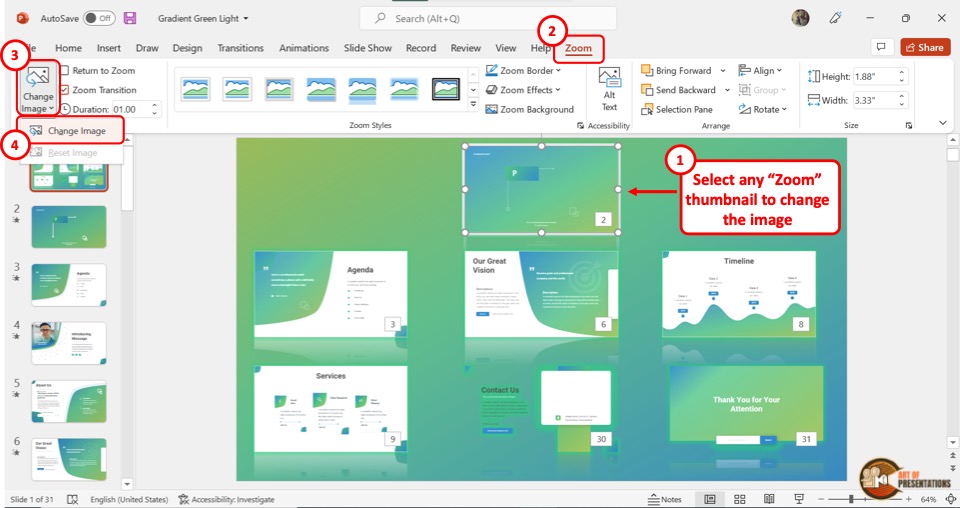
The first step is to click on the slide thumbnail that you want to change. Then click on the “Zoom” tab at which is the last tab in the menu ribbon.
Step-2: Click on the “Change Image” option
The second step is to click on the “Change Image” button which is the first option in the “Zoom Options” section of the “Zoom” menu (as shown in the image in step 1).
Then click on the “Change Image” option from the dropdown menu.
Step-3: Click on “From a File”
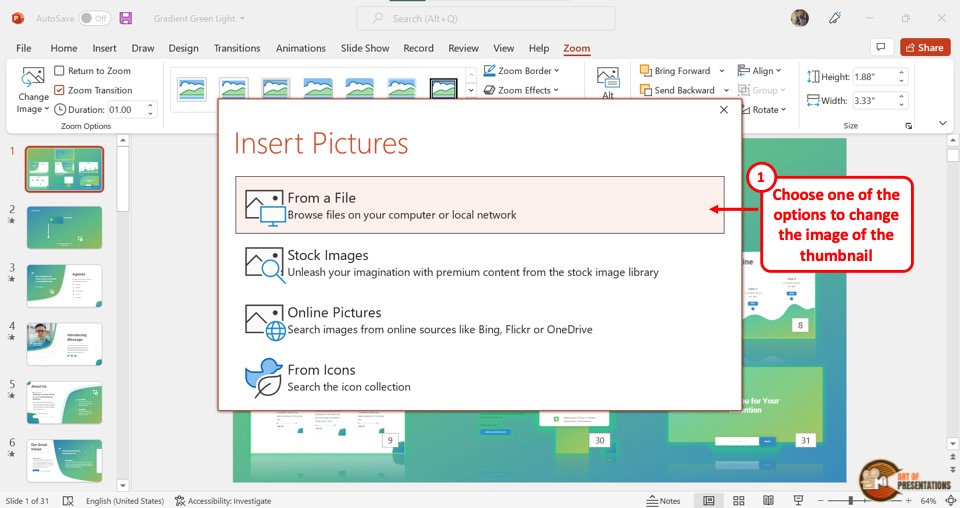
When you click on the “Change Image” option, it will open a dialog box. In the “Insert Pictures” dialog box, click on the “From a File” option. This will open another dialog box.
Step-4: Click on the “Insert” button
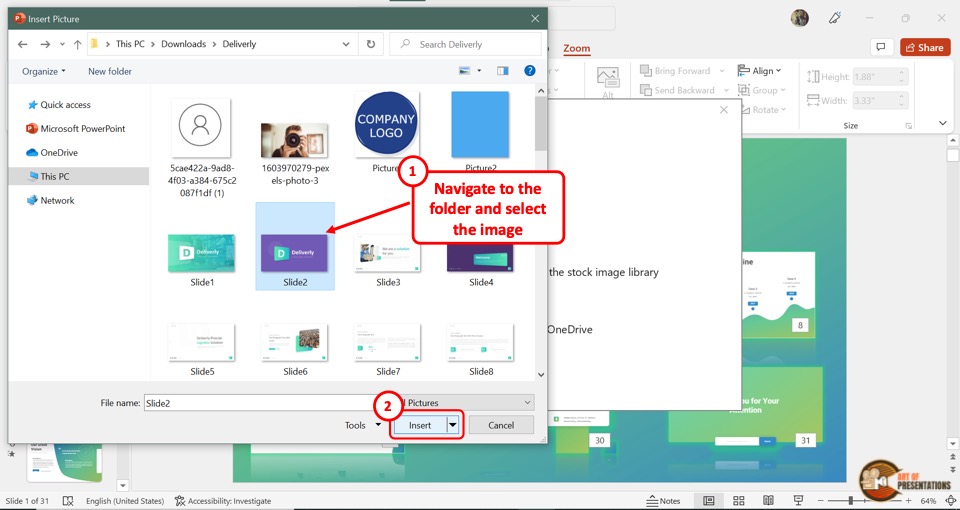
In the “Insert Picture” dialog box, click on the image which you want to add to the slide thumbnail in the slide zoom.
Then click on the “Insert” button at the bottom of the dialog box. In the slide zoom, the original thumbnail will be changed to the selected image.
4a. How to Reset Picture in Slide Zoom?
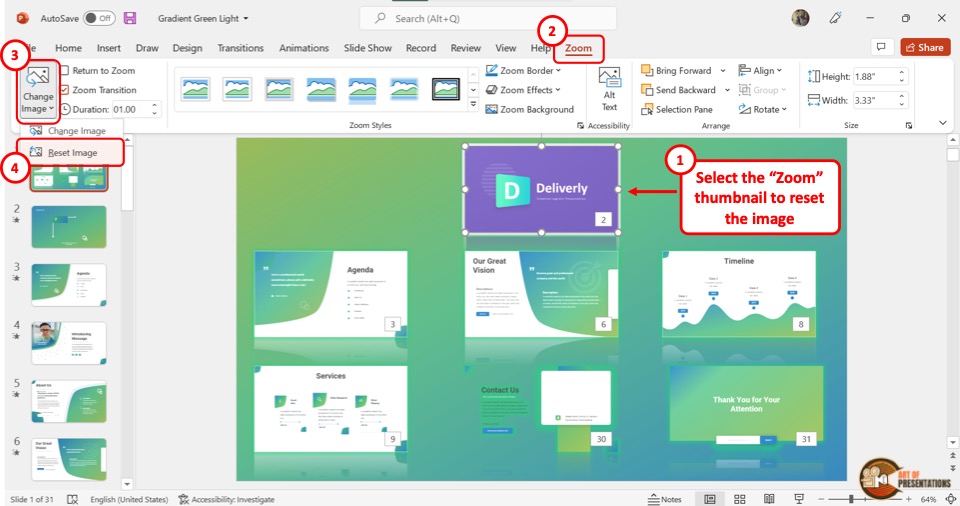
Once you change the picture of the slide thumbnail in the PowerPoint slide zoom, you can revert it to the original thumbnail.
All you have to do is click on the “Change Image” button in the “Zoom” menu. Then click on the “Reset Image” option from the dropdown menu.
5. How to Stop Slide Zoom?

In the Microsoft PowerPoint slide show, the presentation will return to the slide zoom, after each slide. To stop this, select the slide in the slide zoom and then click on the “Zoom” tab in the menu bar.
In the “Zoom” menu, click on the “Return to Zoom” option. The checkmark in the box next to it will disappear. This will stop the slides from returning to the slide zoom screen.
5a. How to Return to Slide Zoom?
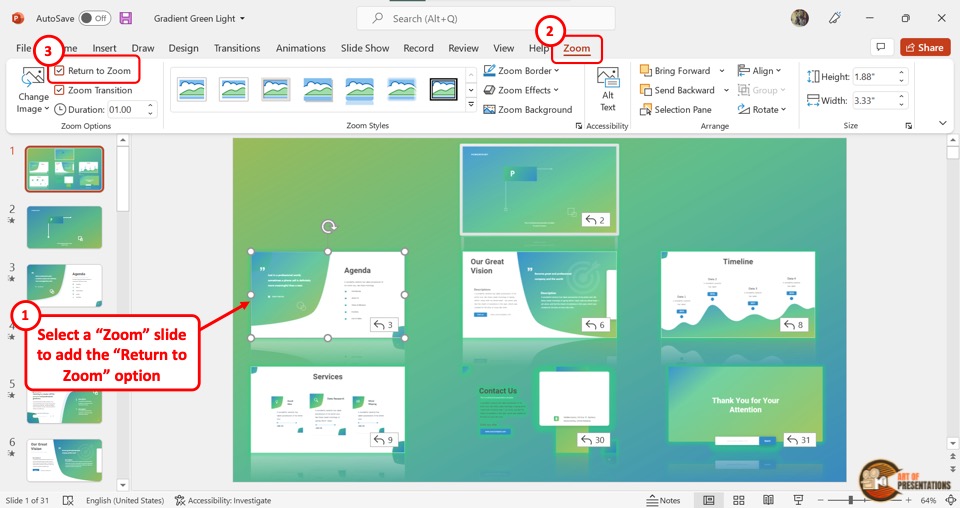
Once you stop the slide zoom on Microsoft PowerPoint, you can turn on the feature again. All you have to do is select the slide again and click on the “Zoom” tab. Then click on the box next to the “Return to Zoom” option.
The checkmark will appear again. Now the screen will return to the slide zoom after the selected slide during the presentation.
Credit to nakaridore (on Freepik) for the featured image of this article (further edited)
- Presentation creation
- PowerPoint templates
- Presentation training
- Print design
- Pitch deck example
- PPT Template example
- Investor deck example
- Product deck example
- Presentation services
- Infographic design
- Pitch decks
- Investor presentations
- Marketing presentations
- Conference presentations
- Finance presentations
- Product presentations
- CPD presentations
- Training overview
- Virtual presentation skills training
- PowerPoint template training
- Storytelling training
- Our showreel
- Charity presentation example
- Conference presentation example
- CPD presentation example
- Investor deck example – Seed stage
- Investor deck example – Series C
- Marketing presentation example
- PowerPoint template example
- Product presentation example
Blog / PowerPoint Tips / How to use Zoom in PowerPoint for interactive presentations.

How to use Zoom in PowerPoint for interactive presentations.
Use PowerPoint’s Zoom feature to add navigation to your presentations, without breaking a sweat.
Regular readers will know that Buffalo 7 is basically PowerPoint’s unofficial fan club. We rave about the possibilities of PowerPoint on a daily basis. Sometimes we’ll talk about other presentation software , but it’s always being compared to the OG of presentation programs.
However, we work with PowerPoint day in, day out, and we’re certainly not looking through rose-tinted glasses. We know all her weaknesses, all too well. And, naturally, we’ve found a way around each one. But we understand that you don’t have the time or inclination to hack your presentation software until it does everything you need it to.
And if what you need it to do is crazy, nauseating menus, we can see why you might lean towards Prezi as your preferred presentation program.
But before you make your final choice, give us just a few moments of your time. It seems as though Microsoft has been listening to your Prezi praising. Sort of. Enter Zoom: PowerPoint’s quick menu-making magic wand.
Before we begin, we need to preface this article by saying this:
“We never use the Zoom feature.” Buffalo 7
However, if you don’t have a lot of time on your hands and you need to have the option to move around your presentation freely, Zoom might be the answer to your prayers.
What is Zoom?
The name is confusing in this modern world where a pandemic has changed every aspect of our lives and one of the innovations keeping the earth turning is also called Zoom . But we’re not talking about the VC software now .
Originally launched in 2016, the Zoom feature in PowerPoint allows you to present your slides in any order you want. PowerPoint presentations have traditionally followed a strict linear format. They start at the start, end at the end and should you have cause to jump back to an earlier slide, well, your audience is just gonna have to wait while you cycle through them.
Not anymore. With just a couple of click, PowerPoint will create a menu slide and all the hyperlinks for you, giving you the freedom to move around your slides in whatever order you, or your audience, want.
Why use Zoom?
Interactivity can be the difference between an okay presentation and a next-level one. Interactivity puts your audience at the heart of your story, hands the reins over to them, and builds trust between viewer and speaker. It breaks down imaginary walls between those on the stage and those off it. Walls are never a good thing if you’re trying to build relationships.
By implementing a menu system in PowerPoint, you can let your audience choose where they want to go next and, in just one click, you’ll be able to get to the slide that supports the conversation. While menu systems have always been possible in PowerPoint, before Zoom they required a lot of manual labour, duplicated slides, invisible triggers, and hyperlinks up the wazoo. Now PowerPoint does all the heavy lifting for you.
What do each of the Zoom features do?
Zoom options can be found in your top ribbon, by clicking the Insert drop down. The keen-eyed amongst you will see there are three different types of Zoom. Let’s take a look at each one.

How to use Summary Zoom in PowerPoint
Think of Summary Zoom as a master menu. Once you’ve built your presentation, simply click Insert > Zoom > Summary Zoom to open the dialogue box. You select which slides you want to be able to jump to, and PowerPoint will not only create the links, but the menu slide as well. PowerPoint will automatically put your menu slide to the front, but you can move it to wherever you want it to sit within your narrative , without worrying about breaking the links.

You’ll also see that PowerPoint creates sections in the thumbnail slide view down the left-hand column of your window, based on which slides you choose. More on this later, but if you want to get super organised, it could be a good idea to rename these to reflect the section content.
In Slide Show mode, click the slide image within your menu that represents the slide you want to move to, and, like magic, you’ll end up there. If only life was that simple. Once you reach the end of the section, another click will see you navigate right back to your main menu.
If you need to edit your menu at any time, select Zoom > Format > Edit Summary . Here you can update the sections that feature on your summary page. When you’re done, select Update and that’s a wrap.
How to use Section Zoom in PowerPoint
Like the chapters in a book, a lengthy or complex presentation can be divided into sections. This makes it easier for your audience to follow along and gives you the opportunity to ask them which solution they’d like to see first. Whether it’s to revisit a section or skip one altogether, Section Zoom removes the need for embarrassing, unprofessional, and seemingly-endless scrolling.
For Section Zoom to work, you will need to section off your slides first. You can do this by clicking the first slide in the section in the slide thumbnail view of your PowerPoint window. Then, under the Home tab, click Section and Add Section .
Once you’ve got your sections in order, select Insert > Zoom , click on Section Zoom , make your navigation choices, and hit Insert . It’s that simple.

At this point you might be thinking, if PowerPoint creates sections after you’ve chosen your navigable slides in Summary Zoom, why would I bother making sections to be able to use Section Zoom? It’s a good question, and one we don’t know the answer to either. We did start this blog by saying she’s not perfect.
How to use Slide Zoom in PowerPoint
Slide Zoom gives you the option to navigate to any slide you like, from any slide. Instead of creating a separate main menu slide to house your navigation buttons, Slide Zoom adds the button to your chosen slide.
This is a great way to hide excess information that doesn’t need to form part of your main presentation, but that one particularly pernickety audience member may challenge you on. In just one click you can navigate to a deep dive slide and leave them reeling that you could be so prepared.
As before, you simply choose which slide you want to navigate from, then Insert > Zoom > Slide Zoom and choose the slide you want to navigate to.

Zoom really is super easy to use. But is it worth it?
Design matters
One of the reasons we don’t use the Zoom function is because we’re damn fussy about design. We don’t want to compromise; we want to have beautiful presentations that also have intricate menu systems and interactive elements. There are very limited ways to customise your Zoom menus in PowerPoint. You can move them around a bit, change the size, add an ugly border and mess with the transition effects. But that sort of limitation just doesn’t fly around here.
That being said, you can change the button image by right-clicking and choosing Change Image. For all other customisation options, click the button in edit mode and you’ll see Zoom Tools in your ribbon, if you’re on a Mac, and Zoom Styles if you’re on a PC.
Zoom Background in PowerPoint
To help with the lack of design options available, Zoom Background makes your buttons transparent, so your beautiful slide design can shine. Just make sure you remember where the trigger is. We find it works to place the invisible button over a design element, such as your company logo, so it looks as though you’re clicking on that to trigger the navigation. You’ll find Zoom Background in the Zoom Tools/Styles tab.
We can see why Microsoft felt the need to introduce Zoom. After 7 years of hearing about how ‘cool’ Prezi’s menus were, they probably caved just to shut people up. But, unless you don’t know the first thing about creating hyperlinks, or you promised your boss an interactive PowerPoint and you only remembered at the very last minute, we can’t see many reasons why you’d want to use Zoom.
At Buffalo 7, we’re proud of the work we create. We pour innovation and passion and creativity into every deck, and we sure as hell never cut corners. If something’s worth doing, it’s worth doing right. Why not get in touch today and talk about a fully-interactive, navigable deck that won’t make your audience sea sick?
Here are just a few examples of our carefully-crafted menu systems in action. None of which were created with Zoom.
LIKE WHAT YOU'VE READ? WHY NOT share
Work Can wait
Put off writing that email just a little longer. Send your incoming calls to voicemail. Put your feet up, grab a brew and explore more presentation insight in the Buffalo 7 Library
We Trust in Human Precision
20,000+ Professional Language Experts Ready to Help. Expertise in a variety of Niches.
API Solutions
- API Pricing
- Cost estimate
- Customer loyalty program
- Educational Discount
- Non-Profit Discount
- Green Initiative Discount1
Value-Driven Pricing
Unmatched expertise at affordable rates tailored for your needs. Our services empower you to boost your productivity.
- Special Discounts
- Enterprise transcription solutions
- Enterprise translation solutions
- Transcription/Caption API
- AI Transcription Proofreading API
Trusted by Global Leaders
GoTranscript is the chosen service for top media organizations, universities, and Fortune 50 companies.
GoTranscript
One of the Largest Online Transcription and Translation Agencies in the World. Founded in 2005.
Speaker 1: Good morning, afternoon or evening colleagues. Hi, my name is Brandt van de Gaast and I'm a temporary instructor at the philosophy department of Utrecht University. Now, in this quick video, I'd like to show you a few things on how you can record lectures or presentations for remote teaching. And I will especially go into the technical details, so the hardware and the software that you could use for this purpose. And hopefully some of you will find the information useful for your own teaching. Now, the things I'd like to cover are tools and software. Then I will first show and explain how to record a lecture in Microsoft Teams. Then how to do the same in OBS, which is open broadcaster software. Then I'll show you how to use an electronic whiteboard in OBS. And finally, I will combine a few of these applications together. For instance, I'll show you how you can stream your webcam together with a whiteboard into video conferencing software such as Microsoft Teams. Now, the level of tech savviness that these applications presuppose increase. So not everybody may be interested in all of them, but it's just to show you what can be done. All right, so let's first talk about some of the tools and the software. So for recording, what I like is OBS, open broadcaster software. This is open source and it's very versatile. You can download it at obsproject.com. For video conferencing and also for teaching, Utrecht University normally uses Microsoft Teams. So that's what I'll be using as well. For your presentations, you can use PowerPoint. But of course, you can also use a PDF viewer or Apple's Keynote or another bit of software. Now, the whiteboard application will require a drawing program. Lots of options there. The one I like is called SmoothDraw, which is a very minimalistic, free drawing program. The hardware that you'll need is a webcam, of course, a microphone, and usually that's built into the webcam. For the whiteboard application, a drawing tablet is useful. Now, Wacom has pretty much cornered this market. So any Wacom tablet will do the job. And of course, a desktop or a laptop computer. Okay, so let's look at the first application, recording a lecture in Microsoft Teams. And this is fairly straightforward. You go to the calendar in Teams and you click on Meet Now. You are now in a meeting with yourself and you can share the screen containing your presentation. Now, if you now hit record and give your lecture, your presentation will be recorded. If you then stop recording, stop sharing your screen and stop the meeting, then you have a video of your presentation. Now, you can find this video by going to web.microsoftstream.com. And on stream, you can edit the video. You can determine who can view it and who can delete it. You can also create a channel and you can assign the video to a channel. Now, this is useful because if you also teach inside Teams, you can simply combine the channel to your team and give the students access to that video. In your class in Teams, you can simply create a tab which contains all the videos of your channel. So, it's useful and it's worthwhile to use both Teams and Stream at the same time. It's very well integrated. Let me show you how to do this. So, let's record a lecture using only Microsoft Teams. You go to calendar and you click on Meet Now and you join the meeting. Now, you are in a meeting with yourself and you can start sharing the screen containing your presentation. So, I'm going to share this screen. Well, now I can go back to Teams and I can start recording my meeting by clicking on Start Recording. So, right now, my meeting with myself is being recorded. Now, at this point, I can simply go through my slides and give my lecture and then finish. And I will go to Teams. I will stop recording. I will stop sharing. And I will stop the meeting. Now, I can go to the website, web.microsoftstream.com, and I can look at the most recent video. And as you can see, my meeting has been recorded and here's the file. I can click on it. Well, it's not ready yet, but this is where I can set all the permissions. I can allow students to watch it. I can also add it to a channel and I can even do simple editing. So, this is the very simplest method of recording your lecture. So, the next thing I'll show you is how to record a lecture in open broadcaster software, OBS. So, first, you go to obsproject.com and download and install OBS. When you have installed it, make sure that the audio and video connections are working as they should. You then go to Sources and you add your webcam window and the window of your presentation. Now, there's a slight complication here because OBS and Microsoft PowerPoint, they don't play nice together. So, what I usually use is a PDF viewer. I convert my presentation into PDF and use that. You arrange them as desired, these windows, and you start recording. Now, let me show you how you can do this. Let's now try to record a lecture in OBS. So, first, you install OBS and this is what the main window looks like. Now, you can add sources to the Arrange window by going to Sources down here, clicking on Plus. And first, I will select Video Capture Device, which is my webcam. And I will make some adjustments. Usually, that's not necessary. And then I can resize my webcam because my face was too big just then. And I can make it like that. And now I can add another source. For instance, I can go to Window Capture and I can select my Presentation window. There it is. I can resize it and reposition it. Now, this window contains this unwanted border and I don't want that. So, I can use Alt-Left-Click to crop the window and show me only the part that I want to see. I put it in the top right, I make it bigger again and I send it to the back. So, now my webcam is on top. Now, I can just give my lecture and go to my PDF window and advance through the slides while giving my presentation. And then I can stop recording. Now, as I said, OBS does not play nice with PowerPoint, unfortunately. So, you'll have to use PDF Viewer or some other program. Now, this recording will end up on your hard drive and it will have a certain resolution and a certain file format. If you want to change that, go to File, Settings and go to the Output or the Video menu. And that's where you can adjust the resolution as well as the file format. So, that's fairly straightforward, I hope. So, the third thing I'd like to show you is how you can use a whiteboard in Open Broadcaster software. So, first you'll need a drawing program. So, start up your favorite drawing program. What I like is called Smooth Draw. Then you start OBS. And in the Arrange window, you add your webcam and the window of your drawing program. You arrange them the way you want and you start recording. Now, the whiteboard, for instance, is used by the Khan Academy. This is a well-known organization that creates math videos on the internet. Look up their channel to see how you can use a whiteboard in teaching to great effect. Okay, so let's now combine our webcam and a whiteboard in OBS. First, we add the video capture device as a source. And we have our webcam. Make adjustments if needed and then resize it. Now, then we add a new source, which will be a window capture. And we will select our drawing program. There it is. We will resize it with CTRL-left-click. Now, as you can see, this window also has unwanted edges. We can crop those by using ALT-left-click. So, there we go. And then we make it bigger. And we send it to the back. And now I can hit Record. And then I can start drawing. Which is basically the whiteboard application we were going to use. And, of course, you can assign a button to delete so that you can easily wipe the whiteboard and start from scratch. So, this is how to use OBS and a drawing program to create a lecture in which you use a whiteboard. Now, the fourth application I'd like to show you is how you can use your webcam together with a whiteboard inside a meeting in, for instance, Microsoft Teams or in other video conferencing software, for instance, Zoom. Now, to do this, you'll need a plugin for open broadcaster software, which is called VirtualCam. So, get this plugin and install it. Fire up OBS and arrange the webcam and the whiteboard window the way you want it to look. And then start running VirtualCam. So, what OBS will do is it'll take the output of the arrange window and present it to other software as if it's the webcam. So, for instance, in Teams, you can now select OBS camera as your webcam and the participants in your Teams meeting will see the output of OBS. This is one way where you can stream your webcam together with a whiteboard to other participants in a meeting in Teams. Now, of course, you can also do this in certain other ways. For instance, you could also share the window of your drawing program inside Microsoft Teams. But combining them in OBS is what I prefer. So, let me show you how to do that. All right, so let's try some other applications. Let's combine some of these. Suppose we would like to have our webcam and a whiteboard visible in a live meeting, for instance, in Teams. Well, that's possible. So, you go to OBS and you add your webcam and your drawing window as a source and you arrange them the way you want. Then you install a plugin for OBS called VirtualCam. And when you've installed it, it'll become visible in the Tools menu. So, you hit VirtualCam and then hit Start. What now happens is that OBS presents this output to other software as if it is your webcam. So, you can go to Teams, go to Calendar, start a meeting, join the meeting, and other participants in this meeting will see your webcam combined with a whiteboard and not just your webcam. And you can talk to the other participants. And meanwhile, you can draw on the screen. Draw in a live meeting. Now, this is useful for certain applications. I've been using it for question and answer sessions with my students where I would talk to them and draw on the screen using the whiteboard. Now, there are some downsides. One is that Teams sometimes crops your image unpredictably. Now, you can prevent that by asking other members of the meeting to right-click your image and to select Fit to Frame. If you select Fit to Frame, there's no cropping going on. And, of course, they can also pin your screen, which means that your screen will be more prominent on their screens. Now, of course, you could also achieve this in a slightly simpler setting. You can, of course, also have a meeting with others where you use your webcam and where you share the window of your drawing program in Teams by going to Share. So that's also a possibility. But I like this one a little bit better because you have more control over what others see. So hopefully this was also useful. All right, so that's it for today. Hopefully some of these tips were useful. If you have any questions, don't hesitate to send me an email. Take care.

- Vote: Reader’s Choice
- Meta Quest 4
- Google Pixel 9
- Google Pixel 8a
- Apple Vision Pro 2
- Nintendo Switch 2
- Samsung Galaxy Ring
- Yellowstone Season 6
- Recall an Email in Outlook
- Stranger Things Season 5
How to use Microsoft PowerPoint

Creating a successful slideshow is no small task. So, if you’re new to Microsoft PowerPoint, you’ll need to familiarize yourself with the features and tools you need to build a presentation.
How to create a slideshow
How to add a slide, how to insert slide elements, how to use different views, how to add speaker notes, how to start and end a presentation.
We’ll guide you through the process of creating a PowerPoint slideshow by adding slides and elements as well as how to present the show when you finish. These basics are just what you need as a beginner and should get you off to a terrific start with PowerPoint.
Note : The information in this tutorial applies to PowerPoint for Microsoft 365 on Windows. While you may see variations in features or menus, most PowerPoint versions have the same basic options.
When you open the application, you can create a new blank slideshow or use a built-in PowerPoint template . To best familiarize yourself with the application and the items we’ll walk through here, select a Blank slideshow on the Home screen and follow along.
Next, you’ll want to name and save your presentation file. Select File > Save or Save As name the file on the right, choose a location for it, and select Save .
Be sure to continue saving your slideshow regularly as you work on it by selecting Save in the Quick Access Toolbar.
A blank presentation in PowerPoint starts you off with a main slide. You’ll notice a text box at the top for the title and one beneath for the subtitle. Simply click inside these boxes to enter your text.
While it’s good to get in the habit of using title slides like these to begin future presentations, you’ll also need to know how to insert the additional slides.
Go to either the Home or Insert tab and open the New Slide menu in the ribbon.
Choose the layout you want to use for the new slide. You’ll see several options that include placeholders, which is handy for popping in what you need like text, lists, or images.
Once the slide appears, click inside a placeholder to add the necessary elements.
Continue to insert as many slides as you want the same way.
Along with using the placeholders on the slides, you can add your own items. This is helpful if a slide doesn’t contain the number or type of placeholders you need.
Add a text box
One popular slide element to add is a text box, which is just like the title and subtitle boxes on the title slide. With it, you can insert and format text as you wish.
Go to the Insert tab and select Text box in the Text group.
You can use your cursor to draw the size of the box you want or simply click the slide and begin typing inside the box.
To format the text in the box, select it and go to the Home tab. Use the options in the Font section of the ribbon to adjust the style, size, color, or emphasis.
Specific to PowerPoint on Windows, you’ll also see a floating toolbar appear near the text that you select. This toolbar contains the same features as on the Home tab along with additional options.
Add images, shapes, and icons
Because a slideshow is a visual tool, you’ll likely want to add photos, illustrations, shapes, or icons to slides.
Go to the Insert tab and open the Pictures , Shapes , or Icons menu.
- Pictures : Pick an image from your device, one of the stock images, or an online picture and select Insert .
- Shapes : Pick a shape from the menu and use your cursor to draw it on the slide.
- Icons : Search or use the categories to find the icon, select it, and click Insert .
Once you insert one of the above on your slide, you’ll see the corresponding tab appear to format the object. For pictures, you have a Picture Format tab, for shapes, you have a Shape Format tab, and for icons, you have a Graphics Format tab.
You can use the tools in the ribbon to do things like change the color, add a border, align or rotate the object, and resize it.
Add audio or video
Another useful object to add to your slides is an audio file or video. You can then play the sound or video clip during your presentation.
Go to the Insert tab and open the Audio or Video menu.
- Audio : Pick an audio file to add to PowerPoint from your device or record audio on the spot.
- Video : Pick a video to embed into your presentation from your device, one of the stock videos, or an online video and select Insert .
Like with images and shapes, you’ll see tabs appear to format the file you insert. For audio, you have an Audio Format tab, for video, you have a Video Format tab, and for both types of files, you have a Playback tab.
Use the Format tabs to adjust the color, add a border, or apply an effect and the Playback tab to set a fade in or out effect, loop the playback, or play it in the background.
You can take advantage of different views in PowerPoint for accomplishing various tasks. This is helpful for seeing all of your slides in a grid, viewing a notes page, or working with an outline.
Go to the View tab and you’ll see the options in the Presentation Views group.
- Normal : Use this to create and edit your slides.
- Outline View : Use this to work with an outline of your presentation. Each slide is numbered with a hierarchy of slide elements.
- Slide Sorter : Use this to see your slides in a grid format for an overall slideshow view.
- Notes Page : Use this to view your presentation with notes — this is where you print a PowerPoint presentation with notes .
- Reading View : Use this to play your slideshow in the same window without entering full-screen mode.
Use the tools in the Show section of the View tab to display a Ruler , Gridlines , or Guides . These items can help you line up your slide elements.
You can also select the Zoom and Fit to Window options in the Zoom section of the ribbon to get a better view of slide items or the overall slide.
Presenting a slideshow is similar to giving a speech where you may want to use speaker notes. Like note cards, you can add notes to each slide in your presentation. When you present the slideshow, only you can view your notes; your audience cannot see them.
Select Notes in the Status Bar at the bottom of the PowerPoint window or go to View > Notes .
Add your notes in the section that appears below the slide.
You can use the options in the Font section of the Home tab to add emphasis or create a list.
For more detail, check out our how-to for adding notes in PowerPoint .
When you’re ready to present your PowerPoint slideshow or to see it as your audience will, you can start the presentation anytime.
Go to the Slide Show tab.
To display your speaker notes and a dashboard of controls while you present, check the box for Use Presenter View in the Monitors section. Then, select the monitors for the slideshow display and presenter view using the Monitor drop-down menu.
On the left side of the ribbon, pick From Beginning or From Current Slide per your preference.
When the slideshow starts, you’ll see what your audience sees on one monitor with Presenter View on the other. This is a super helpful way to present your slideshow because the Presenter View window provides you with controls.
If you’re unable to use more than one monitor, you’ll also see controls on the bottom left of the slides.
In the Presenter View window, you’ll see the current slide on the left with the controls beneath and the next slide on the right along with your speaker notes.
To use a control, hover your cursor over each button for a brief description.
From left to right, you can choose a laser pointer or pen, see all slides in a grid, zoom in on the slide, display a black screen, turn the subtitles or camera on or off, and view additional options like changing the subtitle settings or ending the presentation.
To stop presentation mode, press your Esc key, select End Slide Show at the top, or use the three dots to choose End Show .
While this beginner’s guide to using PowerPoint should get you off to a great start creating and presenting your first slideshow, there’s plenty more to learn. Check out how to use Presenter Coach for rehearsing your presentation and best practices for making awesome PowerPoint slides for tips and suggestions.
Editors’ Recommendations
- What is Microsoft Teams? How to use the collaboration app
- What is Microsoft Edge and how to use it
- Best Microsoft Office deals: Get Word, PowerPoint, and Excel for free
- Copilot Pro: how to use Microsoft’s advanced AI sidekick
- Microsoft Copilot: how to use this powerful AI assistant

Microsoft hasn't been shy about pushing first-party services and apps in Windows, but this time, it's getting a little ridiculous. As reported by Windows Latest, the Microsoft application PC Manager claims you can "fix" your computer simply by changing Bing to be the default search engine.
The change was spotted when using the Edge browser and having, for example, Google as the default search engine. After you run a health check, one of the suggested changes will be to set Bing as your default search engine. If that's how you want to go, there's a button to make it happen.
In its Annual Work Trend Index, Microsoft has, unsurprisingly, published some fresh data around AI in the workplace. The big stat is that according to its survey, 75% of "knowledge workers" are already using generative AI at work, with that number doubling in the last six months alone.
The survey defines "knowledge workers" as "those who typically work at a desk (whether in an office or at home)," which is a pretty broad demographic.
Microsoft Teams was introduced in 2017 as a unified communication and collaboration platform aimed at helping businesses and organizations get things done. Microsoft leveraged the company's existing Office software experience and created a unified experience between Teams, Office 365, and Skype for Business. However, as with all software, things don't always go according to plan. Sometimes you can run into Teams problems.
We're big Teams users here at Digital Trends -- it's our go-to communication and meeting tool -- and we've come across a few issues ourselves over the years. In the event you're having Microsoft Teams issues, here's how to fix some of the most common problems.

- Home /
- Videos /
How to Use Summary Zoom for Better Navigation in PowerPoint
In this video, Nolan Haims shows how to use Powerpoint’s Summary Zoom to focus in on a particular slide and back out again to a selection of slides. He uses this method as a great alternative to boring and uninteresting bullet points.
This video in an excerpt from Nolan’s “Alternatives to Bullet Points” session at CreativePro Week .
Subscribe to the CreativePro YouTube channel for more helpful design tips!
Recommended For You
How to Create a Scrolling Timeline With Parallax Effect in PowerPoint
How to Create Focus with Animation in PowerPoint
CreativePro Week Preview: 5 Presentation Power-Ups
Presentation Design Resource Guide

Session expired
Please log in again. The login page will open in a new tab. After logging in you can close it and return to this page.
To provide the best experiences, we use technologies like cookies to store and/or access device information. Consenting to these technologies allows us to process data such as browsing behavior or unique IDs on this site. Not consenting or withdrawing consent, may adversely affect certain features and functions.
To provide the best experiences, we and our partners use technologies like cookies to store and/or access device information. Consenting to these technologies will allow us and our partners to process personal data such as browsing behavior or unique IDs on this site and show (non-) personalized ads. Not consenting or withdrawing consent, may adversely affect certain features and functions.
Click below to consent to the above or make granular choices. Your choices will be applied to this site only. You can change your settings at any time, including withdrawing your consent, by using the toggles on the Cookie Policy, or by clicking on the manage consent button at the bottom of the screen.
Advanced Search
Forgot Password?
Not a member?
You have to be logged in to save.
Not a member? Join Today - it's FREE!
Your current User-Agent string appears to be from an automated process, if this is incorrect, please click this link:
How to embed a video in powerpoint from YouTube?
How to Embed a Video in PowerPoint from YouTube?
Are you tired of manually downloading videos from YouTube and then uploading them to PowerPoint? Or maybe you’re struggling to get the video to play smoothly in your presentation? Fear not! In this article, we’ll show you how to easily embed a video in PowerPoint from YouTube, making your life easier and your presentations more engaging.
Step 1: Find the Video
Table of Contents
**Locate the YouTube Video You Want to Embed**
Before you can embed the video, you need to find the YouTube video you want to use. Go to YouTube.com and search for the video you want to embed. Once you’ve found the video, make a note of the video URL, as you’ll need it later.
Step 2: Enable Embedding
**Check the Video’s Embedding Options**
Not all YouTube videos can be embedded. Check the video’s settings to make sure embedding is allowed. To do this:
- Go to the YouTube video’s page
- Click on the Share button
- Click on Embed
- Make sure the Embedding is allowed toggle is turned on
Step 3: Get the Embed Code
**Copy the Embed Code**
Once embedding is enabled, you’ll see the embed code. Copy this code, as you’ll need it to embed the video in PowerPoint.
Step 4: Add the Video to PowerPoint
**Insert the Video into PowerPoint**
Now it’s time to add the video to PowerPoint. Here’s how:
- Open your PowerPoint presentation
- Go to the slide where you want to add the video
- Click on the Insert tab
- Click on Video from the ribbon
- Select Online Video
- Paste the embed code you copied earlier into the Video URL field
- Click Insert
Step 5: Customize the Video
**Customize the Video Player**
You can customize the video player to fit your presentation needs. Here are some options:
- Start time : Set the video to start playing at a specific time
- End time : Set the video to end at a specific time
- Loop : Make the video loop continuously
- Volume : Adjust the video’s volume
- Caption : Add captions to the video
Tips and Tricks
- Use the embeded **video URL **: Using the embedded video URL will ensure that the video is playable in PowerPoint.
- Avoid long video URLs **: Long video URLs can cause issues with embedding. Try to use a shorter URL if possible.
- Test the video : Before presenting, test the video to ensure it’s playing correctly.
Troubleshooting Common Issues
- Video won’t play : Check that the video URL is correct and that embedding is enabled.
- Video is buffering : Check your internet connection and try pausing and resuming the video.
- Video is not displaying correctly : Check the video’s settings and try resizing the video player.
Embedding a video in PowerPoint from YouTube is a simple process that can enhance your presentations and make them more engaging. By following these steps, you’ll be able to easily add videos to your PowerPoint presentations and customize them to fit your needs.
Table: Embedding Options
| Option | Description |
|---|---|
| Start Time | Set the video to start playing at a specific time |
| End Time | Set the video to end at a specific time |
| Loop | Make the video loop continuously |
| Volume | Adjust the video’s volume |
| Caption | Add captions to the video |
Leave a Comment Cancel Reply
Your email address will not be published. Required fields are marked *
Save my name, email, and website in this browser for the next time I comment.
- Excel講座:ビジネス/VBAコース
- Excel講座:パワークエリコース
- Copilot MicrosoftのCopilot製品に関する仕事術やハウツーをお届けする記事カテゴリです。
- Power Automate MicrosoftのPower Automate製品に関する仕事術やハウツーをお届けする記事カテゴリです。
- Google Google製品に関する仕事術やハウツーをお届けする記事カテゴリです。
- AI全般 GoogleとMicrosoft関連を除く、AIの最新情報や仕事術ハウツーをお届けする記事カテゴリです。
- IT全般 GoogleとMicrosoftを除くIT全般に関するお役立ち情報や仕事術ハウツーをお届けする記事カテゴリです。
- 法人研修・組織変革サービス
\Excelショートカット集もらえる/
PowerPointをZoomで効果的に発表する方法:初心者向けガイド | ユースフル

はじめに:Zoomでの効果的なPowerPoint発表の重要性
Zoomでのプレゼンテーションに悩んでいませんか?以下のような経験はありませんか?
- スライドの周りに余計な要素が表示されてしまう
- 聴衆の集中を妨げてしまう
- マルチタスクをしたいが、画面共有で全てが見えてしまう
本記事では、ZoomでPowerPointを効果的に発表するための4つの方法を詳しく解説します。それぞれの方法の長所と短所を理解し、状況に応じて最適な方法を選択できるようになりましょう。
1. 全画面共有:直感的だが注意が必要
全画面共有は最も直感的な方法ですが、いくつかの注意点があります。
- 複数のコンテンツタイプ(スライド、動画、ウェブサイトなど)を簡単に切り替えられる
- 操作が簡単で初心者にも分かりやすい
- 画面上の全ての情報が共有されてしまう
- マルチタスクが困難(メールチェックなどが見えてしまう)
- Zoomの「画面を共有」ボタンをクリック(またはAlt+S)
- 必要に応じて「コンピューターの音声を共有」と「ビデオの最適化」にチェック
プレゼンテーションの最適化:
PowerPointのリボンやスライドサイドバーは聴衆の注意を散漫にする可能性があります。以下の手順で画面を最適化しましょう:
- 「スライドショー」タブをクリック
- 「最初から始める」を選択(またはF5キー)
これにより、クリーンなフルスクリーン表示でプレゼンテーションを行えます。
全画面共有時は、メールチェックなどのマルチタスクが聴衆に見えてしまいます。プロフェッショナルな印象を保つため、プレゼンテーション中はマルチタスクを避けましょう。
Zoomの機能について:
Zoomのコントロールバーや機能(チャットなど)は聴衆には表示されません。これらを利用してコミュニケーションを取ることができます。
2. ウィンドウ共有:マルチタスク可能な柔軟な方法
ウィンドウ共有は、PowerPointウィンドウのみを共有する方法です。これにより、マルチタスクが可能になります。
- PowerPointウィンドウ以外の操作が聴衆に見えない
- マルチタスクが可能(メールチェックなどができる)
- 他のアプリケーションへの切り替えが少し手間
- Zoomの「画面を共有」ボタンをクリック
- 「ウィンドウ」タブでPowerPointウィンドウを選択
プレゼンテーションモードの選択:
ウィンドウ共有時は、2つのプレゼンテーションモードが選択できます:
1. フルスクリーンモード:
- 最もクリーンな表示方法
- 聴衆の注意を集中させやすい
2. ウィンドウモード:
- マルチタスクがより容易
- プレゼンテーションウィンドウのサイズ調整が可能
ウィンドウモードの設定方法:
- PowerPointの「スライドショー」タブをクリック
- 「スライドショーの設定」を選択
- 「ウィンドウ表示」にチェック
ウィンドウモードを使用する場合、プレゼンテーションウィンドウを画面の片側に配置し、もう片側でメールやメモを確認するなど、効率的な作業が可能です。
3. ウェブ版PowerPointの活用:クラウドベースの柔軟な選択肢
クラウドストレージ(OneDrive、Google Drive、Dropboxなど)に保存されたPowerPointファイルを直接共有する方法です。
- デスクトップアプリケーションのインストールが不要
- どのデバイスからでもアクセス可能
- インターネット接続に依存
- 一部の高度な機能が使用できない場合がある
- 「ファイル」タブを選択
- クラウドストレージサービスを選択(例:OneDrive)
- 共有したいPowerPointファイルを選択
- アクセス権限を設定(「リンクを持つ全員がアクセス可能」など)
プレゼンテーションのコツ:
ウェブ版PowerPointでも、フルスクリーンモードでプレゼンテーションを行うことができます。聴衆にクリーンな表示を提供しつつ、別のタブやウィンドウでメールチェックなどのマルチタスクが可能です。
ウェブ版PowerPointを使用する際は、事前にインターネット接続の安定性を確認しておくことが重要です。また、使用する予定の機能がウェブ版でサポートされているか確認しておきましょう。
ベストプラクティス:効果的なZoomプレゼンテーションのために
これまでの方法を踏まえ、Zoomでの効果的なPowerPointプレゼンテーションのためのベストプラクティスをまとめました:
- 事前準備の徹底: プレゼンテーション前に、選択した共有方法でテスト実行を行い、問題がないか確認しましょう。
- クリーンな画面の維持: デスクトップの整理、不要なタブの閉じるなど、画面をクリーンに保ちましょう。
- バックアップ計画の用意: 技術的な問題に備え、プレゼンテーションのPDFバージョンを用意するなど、バックアップ計画を立てておきましょう。
- 聴衆との対話: Zoomの機能(チャット、投票など)を活用し、聴衆との対話を促進しましょう。
- プライバシーへの配慮: 画面共有時は、個人情報や機密情報が表示されないよう注意しましょう。
以下の状況において、最適な画面共有方法を選んでください。
あなたは複数のアプリケーション(PowerPoint、ウェブブラウザ、Excelなど)を切り替えながらプレゼンテーションを行う予定です。どの共有方法が最適でしょうか?
全画面共有が最適です。
全画面共有では、複数のアプリケーション間をスムーズに切り替えることができ、聴衆にシームレスな体験を提供できます。ただし、個人情報や機密情報が表示されないよう注意が必要です。
長時間のプレゼンテーション中に、聴衆に見られることなく、メールをチェックしたり、メモを取ったりする必要があります。どの共有方法が最適でしょうか?
ウィンドウ共有(PowerPointウィンドウのみ)が最適です。
ウィンドウ共有を使用すると、PowerPointウィンドウ以外の操作(メールチェック、メモ取りなど)が聴衆に見えません。これにより、プレゼンテーションを中断することなく、必要なマルチタスクを行うことができます。
チームメンバーと共同で作成したプレゼンテーションを、最新版で発表する必要があります。どの共有方法が最適でしょうか?
ウェブ版PowerPoint(クラウドストレージ経由)が最適です。
クラウドストレージに保存されたPowerPointファイルを使用することで、常に最新版でプレゼンテーションを行うことができます。また、プレゼンテーション直前まで共同編集が可能で、チームワークを促進します。ただし、安定したインターネット接続が必要です。
まとめ:状況に応じた最適な方法の選択
ZoomでのPowerPointプレゼンテーションには、様々な方法があります。それぞれの特徴を理解し、状況に応じて最適な方法を選択することが重要です。
- 全画面共有: 複数のアプリケーションを使用する場合に最適
- ウィンドウ共有: マルチタスクが必要な場合に便利
- ウェブ版PowerPoint: チーム協働や最新版の維持に効果的
これらの方法を適切に使い分けることで、より効果的で印象的なプレゼンテーションを行うことができます。練習を重ね、自信を持ってZoomでのプレゼンテーションに臨みましょう。
Zoomでのプレゼンテーションスキルを更に向上させたい方は、ユースフルプロの各講座をぜひご覧ください。実践的なテクニックや最新のトレンドを学ぶことができます。詳細は こちら からご確認いただけます。
- URLをコピーしました!

IMAGES
VIDEO
COMMENTS
Switch back to Powerpoint and click the Slide Show tab. Begin the presentation by selecting the Play from Start or Play from Current Slide options. PowerPoint will display the slide show in a window. In Zoom, start or join a meeting. Click Share Screen in the meeting controls. Select the PowerPoint window and then click Share.
In this step-by-step tutorial, learn how to best present Microsoft PowerPoint slides in Zoom Video Conferencing.⌚ Timestamps0:00 Introduction1:19 Share entir...
In this article I am using the Zoom app in Windows 10. The six options are: Share your entire screen/desktop. Share the Slide Show window. Share the editing window with a clean look. Run the Slide Show in a window and share that window. Use Presenter View to show the audience your slides while you see Presenter View.
At the bottom of the Zoom meeting window, click "Share Screen." If you're using a single monitor, you will immediately start sharing your screen. If you're using dual monitors, you'll need to click the screen that your presentation will be shared on. In our case, that will be "Screen 2." To begin sharing that screen, click "Share" at the bottom ...
Here is how you can do that-. Step 1: First, start or join a Zoom meeting. Step 2: Click on " Share Screen " and select the " Advanced " option. From there, select " PowerPoint as Virtual Background " and select the file you want for your presentation. Then click on " Share ".
The default when presenting a PowerPoint presentation on Zoom is to share your screen. But that is not your only option (and is often not the best option).Th...
Here's how to get it done. Open your PowerPoint presentation. Launch the slideshow in a window—navigate to the Slide Show tab and click Set Up Slide Show. In the dialog box that appears, select Browsed by an individual (window) and click OK. Navigate to the Slide Show tab and select From Beginning or From Current Slide.
This video shows you how to share your screen and present a PowerPoint presentation over Zoom. This series is aimed at helping folks figure out easy methods ...
To record yourself giving a PowerPoint presentation on Zoom, launch Zoom and PowerPoint; be sure to close all other applications. Create a new Zoom meeting, select Share Screen, select your PowerPoint presentation, and click Share. Launch your PowerPoint slideshow. In Zoom, choose Record > Record on This Computer.
Here's how you share a PowerPoint presentation on dual monitors in Zoom: Select the PowerPoint file that's on the agenda. Now either Start or Join a Zoom meeting. On the meetings controls ...
To share a PowerPoint presentation on Zoom, open your PowerPoint presentation and select the Slide Show tab. Start the slide show by clicking From Beginning. In Zoom, click the Share Screen button ...
How to share a presentation as your background. In the meeting controls toolbar, click Share Screen. Click Advanced. Click Slides as Virtual Background. Browse and select the presentation file. Click Open. Once the presentation is imported, the slides will be shown as your virtual background. If your video is on, by default it will be imposed ...
Start Presenter View Preview by pressing Alt+F5. In Zoom, share a portion of the screen from the Advanced sharing options. Make the current slide larger in Presenter View and adjust the sharing rectangle so you just share the current slide portion of the screen in Zoom. Deliver your presentation. Full detailed article.
Click the "Share Screen" Button: In the Zoom meeting window, locate the green "Share Screen" button at the bottom of the screen and click on it. Select Your PowerPoint Window: A dialog box will appear with a list of available screens and windows to share. Choose the window that has your PowerPoint presentation open.
2. Use Zoom to present. Now that the windows have been separated, you can easily use Zoom to present the slideshow window. While in a meeting, click on the 'Share Screen' button and select the browser window with Google Slides on top. Finally, hit 'Share' to start the screen-sharing session.
We want to zoom into the different description slides from our Iceberg Model slide. 2. Access the Slide Zoom Feature: Next, click Insert > Zoom > Slide Zoom. From here, choose the slide, or slides, that you want to zoom into. Click Insert and a thumbnail or thumbnails of the slides will appear on your current slide.
If you would like to make your presentations more dynamic and exciting, try using zoom for PowerPoint. To add a zoom, go to Insert > Zoom. To summarize the entire presentation on one slide, choose Summary Zoom. To show selected slides only, choose Slide Zoom. To show a single section only, choose Section Zoom.
In PowerPoint, select the Slide Show menu option. On the Slide Show ribbon, click on the Set Up Slide Show toolbar icon. In the upper left corner of the Set Up Show dialog box, click on the Presented by a speaker (full screen) radio button and then click on the OK button. Return to your Zoom meeting screen by clicking on the Zoom icon in either ...
This video shows you how to share Powerpoint slides in Zoom, including dual-monitor scenarios and the new "Powerpoint as virtual background" feature. You can...
Head to the Insert tab and Links section of the ribbon. Click the Zoom drop-down arrow and pick "Section Zoom." In the Insert Section Zoom window that appears, check the box next to the section you want to use. You can also include zooms for multiple sections. Click "Insert."
To use the "Zoom" feature in PowerPoint, first, click on the "Insert" tab. Then, click on the "Zoom" button from the ribbon. Choose the type of zoom from "Summary", "Section", and "Slide" zoom. Next, select the slides from the window that pops up by holding the "Ctrl" key, and click on "Insert". Here's a step ...
For Section Zoom to work, you will need to section off your slides first. You can do this by clicking the first slide in the section in the slide thumbnail view of your PowerPoint window. Then, under the Home tab, click Section and Add Section. Once you've got your sections in order, select Insert > Zoom, click on Section Zoom, make your ...
For your presentations, you can use PowerPoint. But of course, you can also use a PDF viewer or Apple's Keynote or another bit of software. Now, the whiteboard application will require a drawing program. ... I put it in the top right, I make it bigger again and I send it to the back. ... for instance, Microsoft Teams or in other video ...
A blank presentation in PowerPoint starts you off with a main slide. You'll notice a text box at the top for the title and one beneath for the subtitle. Simply click inside these boxes to enter ...
In this video, Nolan Haims shows how to use Powerpoint's Summary Zoom to focus in on a particular slide and back out again to a selection of slides. He uses this method as a great alternative to boring and uninteresting bullet points. This video in an excerpt from Nolan's "Alternatives to Bullet Points" session at CreativePro Week.
Invite collaborators: Share the presentation with your team members by sending them a link or inviting them directly through the software. Work together in real time: Once your team members have access, they can start editing the slide presentation simultaneously.Use the built-in chat and comment features to communicate and provide feedback in real time.
Zoom allows you to share different screens with your meeting participants. You can use PowerPoint to present slides in a clean visual format; however, how to...
Copy this code, as you'll need it to embed the video in PowerPoint. Step 4: Add the Video to PowerPoint **Insert the Video into PowerPoint** Now it's time to add the video to PowerPoint. Here ...
ZoomでのPowerPoint発表に悩んでいませんか?本記事では、効果的なプレゼンテーションのための4つの方法を詳しく解説。全画面共有、ウィンドウ共有、ウェブ版PowerPointの活用など、状況に応じた最適な方法を学びましょう。初心者でも簡単に実践できるテクニックとベストプラクティスをご紹介 ...